
Gigabyte AORUS ELITE FO27Q28G
Introduction
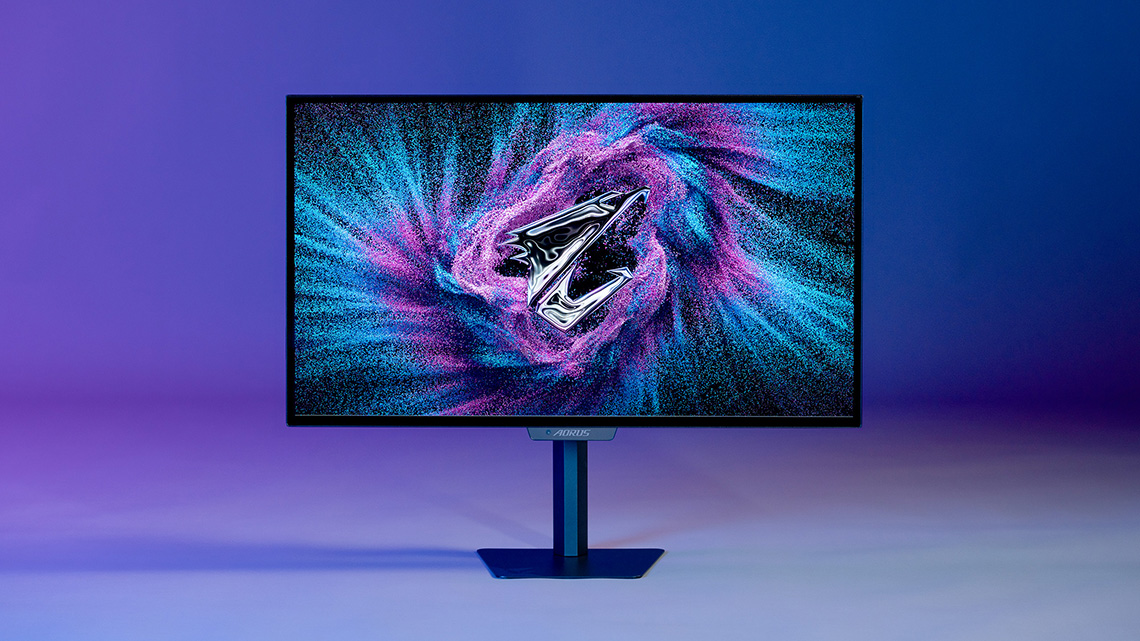
At Computex 2026 in June, Gigabyte unveiled their new AORUS ELITE series monitors, offering a new selection of OLED and LCD screens in their premium tier of displays. We recently published an article exploring the new ELITE series in full, looking at their new design aesthetic, features and technologies so if you want to know more about what distinguishes this new range from their previous AORUS range, check that out for loads more information and testing.
One of the first AORUS ELITE series models to be released is the FO27Q28G, an update to the super-popular MO27Q28G / GR models which were released around this time last year, featuring the exact same underlying Tandem WOLED panel and spec, but now with an updated ELITE-series feature set. It’s a 27″ sized screen with a 2560 x 1440 resolution and 280Hz refresh rate, and this model retains the same ‘RealBlack Glossy’ screen coating of the MO27Q28GR version.
In this review we will test the screens performance to see if it varies to the previous MO series models, while also honing in more on the changes, updates and improvements on offer from the ELITE series. Later on we will provide a direct comparison between this new model and the earlier MO series to help you decide which might be right for you.
| #affiliate. We may earn a commission if you purchase from our affiliate links in this content – TFTCentral is a participant in the Amazon Services LLC Associates Programme, an affiliate advertising programme designed to provide a means for sites to earn advertising fees by advertising and linking to Amazon.com, Amazon.co.uk, Amazon.de, Amazon.ca and other Amazon stores worldwide. We also participate in a similar scheme for Overclockers.co.uk, Newegg, Bestbuy, Walmart, B&H and some manufacturers. |
Key Specs
- 27″ screen size (26.5″ accurate), flat format
- 4th Gen LG Display Tandem WOLED panel
- ‘RealBlack Glossy’ screen coating
- 2560 x 1440 resolution
- 280Hz refresh rate
- VESA DisplayHDR True Black 500 certification and 1500 nits peak brightness spec (1.5% APL)
- AI OLED Care Pro, including motion sensor
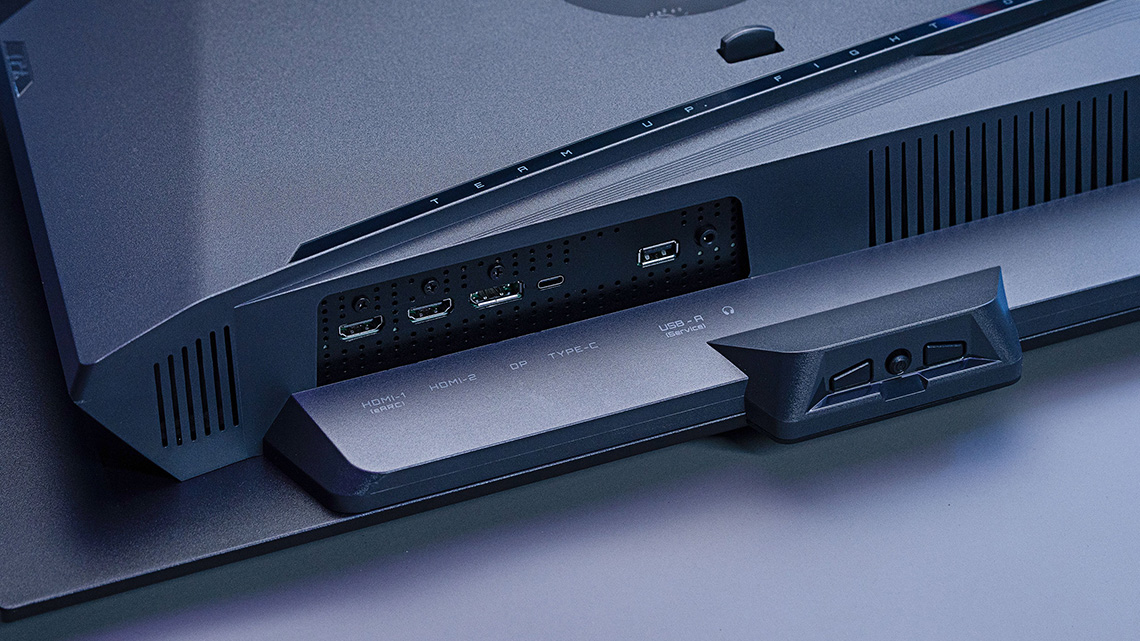
- Video connectivity: 1x DisplayPort 2.1 (UHBR 13.5) , 2x HDMI 2.1, 1x USB type-C (DP Alt mode and 15W)
- Other connectivity: 1x headphone jack, 1x USB-A (service only), 1x eARC sound over HDMI
- Fully adjustable stand with tilt, height, swivel and rotate
- 4-year extended warranty period including burn-in cover

Design and Features
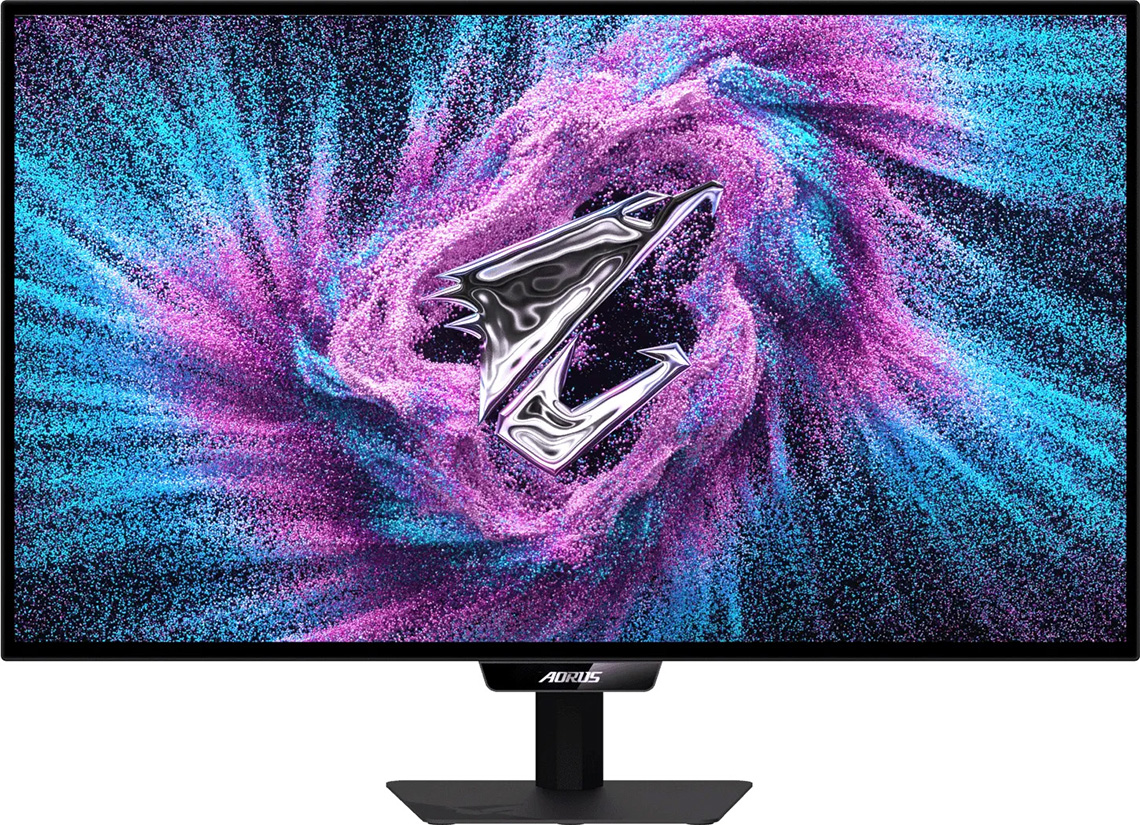
The new AORUS ELITE models offer a new design aesthetic with a sleek and futuristic looking design. You’ve got a new rear enclosure, a new stand, and on the OLED models like this one (and perhaps not to everyone’s liking), a new chin on the bottom of the screen. This chin features their new OLED care sensor which we will talk about more in a moment.
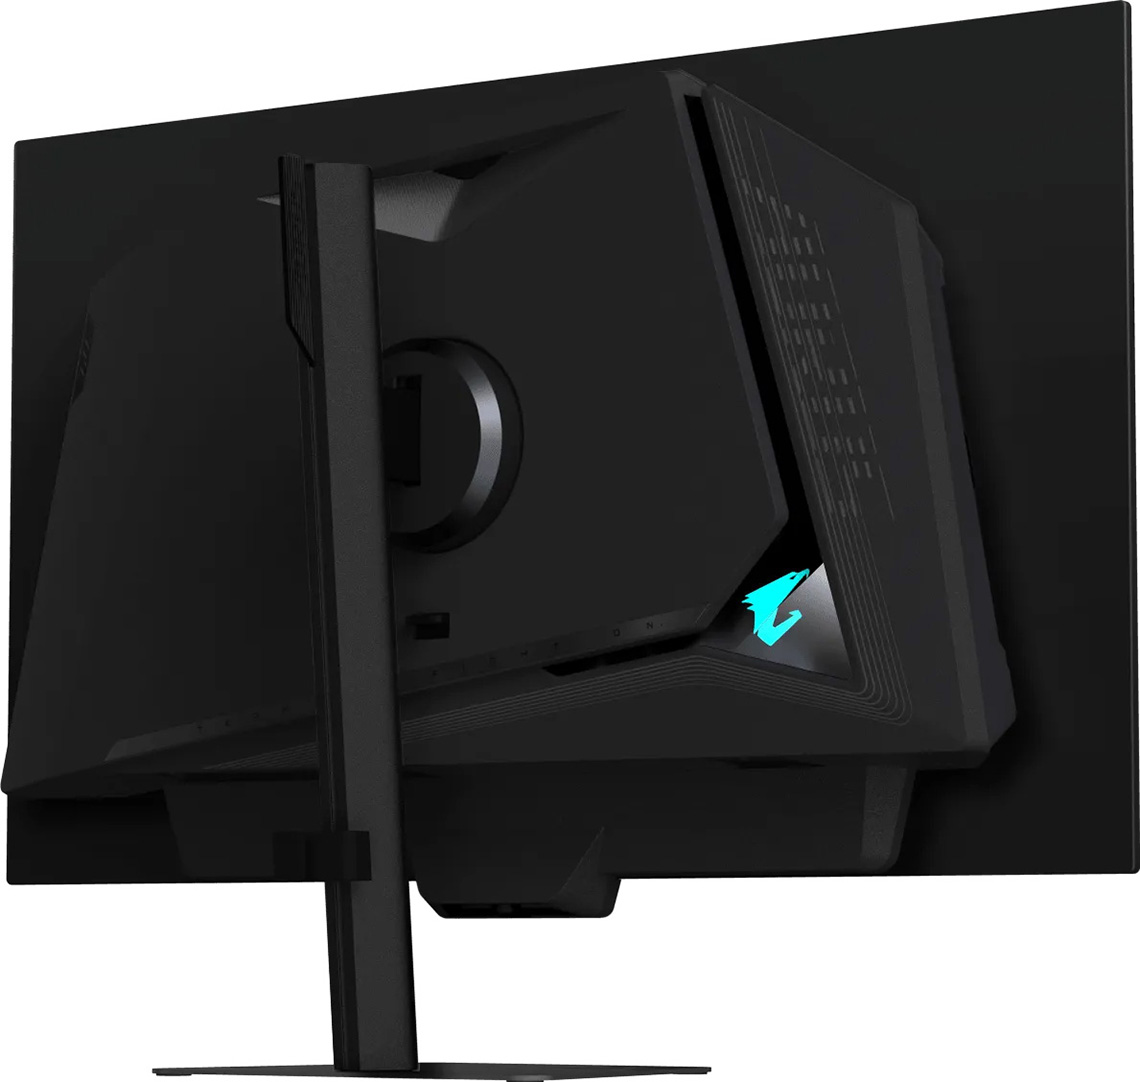
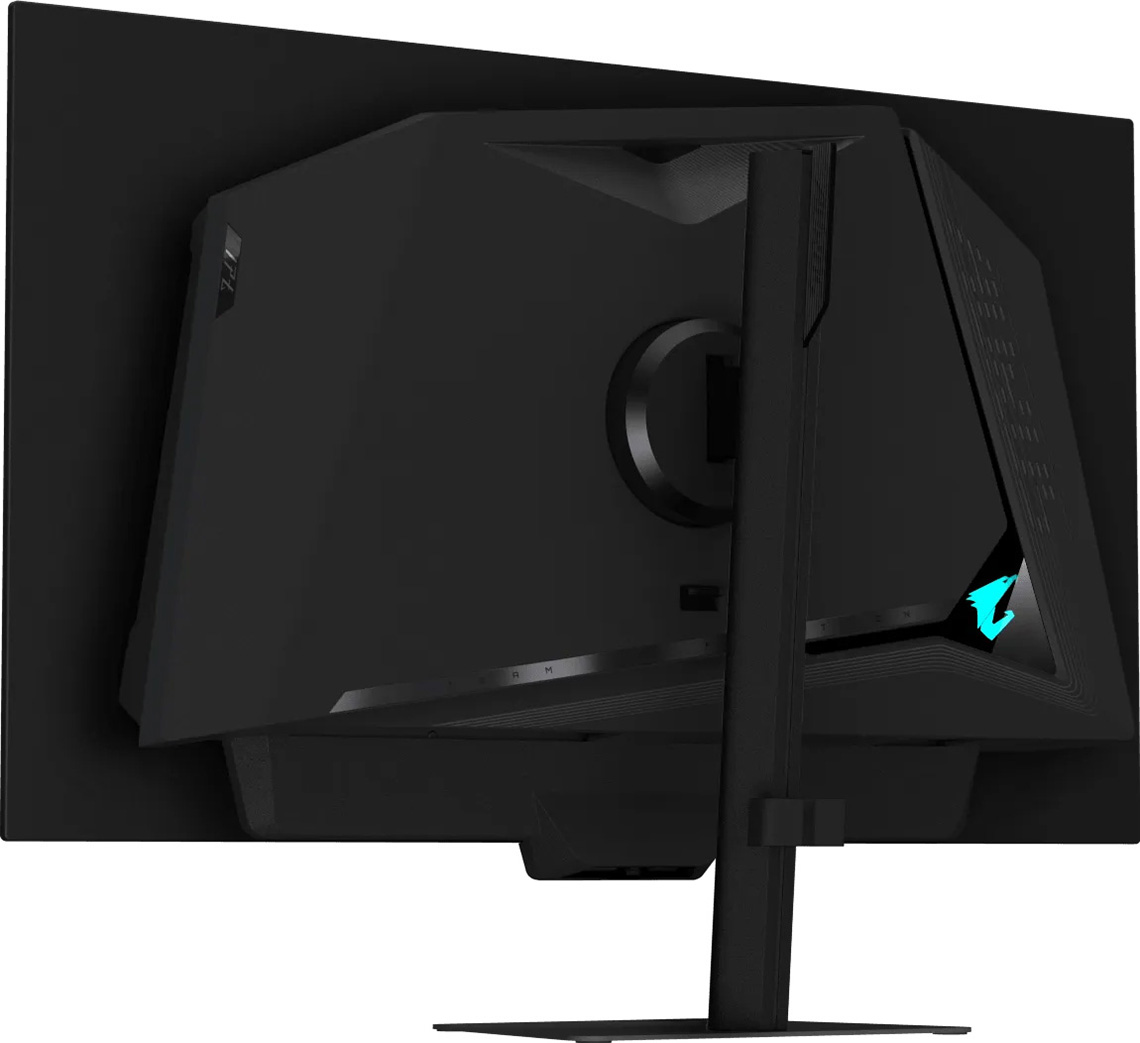
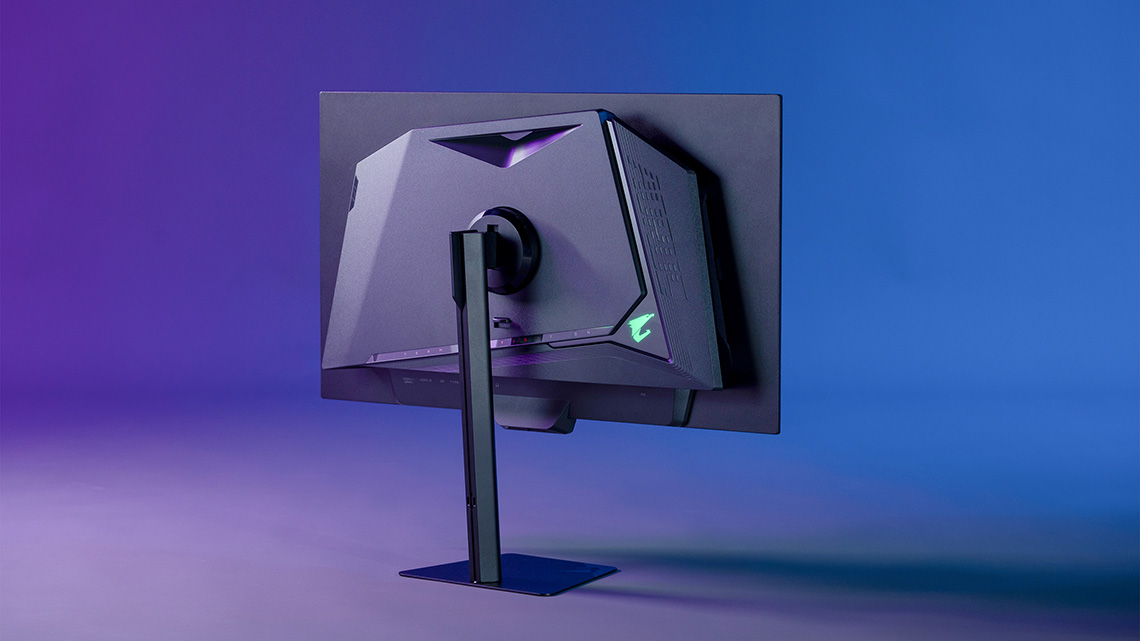
The rear of the screen is encased in a matte black plastic with an asymmetric design. This is a bit chunkier than on some of their previous screens, but it houses a more capable heat-pipe cooling heatsink for keeping the panel cool. There’s a new carry handle built in to the top of the enclosure at the back, and the stand attaches via a quick release mechanism in to the middle. This can be removed in favour of VESA 100 x 100mm mounting if you’d rather.
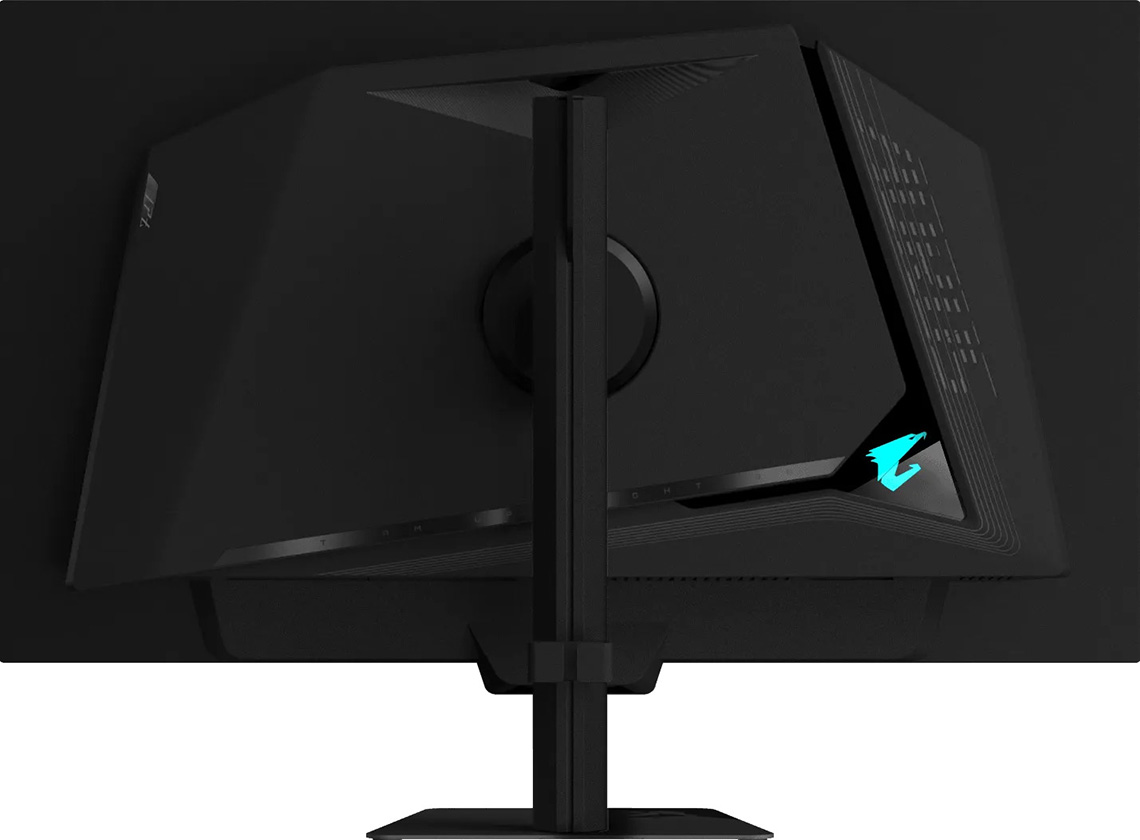
There is a small Gigabyte logo RGB lighting feature on the back as well, which can be controlled or turned off via the OSD menu. The back of the monitor arm includes a detachable cable tidy clip as well which is useful, although the arm of the stand is quite thin so hiding cables fully can be a little tricky.
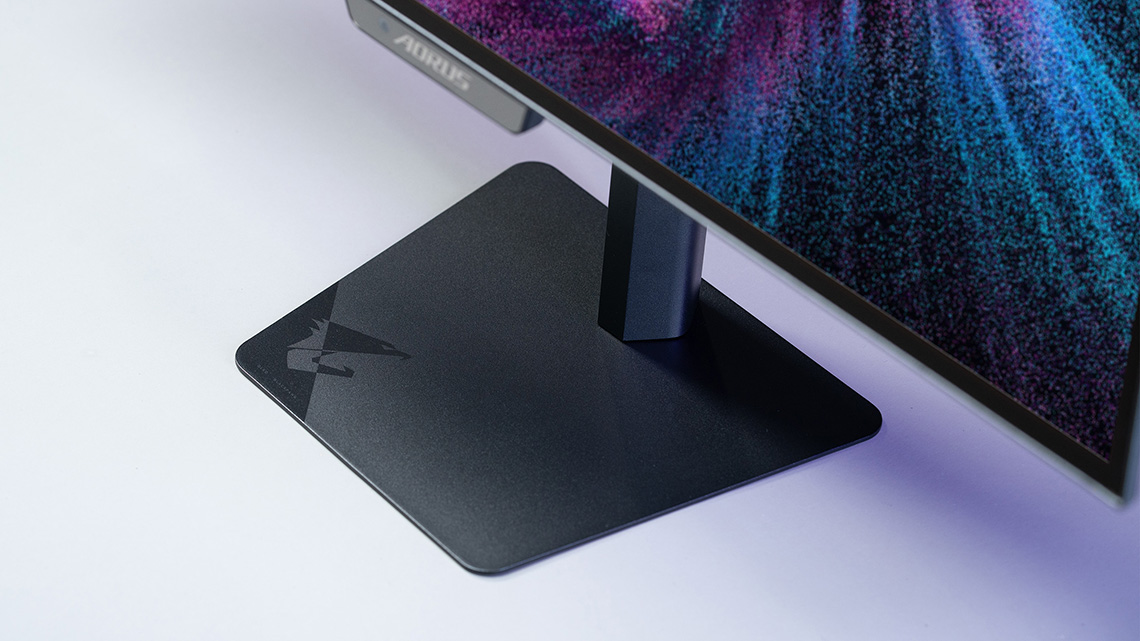
The stand offers a full range of tilt, height, swivel and rotate adjustments. These are all pretty smooth to operate but can be a little stiff. There’s a fair amount of wobble to the screen when you re-position it or use the on screen menu as the stand attachment is small at the back, and the arm is thin.
The foot of the stand is small and made of a dark grey metal, with an etched logo on the front left corner as well which looks nice. The small footprint should give you plenty of desk space for your peripherals.
Connectivity
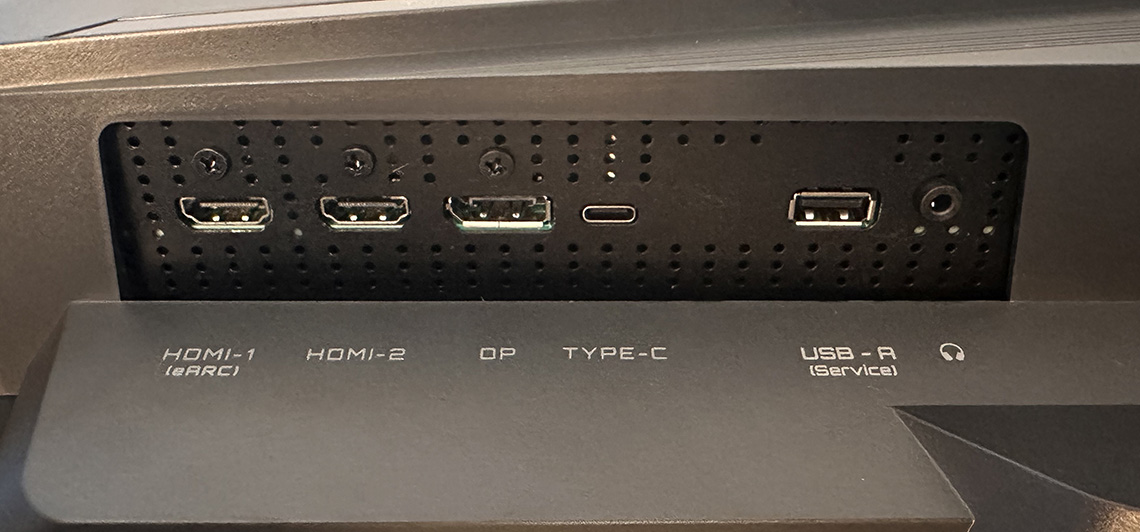
The back of the screen offers a good range of modern connectivity. There’s 1x DisplayPort 2.1 with UHBR 13.5 tier speeds (54Gbps). That’s sufficient to power the full spec without DSC if you have a compatible GPU. There’s also 2x HDMI 2.1 connections, one of which also supports eARC sound which is still a rare feature in the monitor market. There’s no integrated speakers on this model though, unlike the MO versions which featured 2x 5W speakers. Some of the larger sized ELITE series OLED screens will continue to feature speakers, but not this one.
There’s also 1x USB type-C here with DP Alt mode, data transfer and 15W power delivery. We’d have liked a higher power delivery from this port really, it’s not sufficient to power laptops, only really useful for charging smaller external devices perhaps. Note that the previous MO27Q28G/GR model offered 18W power delivery from its connection as well, although you could use the ‘dynamic’ feature to boost this to 45W if you sacrificed maximum brightness.
There’s also 1x headphone jack and 1x USB-A port, but the latter is only for service usage like firmware updates. It can’t be used as a USB hub which is another shame. The MO model offered 2x USB-A data ports along with a USB-B upstream port for that purpose. Without any USB data ports on the new model, there’s also no KVM switch function, again this was offered on the MO models. There are however PiP and PbP functions for handling multiple video inputs.
OSD menu
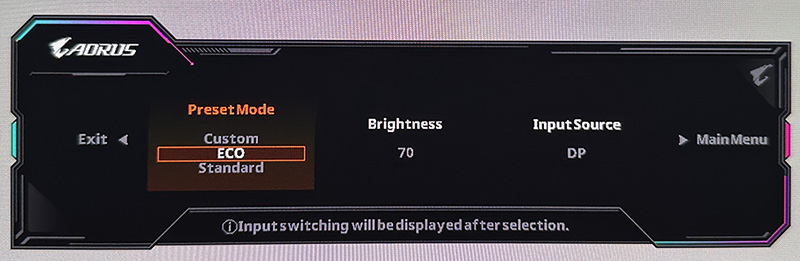
The OSD menu has had a revamp as well and it’s controlled through a joystick toggle on the bottom of the chin section at the front. There’s a new quick access menu when you press the joystick, giving you quick access to various customisable sections.
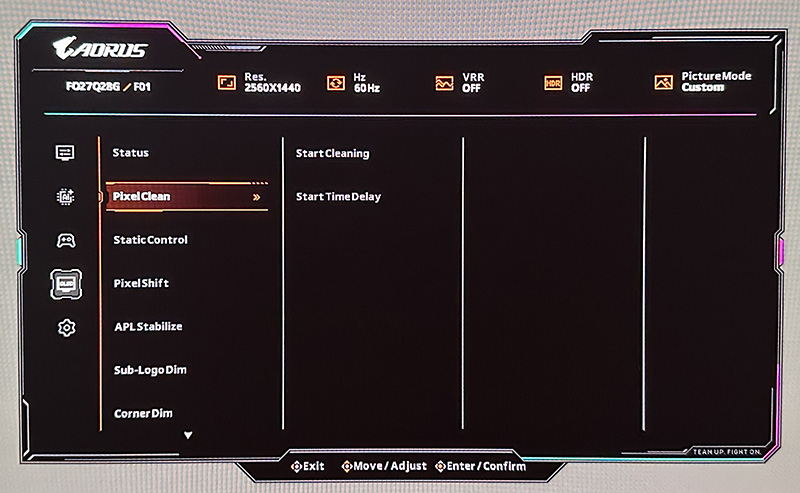
The main menu is split in to 5 sections and there’s a decent range of options and settings to change here. Navigation was quick, easy and intuitive with the joystick toggle. We sometimes found it a bit tricky to press the button, instead triggering directional presses which was annoying. Some of the menus involve digging through various layers as well, but overall it’s fine. The menu does not remember which section you were last using though so you have to start from the top each time you open it.
| OSD Menu | |
| Joystick toggle controller |  |
| Quick and snappy | |
| Intuitive to use | |
| User updatable firmware | |
OLED Care
The new-generation AORUS ELITE Series includes an updated ‘AI OLED Care Pro‘ feature set, built on an upgraded version of their previous ‘AI OLED Care’ features. This adds some additional panel care functions, but the key changes is the addition of their new ‘AI Assistant’ Sensor which is built in to the bottom chin of their OLED displays.
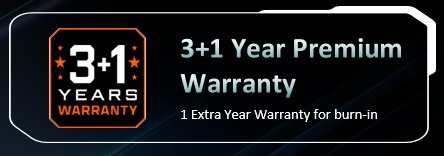
Along with a new heat-pipe cooling design this affords this screen an improved warranty period, extended from 3 years on the MO series to 4 years here which gives further peace of mind. That includes cover for burn-in as well.
| OLED Care and Warranty | |
| Warranty period | 4 years |
| Burn-in cover | |
| Screen saver (static control) | |
| Pixel / screen shift | |
| Logo dimming | |
| Taskbar detection |  |
| Motion / proximity sensor | |
| Other OLED care features | Corner dim |
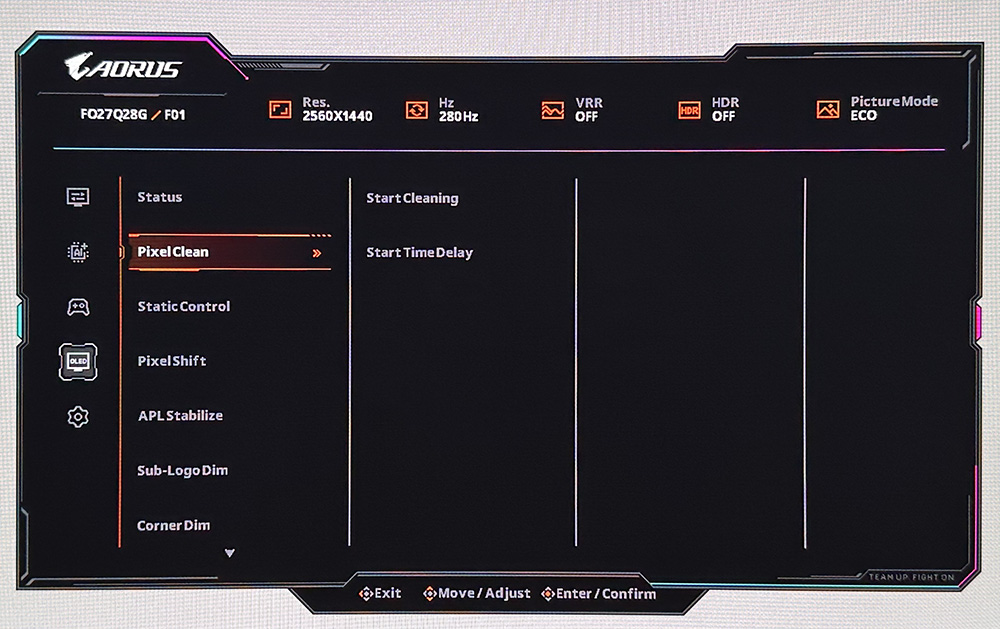
There’s a wide range of familiar OLED care options in the menu, most of which can be fully disabled if you find them problematic, although the pixel shift only has options for slow and normal. We’d recommend leaving as many of these turned on as possible to help with the mitigation of image retention.
AI Assistant sensor
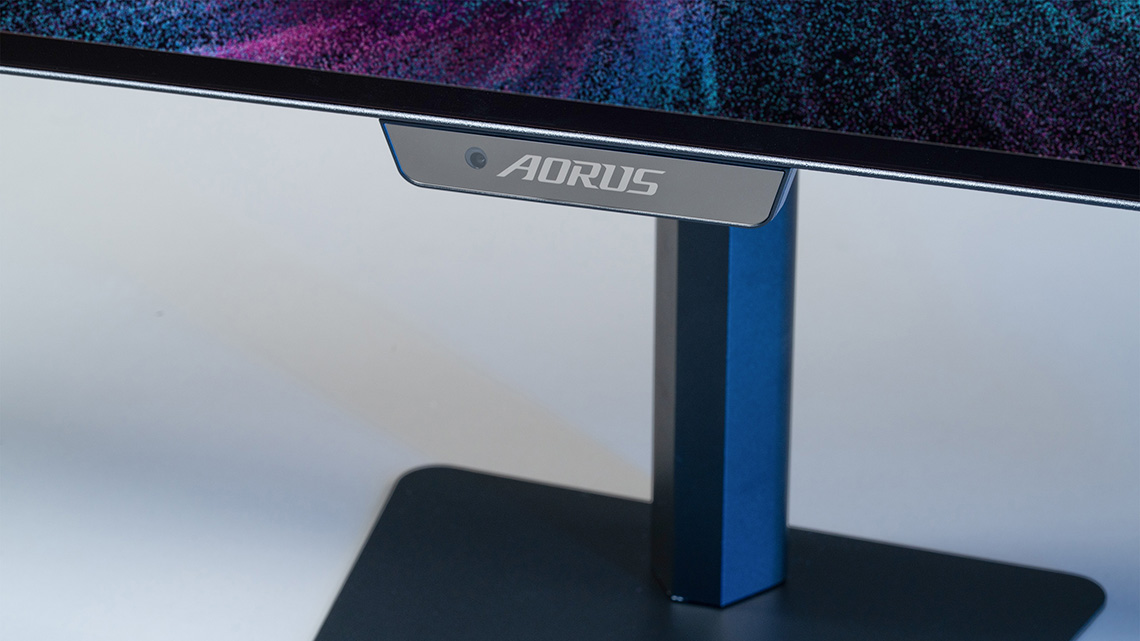
This is the key change with the new AORUS ELITE OLED model OLED care features, a sensor built in to the front of the screen which utilises a small sensor like we’ve seen in recent times from MSI’s AI Care Sensor. The new Gigabyte sensor can support the following functions:
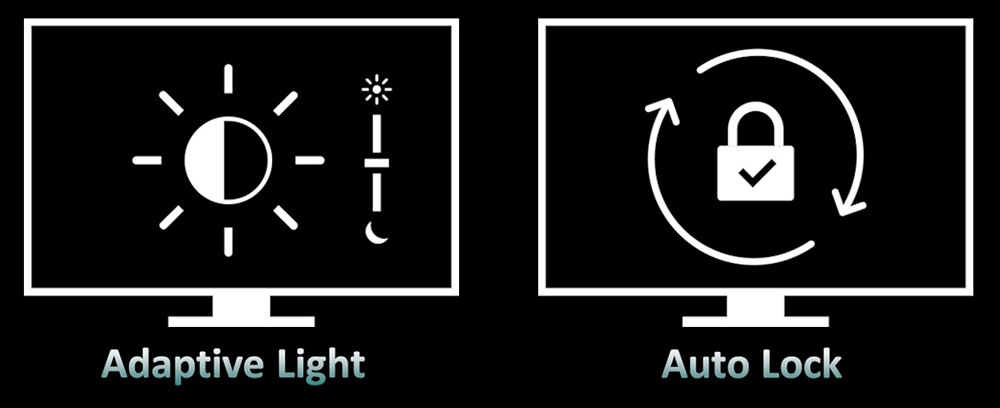
- Auto Lock – turns the screen off when you move away, and back on when you return
- Adaptive Light – dynamically adjusts your screen brightness depending on your ambient lighting conditions
We tested these features in more detail in our recent feature article about the AORUS ELITE series so we won’t repeat it all here, but check that out if you want to know more.
Brightness and Contrast
For this testing we disabled the OLED care features in the OSD menu as those can have a small impact to screen brightness in certain situations. We would recommend enabling as many of those features as possible to mitigate risks of burn-in, although you may need to experiment for your particular usage to ensure none are distracting or problematic.
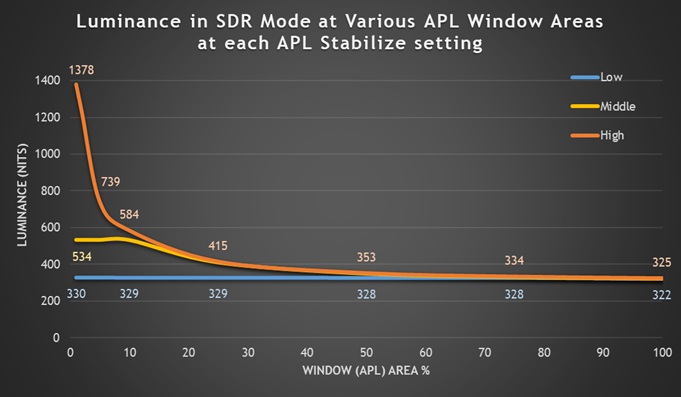
If you leave the screen set to ‘APL stabilize’ low in the OLED care menu then in SDR mode it operates with a uniform brightness behaviour without any ABL dimming, and so you get consistent brightness levels during desktop usage regardless of your content and windows sizes. We measured a maximum 330 nits in SDR which was good, and typical for a modern Tandem OLED panel. This performance was basically the same as the previous M-series versions, unsurprisingly given it’s the same panel.
At the minimum adjustment it could reach down to 30 nits which should be fine for darker room conditions as well.
You can disable uniform brightness if you want to get a boost in potential SDR brightness up to ~534 nits in the ‘middle’ mode and an even higher 1378 nits in ‘high’ mode, although you would then have to live with some ABL dimming in certain situations. This is more noticeable in the high mode for sure, with the middle mode being less aggressive in dimming. These modes are likely ok though for SDR gaming and multimedia, and other dynamic content if you really need further brightness boost, but 330 nits in the ‘low’ mode with uniform behaviour is likely more than enough for most users anyway. The uniform mode (low) is also preferrable for desktop applications and general uses too.
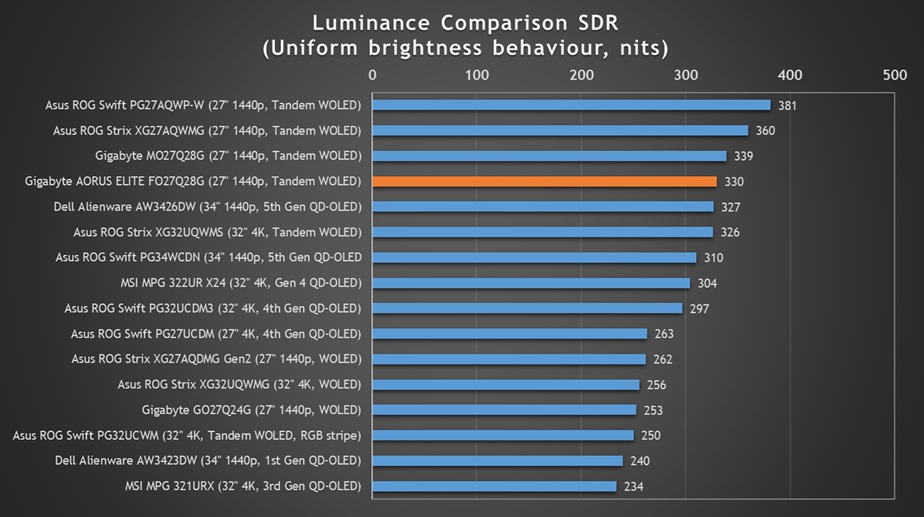
Keep in mind also that as a result of the amazing contrast ratio of the OLED panel, the perceived brightness in SDR mode is equivalent to an approximate 540 nits LCD monitor, even when using the uniform brightness mode so that should be plenty bright enough for most users. We explained the principles behind this in our article here, although we can’t officially give this screen a ‘TrueBright’ certification tier as that’s a programme created for QD-OLED monitors. The same principles apply though.
Testing Methodology Explained (SDR)

Performance is measured and evaluated with a high degree of accuracy using a range of testing devices and software. The results are carefully selected to provide the most useful and relevant information that can help evaluate the display while filtering out the wide range of information and figures that will be unnecessary. For measurement, we use a UPRtek MK550T spectroradiometer which is particularly accurate for colour gamut and colour spectrum measurements. We also use an X-rite i1 Pro 2 Spectrophotometer and a X-rite i1 Display Pro Plus colorimeter for various measurements. Several other software packages are incorporated including Portrait Displays’ Calman color calibration software – available from Portrait.com.
We measure the screen at default settings (with all ICC profiles deactivated and factory settings used), and any other modes that are of interest such as sRGB emulation presets. We then calibrate and profile the screen before re-measuring the calibrated state.
The results presented can be interpreted as follows:
- Gamma – we aim for 2.2 gamma which is the default for computer monitors in SDR mode. Testing of some modes might be based on a different gamma but we will state that in the commentary if applicable. A graph is provided tracking the 2.2 gamma across different grey shades and ideally the grey line representing the monitor measurements should be horizontal and flat at the 2.2 level, marked by the yellow line. Depending on where the gamma is too low or too high, it can have an impact on the image in certain ways. You can see our gamma explanation graph to help understand that more. Beneath the gamma graph we include the average overall gamma achieved along with the average for dark shades (0 black to 50 grey) and for lighter shades (50 grey to 100 white).
- RGB Balance and colour temperature – the RGB balance graph shows the relative balance between red, green and blue primaries at each grey shade, from 0 (black) to 100 (white). Ideally all 3 lines should be flat at the 100% level which would represent a balanced 6500K average colour temperature for all grey shades. This is the target colour temperature for desktop monitors, popular colour spaces like sRGB and ‘Display DCI-P3’ and is also the temperature of daylight. It is the most common colour temperature for displays, also sometimes referred to as D65. Where the RGB lines deviate from this 100% flat level the image may become too warm or cool, or show a tint towards a certain colour visually. Beneath this RGB balance graph we provide the average correlated colour temperature for all grey shades measured, along with its percentage deviance from the 6500K target. We also provide the white point colour temperature and its deviance from 6500K, as this is particularly important when viewing lots of white background and office content.
- Greyscale dE – this graph tracks the accuracy of each greyscale shade measured from 0 (black) to 100 (white). The accuracy of each grey shade will be impacted by the colour temperature and gamma of the display. The lower the dE the better, with differences of <1 being imperceptible (marked by the green line on the graph), and differences between 1 and 3 being small (below the yellow line). Anything over dE 3 needs correcting and causes more obvious differences in appearance relative to what should be shown. In the table beneath the graph we provide the average dE across all grey shades, as well as the white point dE (important when considering using the screen for lots of white background and office content), and the max greyscale dE as well.
- Luminance, black depth and contrast ratio (static) – measuring the brightness, black depth and resulting contrast ratio of the mode being tested, whether that is at default settings or later after calibration and profiling. We aim for 120 cd/m2 luminance which is the recommended luminance for LCD/OLED desktop monitors in normal lighting conditions. Black depth should be as low as possible, and contrast ratio should be as high as possible.
- Shadow detail – this is evaluated with the screen configured to a 200 nits white luminance for consistency between different monitors, and viewed in a dimly lit room. This first 16 greyscale shades are measured using our UPRTek MK550T spectro device (0.002 nits lower limit) for shades near-black, and the results are plotted on a graph relative to a target gamma curve (usually 2.2 gamma). Where the measurement line crosses the 0.01 nits point on the Y-axis is typically the visual threshold for where we would start to be able to detect luminance compared with black (0.00 nits). We combine these objective measurements with visual tests using a grey shade test pattern to determine the first visible shade, and then rank the shadow detail performance accordingly.
- Gamut coverage – we provide measurements of the screens colour gamut relative to various reference spaces including sRGB, DCI-P3, Adobe RGB and Rec.2020. Coverage is shown in absolute numbers as well as relative, which helps identify where the coverage extends beyond a given reference space. A CIE-1976 chromaticity diagram (which provides improved accuracy compared with older CIE-1931 methods) is included which provides a visual representation of the monitors colour gamut coverage triangle as compared with sRGB, and if appropriate also relative to a wide gamut reference space such as DCI-P3. The reference triangle will be marked on the CIE diagram as well.
- dE colour accuracy – a wide range of colours are tested and the colour accuracy dE measured. We compare these produced colours to the sRGB reference space, and if applicable when measuring a wide gamut screen we also provide the accuracy relative to a specific wide gamut reference such as DCI-P3. An average dE and maximum dE is provided along with an overall screen rating. The lower the dE the better, with differences of <1 being imperceptible (marked by the green area on the graph), and differences between 1 and 3 being small (yellow areas). Anything over dE 3 needs correcting and causes more obvious differences in appearance relative to what should be shown. dE 2000 is used for improved accuracy and providing a better representation of what you would see as a user, compared with older dE methods like dE 1994, as it takes into account the human eye’s perceptual sensitivity to different colours.
SDR Performance
Default Setup
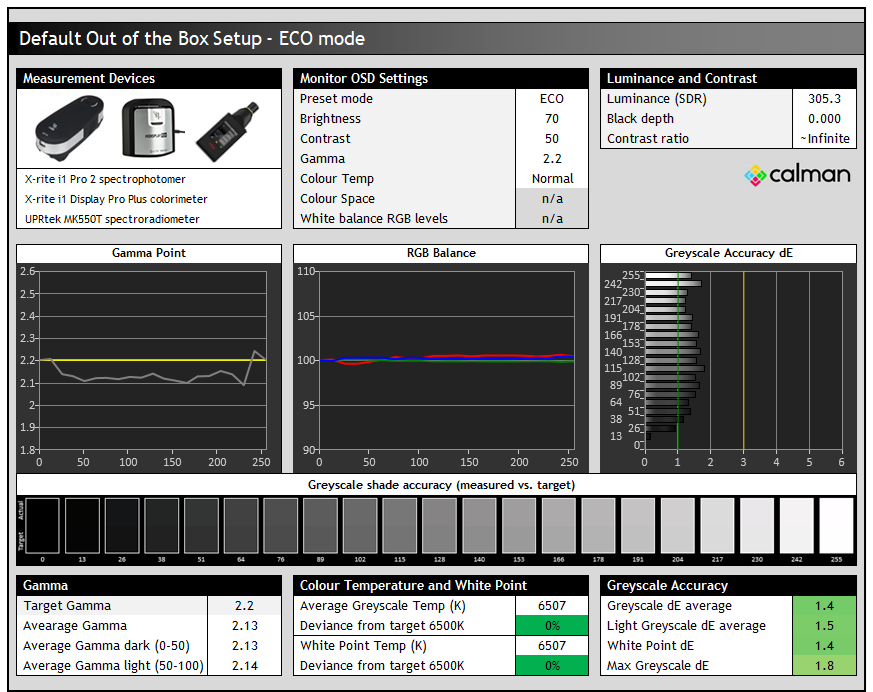
The screen is set in the ‘ECO’ preset mode by default with the full wide gamut of the backlight active. In that mode we found a reasonable gamma which was a little lower than the 2.2 target, but a very accurate greyscale and RGB balance which was great.
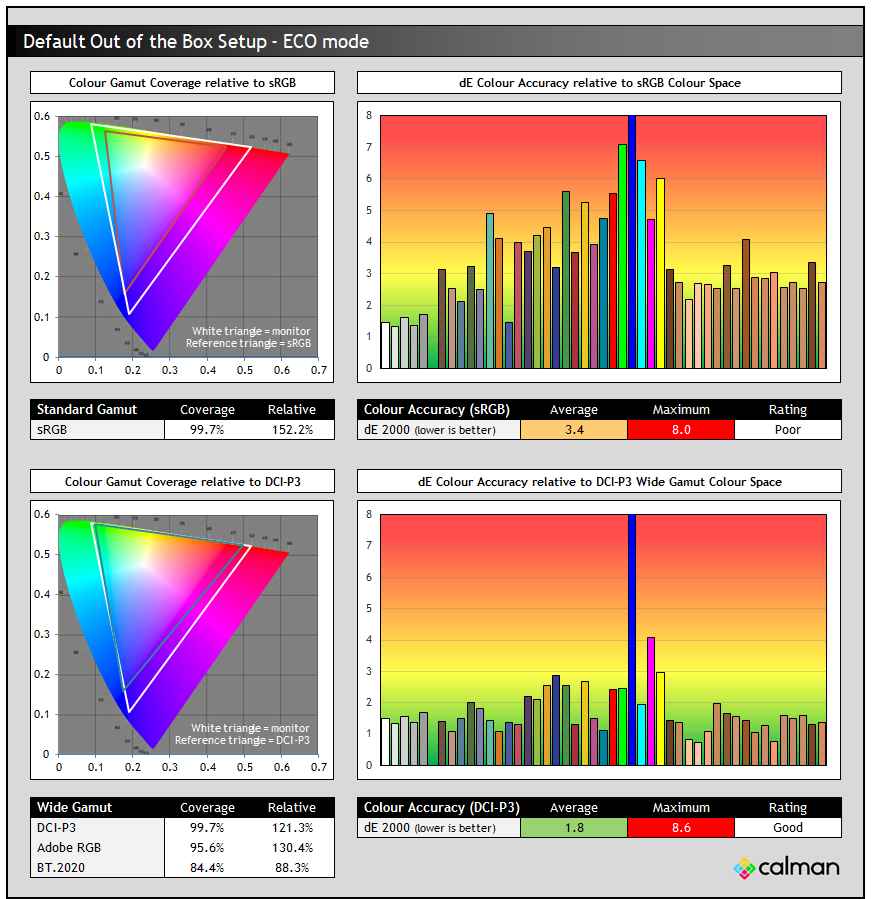
This Tandem WOLED panel has a wider colour space than earlier gen WOLED panels, reaching around ~152% relative sRGB coverage, compared with the older panels which were ~127%. This can lead to more vivid and saturated colours, but at the same time this leads to further errors when viewing SDR content which is mastered in the much smaller sRGB colour space.
With the wide native wide colour gamut active here, the accuracy of sRGB colours was therefore poor, with a dE 3.4 average measured. This is normal for a wide gamut screen and to be expected and we will look if we can improve sRGB / SDR accuracy in a moment.
The native colour gamut of this panel was closer to the DCI-P3 reference, although still extended a fair way beyond that in blue and red shades especially. With that somewhat closer match the accuracy of DCI-P3 colours out of the box was good, with a dE 1.8 measured.
Colour space emulation modes
Gigabyte have updated how you access the various emulation modes in the new OSD menu. On older screens you had a dedicated preset mode for sRGB, but for DCI-P3 and Adobe RGB you had to access those via a specific ‘colour space’ setting while using the other modes like ‘ECO’ or’ Custom’.
Now they’ve switched each emulation mode to have its own defined preset mode in the menu. Unfortunately when using these preset modes you lose access to all the colour, gamma and contrast settings, leaving you only with brightness control which is quite inflexible. Let’s hope they’re configured nicely from the factory.
Gamma and greyscale
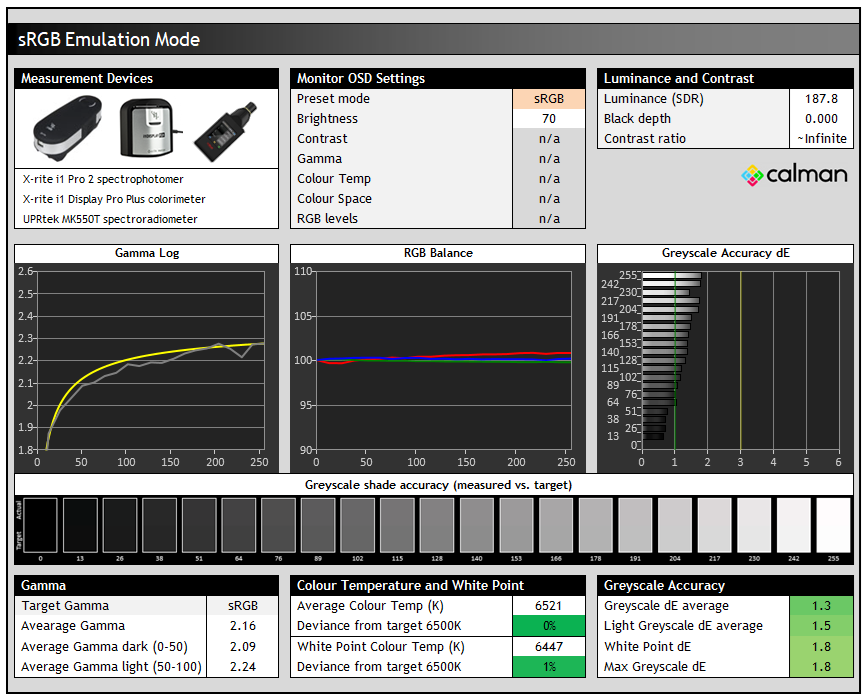
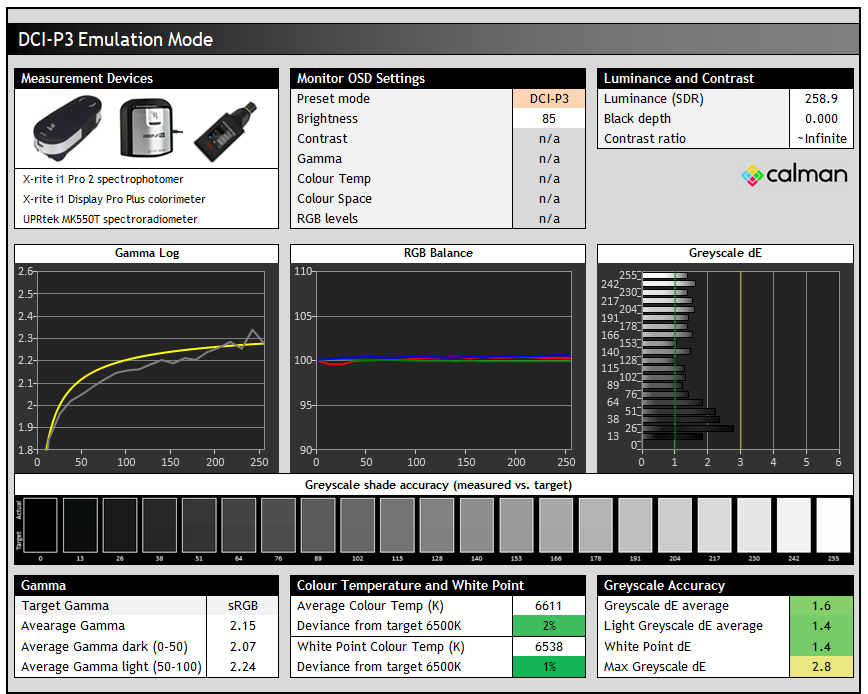
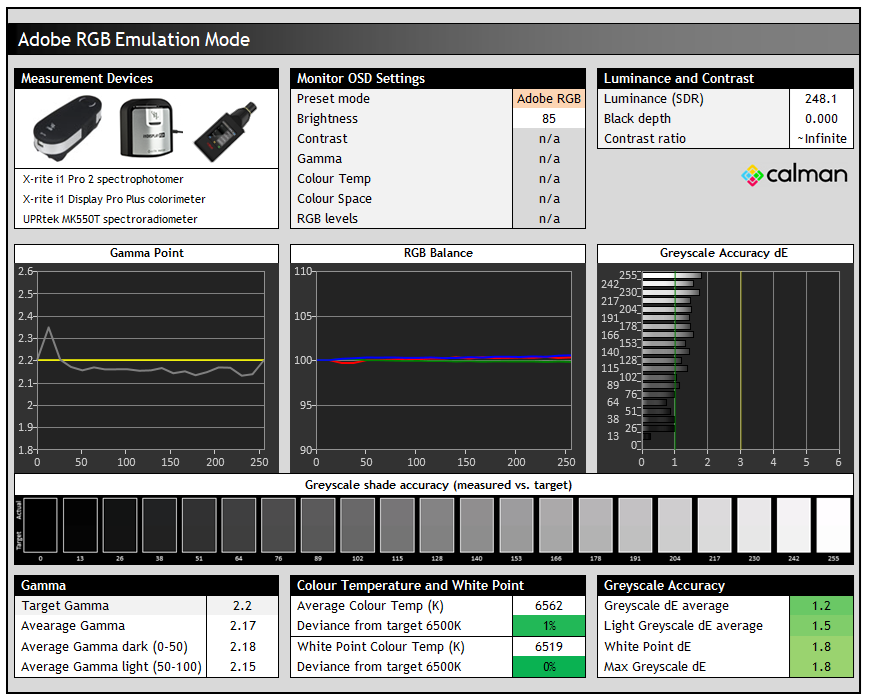
The sRGB and DCI-P3 modes are configured to the slightly different sRGB gamma curve, instead of 2.2, which is still used for the Adobe RGB preset. Making this change for those two modes improves the near black shadow detail by increasing the luminance for those shades, something that we will look at in more detail in a moment. The RGB balance, colour temp, white point and greyscale accuracy remained very good in all 3 modes, as they had been in the native mode before.
Overall this was very similar performance and tuning to what we’d seen with the MO27Q28G model, a little more accurate here though for gamma which was nice to see.
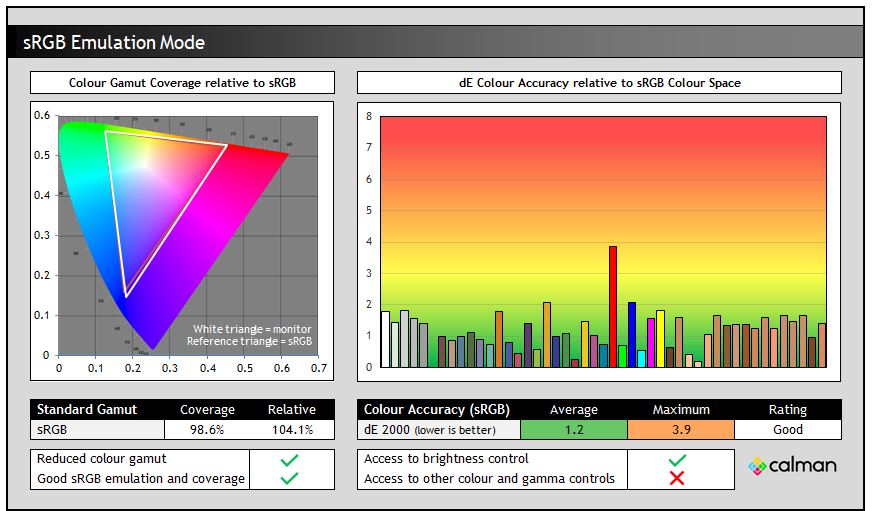
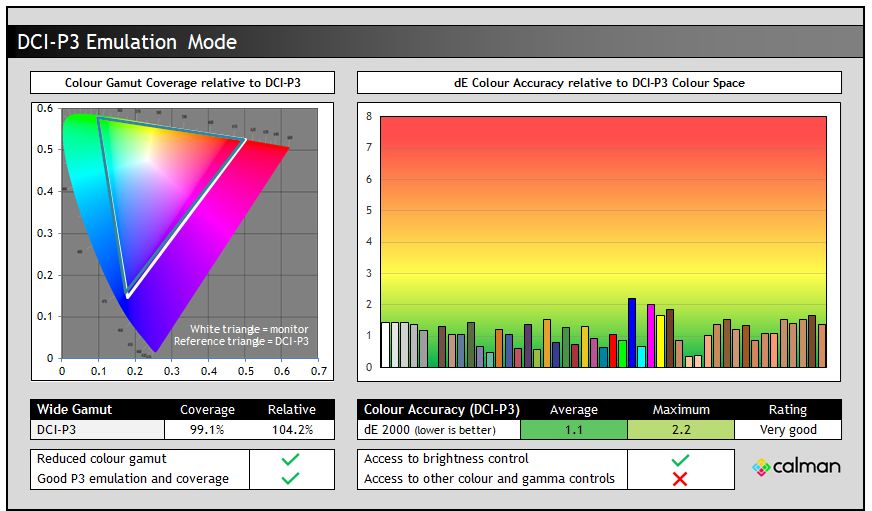
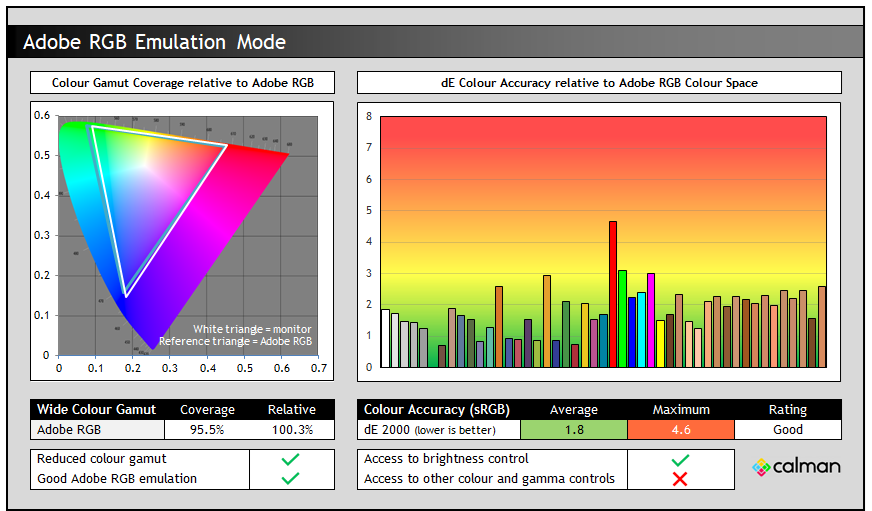
The other main thing that all these mode do is to clamp the native colour space back very close to the target reference, removing the over-coverage we’d seen in the native mode. This improves the colour accuracy very nicely which is generally very good. sRGB and DCI-P3 accuracy was very good overall making those modes well-suited to working with relevant content more accurately.
Note that the panel can’t quite fully cover the Adobe RGB reference space, reaching only 95.5% absolute coverage but it’s pretty close and it’s still useful to have an emulation mode on offer.
Shadow Detail
We also explored and tested the near-black shadow detail which can sometimes be a challenge on OLED panels, even though they have a true 0 nits black depth and ~infinite contrast. We explored the reasons for this and the challenges that display manufacturers face when calibrating OLED panels in our detailed article here.
For these tests screen was configured to 200 nits white luminance, and we tested the screen in several colour space modes, as well as at different refresh rates.
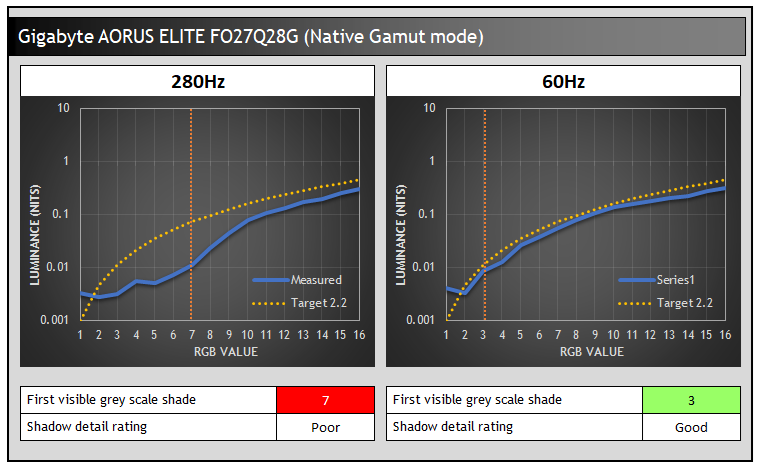
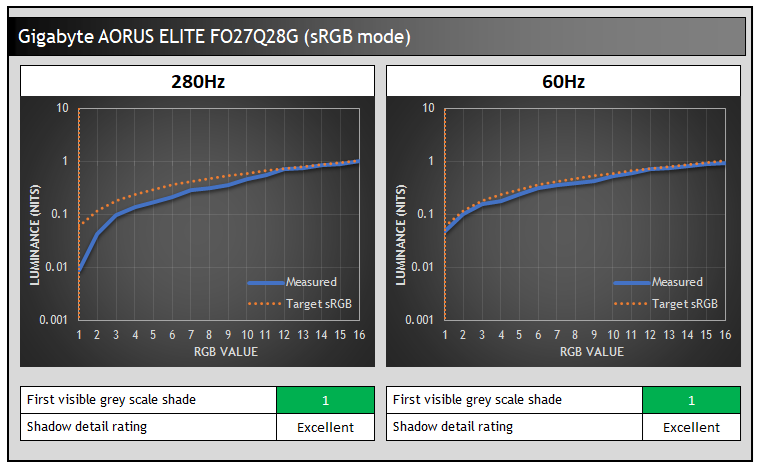
Shadow detail was weak on this screen in the native mode as we’ve seen on some OLED panels in the past. The gamma was factory calibrated at a 60Hz refresh rate which is common, and so performance was much better at that refresh rate where gamma tracking is nice and accurate. However it strays further from the target luminance for darker shades at the higher 280Hz refresh rate. We explored that topic in more detail in our article here. This meant that near-black shades were a bit brighter at lower refresh rates due to the gamma shift, which made darker content a bit easier to see.
In both the DCI-P3 and sRGB modes the gamma is configured to the sRGB gamma curve instead of 2.2, which as you can see is again very accurately calibrated at 60Hz, and slightly lower at 280Hz. The shadow detail and overall brightness of darker content was substantially improved in these modes which was great news. This is perhaps one reason to use the DCI-P3 mode for wide gamut / native mode, and the sRGB mode if you want to work with SDR content more commonly.
The shadow detail performance was a little better than we’d seen on the MO27Q28G although the same pattern applies with regards to 280Hz vs. 60Hz operation.
Black Equalizer setting
Gigabyte provide a ‘AI Black equalizer’ setting (because everything has to be “AI” now it seems) in the menu which can adjust darker scenes quite well. There’s settings from 0 (off) to 15 available which changes the gamma and shadow detail progressively as you increase it. We’ve provided measurements in increments of 5 here:
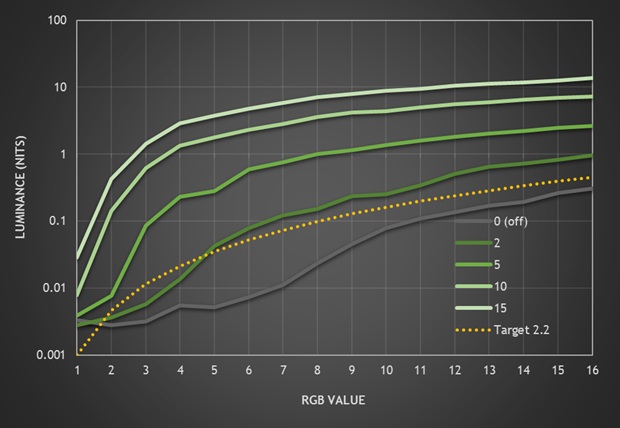
Turning this up from the default 0 to a setting of 2 helps improve shadow detail in native mode (RGB 4 now visible at 280Hz) without raising the black depth and tracking to 2.2 gamma is better. You can increase it further and none of the settings raise the black point which is good news, but make the dark grey shades progressively brighter. This is better than on the previous MO27Q28G model where moving above a couple of notches resulted in black raise as well, which you want to avoid.
This is one to experiment with in darker games if you want. For accuracy, you probably don’t need this if you’re using the sRGB/DCI-P3 modes, but it is useful if you’re using the native mode.
Black Crush Explored:
Exploring black crush and shadow detail on OLED panels. Is this a problem? What causes it? Why are WOLED panels different to QD-OLED?
[Read here]
Calibration
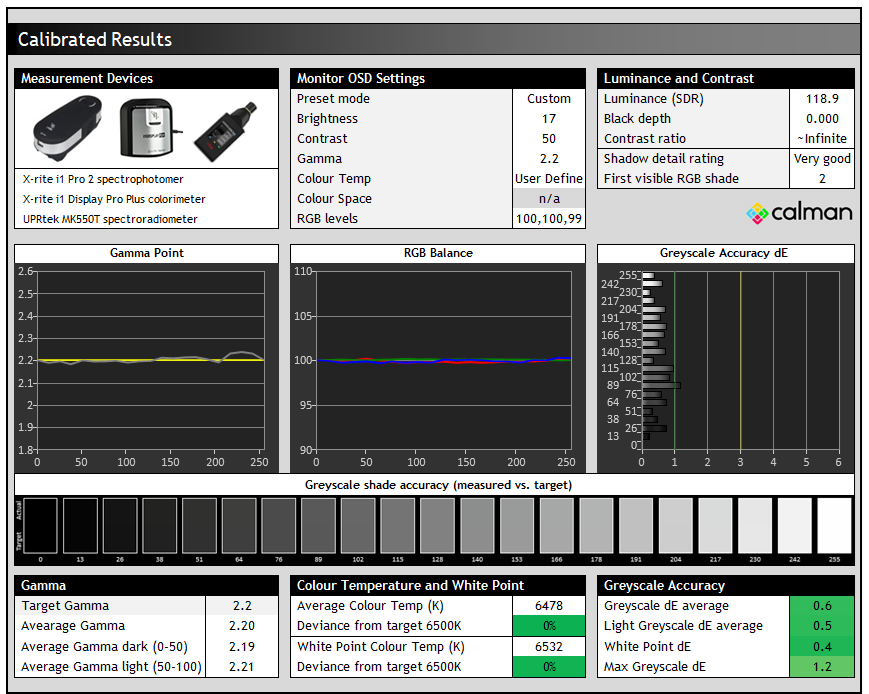
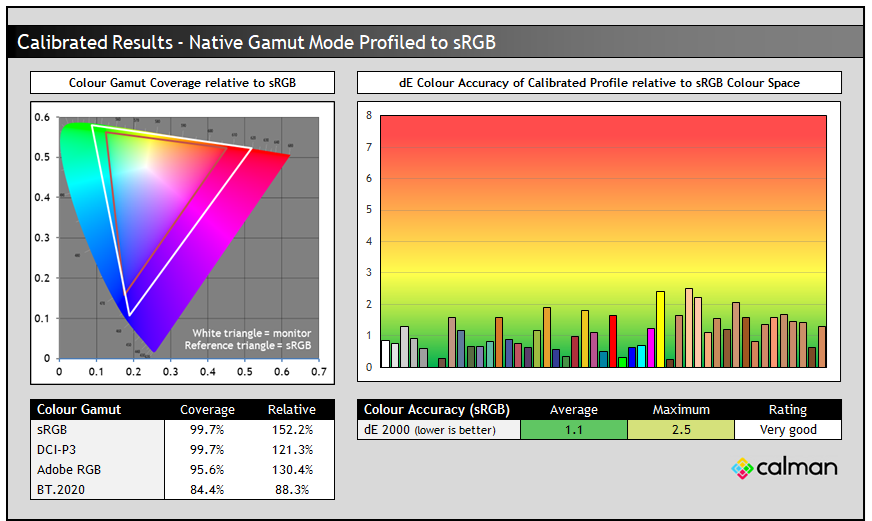
Calibration and profiling can produce some very good overall results and could be useful though if you wanted to operate the screen within its native wide gamut mode, but then map the colour space back to something else like sRGB or Adobe RGB for instance for colour-aware applications (e.g. Photoshop). You would need a suitable calibration device and software for this, or you could also try our calibrated ICC profile.
The screen was profiled to 2.2 gamma, 6500K colour temp and to the sRGB colour space. The screen was left in its native wide gamut mode, but this profile will be used in colour-aware applications to map back to sRGB in this instance.
Overall the calibrated results were good as you’d hope, although it didn’t seem to be possible to fully correct the colour accuracy despite multiple attempts. We’ve seen this on other WOLED monitors in the past before including the previous MO27Q28G model using this panel, but we’re not sure of the cause. Gamma and greyscale was excellent and this also improved shadow detail very well.
Best Settings Guide
- On our Patreon Insider tier and above you can find our full ‘Best settings guide’ for this screen which includes all our recommended calibrated settings and ICC profile for SDR mode, as well as other best settings guidance for other configurations, modes, HDR, gaming and everything else.
- Please note that you have the option to either join our Patreon on a subscription basis, which will also open up access to other locked posts on our page; or you can purchase just the single post for these best settings as a one-off if you’d rather.
- If you only want just our standard SDR settings and calibrated profile, that is available via our ICC database (without all the other best settings guide).
ICC Profiles and Monitor Calibration Database
Find the recommended settings and a calibrated ICC profile for your display.
[View here]
General and Office
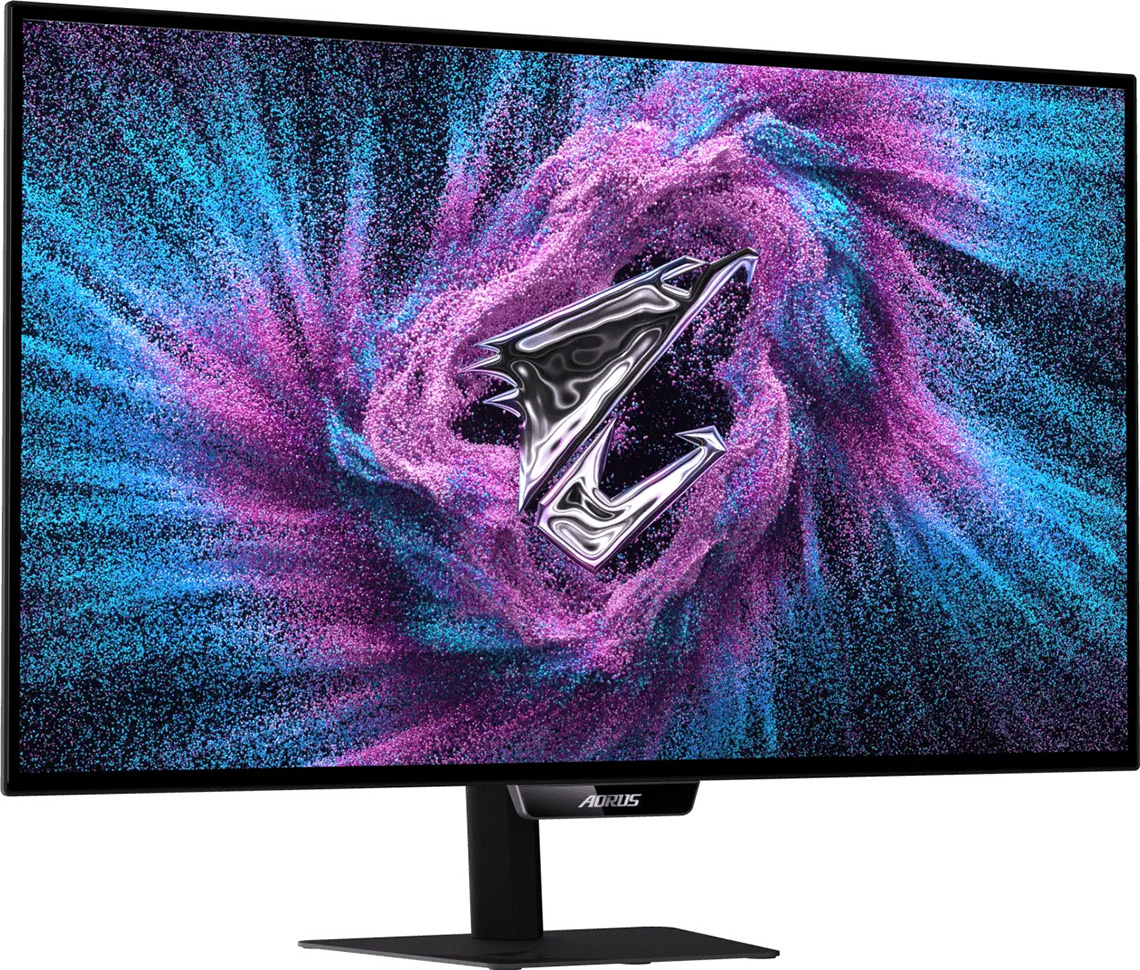
The resolution of 2560 x 1440 is standard on a 27″ sized screen and is comfortable without scaling being required, providing a decent desktop space for multi-tasking and split screen work. Higher pixel densities from 4K resolutions are available in this size of OLED monitor, but at higher prices, and the lower 1440p resolution is more suitable for fast-paced gaming, being a lot easier to power than 4K. As this is an OLED panel you need to be mindful of image retention risks for lots of static work, although there’s a good range of OLED Care options and a robust 3-year warranty offered as well.
Sub-pixel layout and text clarity
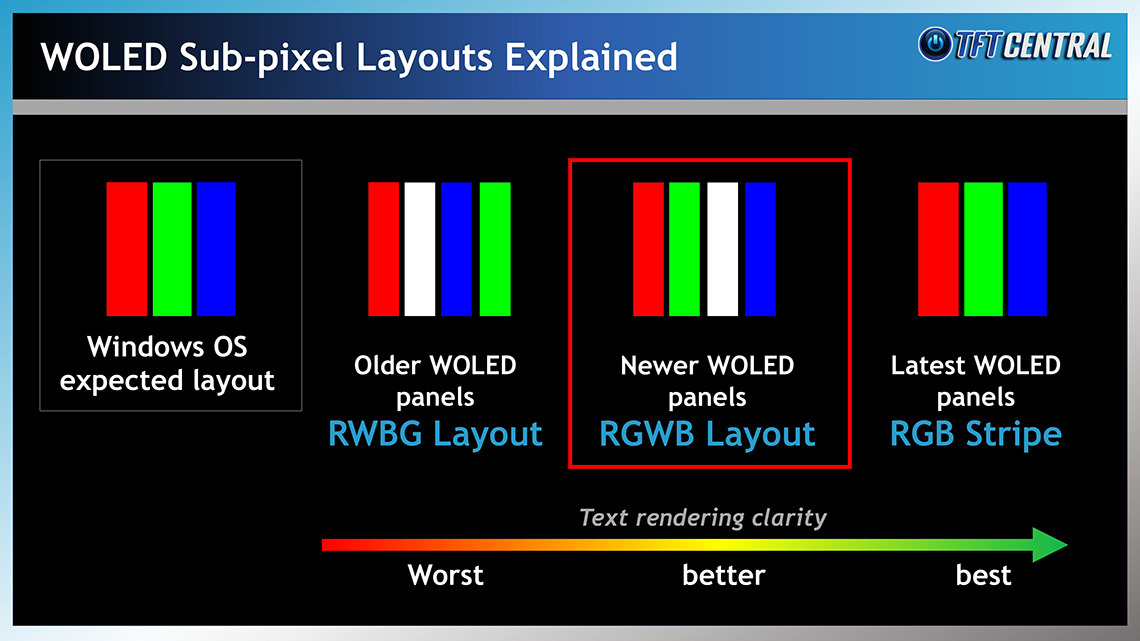
The Tandem WOLED panel used here features LG Display’s updated sub-pixel layout, improving the order of the sub-pixels to RGWB compared with previous-gen WOLED panels and therefore improving text rendering a bit. This was identical to the M-series models as it’s the same panel, pixel density and layout. There is still a bit of fringing visible when viewing lots of text, and this can only be improved further by increasing the pixel density (like on 27″ 4K panels for instance) or shifting to a true RGB-stripe layout. For dynamic content, gaming etc there shouldn’t be any issues though we don’t think with the current layout.
Glossy coating
The ‘RealBlack Glossy’ coating provides a super sharp and clear image, free of any grain which is great news. The glossy coating certainly looks crisper and cleaner than the matte anti-glare coated WOLED panels you can find on the market.
A lot of people prefer this coating finish, and it helps the image pop more as well. On the other hand, it is not as well suited to viewing in brighter room conditions or where you have light sources and windows facing the screen. It’s a lot more reflective and produces mirror-like reflections which can be distracting in some situations. You will need to consider your usage environment to decide if glossy is right for you, or if you’d be better off with a matte anti-glare coating.
Useful Office Features
| Features | Notes | |
| USB type-C connectivity (DP Alt mode) | | |
| USB type-C power delivery | | 15W |
| Daisy chaining support | | |
| KVM switch | | |
| PiP and PbP support | | |
| USB data ports | | Only 1x for service |
| Easy access USB data ports | | |
| Integrated speakers | | |
| Audio output / headphone out | | 1x connection on back |
| Mic input | | |
| Integrated webcam | | |
| Ambient light sensor | | Adaptive Light feature |
| Motion sensor | | New OLED Care sensor, Auto Lock |
| Stand adjustments | | Tilt, height, swivel and rotate |
| VESA mount support | | 100 x 100mm via provided bracket |
| Integrated power supply | | |
| Tripod socket | | |
| Firmware updates | | |
| Fan-less design | |
As this is part of Gigabyte’s more affordable range within their ELITE series and it is missing some features compared with their flagship OLED offerings. There’s no USB-A data ports on this screen, which is a shame. That also means that despite there being a USB-C connection (with a fairly low 15W power delivery) there’s no KVM switch function.
There’s also no speakers on this model, something featured on most of their other OLED monitors, albeit with low power delivery. The MO models had 2x 5W speakers for instance, but those are not featured on this new model. There is however PiP/PbP support and a headphone connection which are useful, and the stand provides a great range of adjustments too. The new OLED care sensor provides a couple of useful features such as Auto Lock and Adaptive Light which weren’t offered on the previous M-series models.
Blue Light
| Blue light output | |
| Blue peak wavelength | 452 nm |
| Blue light portion | 30.32% |
| Low blue light modes available | But ‘Reader’ mode preset |
| Low blue light mode temp | 5740K (Reader mode) |
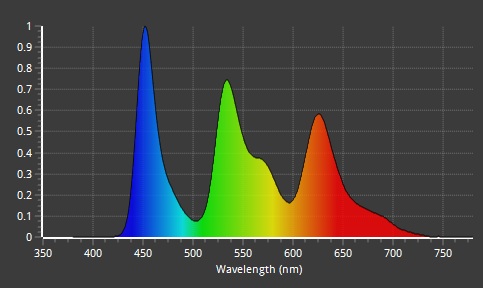
The native panel spectral distribution is shown above at a calibrated 6500K white point, where the blue peak is at 452 nm. The spectral distribution shows this is a Tandem WOLED panel with more defined separation between the green and red areas compared with previous-gen WOLED panels.
There aren’t any specific ‘Blue Light Filter’ settings in the menu but there is a ‘Reader’ preset mode which has the colour temp set to warm by default, and results in a ~5740k white point. That may be useful in the evening or for lots of text work potentially.
Flicker free
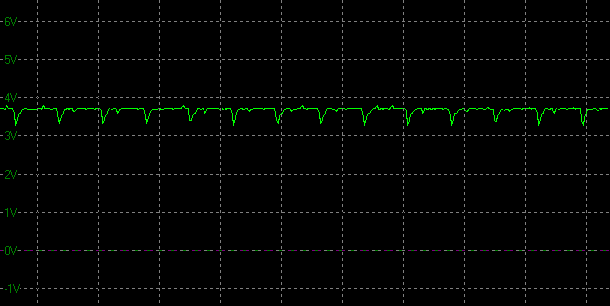
| Flicker | |
| Flicker free verified | |
| PWM / flicker frequency | n/a |
Uniformity
OLED panels, especially Tandem WOLED, can be impacted by noticeable “grey banding” artefact and a “dirty screen effect” when viewing darker content. This might be in dark games, or dark mode apps, and it’s a topic we’ve explored at length in the past.
The screen was configured to a consistent 0.2 nits luminance for this full-screen grey test, and the photos captured are as representative to what we see visually as possible.
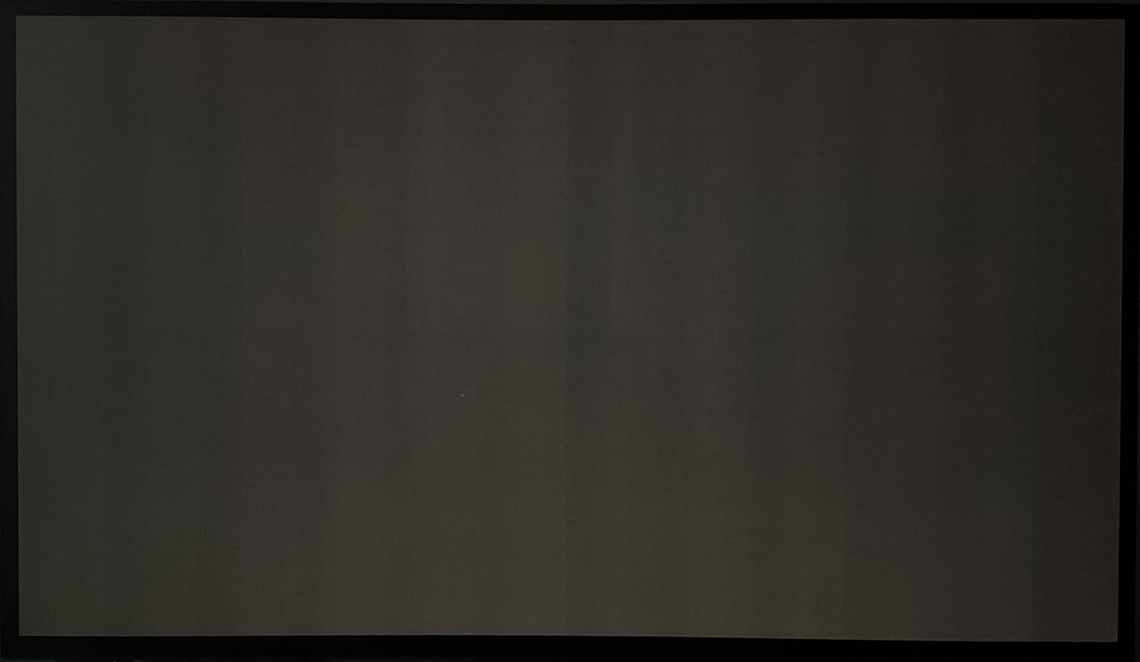
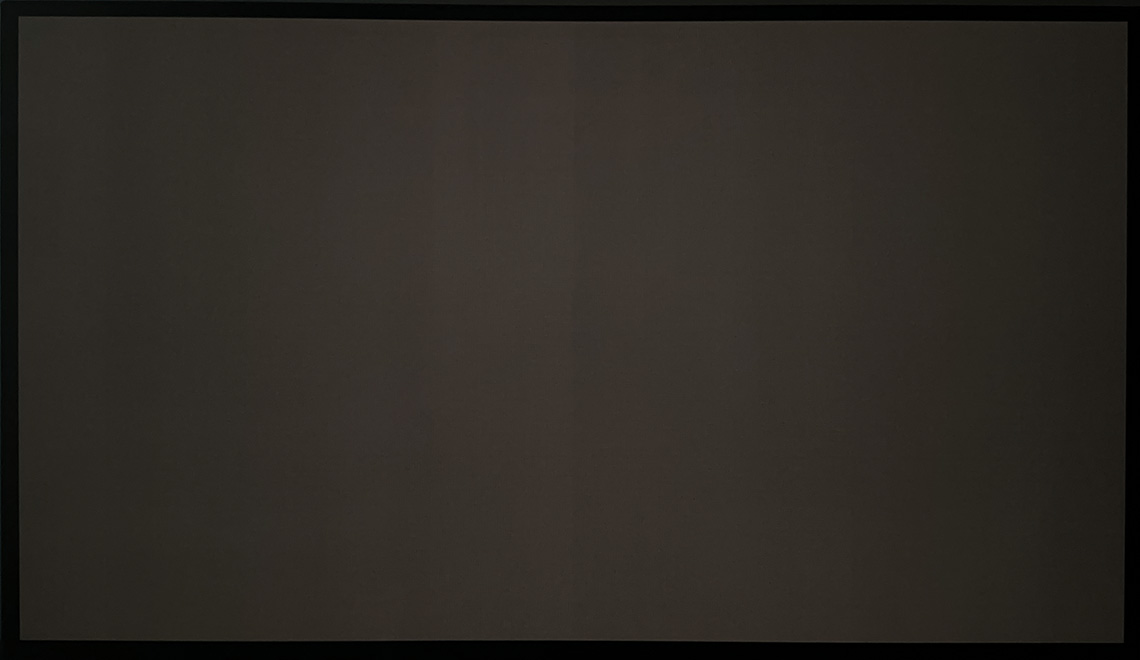
Results could vary between samples and also vary with panel ageing and panel refresh cycles. We saw some fairly typical vertical banding on this panel at the native 280Hz refresh rate, but it was really only visible in very dark situations and in darker room conditions. As with other Tandem WOLED panels this improves as refresh rate lowers and was very hard to see at 60Hz.
Grey Banding Explored:
Exploring issues reported on Tandem WOLED panels with banding artefacts in certain situations, especially on dark grey colours. Is this a widespread issue to be concerned about and does it affect all OLED panels in the same way?
[Read here]
HDR
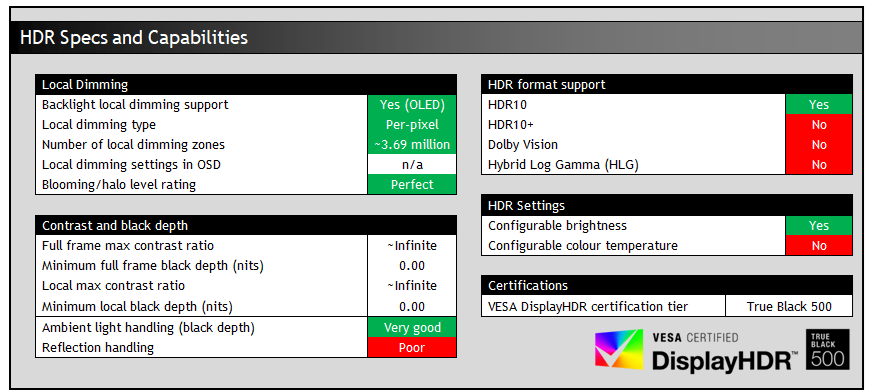
Being an OLED panel, the FO27Q28G is well-equipped to handle HDR content with its per-pixel level dimming allowing for true blacks, a basically infinite contrast ratio and the avoidance of all blooming and halos. In these regards it can easily surpass any Mini LED backlit LCD monitor. However, it cannot reach the same luminance levels as Mini LED screens, and carries a “peak brightness” spec of 1500 nits, which will then also lower as the content on your screen changes and the APL increases which is normal on this technology. This is one key area where Mini LED screens can look brighter and deliver a more impactful HDR experience.
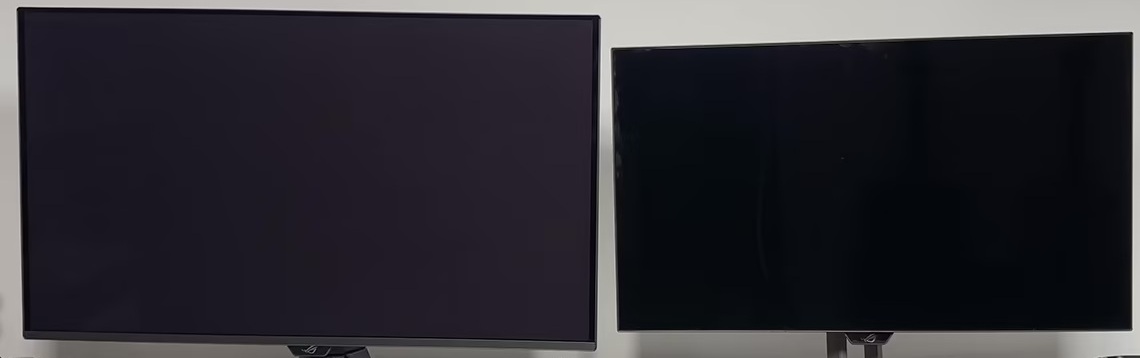
Black depth comparison in a brightly lit room
QD-OLED with QuantumBlack film (left) vs glossy Tandem WOLED (right) – not this specific monitor but the same results apply
The WOLED panel maintains better contrast and black depth in the presence of ambient light than alternative QD-OLED panels, which show raised blacks that start to go grey as ambient light increases, especially where those light sources are in front of the screen. Some improvements have been made with 2026 ‘QuantumBlack’ coated QD-OLED panels, but they still remain behind WOLED in this regard. This is especially the case with these latest Tandem WOLED panels which offer improvements over previous gen WOLED as well.
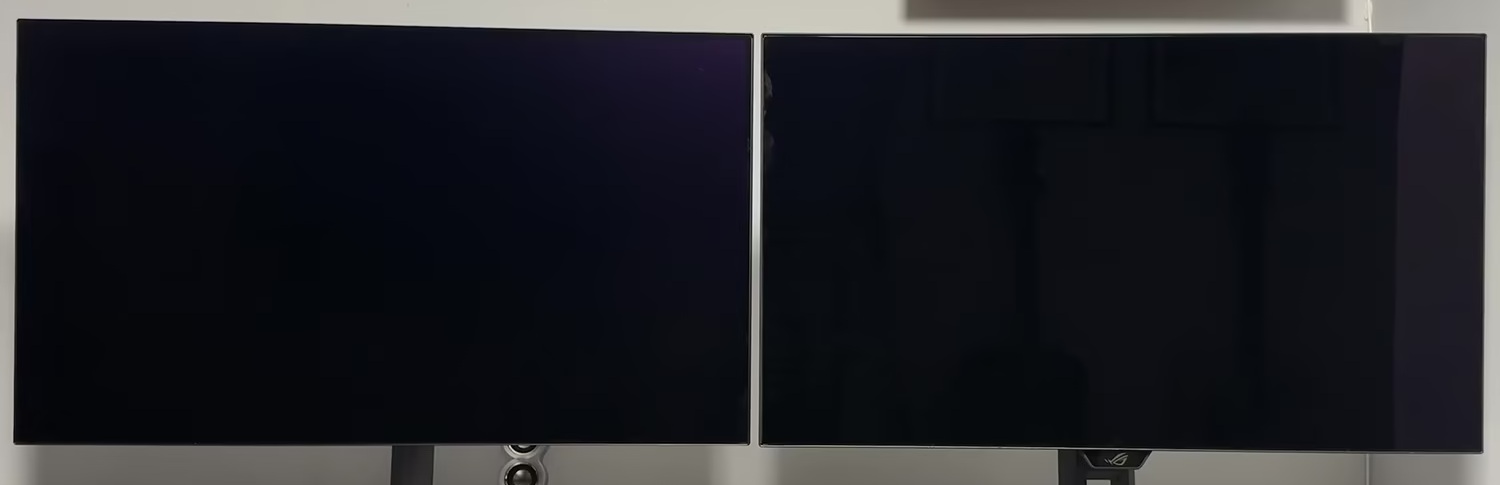
Matte Tandem WOLED (left) vs Glossy Tandem WOLED (right) – not this specific monitor but the same results apply
The ‘RealBlack Glossy’ coating used on this screen also helps with black depth retention a little compared with matte anti-glare coatings, as it doesn’t diffuse light across the panel like a matte AG coating would, but on the flip side you do need to be more mindful of mirror-like reflections with this coating and the screen is not as well suited to brighter viewing environments.

HDR Demo and Test Video
Test and demo the HDR on your display using our handy compilation, highlighting black depth, contrast and peak brightness capabilities.
[View here]
HDR modes
Like other recent Gigabyte OLED monitors the FO27Q28G offers a wide range of HDR modes, settings and configurations to choose from. Each mode is basically a preset configuration of different settings, and in many of the modes you can change these settings if you want. The main setting which also impacts brightness in HDR is the APL stabilize setting which is available in the OLED care menu. The default settings for each mode are shown below:
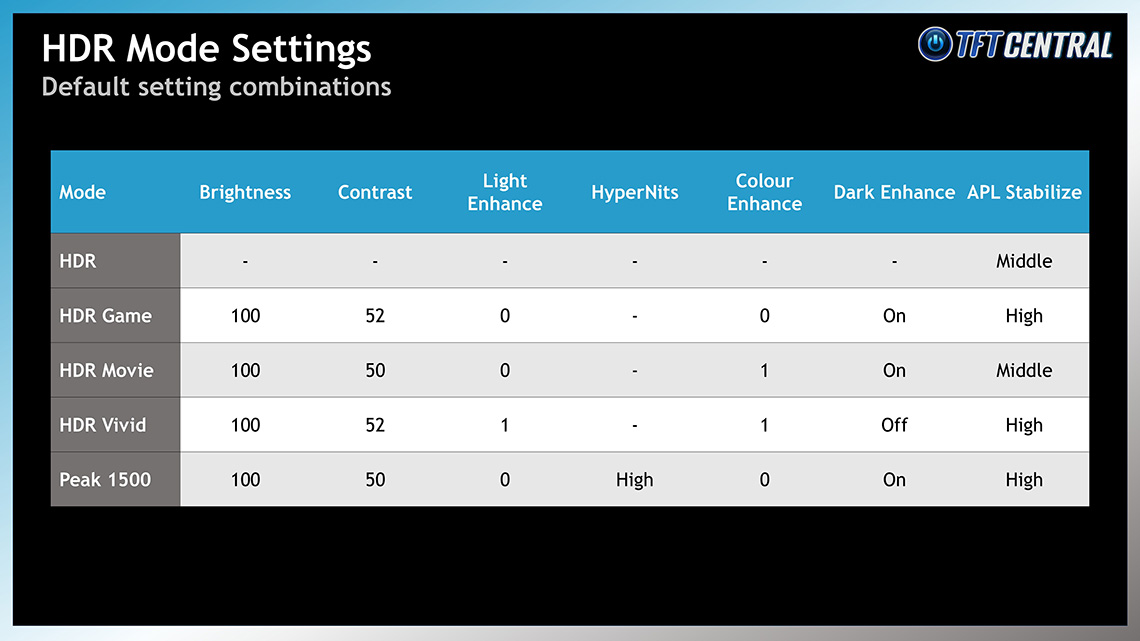
You can see that the normal “HDR” mode has most of it’s settings locked and behaves like a traditional “True Black” mode that we’ve seen on loads of OLED monitors before. That has APL stabilize set to ‘middle’.
The ‘Peak’ mode is the only one to offer access to the recently introduced HyperNits feature which we explored in detail here, although the new ‘Shadow Boost’ setting we’d seen when first testing HyperNits was not included here for some reason. The ‘Dark enhance’ setting we’ve seen on previous Gigabyte OLED monitors is still there though.
HDR Testing Methodology Explained

Performance is measured and evaluated with a high degree of accuracy using a range of testing devices and software. The results are carefully selected to provide the most useful and relevant information that can help evaluate the display while filtering out the wide range of information and figures that will be unnecessary. For measurement, we use a UPRtek MK550T spectroradiometer which is particularly accurate for colour gamut and colour spectrum measurements. We also use an X-rite i1 Pro 2 Spectrophotometer and a X-rite i1 Display Pro Plus colorimeter for various measurements. Several other software packages are incorporated including Portrait Displays’ Calman color calibration software – available from Portrait.com.
We measure the screen at default settings (with all ICC profiles deactivated and factory settings used). The results presented can be interpreted as follows:
HDR accuracy section
- Greyscale dE – this graph tracks the accuracy of each greyscale shade measured from 0 (black) to 100 (white). The accuracy of each grey shade will be impacted by the colour temperature and gamma of the display. The lower the dE the better, with differences of <1 being imperceptible (marked by the green line on the graph), and differences between 1 and 3 being small (below the yellow line). Anything over dE 3 needs correcting and causes more obvious differences in appearance relative to what should be shown. In the table beneath the graph we provide the average dE across all grey shades, as well as the white point dE (important when considering using the screen for lots of white background and office content), and the max greyscale dE as well.
- RGB Balance and colour temperature – the RGB balance graph shows the relative balance between red, green and blue primaries at each grey shade, from 0 (black) to 100 (white). Ideally all 3 lines should be flat at the 100% level which would represent a balanced 6500k average colour temperature for all grey shades. This is the target colour temperature for desktop monitors, popular colour spaces like sRGB and ‘Display DCI-P3’ and is also the temperature of daylight. It is the most common colour temperature for displays, also sometimes referred to as D65. Where the RGB lines deviate from this 100% flat level the image may become too warm or cool. Beneath this RGB balance graph we provide the average correlated colour temperature for all grey shades measured, along with its percentage deviance from the 6500k target. We also provide the white point colour temperature and its deviance from 6500k, as this is particularly important when viewing lots of white background and office content.
- ST 2084 EOTF (PQ) tracking – this graph tracks the PQ curve in HDR mode, akin to gamma measurements in SDR. The yellow line represents the ideal PQ curve, while the grey line plots the monitors measured performance.
- Luminance, black depth and contrast ratio (top right hand table) – measuring the brightness, black depth and resulting contrast ratio of the mode being tested. The luminance figure captured here is from a standard 10% APL window area measurement, although further luminance measurements are included in a separate section to capture “peak brightness” and the luminance at other APL areas. This section also measures the black depth on the screen and the resulting contrast ratio.
For HDR, any local dimming is left enabled, and so we measure the black depth adjacent to a white test image and calculate the “local contrast ratio” from there. We also measure the black depth towards the edges of the screen, away from the white test area in order to calculate the “maximum full frame contrast ratio” across the whole panel. These figures will often be different on LCD screens with local dimming, as this dimming can be more effective for dark areas further away from light areas.
HDR colours section
- Gamut coverage (2D) – we provide measurements of the screens colour gamut for HDR relative to the very wide Rec.2020 colour space. Coverage is shown in absolute numbers as well as relative, which helps identify where the coverage extends beyond a given reference space. A CIE-1976 chromaticity diagram (which provides improved accuracy compared with older CIE-1931 methods) is included which provides a visual representation of the monitors 2D colour gamut coverage triangle as compared with Rec.2020. The higher the coverage, the better.
- dE colour accuracy – a wide range of Rec.2020 colours are tested and the colour accuracy dE measured. An average dE and maximum dE is provided along with an overall screen rating. These numbers are calculated based on the colour tone and hue, and ignore any luminance error. The lower the dE the better, with differences of <1 being imperceptible (marked by the green area on the graph), and differences between 1 and 3 being small (yellow areas). Anything over dE 3 needs correcting and causes more obvious differences in appearance relative to what should be shown. dE 2000 is used for improved accuracy and providing a better representation of what you would see as a user, compared with older dE methods like dE 1994, as it takes into account the human eye’s perceptual sensitivity to different colours.
HDR Performance
Peak White Luminance Measurements
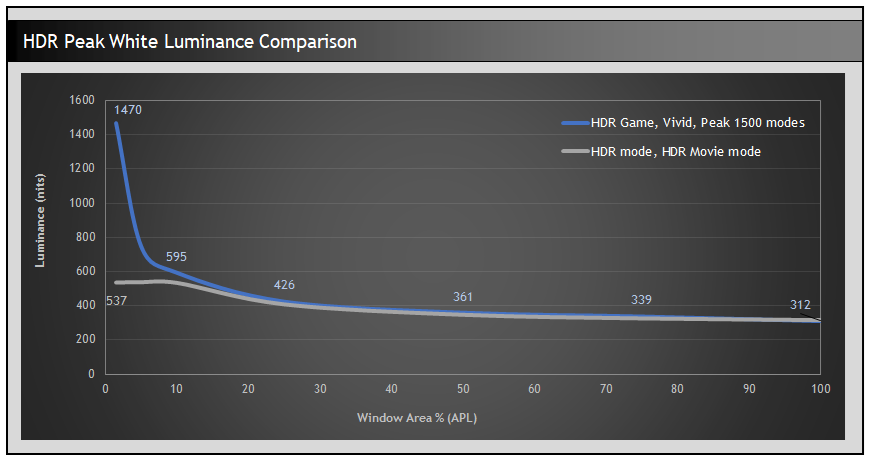
You can see from the default settings table that the HDR default mode and movie mode are set with APL stabilize on medium, whereas the Game, Vivid and Peak modes have it set to high. A quick comparison of the peak white luminance performance at different APL shows the variation between the different modes, impacted by that APL stabilize setting.
These measurements alone don’t tell the full story, but you can see that those modes with APL stabilize on high can reach much higher peak brightness in each case, up to 1470 nits in our testing which is very close to the advertised 1500 nits figure. Note also that those modes set on the APL stabilize medium setting only reach around 537 nits maximum, and are locked to lower luminance levels, primarily to conform to the VESA DisplayHDR True Black certification process and significantly reduce ABL dimming during changing content.
EOTF Measurements
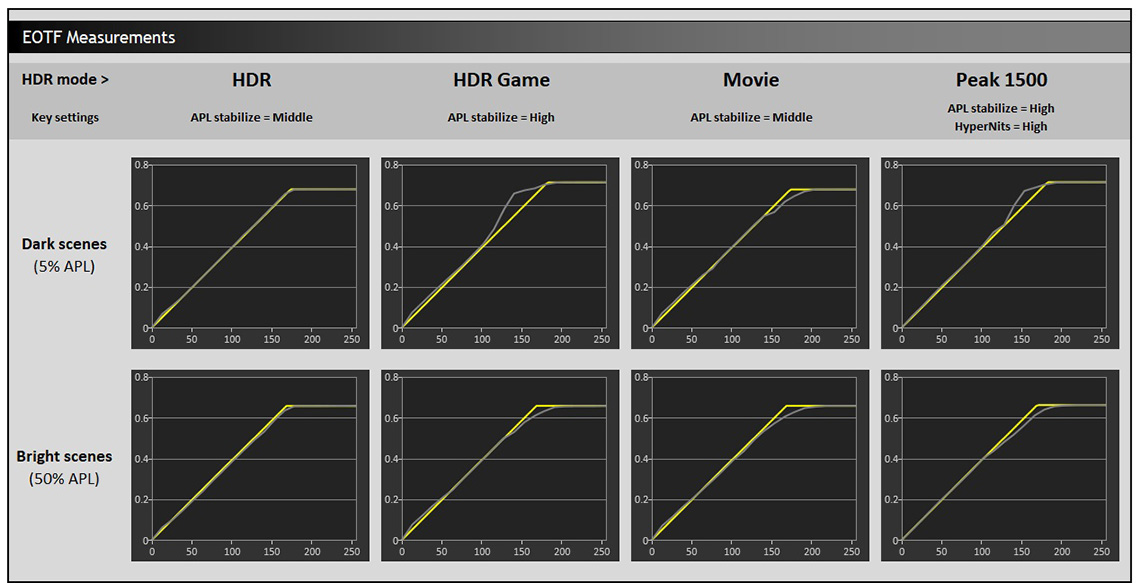
We’ve provided EOTF measurements for a each of the available modes above except ‘Vivid’ which behaves the same as the Game mode, just with accentuated colours. The standard HDR mode shows the most accurate EOTF performance in both dark and light scenes as it’s been carefully calibrated to meet the TB500 certification process, but is limited in its peak brightness capability as we explained earlier. The HDR movie mode is fairly similar, again only reaching the ~537 nits max brightness, although shows a little more roll-off in mid tones which leads to a slightly darker image.
We think most users will be interested in the brighter modes which can deliver the full peak brightness capabilities of the panel, offering more impressive and impactful highlights in darker scenes especially. The HDR Game mode shows some over-brightening of mid to light shades in overall dark scenes which is a familiar approach on OLED monitors, leading to a brighter appearance but some loss of tonal detail in those situations. This over-brightening is done to compensate for the brighter overall scenes and avoid unnecessary dimming there, and the EOTF tracking remains good in those situations as a result. The Peak 1500 mode with HyperNits enabled behaves in a similar way, although is slightly darker.
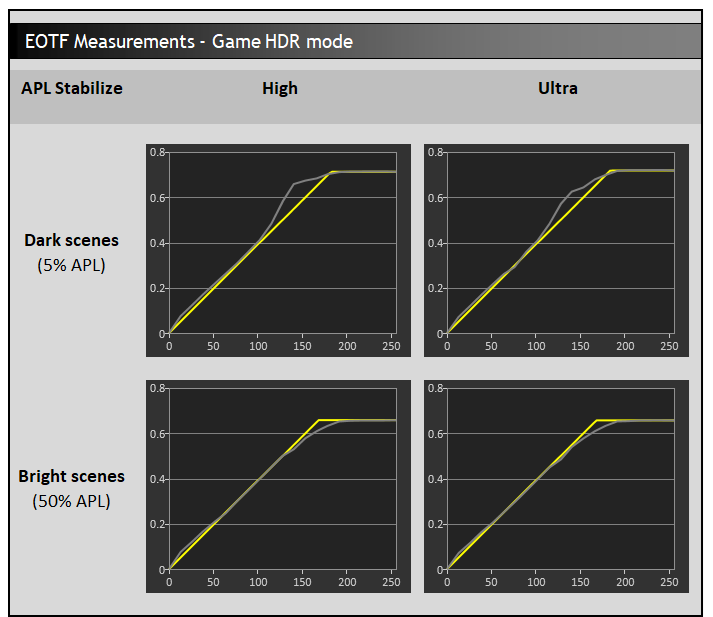
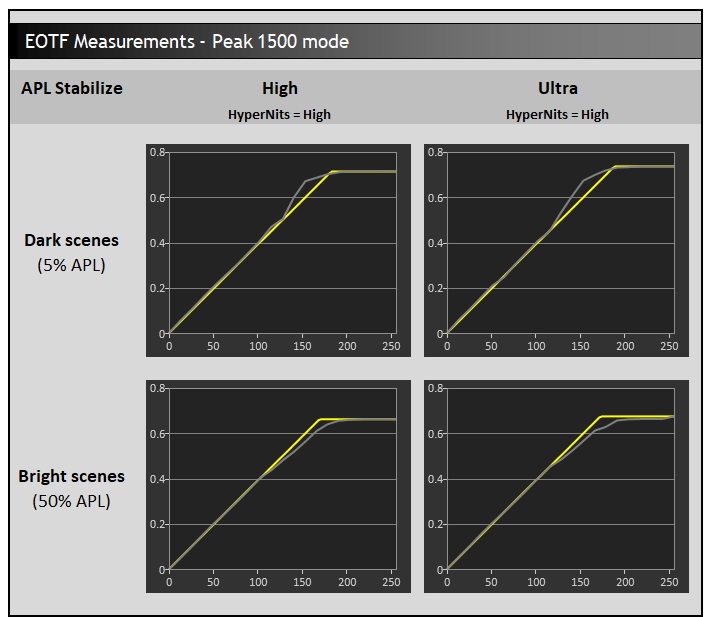
We should also quickly touch on a new APL Stabilize setting available in HDR which is called ‘Ultra’ in the menu. This seems to provide a very small additional boost in brightness compared with the High setting, but it’s very minor overall.
Real Scene Brightness
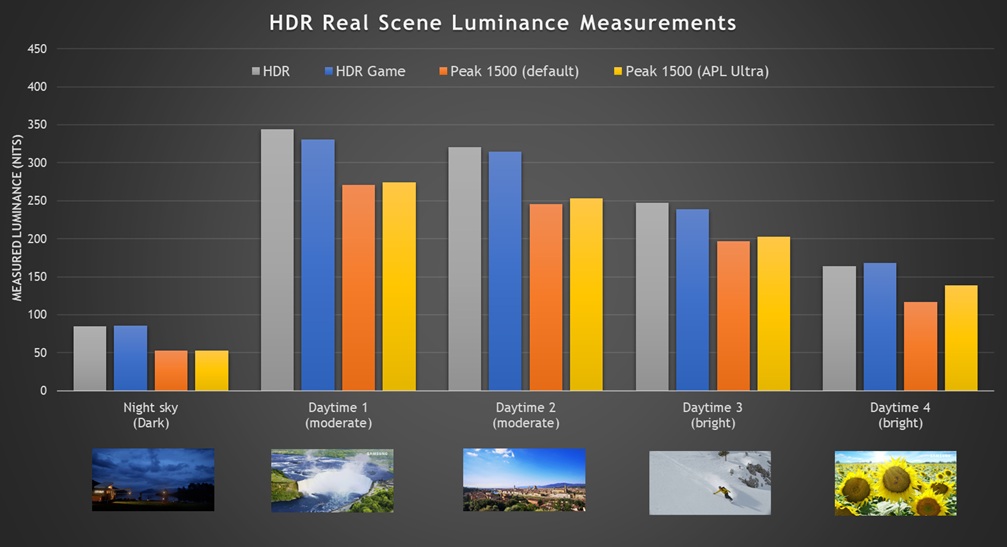
Measuring various real scenes allows us to compare the actual brightness in more detail. You can see that the standard HDR mode (akin to a True Black certified mode) and the HDR Game mode are very similar to one another in overall brightness in most scenes. The standard HDR mode is more accurate and shows some additional detail in certain situations, but the HDR Game mode offers considerably higher brightness for highlights in dark scenes. The Peak modes are a little bit darker in most situations but not by much, and the HyperNits feature has certainly helped that mode improve its brightness compared with if you turned that off. See our HyperNits article for loads more information on that.
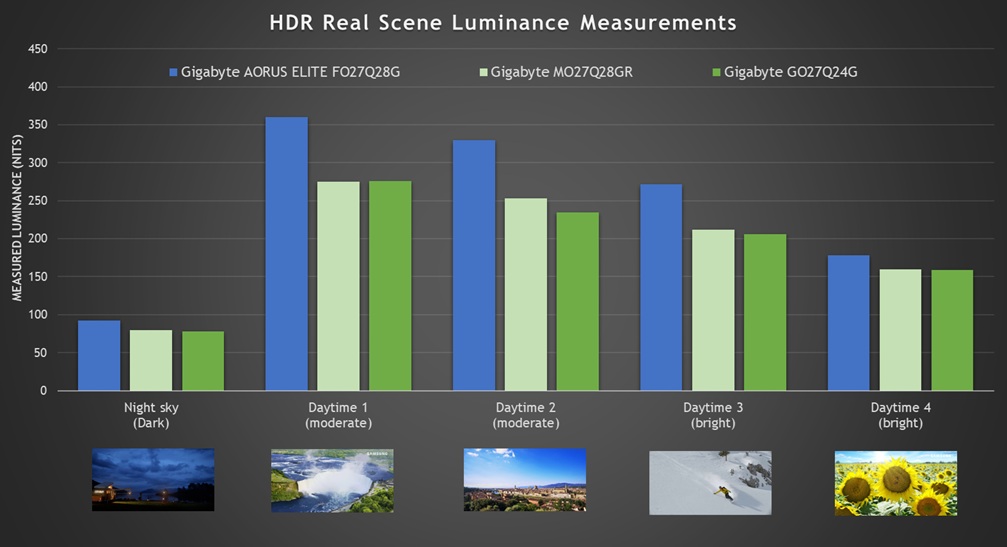
You can see also that there are some improvements to overall HDR brightness on this new AORUS ELITE model compared with the MO27Q28GR (using the same Tandem WOLED panel), and the GO27Q24G (previous gen WOLED). It looks like Gigabyte have further optimized real-world brightness for the new series, probably assisted by the improved cooling design as well.
EOTF and Greyscale Measurements
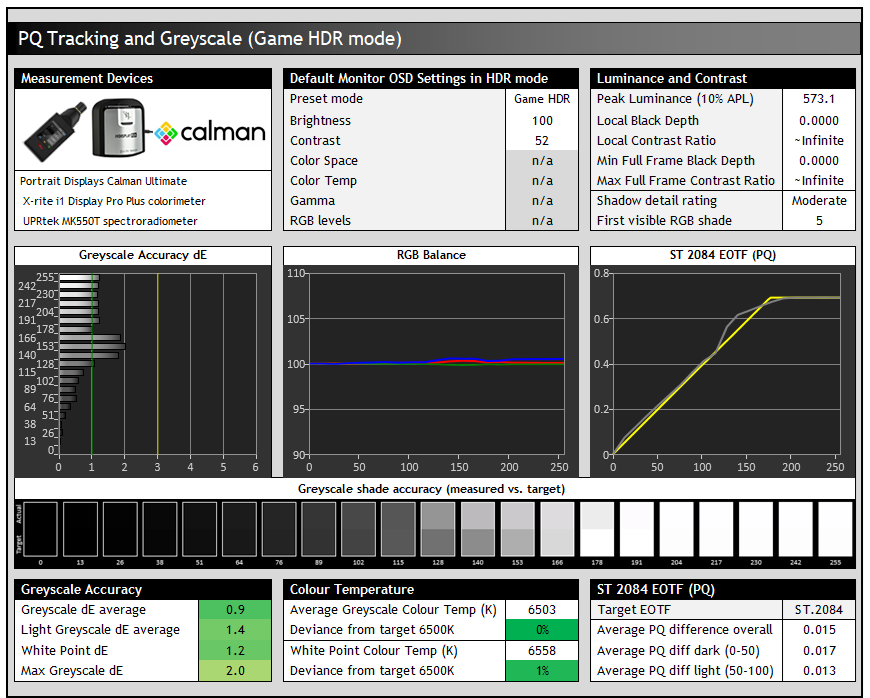
Having settled on the Game HDR mode as our preferred configuration, we measured this in a bit more detail to evaluate the greyscale accuracy and temperature. These results remain consistent in the other modes as well.
There’s an excellent RGB balance in HDR mode with a very good greyscale temp and a white point which was good news. There aren’t any controls for colour temp in HDR mode, just a setting called ‘color enhance’ which can tweak vividness a little. Thankfully the greyscale temp is very good by default anyway and close to D65.
Shadow detail was moderate in HDR mode and varies depending on your refresh rate as we explained earlier. The first visible shade at 280Hz was RGB 5, improving to RGB 2 for 60Hz inputs. The ‘black equalizer’ setting is unfortunately not available in HDR mode as that had worked pretty nicely in SDR for brightening dark content. The ‘Dark Enhance’ setting in HDR is turned on for these results and helps a small amount.
HDR Colours
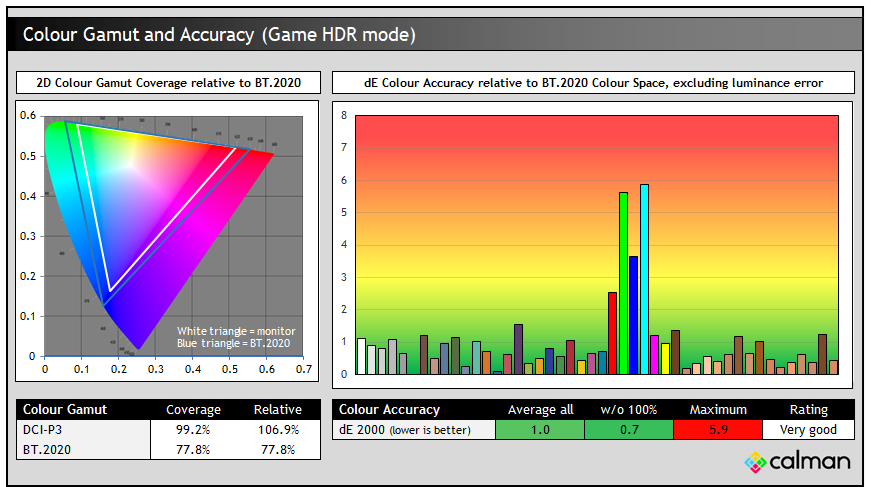
The colour gamut in HDR mode was clamped a little bit compared with native mode, operating very similarly to the DCI-P3 emulation mode and offering a close match to the DCI-P3 colour space used for a lot of HDR content. Colour accuracy was very good overall with dE 0.7 average, if we ignore the 100% primaries from BT.2020 which this panel cannot reach.
Gaming
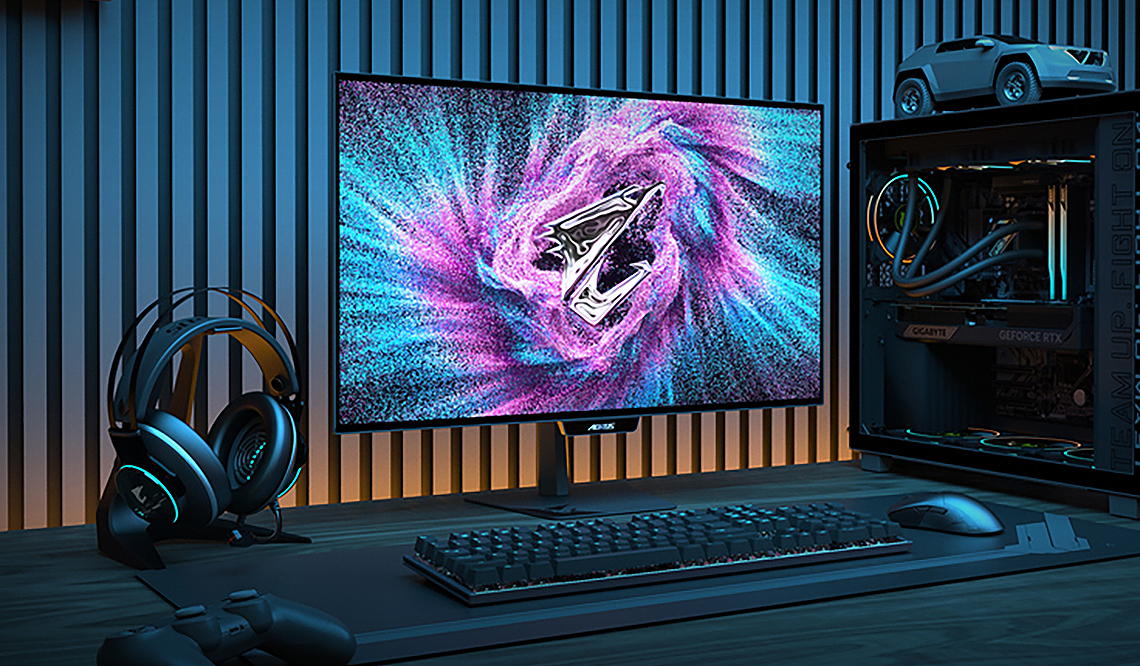
The FO27Q28G is well-suited to gaming, using an OLED panel which is well-known for its near-instant response times and excellent motion clarity capabilities at high refresh rates. It can also support HDR gaming very well with amazing blacks and contrast ratio. The ‘RealBlack Glossy’ coating provides a super clear and clean image although you need to be mindful of the positioning of external light sources relative to the screen to reduce reflections.
| (at native resolution) | Refresh Rate |
| Maximum Refresh Rate DisplayPort | 280Hz |
| Maximum Refresh Rate USB type-C | 280Hz |
| Maximum Refresh Rate HDMI | 280Hz |
| VRR range | 48 – 280Hz |
| ClearMR certification tier | |
The screen has a lower refresh rate (280Hz) than some other recent OLED monitors, which now offer 360 – 540Hz commonly. This is a more mid-tier refresh rate, but it’s certainly not slow and still provides great motion clarity and frame rate support, as well as a small boost compared with the wide range of 240Hz screens on the market. This is the same 280Hz offered on the previous MO27Q28G / GR models as well.
There’s many people who don’t want or need anything higher than this, either because they’re not playing competitively, don’t play games that support super high frame rates, or don’t have a powerful enough system to drive it anyway. Having a lower refresh rate on this new panel helps ensure a more affordable price point too. There’s no dual-mode support on this model either, although if it did have one it would only offer you a lowly 720p mode so it’s unlikely to be missed by most people.
| Other Features | |
| Variable Refresh Rate (VRR) support | AMD FreeSync Premium Pro NVIDIA G-sync Compatible (pending) |
| OLED VRR Anti flicker | |
| Black Frame Insertion (BFI) | |
| Dual-mode support | |
| Gaming extras | Black equalizer Shadow scope Timer FPS counter Tactical Crosshair Tactical Switch Eagle Eye Night Vision Tactical HUD |
| Emulated gaming sizes | 22″W (16:10) 23″W (16:9) 23.6″W (16:9) 24″W (16:9) |
To help support the demands of 1440p @ 280Hz the screen features adaptive-sync, giving Variable Refresh Rate (VRR) support for both NVIDIA and AMD systems which is great news. It has received certifications under the AMD ‘FreeSync Premium Pro’ scheme so far at the time of writing with NVIDIA ‘G-sync Compatible’ certification also listed and pending.
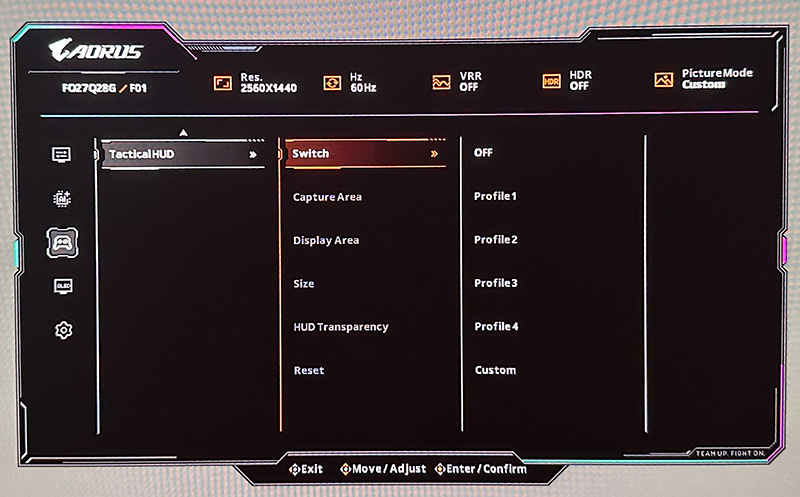
There’s a really wide wide range of gaming settings and extras on offer here too from the ‘Game Assist’ menu and a few options in the main OSD menu. This includes their ‘UltraClear’ mode which operates a black frame insertion function for improved motion clarity in certain gaming situations which we will test in a moment. There’s also an OLED VRR Anti-flicker control, and a useful black stabilizer setting for adjusting darker content.
Of note for the new AORUS ELITE series are the Tactical Crosshair and Tactical HUD features which we explored in our article looking at the new AORUS ELITE series overall. Those could be useful to some gamers.
Response Times and Motion Clarity
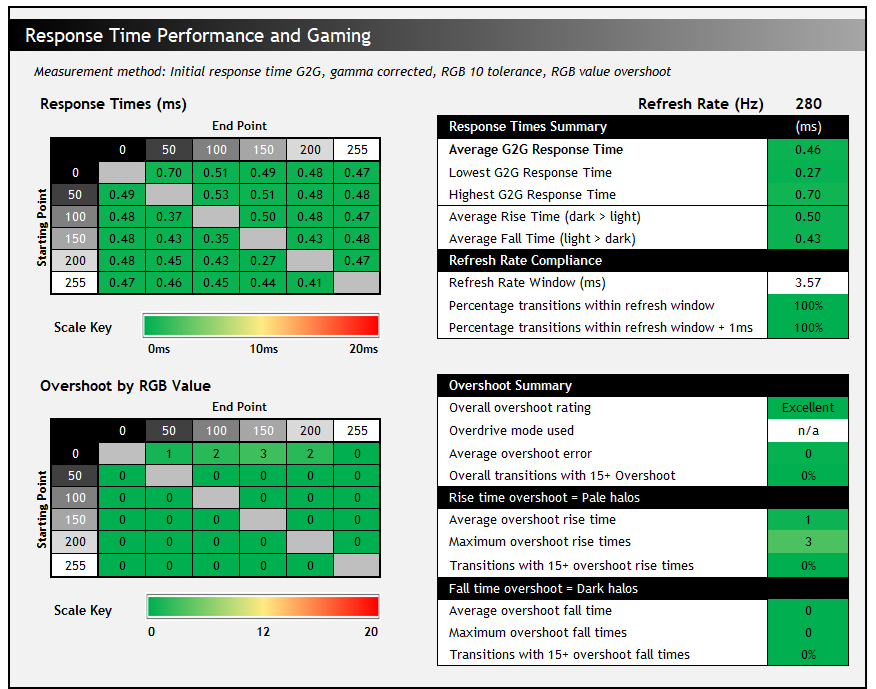
The OLED panel offers the usual near-instant response times you’d expect, and there’s a native 280Hz refresh rate which offers very good motion clarity. Powering these kind of frame rates at 1440p will be easier than on 4K equivalent screens. The panel is exactly the same as the MO27Q28G / GR models so the response time performance and motion clarity are identical.
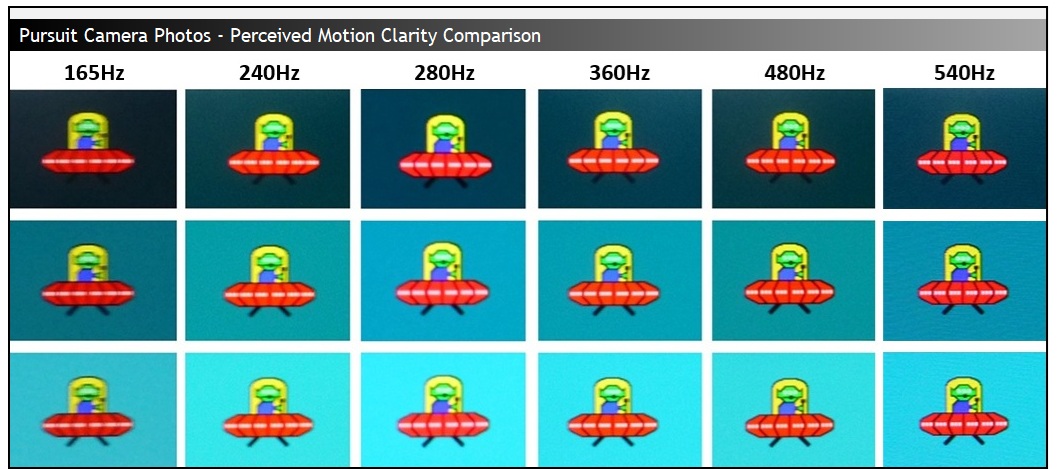
You can find much higher refresh rates from some other OLED monitors now, but let’s not lose sight of the fact though that 280Hz on an OLED is still very good, equivalent in motion clarity to a ~420Hz LCD and likely more than enough for most gamers. If you’re a serious or competitive gamer or focused on taking gaming experience further then other options are available but at a higher price point. The Asus ROG Swift PG27AQWP-W for instance uses the fastest currently available OLED panel and has a 540Hz native refresh rate, plus a dual-mode function for 720Hz at 720p.
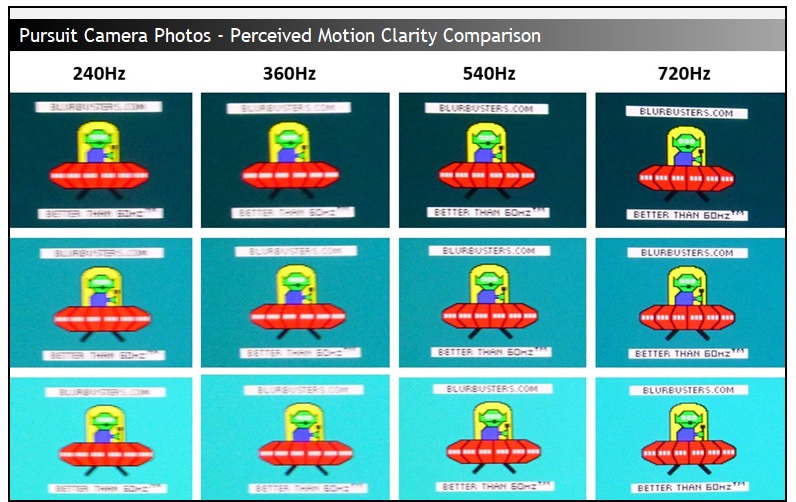
It’s smaller moving details that tend to benefit most from the increases in refresh rate beyond these refresh rates, and we’ve added in some scrolling text to the UFO tests above to capture that above when comparing this monitor to other high refresh rate OLED’s. The moving text becomes much clearer and easier to read by the time you reach 540Hz, and even more so at 720Hz which was truly impressive.
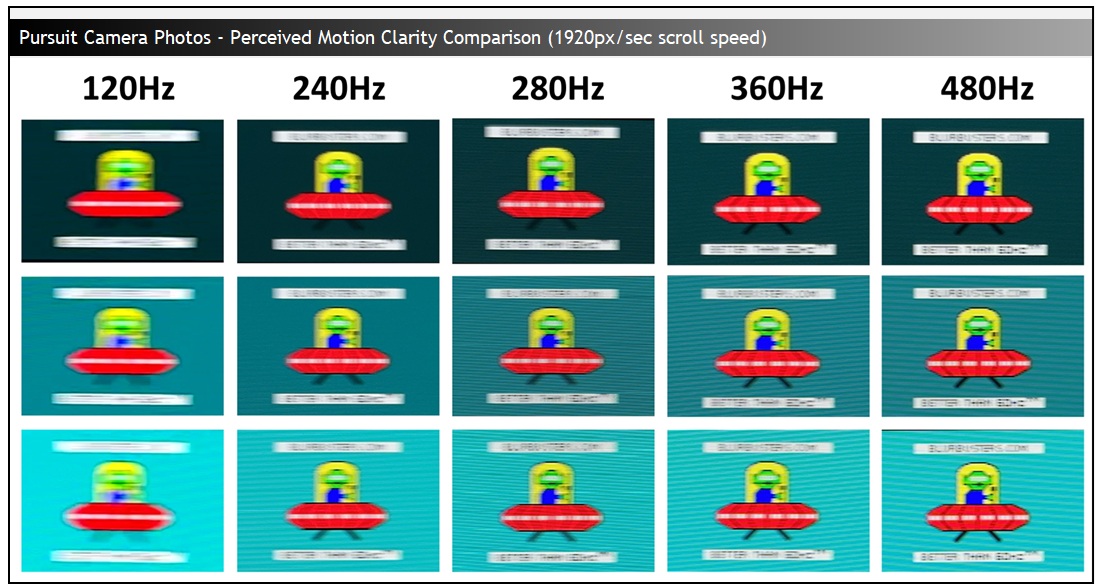
If we consider faster gaming scroll speeds then this is where you can start to see the differences between 280Hz and the higher refresh rates more clearly and so there are certainly benefits for competitive gaming situations by moving up to higher refresh rates.
VRR Flicker
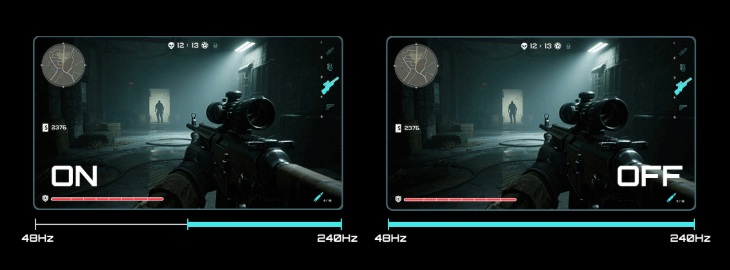
All OLED monitors can show flicker and gamma fluctuations in VRR situations and this is something we studied and tested in detail in our article here. Remember that just because a screen can show flicker, doesn’t mean you’ll necessarily experience it during your usage and from your system. Please see our detailed article for loads more information about this issue on OLED monitors.
Gigabyte have included their recently introduced ‘Anti-flicker’ settings on this screen, with options for ‘off’, ‘middle’ and ‘high’ available in the OSD menu. The screen switches to black for a couple of seconds when you change this setting.
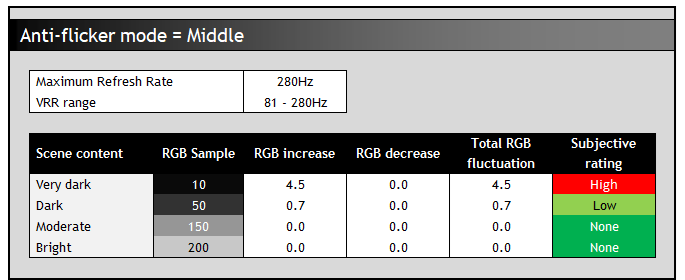
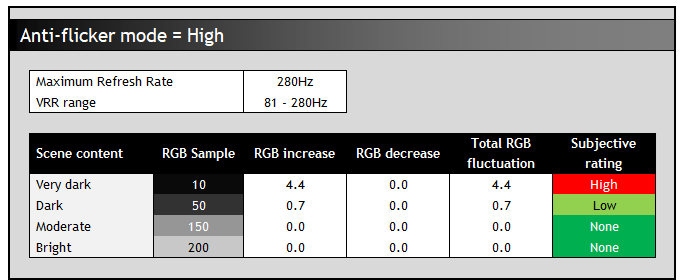

Warning: if you enable VRR anti-flicker, make sure you re-check your graphics card settings to ensure you’re still set to the maximum refresh rate and that G-sync / FreeSync is still active.
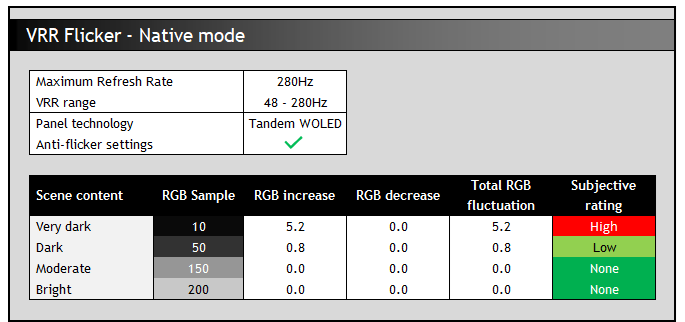
With the anti-flicker modes turned off we saw an active VRR range of 48 – 280Hz with LFC used below that. Like other WOLED technology panels we tested in our detailed study, the gamma response is directly tied to the frame rate during VRR situations and this causes potential flicker.
It is large swings in frame rate that cause the most potential flicker and gamma shift and so the trick with this panel would be to keep frame rates as consistent as possible, at whatever level you can achieve, to reduce the likelihood of flicker. Remember that this data represents the maximum potential flicker, and it would be less with more steady frame rates. We saw the most noticeable flicker in darker scenes and content where it reaches high levels on this screen, with basically none visible in lighter content which was very good. The flicker did seem to be a little improved compared with the MO27Q28G when we tested it previously, but it was close overall.
The anti-flicker modes restrict the VRR range in an effort to reduce the gamma shift that can occur with large frame rate swings. Using the Middle setting just restricts the range a little from 48 – 280Hz to 81 – 280Hz and that has a small impact on total potential flicker since the frame rate doesn’t drop as low, and so the gamma can’t shift as much. The ‘high’ mode didn’t seem to change anything further at all, either in VRR range of in potential flicker severity.

OLED VRR Flicker Explored:
We explore and test OLED VRR flicker. What causes it? Is it the same on WOLED and QD-OLED panels? What can be done to improve it?
[Read here]
UltraClear BFI mode
Like some other recent Gigabyte OLED monitors, the FO27Q28G has an added BFI (Black Frame Insertion) mode for blur reduction. Gigabyte call this ‘UltraClear’ and it’s the alternative to a strobing motion blur reduction backlight you might find on some LCD monitors. Rather than the backlight being strobed off and on rapidly (because there is no backlight on an OLED panel), a black frame is inserted periodically in to the image instead.
| Motion Blur Reduction Mode | ||
| Motion Blur Reduction mode / BFI | | |
| Refresh rates supported | 120Hz only | |
| 60Hz single strobe operation | | |
| Blur reduction available with G-sync/FreeSync VRR | | |
| Available in SDR mode | | |
| Available in HDR mode | | |
| Viable with games consoles | | |
| Lag penalty | ~3.17ms | |
| Brightness capability (SDR, max refresh rate supported) | ||
| Independent brightness level | | |
| Brightness adjustable | | |
| Maximum luminance (nits) | 165 nits | |
UltraClear mode is available only in limited scenarios as it is on other OLED monitors. It can only operate at 120Hz on this screen, so not quite half the native refresh rate (140Hz). You also have to disable adaptive-sync VRR in the menu first, and so the operation remains pretty clunky. It’s only available in SDR and not in HDR too like on other Gigabyte OLED monitors with this feature that we’ve tested.
With UltraClear enabled, the brightness control is at least still available all the way up to 100, but annoyingly it’s not remembered independently to the off state which makes it a bit frustrating as you have to change it each time you enable or disable this mode. We’d like to see independent memory between on/off modes for brightness in the future.
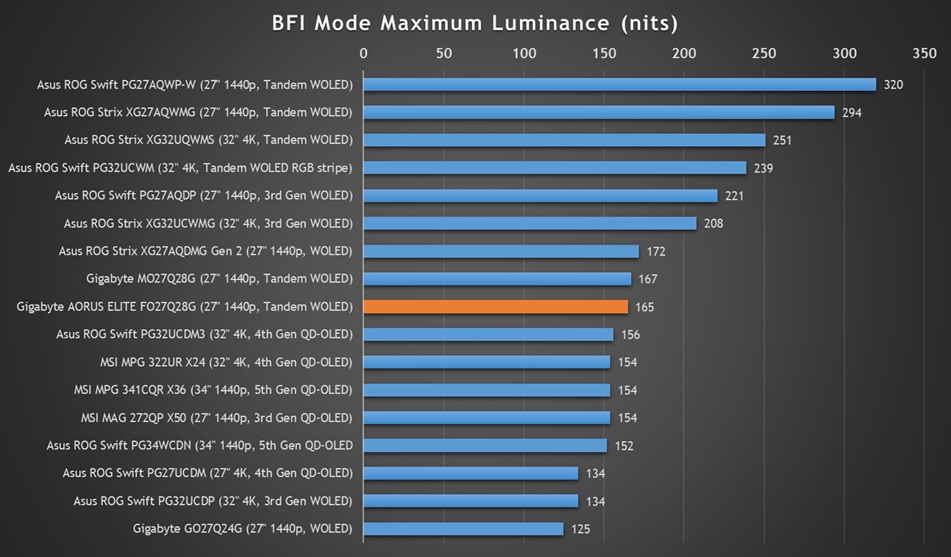
We measured a maximum brightness of only 165 nits in UltraClear mode, and it operates with a uniform brightness behaviour (no ABL dimming) at all times on this screen which is why it’s a little lower than some other models. You do not have access to the ‘APL Stabilize’ setting when using UltraClear mode, so you cannot disable this.
It’s basically identical to the MO27Q28G, not surprisingly given they use the exact same panel. The Asus equivalent screen (XG272AQWMG) reached up to 294 nits peak in their equivalent ELMB mode, but that had ABL dimming and brightness dropped for full screen white for instance which makes it very similar to this Gigabyte screen in many situations.
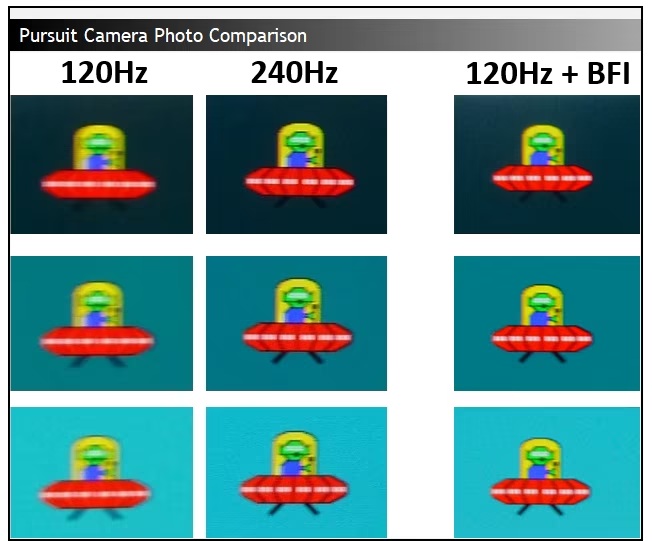
Pursuit camera photos captured at 960 px/sec scroll speed
Above is the perceived motion clarity of the screen at 120Hz and 240Hz when running in normal mode, and then also at 120Hz with UltraClear enabled. You can see that the motion clarity looks the same at 120Hz with UltraClear as it does at 240Hz with the mode turned off. This is to be expected given the 50:50 duty cycle of the BFI function. This clarity is the same across the entire screen though thanks to the super-fast response times of the OLED panel, you don’t need to worry about which area of the screen is the cleanest and clearest, like you do on an LCD screen with a strobing blur reduction backlight.
UltraClear use-cases
This mode can help improve perceived motion clarity at 120Hz nicely, and so might be useful if you can only power up to around 120 fps from your system, or if you’re using a device which only supports that refresh rate maximum, such as a modern games console. You could game at 120Hz and use UltraClear in that mode to bump your motion clarity up to the equivalent of 240Hz – a shortcut if you will to reaching 240Hz-like motion clarity.
If your system is more powerful, you can get the same motion clarity if you stick with 240Hz and can reach up to 240fps. That’s along with the improved latency and frame rates that running that high will offer. You can also then use VRR and other settings, so if you can power the screen at that level you will probably want to try and just use the screen in normal mode instead where possible. Had this BFI mode also been available at 280Hz, it could have offered another step up in motion clarity, reaching 560Hz-like levels. Sadly it’s only possible at half the native refresh rate at the moment.
Lag
Read our detailed article about input lag and the various measurement techniques which are used to evaluate this aspect of a display. The screens tested are split into two measurements which are based on our overall display lag tests and half the average G2G response time, as measured by our oscilloscope. The response time element, part of the lag you can see, is split from the overall display lag and shown on the graph as the green bar. From there, the signal processing (red bar) can be provided as a good estimation of the lag you would feel from the display. We also classify each display as follows:
Lag Classification (updated)
- Class 1) Less than 4.17ms – the equivalent to 1 frame lag of a display at 240Hz refresh rate – should be fine for gamers, even at high levels
- Class 2) A lag of 4.17 – 8.33ms – the equivalent of one to two frames at a 240Hz refresh rate – moderate lag but should be fine for many gamers. Caution advised for serious gaming
- Class 3) A lag of more than 8.33ms – the equivalent of more than 2 frames at a refresh rate of 240Hz, or 1 frame at 120Hz – Some noticeable lag in daily usage, not suitable for high end gaming
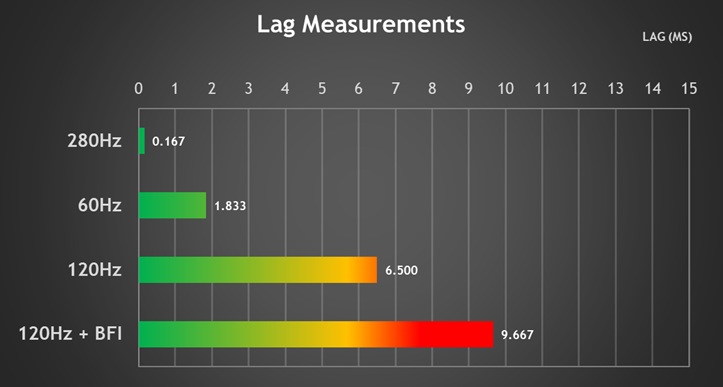
There is an extremely low lag at native refresh rate, measured at 0.167 ms total display lag, and leaving us with only 0.05 ms of estimated signal processing lag which is basically nothing and is perfectly fine for competitive gaming situations. There’s only a little bit more at 60Hz (1.83ms) which is very good, but unusually 120Hz seems to be a bit slower still (6.5ms) from our testing.
The UltraClear BFI mode adds ~3.17ms of additional lag compared with the native 120Hz mode which is not too bad, although total 120Hz + BFI lag is getting reasonably high now.
Console Gaming
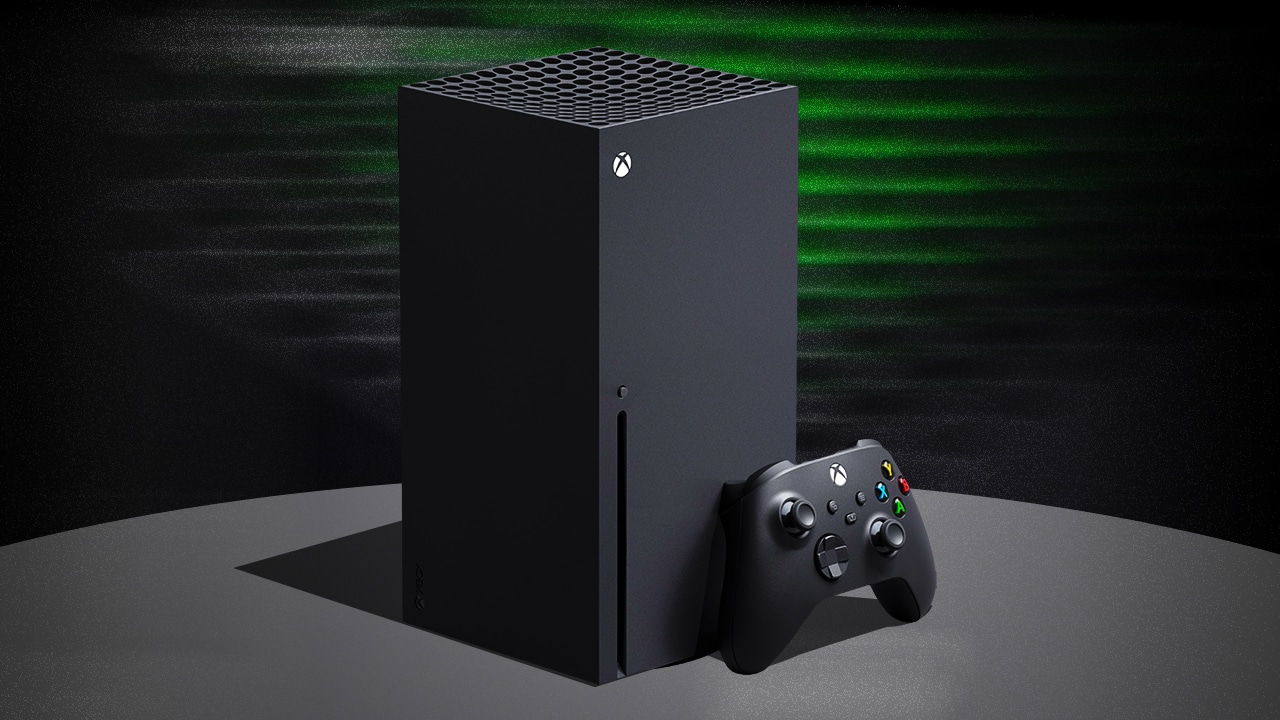
The screen has a native 2560 x 1440 resolution (1440p) panel, but can accept a “virtual 4K” input signal, allowing for wide support of modern games consoles. Importantly this allows for HDR support from an Xbox Series X which can only run in HDR mode at 4K.
| Console Gaming | |
| Native panel resolution | 2560 x 1440 |
| Maximum resolution and refresh rate supported | 4K 120Hz |
| Virtual 4K support | |
| 4K at 24Hz support | |
| 4K at 50Hz support | |
| HDMI connection version | 2.1 |
| HDMI connection bandwidth | 48 Gbps |
| HDMI-CEC auto switch | |
| VRR (variable refresh rates) | |
| Auto Low Latency Mode (ALLM) | |
| HDR10 support | |
| Dolby Vision HDR support | |
| Blur reduction mode available | at 120Hz |
| Integrated speakers | |
| Headphone connection | |
| eARC sound over HDMI | |
| Ultra high speed HDMI 2.1 cable provided | |
We confirmed via an Xbox Series X that 4K 120Hz works fine along with HDR10 support and features like VRR and ALLM. You can use the UltraClear blur reduction mode when running at 120Hz which is potentially useful to boost motion clarity, and there’s support for 4K 50Hz video content too, but not 4K 24Hz for some reason.
Note that there are no integrated speakers on this model unlike some of Gigabyte’s other screens, and so you’ll need to connect headphones or some kind of external soundbar/speaker system when using a console. There is eARC sound support over HDMI which could be useful for that.
FO27Q28G vs MO27Q28G / GR
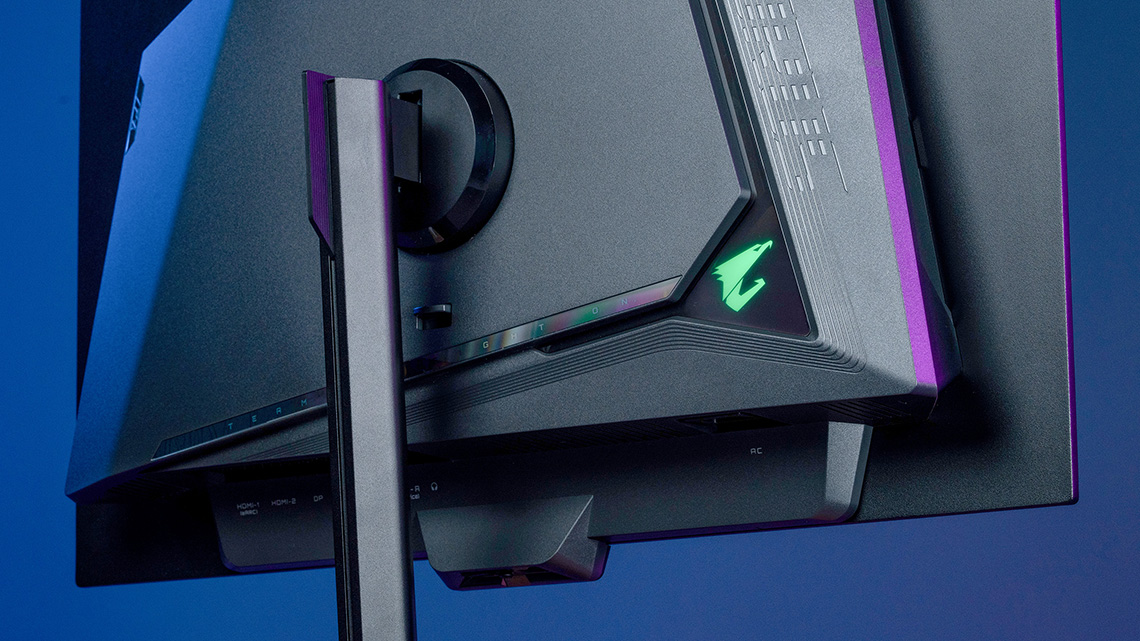
So, let’s try and summarise the differences between this new AORUS ELITE FO27Q28G model and last year’s MO27Q28G / GR model.
| Feature | AORUS ELITE FO27Q28G | MO27Q28G / GR models |
| Panel coating | RealBlack Glossy only | Matte AG and RealBlack glossy options |
| DisplayPort version | DisplayPort 2.1 (UHBR 13.5) | DisplayPort 1.4 (with DSC) |
| USB type-C power delivery | 15W | 18W / 45W dynamic |
| eARC sound over HDMI | | |
| USB-A data ports | (1x service only) | 2x USB-A, 1x USB-B |
| KVM switch function | | |
| Integrated speakers | | |
| Warranty period | 4 years | 3 years |
| Panel cooling | Heat-pipe cooling design | Standard heatsink |
| OSD menu | New design | Old design |
| OLED Care sensor / motion sensor | | |
| Ambient light sensor | | |
| Carry handle | | |
| RGB lighting feature | | |
| Tactical Crosshair | | |
| Tactical HUD | | |
| HDR brightness | Brighter | Not as bright |
The main differences between the two are in design and feature set. You’ll have to decide if you prefer the previous, slightly simpler M-series design or the newer ELITE-series style. There’s a small RGB light feature added, a carry handle on the back, and a smaller foot to the stand which are nice changes. One note is that the ELITE-series model only has a glossy coating option, whereas you can find matte AG and glossy versions of last year’s M-series model. So if you’re after a matte AG coating, you’d need to go with the previous model.
With the new design comes improved heat-pipe cooling, supporting an extra 1 year on the warranty which is certainly welcome, as well as a bit of a boost in HDR brightness it seems. Always welcome! Gigabyte have also added their useful new OLED Care sensor, and the Auto Lock and Adaptive Light features seem to work well and could be useful to many people to protect their panel over time.
Feature set is the biggest change though. For connectivity you’ve gained DP 2.1 which can power the screen without DSC if you want, but the USB type-C connection has taken a bit of a hit in max power delivery capability. You’ve lost USB data ports and the KVM switch function, as well as the integrated speakers, but on the other hand you’ve gained eARC sound over HDMI so if you were planning to use an external sound system anyway, that may be a useful new feature. There’s an updated OSD menu design and a couple of new gaming extras that could be useful to some people.
Conclusion
The FO27Q28 is another very good all-round OLED monitor with an excellent spec, modern panel and attractive price point. 27″ 1440p 280Hz remains a very enticing mid-tier spec in this market, and it’s interesting to see Gigabyte bring this panel to their new AORUS ELITE series of screens, offering a tried and tested panel as one of the first models released. There’s very good gaming performance, lots of accurately configured modes for work and general use, strong HDR performance with lots of modes available, and a great range of extras like the UltraClear BFI feature. There are still some challenges with near-black banding and variable gamma on Tandem WOLED panels to keep in mind though, but that’s consistent with other panels of this tech.
As part of the new ELITE series we like the new OLED Care sensor, the improved cooling design and the addition of eARC audio on the new range, and along with the extended 4 year warranty on this particular model, those are all welcome updates and improvements for sure. Additional features like the new Tactical gaming settings will also be useful to some gamers we’re sure. It is however a shame to lose a few of the features from the M-series models, namely the USB-A data ports, KVM switch and speakers, but these have presumably been removed here to help keep retail costs close to the M models, despite adding those other new features and the new series design.
| Buy these screens here (affiliate links) |
| MO27Q28G (matte) |
| MO27Q28GR (glossy) |
| FO27Q28G (new model, glossy) |
We’ve compared these models pretty extensively in this review, and since this new screen uses the exact same panel as the previous model, and so most of the performance is the same. So really the decision will come down to which features you will personally find more useful, and the price you can buy each model for.
With the product page now live, it’s expected to be available during Q4 2026. We’re told that the MSRP should be $599 USD, making it in theory $100 more than the MO27Q28G which has an MSRP of $499 USD. However, the M-series model is often on sale so the price difference may be more substantial. You can check latest pricing and availability for each model in your region using our affiliate links above.

| Pros | Cons |
| OLED Care sensor, heat-pipe design, extended warranty and eARC audio are welcome updates for this new series | Missing a few features that were included on the previous M-series models |
| Great performance from Tandem WOLED panel | Some general Tandem WOLED tech concerns with grey banding and variable gamma to be aware of |
| RealBlack glossy coating provides a super clear image and deep blacks | Glossy coating may not be for everyone – no matte AG option of this screen offered |
We may earn a commission if you purchase from our affiliate links in this article- TFTCentral is a participant in the Amazon Services LLC Associates Programme, an affiliate advertising programme designed to provide a means for sites to earn advertising fees by advertising and linking to Amazon.com, Amazon.co.uk, Amazon.de, Amazon.ca and other Amazon stores worldwide. We also participate in a similar scheme for Overclockers.co.uk, Newegg, Bestbuy , B&H and some manufacturers.