Asus ROG Strix XG32UCWMG
Introduction
In the last 18 months or so we’ve seen a wide range of 32″ 4K OLED monitors released to market, ranging from some of the earliest QD-OLED panel offerings like the Asus ROG Swift PG32UCDM, to the WOLED panel, dual-mode offerings like the ROG Swift PG32UCDP that came a bit later on. Users have had their choice between the two competing OLED panel technologies, depending on their preference in several performance areas and features.
One common consideration for users has been whether they prefer the semi-glossy screen coating finish (glossy appearance with some anti-reflective properties) of the QD-OLED panels, with a sharper and clearer image that “pops” a little more. Or whether they prefer the matte anti-glare (AG) coating from the WOLED panels, with better reflection and glare handling but a more grainy appearance. That glossy vs matte decision has been a deciding factor for many people, but now Asus are looking to offer an alternative in the busy 32″ OLED monitor space.
The new ROG Strix XG32UCWMG that we have with us now for review is the World’s first 32″ 4K OLED monitor to use a glossy screen coating from LG.Display on one of their WOLED panels. It’s the same underlying panel as that which was used on the PG32UCDP last year – so 32″ 4K resolution, 240Hz refresh rate and a dual-mode function – but this time with a glossy screen coating instead of the traditional matte AG coating. Asus are the only manufacturer offering this option at this time, and it’s an exciting addition to this segment. Not only is the coating a glossy finish, but it’s actually a new and improved ‘TrueBlack’ glossy coating, as Asus call it, promising improved image clarity, sharpness and black depth compared with the first generation of glossy WOLED coating that they introduced last year for their 27″ 1440p XG27AQDMG OLED monitor.
We’ll see how this new coating performs and explore the performance of this new monitor in full in this review.
Key Specs
- 31.5″ screen size (32″ class), flat format
- 3840 x 2160 “4K” resolution
- ~140 PPI pixel density
- 3rd Gen LG.Display WOLED panel technology with MLA+
- TrueBlack glossy screen coating
- 240Hz refresh rate with dual-mode (1080p @ 480Hz)
- OLED Care Pro features and Neo Proximity Sensor
- ELMB (BFI) blur reduction mode and VRR Anti-flicker settings
- 1x DisplayPort 1.4 (with DSC), 2x HDMI 2.1 and 1x USB type-C (with DP Alt mode and 15W power delivery) connections
- Auto KVM switch, PiP/PbP support, headphone jack, 3x USB data ports

Alternative Glossy WOLED Models
Asus are actually releasing 3 new models with a 32″ 4K WOLED glossy panel, with differing refresh rate options. There’s the flagship XG32UCWMG that we’re reviewing here which has a 240Hz refresh rate and support for a dual-mode function for 1080p @ 480Hz. There’s also a slightly slower panel, the XG32UCWG with a 165Hz native refresh rate and 330Hz dual mode support. Asus tell us that there will also be a third model with a fixed 240Hz refresh rate.
Pricing will be a little different between all 3 models, so you can choose which one offers you the refresh rate you need at the most appropriate price point for your budget.
Design and Features
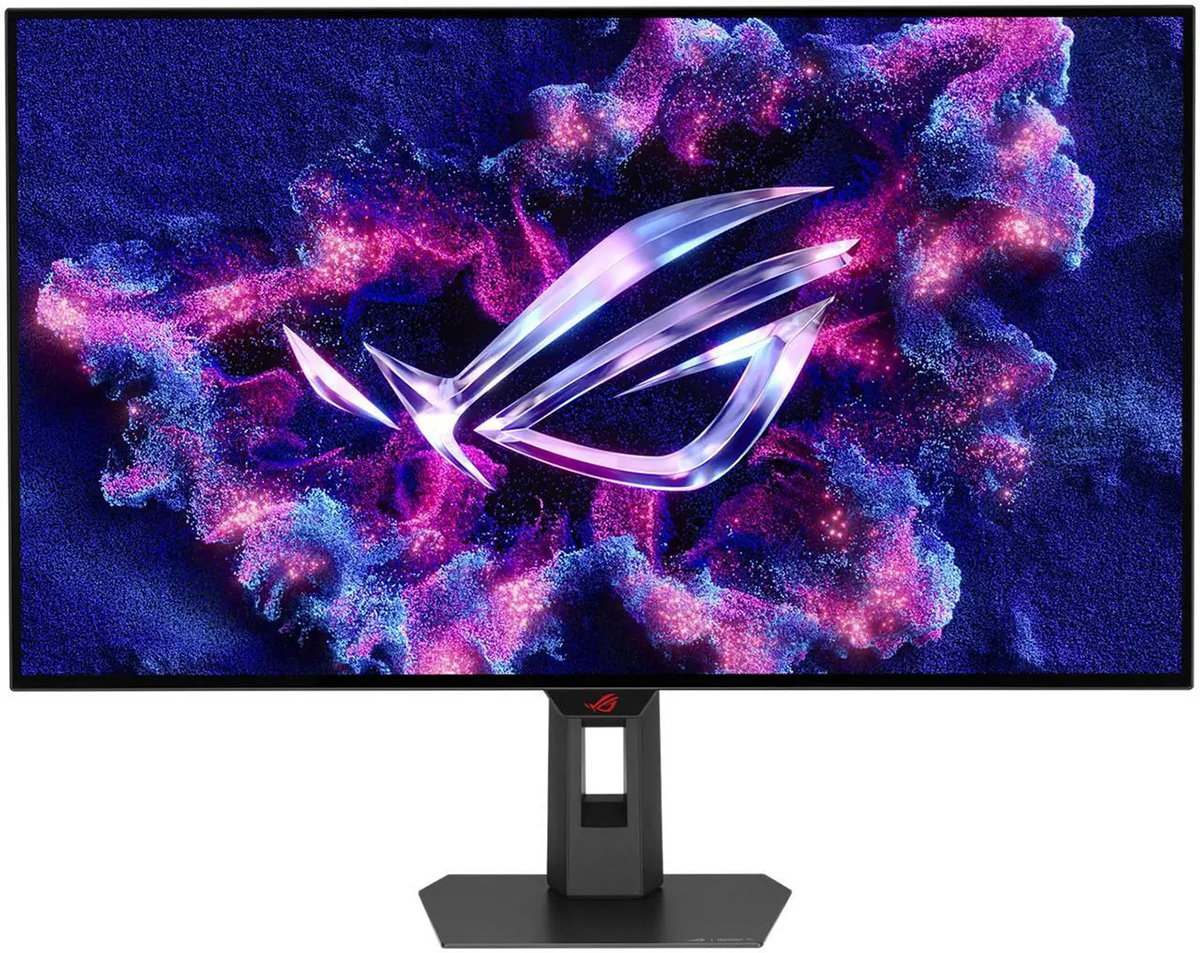
The screen comes in a familiar Asus ROG Strix series design with a 4-side “borderless” panel. There’s a thin black plastic edge around all sides, but then a black panel border before the image starts. The total border measures 9mm along the top and the edges, and 12mm along the bottom. It looks sleek and clean.
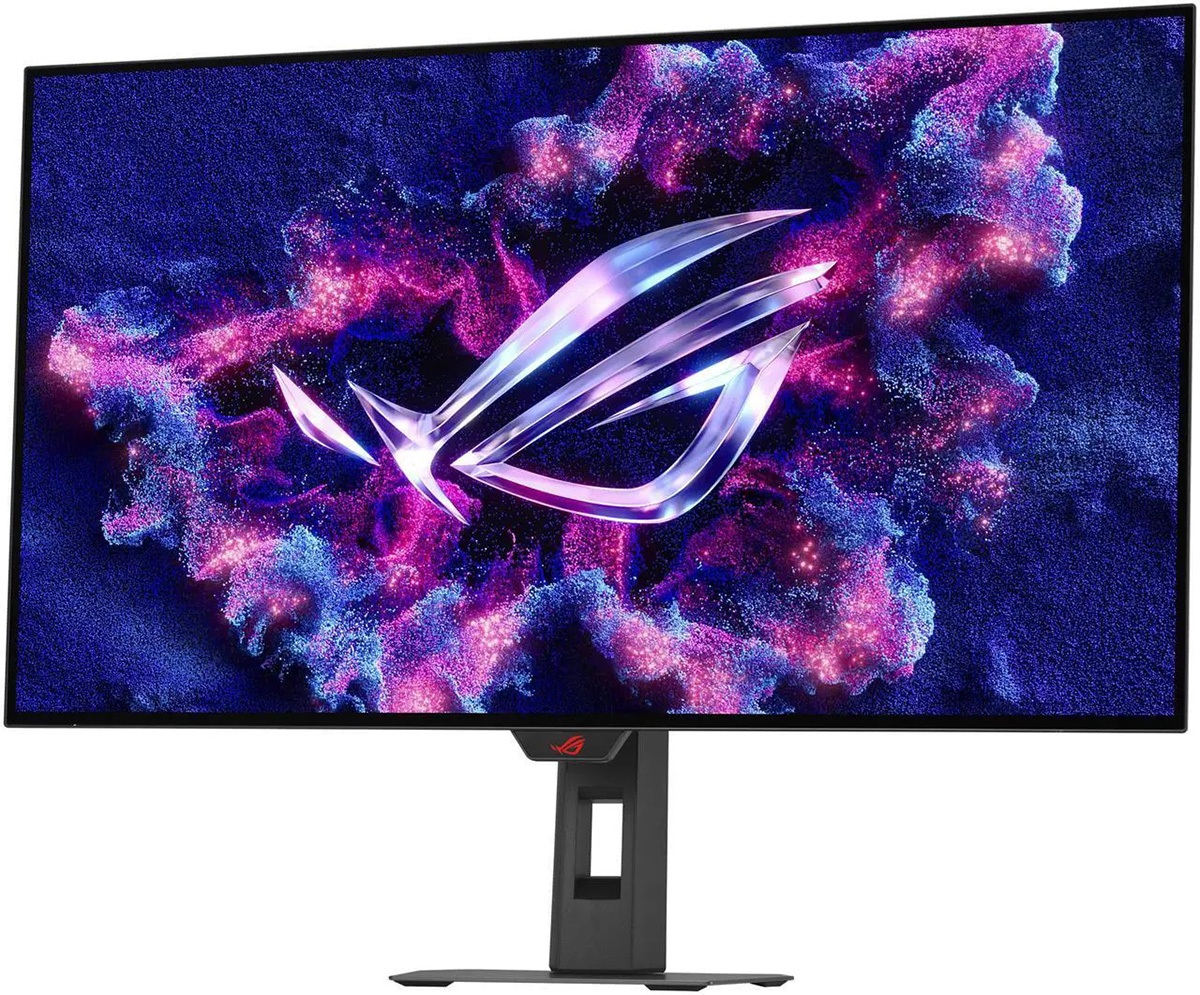
There’s the usual Asus “chin” on the bottom edge, where the OSD control buttons and joystick are contained behind it. The Asus logo light here can be disabled in the menu if you want.
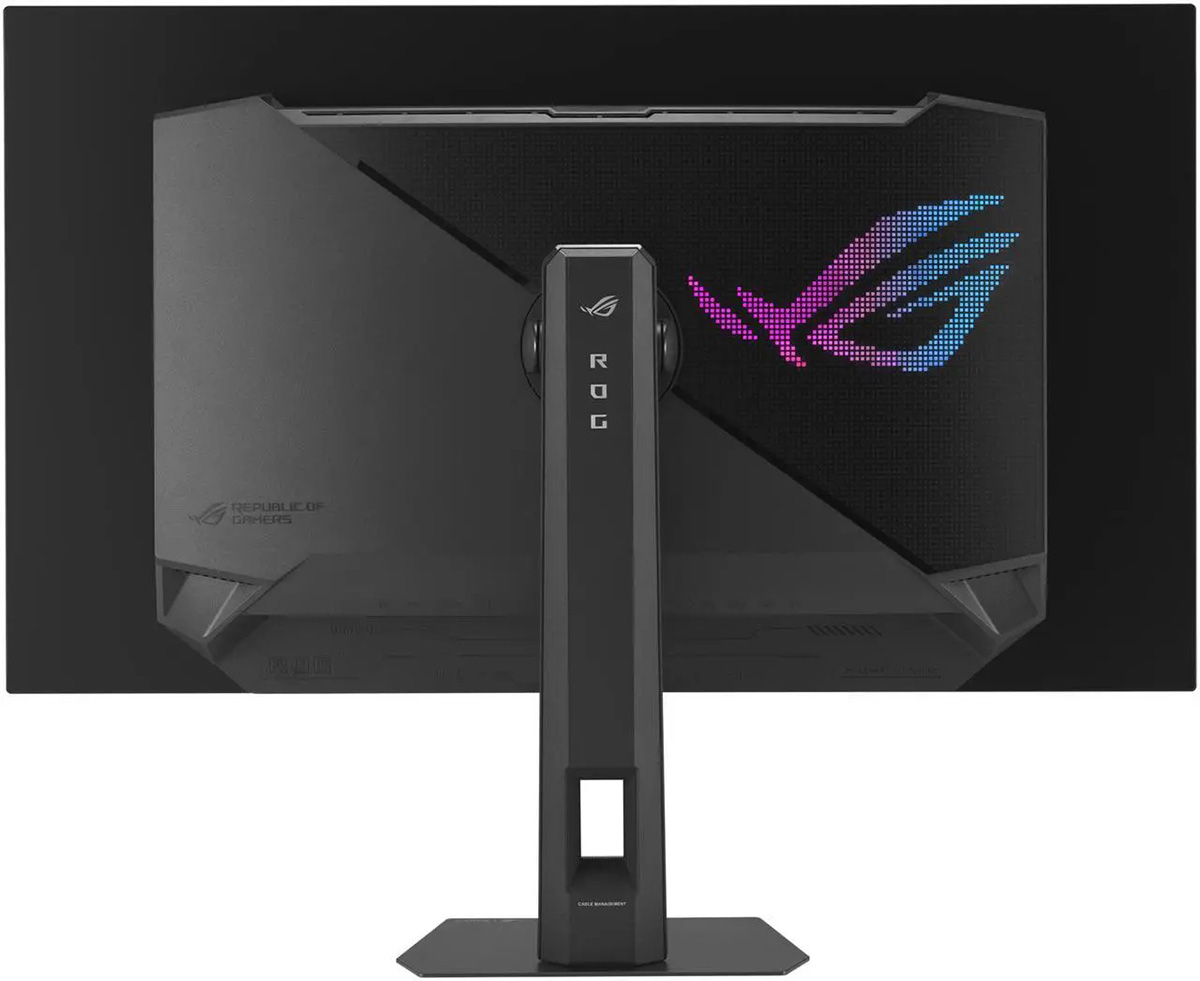
From the back the screen is encased in a matte black and dark grey plastic. There’s an RGB lighting logo on the right hand side as you can see from the photos provided which can be controlled or turned off from the OSD menu. The stand is detachable in favour of VESA 100mm mounting if you prefer.
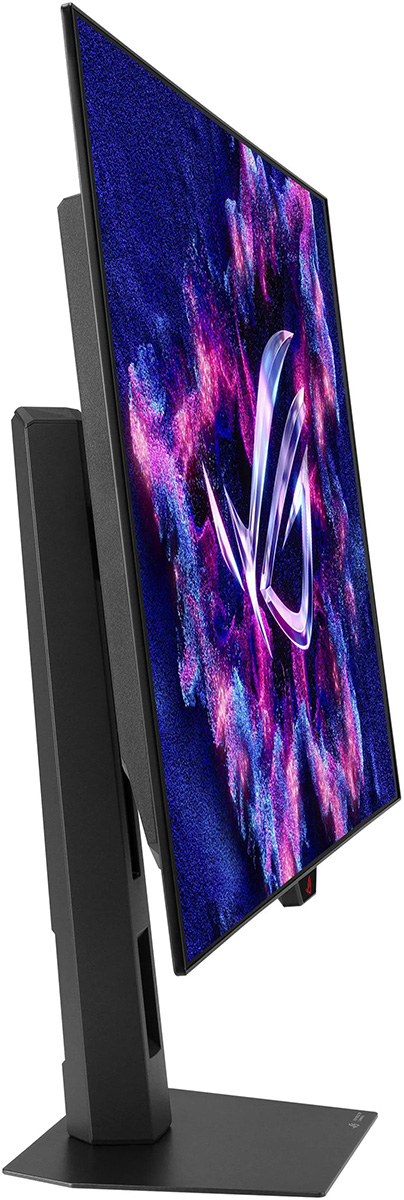
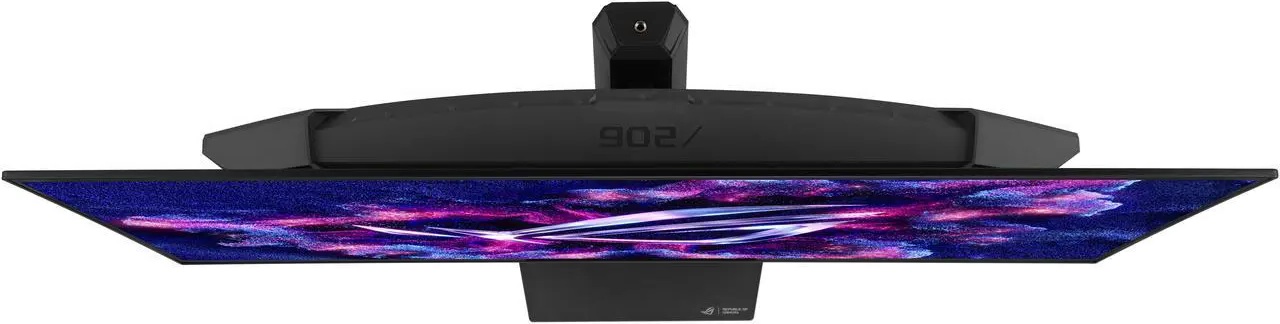
The side profile is a thin around the edges with a bulkier central section where all the electronics and connections are housed. Unlike a few of their other recent OLED monitors we’ve tested, this model features an external power supply brick.
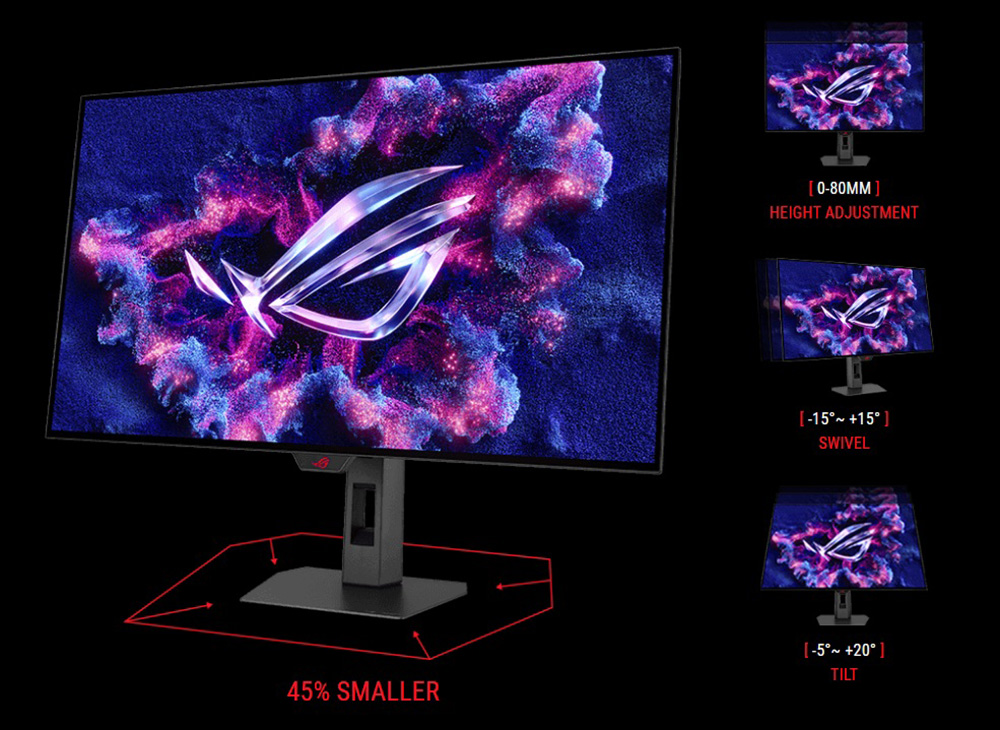
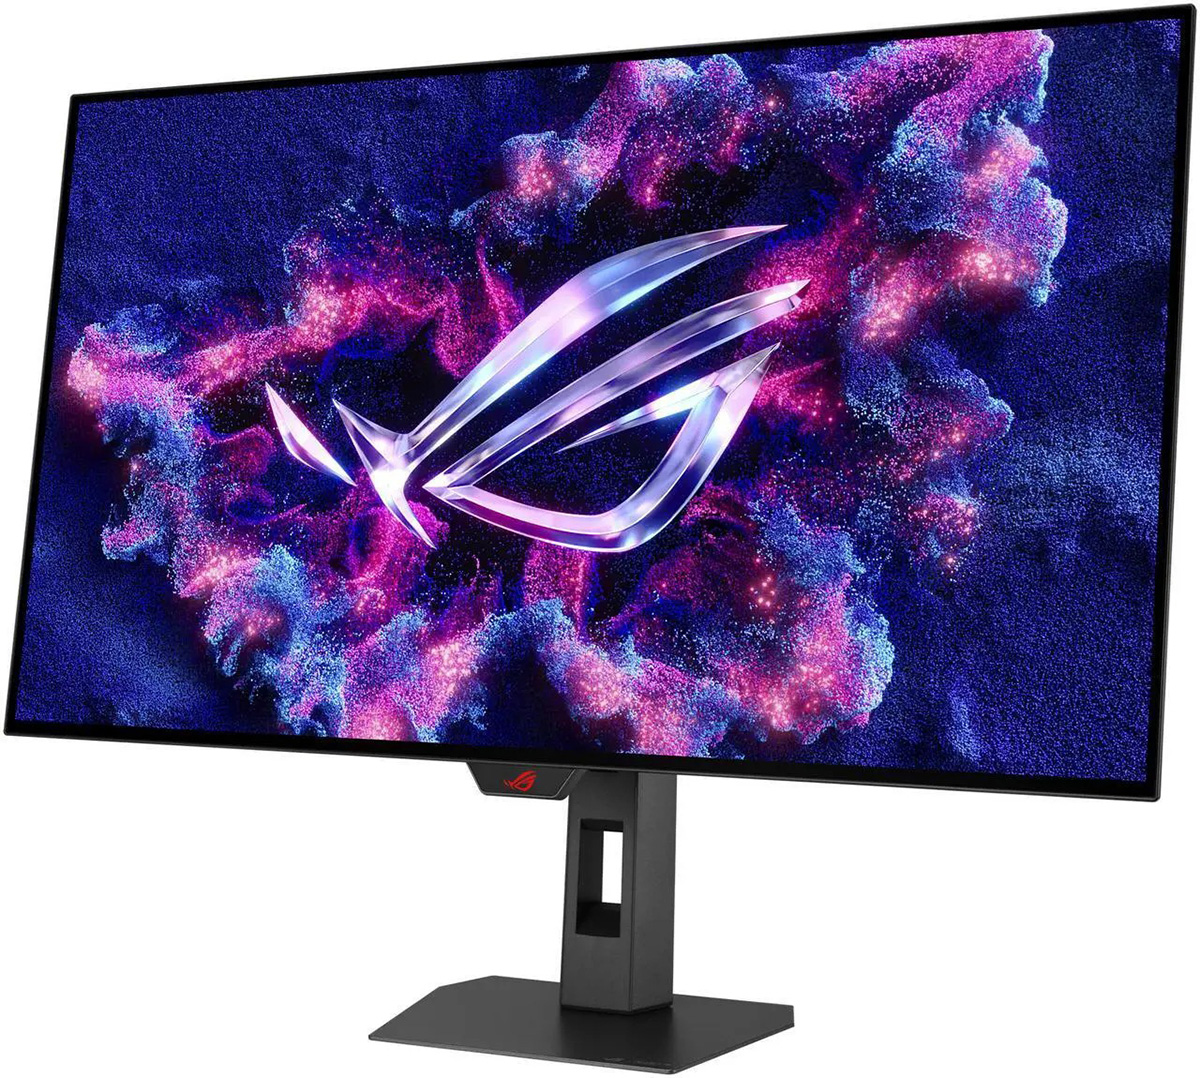
This new screen features a smaller, squarer base to the stand featured on the Asus ROG Strix series, as opposed to the 3-pronged foot of the ROG Swift series. Some people may prefer this as it takes up less room and looks a little less gamer-focused. They’ve done away with the phone holder slot in the base that was featured on the XG27AQDMG 27″ 240Hz glossy WOLED monitor from last year too in an effort to make the base a bit smaller which looks nice. This gives you more desktop space for your keyboard and mouse during gaming.
The stand has a dark grey metal foot, and a dark grey plastic arm, which provides a surprisingly strong and stable base for the large 32″ screen. The stand offers tilt, height and swivel adjustments but no rotate. They’re all pretty smooth and easy to use.

The OSD is controlled primarily through a small joystick toggle on the back of the screen’s “chin” section on the bottom edge. There are also two pressable buttons, one either side of the joystick. One gives you quick access to the ‘frame-rate boost’ dual-mode function by default (explored later), while the other is the power on/off button. You can edit the left hand button via the menu to have a shortcut for something else though if you want. A nice touch is that if you press the power button, it prompts you to confirm you definitely want to turn the screen off, to avoid those accidental power-offs.

There is also some quick access to key settings via the directions on the joystick which you can customise in the menu, or if you press the joystick in you can enter the main menu. Navigation is quick, snappy and intuitive thanks to the joystick controller. There were a decent range of settings and options available too. The screen supports user-updatable firmware too.
| OSD Menu | |
| Joystick toggle controller | |
| Quick and snappy | |
| Intuitive to use | |
| User updatable firmware |
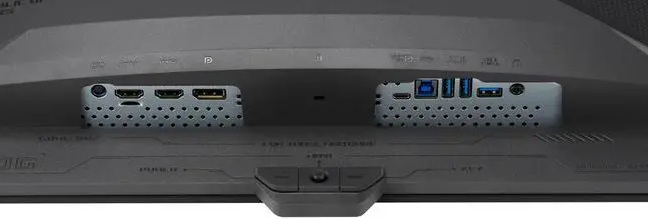
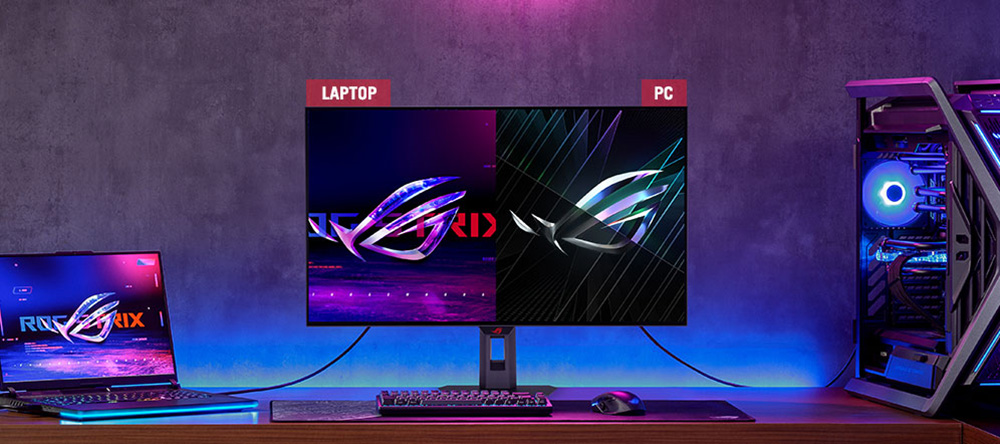
The XG32UCWMG offers 1x DisplayPort 1.4 (with DSC), 2x HDMI 2.1 and 1x USB type-C (with DP Alt mode and 15W power delivery) video connections, along with a headphone jack and 3x USB data ports. An auto KVM switch function is supported for controlling two systems from a single keyboard and mouse setup, and PiP/PbP modes are also available for handling multiple video inputs on the screen at once.
Asus tell us that their ROG Strix range will be used moving forward for those models which offer DP 1.4 connectivity, with the ROG Swift range then being used for those with DP 2.1. The spec here is perfectly capable of being run over DP 1.4 with DSC anyway, so there’s very little need for DP 2.1 on this model and it would only have increased the retail price had it been included. If you’re worried about missing features like NVIDIA DSR/DLDSR etc, check out our recent video investigating DisplayPort 2.1 here. Having DP 1.4 is a non-issue in our opinion for the vast majority of users.
‘TrueBlack’ Glossy Coating
One of the key selling points of this new monitor is the inclusion of Asus’ new ‘TrueBlack’ glossy screen coating, distinguishing it from the competing 32″ 4K OLED models on the market, especially those which use this same WOLED panel and all have a matte anti-glare coating. That includes Asus’s own ROG Swift PG32UCDP that we tested last year.

This is a screen coating applied at the factory by the panel manufacturer LG.Display instead of (not on top of) the matte AG coating, and which has now been improved and enhanced since the first gen glossy WOLED panels from 2024. Asus were the only vendor actually to adopt the original glossy WOLED panel last year, found on their 27″ 240Hz XG27AQDMG monitor. They’ve now adopted this glossy coating here for the XG32UCWMG with the new and improved glossy screen coating option. Asus call this new coating ‘TrueBlack’, not to be confused with the ‘True Black’ terminology used for VESA’s DisplayHDR certifications for OLED panels.
According to the product information, this new coating should offer:
- A zero-haze (0%) optical layer which should remove any slight graininess that was visible on the original glossy WOLED panel from last year for a clean, clear and crisp image. Last year’s panel was rated with a 3% haze finish and we observed some minor grain to the image during our testing.
- Improved blacks in any lighting environment
- A reported 38% drop in ambient reflections “compared to previous-gen glossy WOLED panels” from last year.
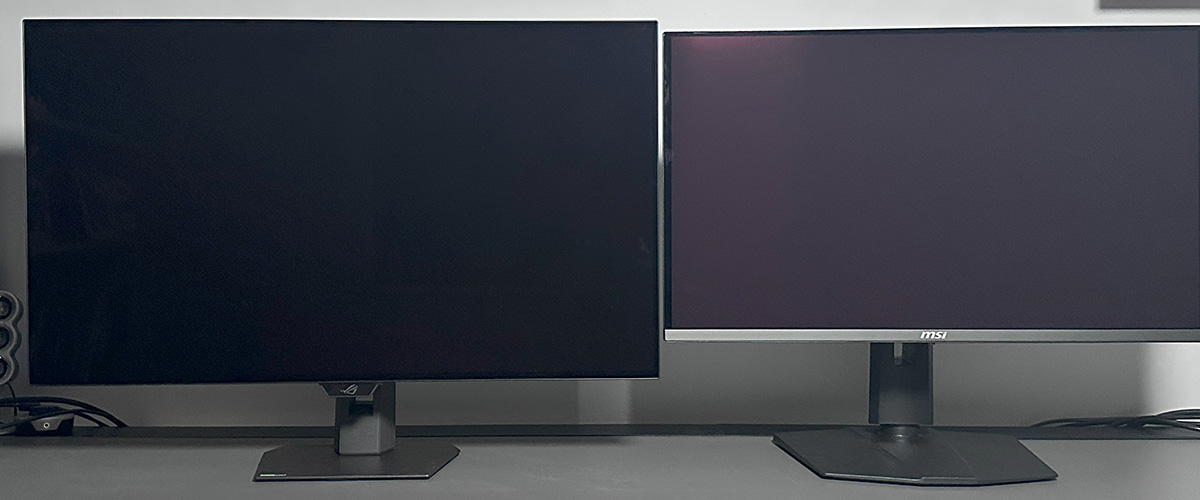
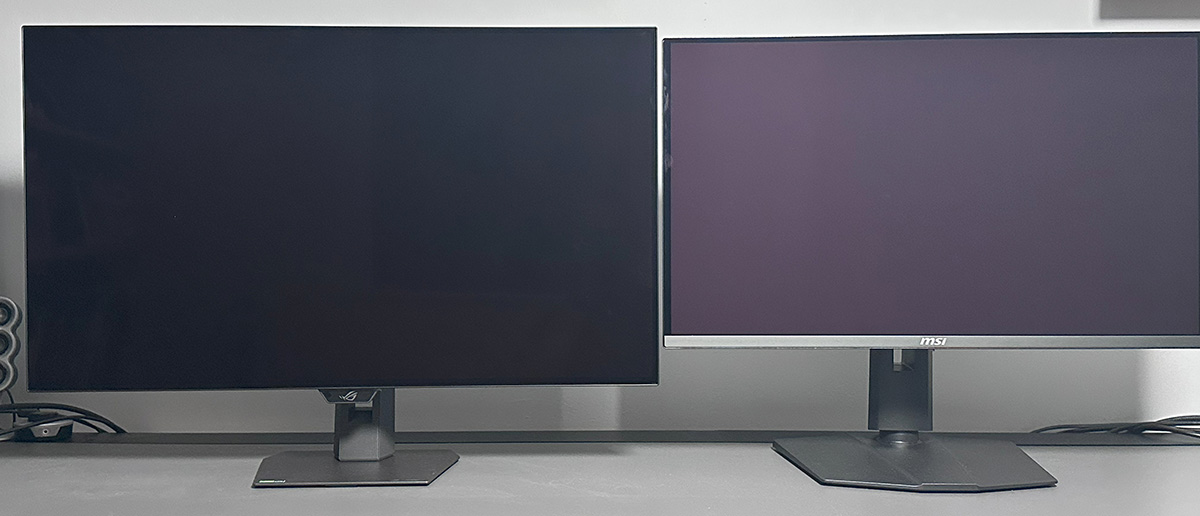
We carried out various side by side tests of the new XG32UCWMG with other panel coating options. That includes 1) the original glossy WOLED XG27AQDMG from last year, 2) another new TrueBlack glossy panels in different screen size found on the Asus’ 27″ XG27AQWMG which also has a 4th Gen WOLED panel, 3) a semi-glossy QD-OLED panel and 4) a standard matte WOLED.
Here’s what we found:
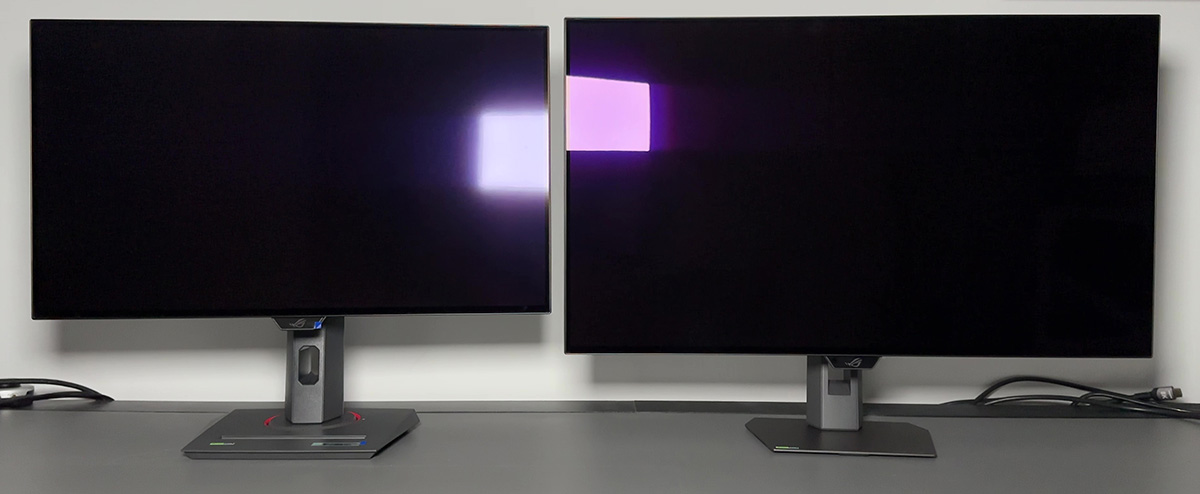
- Graininess is removed entirely – the new 0% haze coating removed any minor graininess that was visible on the older glossy coating, providing a clear and clean image as promised. You can also see this change in the photo above where the light source shining on the screens has a more defined and crisp reflection, whereas the old coating causes some minor haze/diffusion to the reflection. Text and office documents now look super-clear, with no visible grain remaining. This also looks a lot clearer and sharper than a normal matte AG coated WOLED panel.
- There’s a minor pinkish tint to reflections – you can see this from our example photos here where we’re shining the same light source on the screen. The light source looks more white on the old coating, and a little pinkish on the new coating. This only impacts reflections, not the actual image shown on the screen.
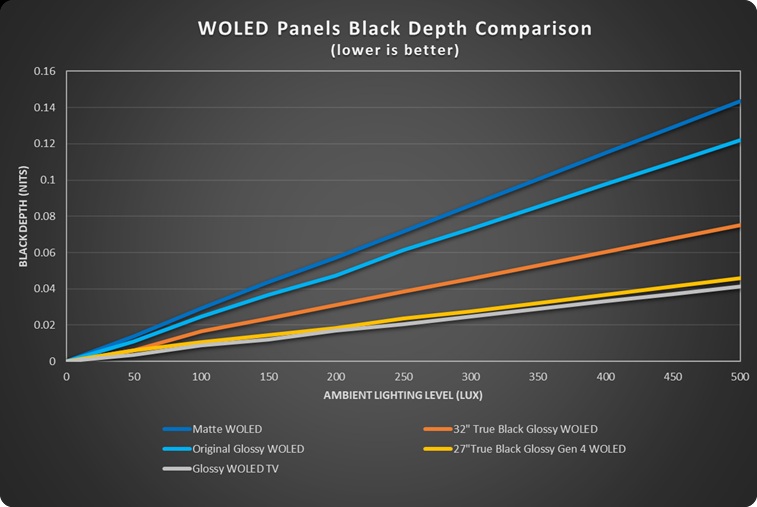
- Black depth was improved – In the presence of ambient light sources the blacks remained a darker and blacker than on the older first gen glossy WOLED coating, which you can see on the graph provided where we measured the black depth in a range of ambient light conditions as per our previous detailed article where we investigated this. On the graph, the lower the line the better in terms of black depth. The orange line represents this new 32″ TrueBlack glossy screen, and this is quite a bit better than the first gen glossy WOLED panel represented by the light blue line. They’re both better than a matte AG coating in this regard, which diffuse light sources across the panel more.
Further improvements can be seen if you combine this TrueBlack glossy coating with a new 4th Gen Primary RGB Tandem WOLED panel (yellow line) as we saw in the recently reviewed Asus ROG Strix XG27AQWMG thanks to the improved internal reflection handling and ‘visual superiority’ technologies of their 4th Gen panels. Those panels reach levels basically on par with WOLED TV’s. - Reflection are improved but you should be mindful – this was very hard to capture in photos but the new coating showed slightly less noticeable reflections than the old glossy coating. There’s still mirror-like reflections to contend with because there’s no AG layer, but the reflection seemed a bit “darker” and less noticeable on the new coating. Some minor improvements there, but you should still be wary of the position of light sources in front of the screen.
Mirror-like reflections are still a challenge on any glossy screen coating, and the matte AG coating doe a far better job of avoiding reflections and glare. You need to be mindful of your external light sources and positioning with a screen like this.
Summary of coating testing and finding the best coating for you
The new TrueBlack coating offers improvements in image clarity, black depth and ambient light handling compared with the previous glossy WOLED panel from last year. The zero-haze finish has eliminated the slight grain that the old 3% haze coating had which is great news, producing a clean and clear image that is now on-par with QD-OLED panels.
The handling of ambient lighting from the TrueBlack coating is improved a bit compared with the older glossy coating, helping to retain black depth a bit more, as well as improving reflection handling a bit. There’s no real drawbacks to the newer TrueBlack coating compared with the original iteration from last year, so if you’re after a glossy OLED monitor, these new screens provide a better overall image. Things can improve even further where the coating is combined with a new 4th Gen WOLED panel like we saw with their new 27″ 1440p XG27AQWMG. This screen still uses a third gen WOLED panel, so the improvements are good, just not as significant.
The coating finish is certainly glossy and this creates a sharp, crisp image without any diffusion of light sources like you’d get on a matte AG coating. Images, colours and blacks “pop” more too. However, the trade-off is that you get more mirror-like reflections from from this coating, so you need to be mindful of your ambient lighting and especially the positioning of light sources and windows. Some people will prefer the image of these glossy coatings, others will find a matte AG coating more appropriate to help eliminate glare and reflections far more than glossy.
TrueBlack glossy WOLED (left) vs QD-OLED (right)
TrueBlack glossy WOLED (left) vs QD-OLED (right)
QD-OLED panels provide an interesting mid-ground with their semi-glossy coating which provides an equally clean and crisp image without any haze or grain. Those panels also include an AR (Anti-reflective) layer which provides some additional benefit to avoid glare and reflections which we like. However, the major drawback of QD-OLED is that you can get raised blacks in the presence of ambient lighting. In a dark room the two technologies look basically the same, but blacks become more grey on QD-OLED as ambient lighting increases. So, on the one hand QD-OLED handles reflections and glare better than these new TrueBlack WOLED glossy coatings, but the TrueBlack coating shows much deeper blacks in a variety of ambient lighting.
At some point we will try and provide a more thorough matte vs glossy, QD-OLED vs WOLED comparison, but for now we can saw that the new TrueBlack coating is superior to the old glossy WOLED coating for sure, and for those seeking a glossy finish, but from a WOLED technology panel instead of QD-OLED, it’s bound to be attractive.
OLED Care

One challenge with OLED panels in general is the inherent risk of image retention and burn-in. It’s a technology more suited to dynamic and changing content, which is why these are largely positioned as gaming and multimedia screens. There is more of a risk of image retention if you are using these screens for lots of static desktop and office use though. Display manufacturers provide a range of measures to help mitigate that risk, and maintain the panel over time and we will talk about the OLED Care measures in a moment.
Asus include a 3 year warranty with the monitor, including burn-in cover which gives some added peace of mind around usage and image retention risks. This is the same as on their other recent OLED monitors.

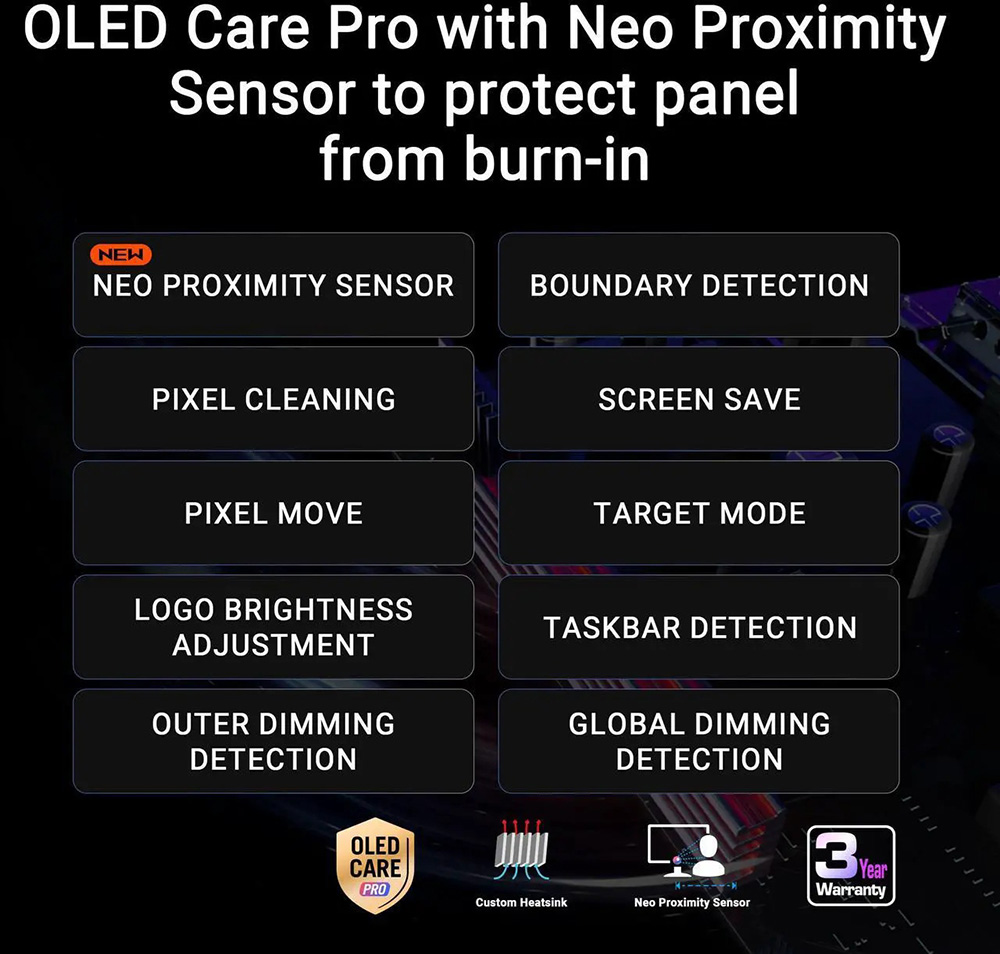
To help mitigate the risks of image retention Asus provide an impressive and expanded set of OLED care options within the OSD menu under their ‘ROG OLED Care Pro‘ features. Familiar options include the pixel shift / screen move which moves the image slightly a few pixels at a time periodically (you can turn this off fully if you want). There’s also a screen saver which dims the screen if there is no change to the image for an extended period of time. There’s also an image cleaning cycle which will run automatically from time to time, or you can run manually in the menu if you want.
| OLED Care and Warranty | |
| Warranty period | 3 years |
| Burn-in cover | |
| Screen saver | |
| Pixel / screen shift | |
| Logo dimming | |
| Taskbar detection | |
| Motion / proximity sensor | |
| Other OLED care features | Outer dimming control Global dimming control |
There’s also some new options we saw on some of their other recent OLED monitors like the PG27UCDM and PG27AQDP for example, but that older OLED screens in their range don’t offer. These include ‘outer dimming control’ and ‘global dimming control’. The former seems to activate the LG.Display CPC (Convex Power Control) feature which dims the edges of the screen, while global dimming control automatically identifies and adjusts the brightest areas of the screen to reduce the risk of burn-in.
An ‘auto logo brightness’ section includes options for ‘logo detection’, as well as ‘taskbar detection’ and ‘boundary detection’. Boundary detection dynamically detects the boundary of the black bars and reduces the brightness and also slightly shifts the pixel of the near borders.
Neo Proximity Sensor

One other new technology Asus have added to the screen is their Neo Proximity Sensor: This highly sensitive TOF sensor allows users to set their preferred usage distance. When the user steps out of range, the monitor will switch to a black image (i.e. turn off the pixels) to reduce the risk of burn-in, and restores on-screen content when you return to it. You can also customize the detection distance quickly and easily.
We’ve been saying for a while that we’d like to see more motion/proximity sensors on OLED screens, and it’s great to see Asus include that here like they had on some of their other recent OLED monitors, taking it a step further with the advanced distance detection which is great to see.
- Additional reading: Helping Avoid OLED Burn-in and Flicker – Exploring the Latest Asus OLED Technologies for 2025
Brightness and Contrast
For this testing we disabled the OLED care features in the OSD menu as those can have a small impact to screen brightness in certain situations. We would recommend enabling as many of those features as possible to mitigate risks of burn-in, although you may need to experiment for your particular usage to ensure none are distracting or problematic.
Uniform Brightness = OFF

Out of the box the screen operates with the ‘Uniform Brightness’ (UB) setting turned off, which is a feature we’ve seen many times now on Asus OLED screens that if enabled would help maintain a consistent screen brightness regardless of the content you show, the size of your windows or your Average Picture Level (APL).
At all brightness settings you can see that the screens brightness varies depending on the APL and so you get fluctuations in brightness as you resize and move windows around or change your content. It reaches up to a decent 418 nits for low APL scenes, dropping down to 251 nits for full screen white when running at the maximum brightness setting. This maximum SDR brightness is pretty much on par with previous WOLED panels from this generation that we’ve tested. For instance the PG32UCDP reached 437 nits, while the 27″ 480Hz PG27AQDP reached 425 nits peak in this configuration. The only WOLED panels we’ve seen so far that push this further are the first wave of 4th Gen WOLED models.
If you’re running at the maximum brightness setting then the ABL dimming may be distracting for office and desktop uses for most people, although may not be as problematic for dynamic content like games and multimedia. You may want to try using this mode for SDR dynamic content as it could reach higher luminance levels than the uniform brightness mode discussed below.
- Useful reading – OLED Dimming Confusion – APL, ABL, ASBL, TPC and GSR Explained
Uniform Brightness = ON
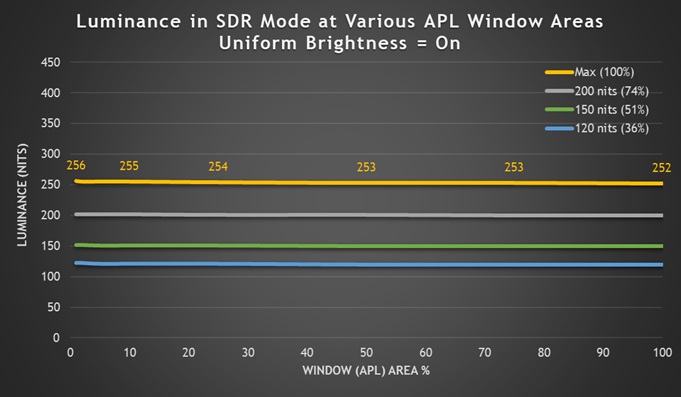
Uniform Brightness mode behaves accurately with the same luminance being retained regardless of the APL window size being tested and the content being displayed, even at maximum brightness setting. The screen can reach up to 256 nits at maximum brightness setting in this UB mode which is again similar to nearly all the previous OLED panels we’ve tested from either technology, only a tad lower than the common 260 – 270 nits you might see. Again, we’ve seen recent improvements with 4th Gen WOLED panels though.
| Black depth and contrast | Uniform Brightness OFF | Uniform Brightness ON |
| Max luminance (nits) | 418 | 256 |
| Min Luminance (nits) | 83 | 32 |
| Uniform / No ABL | ||
| Remains uniform in Windows desktop |
At the lowest setting the screen could reach down to a pretty low 32 nits when using the UB mode, affording you good flexibility for darker room conditions too. It doesn’t get as low as this if you are leaving UB turned off though which is more restrictive for darker environments potentially (83 nits minimum).
Testing Methodology Explained (SDR)

Performance is measured and evaluated with a high degree of accuracy using a range of testing devices and software. The results are carefully selected to provide the most useful and relevant information that can help evaluate the display while filtering out the wide range of information and figures that will be unnecessary. For measurement, we use a UPRtek MK550T spectroradiometer which is particularly accurate for colour gamut and colour spectrum measurements. We also use an X-rite i1 Pro 2 Spectrophotometer and a X-rite i1 Display Pro Plus colorimeter for various measurements. Several other software packages are incorporated including Portrait Displays’ Calman color calibration software – available from Portrait.com.
We measure the screen at default settings (with all ICC profiles deactivated and factory settings used), and any other modes that are of interest such as sRGB emulation presets. We then calibrate and profile the screen before re-measuring the calibrated state.
The results presented can be interpreted as follows:
- Gamma – we aim for 2.2 gamma which is the default for computer monitors in SDR mode. Testing of some modes might be based on a different gamma but we will state that in the commentary if applicable. A graph is provided tracking the 2.2 gamma across different grey shades and ideally the grey line representing the monitor measurements should be horizontal and flat at the 2.2 level, marked by the yellow line. Depending on where the gamma is too low or too high, it can have an impact on the image in certain ways. You can see our gamma explanation graph to help understand that more. Beneath the gamma graph we include the average overall gamma achieved along with the average for dark shades (0 black to 50 grey) and for lighter shades (50 grey to 100 white).
- RGB Balance and colour temperature – the RGB balance graph shows the relative balance between red, green and blue primaries at each grey shade, from 0 (black) to 100 (white). Ideally all 3 lines should be flat at the 100% level which would represent a balanced 6500K average colour temperature for all grey shades. This is the target colour temperature for desktop monitors, popular colour spaces like sRGB and ‘Display DCI-P3’ and is also the temperature of daylight. It is the most common colour temperature for displays, also sometimes referred to as D65. Where the RGB lines deviate from this 100% flat level the image may become too warm or cool, or show a tint towards a certain colour visually. Beneath this RGB balance graph we provide the average correlated colour temperature for all grey shades measured, along with its percentage deviance from the 6500K target. We also provide the white point colour temperature and its deviance from 6500K, as this is particularly important when viewing lots of white background and office content.
- Greyscale dE – this graph tracks the accuracy of each greyscale shade measured from 0 (black) to 100 (white). The accuracy of each grey shade will be impacted by the colour temperature and gamma of the display. The lower the dE the better, with differences of <1 being imperceptible (marked by the green line on the graph), and differences between 1 and 3 being small (below the yellow line). Anything over dE 3 needs correcting and causes more obvious differences in appearance relative to what should be shown. In the table beneath the graph we provide the average dE across all grey shades, as well as the white point dE (important when considering using the screen for lots of white background and office content), and the max greyscale dE as well.
- Luminance, black depth and contrast ratio (static) – measuring the brightness, black depth and resulting contrast ratio of the mode being tested, whether that is at default settings or later after calibration and profiling. We aim for 120 cd/m2 luminance which is the recommended luminance for LCD/OLED desktop monitors in normal lighting conditions. Black depth should be as low as possible, and contrast ratio should be as high as possible.
- Shadow detail – this is evaluated with the screen configured to a 200 nits white luminance for consistency between different monitors, and viewed in a dimly lit room. This first 16 greyscale shades are measured using our UPRTek MK550T spectro device (0.002 nits lower limit) for shades near-black, and the results are plotted on a graph relative to a target gamma curve (usually 2.2 gamma). Where the measurement line crosses the 0.01 nits point on the Y-axis is typically the visual threshold for where we would start to be able to detect luminance compared with black (0.00 nits). We combine these objective measurements with visual tests using a grey shade test pattern to determine the first visible shade, and then rank the shadow detail performance accordingly.
- Gamut coverage – we provide measurements of the screens colour gamut relative to various reference spaces including sRGB, DCI-P3, Adobe RGB and Rec.2020. Coverage is shown in absolute numbers as well as relative, which helps identify where the coverage extends beyond a given reference space. A CIE-1976 chromaticity diagram (which provides improved accuracy compared with older CIE-1931 methods) is included which provides a visual representation of the monitors colour gamut coverage triangle as compared with sRGB, and if appropriate also relative to a wide gamut reference space such as DCI-P3. The reference triangle will be marked on the CIE diagram as well.
- dE colour accuracy – a wide range of colours are tested and the colour accuracy dE measured. We compare these produced colours to the sRGB reference space, and if applicable when measuring a wide gamut screen we also provide the accuracy relative to a specific wide gamut reference such as DCI-P3. An average dE and maximum dE is provided along with an overall screen rating. The lower the dE the better, with differences of <1 being imperceptible (marked by the green area on the graph), and differences between 1 and 3 being small (yellow areas). Anything over dE 3 needs correcting and causes more obvious differences in appearance relative to what should be shown. dE 2000 is used for improved accuracy and providing a better representation of what you would see as a user, compared with older dE methods like dE 1994, as it takes into account the human eye’s perceptual sensitivity to different colours.
Default Setup (SDR)
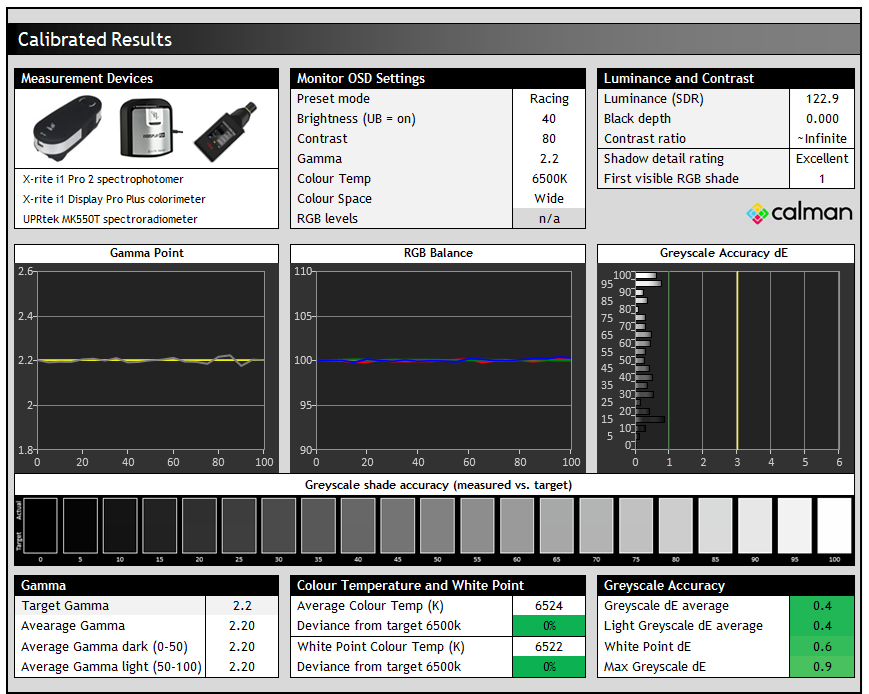
The screen comes out of the box in the ‘Racing’ preset mode, with the ‘wide gamut’ colour space active and with ‘Uniform Brightness’ mode disabled. For these tests we disabled all OLED Care features and switched from the power saving mode (which has limited OSD options) to the performance mode.
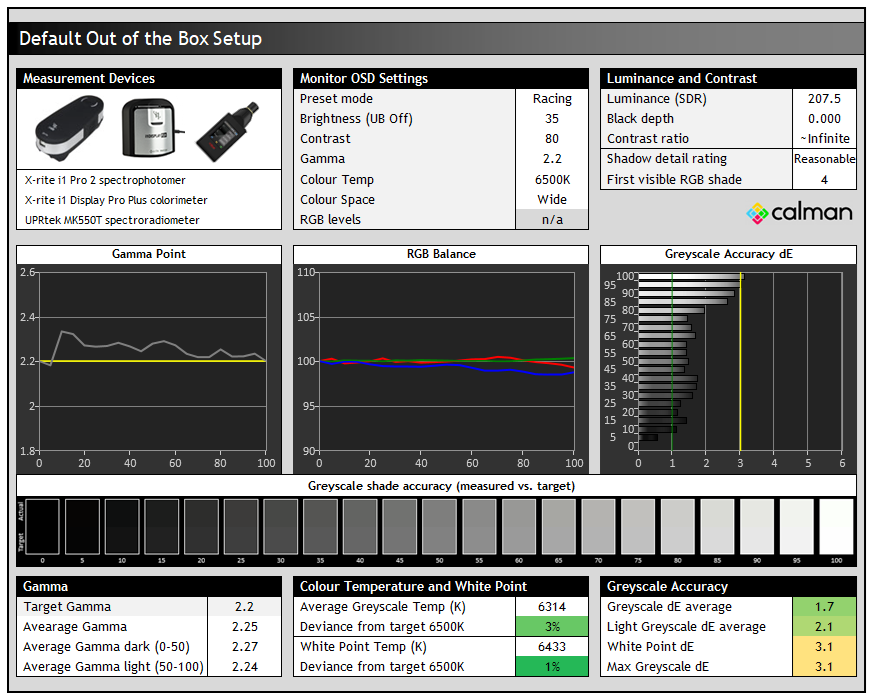
Gamma tracking was good overall and we measured a 2.25 average with a strong performance across the greyscale, being only slightly too high. The colour balance temp on the middle graph were a little weighted towards green, resulting in a very slight greenish tint to the grey shades as you can see from the bar in the middle showing the measured vs. target grey shades. This was minor though and resulted in a good greyscale accuracy of dE 1.8 average. Shadow detail was reasonable as well with the first visible RGB greyscale shade being 4, an area that’s often problematic on OLED monitors.

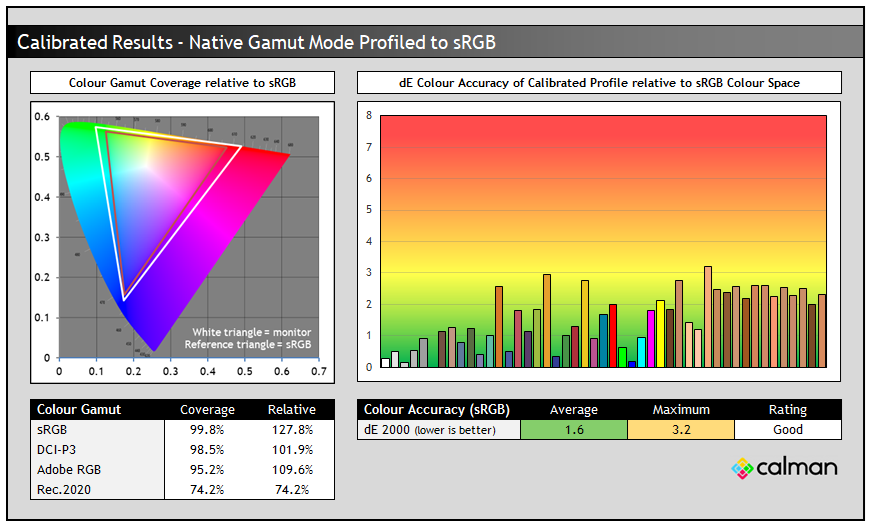
With the wide native wide colour gamut active by default, the accuracy of sRGB colours was only moderate, with a dE 3.0 average measured. This is normal for a wide gamut screen and to be expected and we will look if we can improve sRGB / SDR accuracy in a moment.
There’s a pretty reasonable coverage of the Adobe RGB colour space (95.2%) for professional and photography applications, although you can get wider coverage from QD-OLED panels generally. There’s also no provided Adobe RGB emulation mode on this screen, so it’s not really a great choice for working in that colour space to be honest. You’d probably be better with a QD-OLED panel in a monitor which offers a specific Adobe RGB mode if you want to work with that colour spec.
On the other hand, the native colour gamut of this panel matches the DCI-P3 reference very closely as you can see from the bottom left CIE diagram, reaching only 101.9% relative coverage. DCI-P3 is commonly used for HDR content. With that closer match than to sRGB the accuracy of DCI-P3 colours out of the box was rated good, with a dE 1.7 average measured which was pleasing.
sRGB Emulation Modes
There are actually two ways to achieve an sRGB emulation mode as we’ve seen on other recent Asus OLED monitors. There’s an ‘sRGB Cal’ preset mode available in the ‘Game Visual’ menu where nearly all settings are locked down, or there’s also a colour space setting that can be used from within the other presets, for instance the default ‘Racing’ mode which leaves all other settings accessible. We will test both approaches.
sRGB Colour Gamut option (in Racing preset)
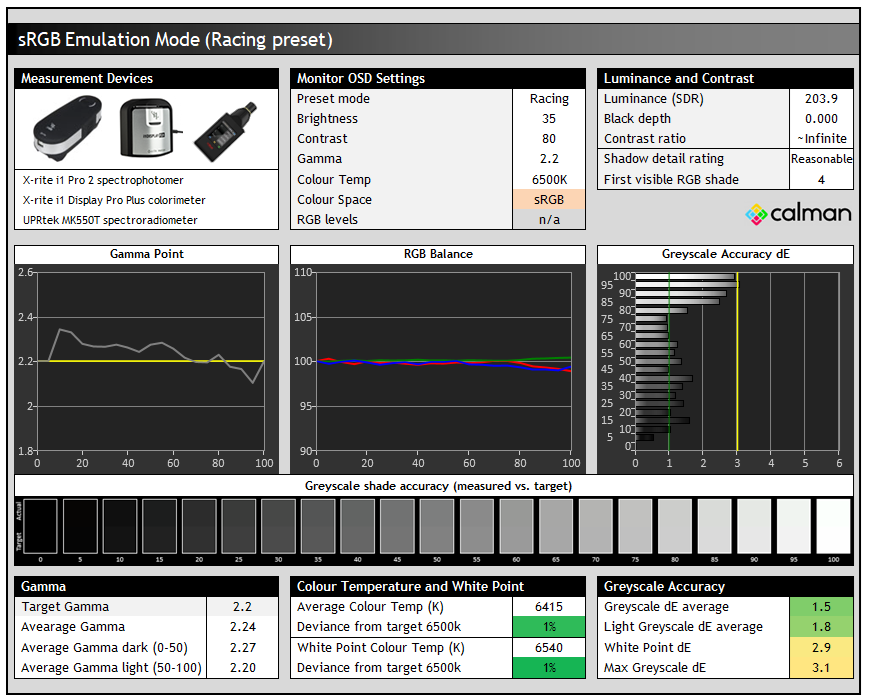

Nothing really changed in terms of gamma, colour temp and greyscale when changing the colour space setting. The only real change was the pretty decent clamping back to the sRGB colour space, leaving only some small over-coverage in red shades present. This helped improve the accuracy of sRGB / SDR content with a dE average of 1.9 measured now which was good.
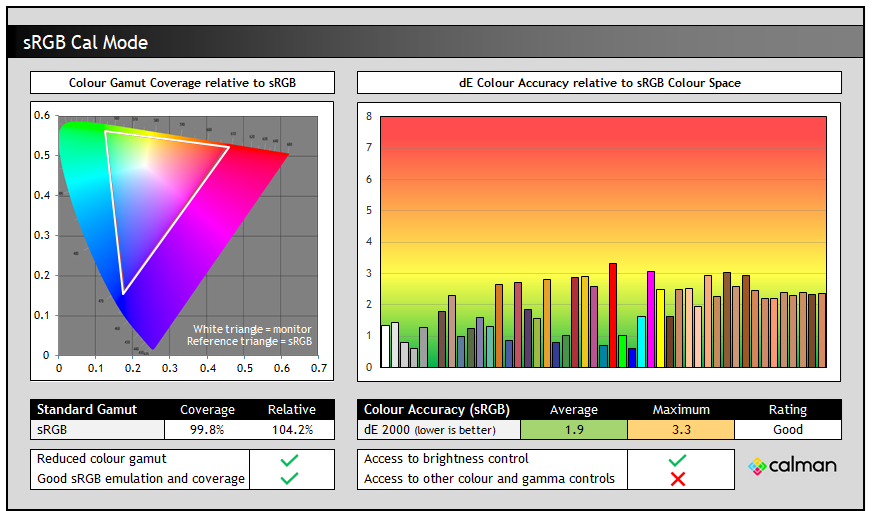
sRGB Cal mode
The sRGB Cal mode in the ‘Game Visual’ menu provides an alternative approach for sRGB / SDR clamping. This mode is pretty much locked down when it comes to OSD menu controls, including the whole ‘color’ section of the menu being greyed out. You can still adjust brightness at least, but we’re fully at the mercy of Asus’ factory calibration here for this mode.
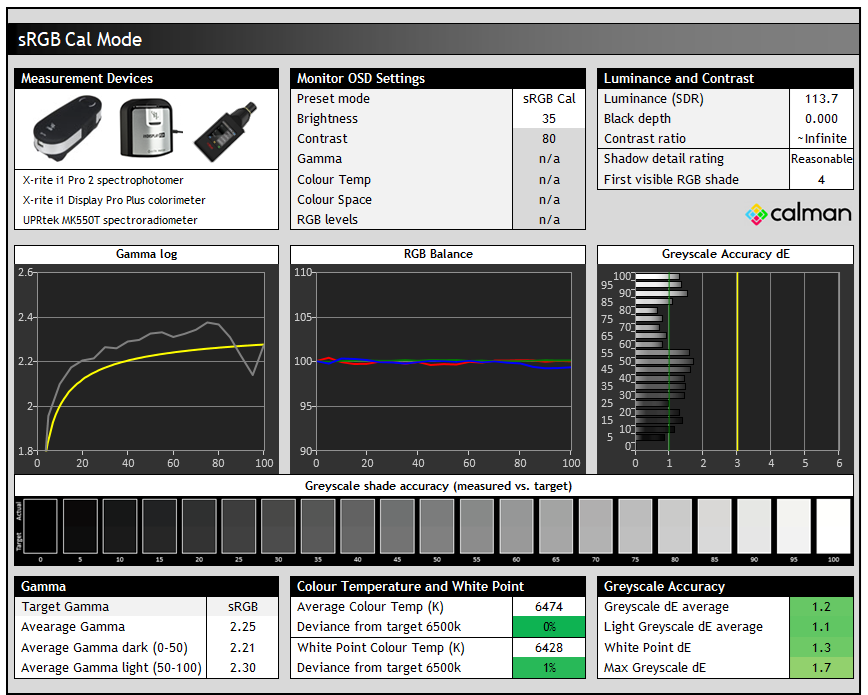
This mode offered an alternative gamma configuration, now set to an sRGB gamma curve instead of 2.2, but they’re very similar to one another and it didn’t really change any of the near-black shadow detail in practice. Colour temp and white point were slightly improved now which was excellent, removing the slightly greenish tint we had seen in the Racing mode before.
Colour space clamping was also a little tighter, cutting back some more of the over-coverage but not really impacting the accuracy of sRGB colours which remained with a dE average of 1.9. We’d hoped for a slightly more accurate dE, but overall this sRGB Cal mode was still very good.
The Racing preset > sRGB colour space mode approach gives much better flexibility in settings and controls, and while the colour space clamping isn’t quite as tight, it’s likely to be a better option should you want to use an sRGB emulation mode we think because of it’s flexibility.
Calibration
Calibration and profiling can produce some very good overall results and could be useful though if you wanted to operate the screen within its native wide gamut mode, but then map the colour space back to something else like sRGB or Adobe RGB for instance for colour-aware applications (e.g. Photoshop). You would need a suitable calibration device and software. In this section the screen was profiled to 2.2 gamma, 6500K colour temp and to the sRGB colour space. The screen was left in its native wide gamut mode, but this profile will be used in colour-aware applications to map back to sRGB in this instance.
Overall the calibrated results were very good as you’d hope, although it didn’t seem to be possible to fully correct the colour accuracy despite multiple attempts. It remained good overall though. You can find our calibrated settings and ICC profile in our ICC profile database now.
The XG32UCWMG unfortunately does not feature support for hardware calibration, something that is offered on LG’s competing 32″ 4K OLED 32GS95UE model. That is a useful feature that we’d like to see included more on high-end OLED monitors.
Minor annoyance with calibration in SDR and HDR
Usually for calibration we would switch to the ‘user’ colour temp mode and tweak the RGB channels to reach an optimal white point for this calibration. However, at the moment these RGB levels are remembered in HDR mode as well, should you use the ‘adjustable HDR’ option and want to tweak your RGB colour temp there too. Unfortunately in HDR you want to use different RGB levels than used here, but changing them in HDR means they’re changed in SDR too.
We’ve suggested to Asus that they release a FW update to make these settings save independently between SDR and HDR modes if they can. Right now we would prefer to use the ‘User’ colour temp mode and make tweaks in HDR, and so in SDR we’ve just stuck with the already very close 6500K colour temp mode and profiled it from there to carry out final corrections and improvements.
- You can find our calibrated settings for SDR and ICC profile in our database now.
ICC Profiles and Monitor Calibration Database
Find the recommended settings and a calibrated ICC profile for your display.
[View here]
Best Settings Guide
Get the best settings for the Asus ROG Strix XG32UCWMG (or also the XG32UCWG). This guide video covers SDR and HDR modes as well as OLED care and gaming options. You can use these settings from a PC input, or equally for external devices like a games console.
General and Office
Resolution and Scaling
The fairly large screen size of 31.5″ provides a decent size upgrade from common 27″ screens, and this combined with the 3840 x 2160 “4K” resolution gives you a higher pixel density at 140 PPI. This 4K resolution is probably still a bit too high to use at native scaling (100%) for some people on a screen even of this pretty large size, although some people may find it ok. Text is small but if you’ve got good eye-sight and are up close then it’s still reasonable and does provide you then with a massive screen real estate and very sharp picture.
Other people will probably want to use operating system scaling to ensure fonts and text are a more sensible and readable size though. 150% is unnecessarily large despite being the “recommended” option detected by Windows, with 125% scaling offering a nice balance on a screen of this size we think. That gives you comfortable text size which is very similar to a 27″ 1440p screen, but does give you the equivalent desktop real-estate area of a 3072 x 1728 resolution. So that’s quite a nice jump up from common 2560 x 1440 resolution screens in this approximate size range. The extra pixel density of the 4K resolution will provide a very sharp and clear image for all uses including office and general applications. Just make sure that your software will support scaling effectively as it can sometimes be a bit difficult to get it right.
Keep in mind that not all Operating Systems and applications handle scaling the same. More recent versions of Windows tend to handle it all better, and recent versions of Mac OS are pretty solid as well. Some applications and games don’t handle scaling correctly and so you can end up with some things with very minute text and fonts and some things which don’t scale completely in every place. Keep this in mind if you’re selecting any super high resolution display as it could be an important factor. You need to ensure you have the necessary operating system and applications to handle scaling effectively for your needs. It does make life a bit more complicated than if you just ran at a native resolution and 100% scaling. If you have the necessary software and operating system then the 4K resolution provides a very sharp and crisp image though.
Coating
We talked at length earlier about the coating, and our advice would be to consider your ambient lighting conditions and positioning before deciding which coating is right for you. There’s no doubt that the new TrueBlack coating provides a super sharp and clear image, removing any minor grain we’ve seen from previous glossy WOLED panels (like the Asus ROG Strix XG27AQDMG). It offers improvements in black depth as well compared with matte AG coatings, but the downside is that reflections can be more apparent and distracting, as there’s no anti-glare or anti-reflection coating on this screen. That’s perhaps more of an issue for daytime office application usage or brighter office environments.
Sub-pixel Layout and Text Rendering

Like the previous matte version of this panel, LG.Display have used their improved RGWB sub-pixel layout. When that’s combined with a high pixel density like this (~140 PPI) it leads to significant improvements in text clarity. Text looks sharp and crisp now and it’s very hard to spot any issues even for office and productivity uses. We had commented the same thing about the 32″ QD-OLED panels including the PG32UCDM, which had their own issues with sub-pixel layout and shape which were basically eliminated with their high density 32″ panels, and it’s the same here with the WOLED panel.
Both 32″ 4K OLED options provide great text clarity now with a very similar overall appearance. We feel that the issues with text clarity are basically resolved on this panel and we would consider text clarity to be fine for the vast majority of users now.
Flicker
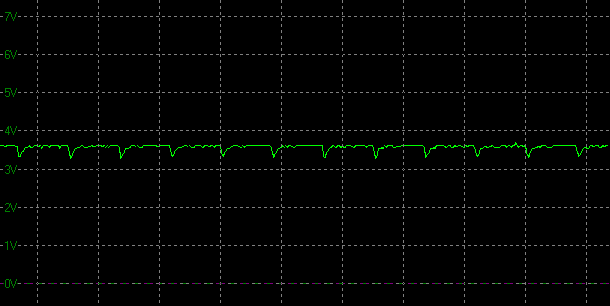
| Flicker | |
| Flicker free verified | |
| PWM / flicker frequency | n/a |
Like other OLED screens there is a minor fluctuation of the backlight, and in this case it operates in sync with the refresh rate, whatever you have that set at. Above it’s operating at 240Hz so there’s a small fluctuation every ~4.17ms. You can see on the graph above that the 0V would be an “off” state, so the amplitude of this fluctuation is minor, and does not produce any visible flickering or anything like that in practice. It’s not the same as PWM on an LCD monitor where the backlight is rapidly switched fully off and on when trying to dim the brightness level. Obviously being an OLED panel there is no backlight here anyway, and this minor fluctuation didn’t cause us any problems in real use and would be considered flicker free.
Useful Office Features
| Features | |
| USB type-C connectivity (DP Alt mode) | |
| USB type-C power delivery | 15W |
| KVM switch | |
| PiP and PbP support | |
| USB data ports | 3x ports |
| Easy access USB data ports | |
| Integrated speakers | |
| Audio output / headphone out | |
| Mic input | |
| Ambient light sensor | |
| Motion sensor | |
| Stand adjustments | Tilt, height, swivel (no rotate) |
| Tripod socket | |
| Fan-less design |
Although this model is part of the lower-tier ROG Strix line-up (as opposed to top-tier ROG Swift) it still has many features and connections that you’d hope to see for office uses. There’s USB type-C connectivity with 15W power delivery, some USB data ports, a KVM switch function and PiP/PbP support. That’s along with a versatile stand and a motion sensor which helps with OLED Care and avoiding image retention. It’s good to see all of these things on offer here. The only cut back compared with the PG32UCDP seems to be with the power delivery from the USB-C port, which was available up to 90W on that model.

There are no speakers on this model which is something the 32″ 4K LG 32GS95UE offers – pretty decent ones at that. You’ll need to have a separate speaker setup for your PC, or maybe use the provided headphone connection.
Blue Light and Eye Care Modes
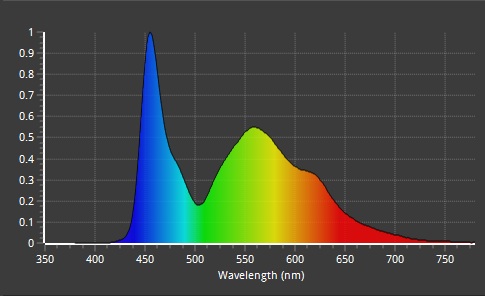
The native panel spectral distribution is shown above at a calibrated 6500K white point, where the blue peak is at 455 nm. This means it is just outside of the Eyesafe certified range of products where there is a supposed harmful range between 415 – 455nm.
There is a ‘Blue light filter’ setting in the menu with 4 levels available although these are only accessible if you disable Uniform brightness for some reason, so they may have limited practical application in desktop situations for many people. The modes make the image progressively warmer and more yellow each time. Levels 1 – 3 are usable though and measured at 5761K, 5586K and 5398K. Level 4 is very yellow to the point where it’s totally unusable (4590K) and also has a locked brightness of 5%.
Gaming
The XG32UCWMG is well-suited to gaming using an OLED panel which is well-known for its near-instant response times and excellent motion clarity capabilities at high refresh rates.
| (at native resolution) | Refresh Rate |
| Maximum Refresh Rate DisplayPort | 240Hz native / 480Hz dual-mode |
| Maximum Refresh Rate USB type-C | 240Hz native / 480Hz dual-mode |
| Maximum Refresh Rate HDMI | 240Hz native / 480Hz dual-mode |
| VRR range | 48 – 240Hz / 480Hz |
| ClearMR certification tier |
4K @ 240Hz is a very attractive combination for many people and the 32″ screen size is well-suited to this spec, providing increased immersion compared with smaller screens and more desktop space for your games. You will of course need a very powerful system and graphics card to get anywhere near 4K @ 240Hz, although you may of course want to play older games or at lower settings where this can be more achievable. There’s also plenty of future-proof room there as other system components are improved and updated over the coming years and new graphics card capabilities are developed. The 4K resolution provides a super sharp and crisp image, with more detail and clarity than lower resolution panels. It also makes the screen well-equipped to handle modern 4K gaming from PC’s and consoles.
Dual-mode support
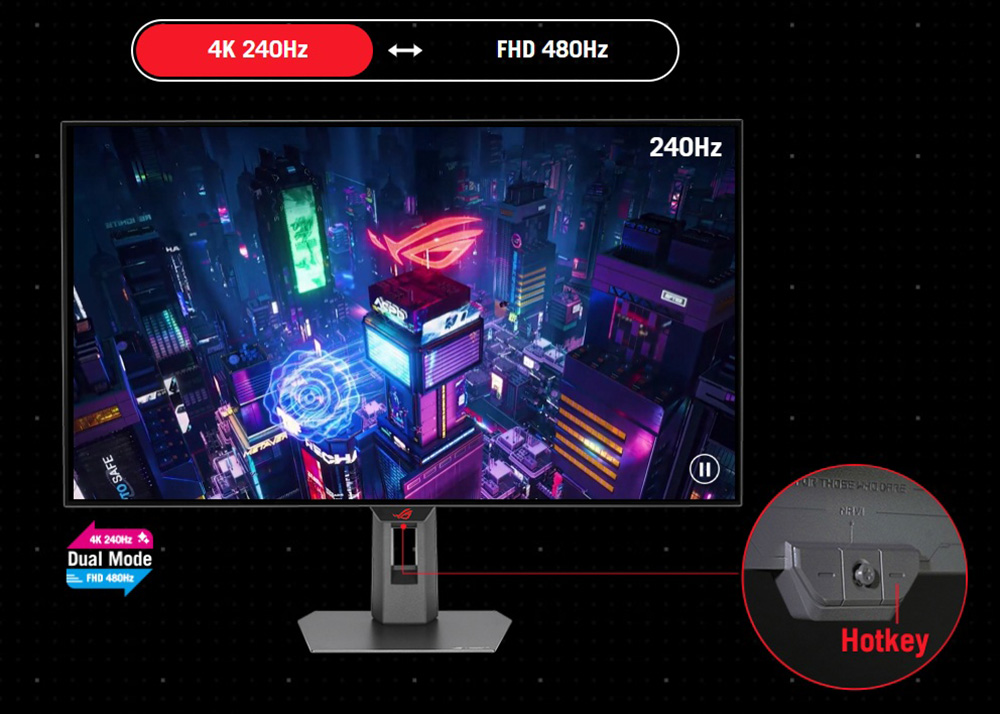
The dual-mode function (called ‘frame-rate boost’ by Asus) is an interesting option that some people may enjoy, allowing you to drop your resolution down to 1080p (1920 x 1080) in order to double your refresh rate up to 480Hz. This setting allows you to quickly and easily switch between different settings to suit different game genres. So, you can prioritise resolution and image detail for graphically impressive and slower games like RTS etc, or prioritise speed, frame rates and motion clarity for faster, competitive FPS games for example.

It’s a nice feature we think that some people will find useful, and something that sets these WOLED panels apart from the QD-OLED alternatives, which don’t have a dual-mode function available. We’ll look at this mode more in a moment.
Variable refresh rates
| VRR capabilities and Certification | |
| AMD FreeSync certification | FreeSync Premium Pro |
| Native NVIDIA G-sync module / G-sync scaler | |
| NVIDIA ‘G-sync Compatible’ certified | |
| VESA ‘AdaptiveSync’ certification | |
| HDMI-VRR (consoles via HDMI 2.1) | |
| OLED VRR Anti-flicker modes |
The screen has a native 240Hz refresh rate which is on par with a wide range of other OLED monitors on the market, including all the 32″ QD-OLED monitors you can buy of this size/res. This provides excellent motion clarity, and can support high frame rates too, reducing overall system latency compared with lower refresh rate screens.
To help support the high spec, this screen features adaptive-sync, giving Variable Refresh Rate (VRR) support for both NVIDIA and AMD systems which is great news. We confirmed certification under the AMD ‘FreeSync Premium Pro’, NVIDIA ‘G-Sync Compatible’ and VESA ‘AdaptiveSync’ schemes already.
Special gaming features
| Other Features | |
| Dual-mode function | |
| Black Frame Insertion (BFI) | |
| Gaming extras | FPS counter Crosshair Sniper Timer Stopwatch Display Alignment Shadow Boost |
| Emulated gaming sizes | 24.5″, 27″, square formats |
Response Times
As discussed in our detailed article about Response Time Testing – Pitfalls, Improvements and Updating Our Methodology we are using an improved and more accurate method for capturing G2G response times and overshoot, based on figures that are more reflective to what you see visually on the screen in real-World usage. Our article linked above talks through why this is better and how we arrived at this improved method in much more detail.
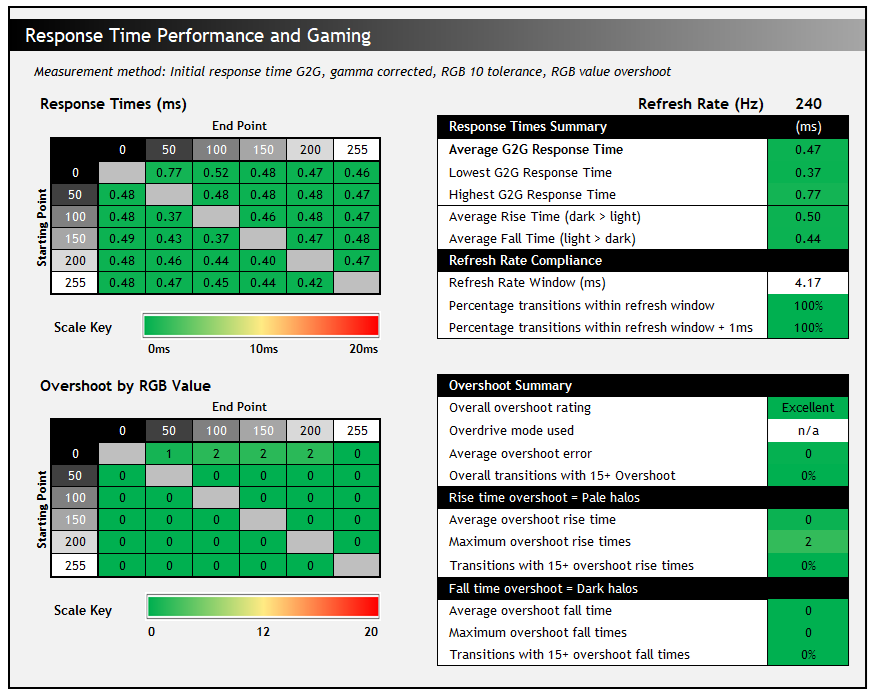
The above G2G response times are consistent at all refresh rates, including 240Hz, 120Hz and 60Hz, when using the dual-mode 480Hz mode, and during VRR situations with changing frame rates. Thanks to the OLED panel the response times are super-fast and near-instant, with an average of only 0.47ms G2G measured. All transitions can keep up easily with the frame rate demands of even the 480Hz mode, and there was also no visible overshoot evident which is great news too, so overall there was nice and clean pixel transition times.
Our thanks to the following manufacturers for support in the build of our test system:
| AMD Ryzen 9 7950X | Buy the latest AMD CPUs here | |
| Asus ProArt B650-Creator | Buy Asus motherboards here on Amazon | |
| Corsair DDR5 RAM | Buy here on Amazon | |
| Corsair H100i Elite Capellix AIO cooler | Buy Corsair coolers here on Amazon | |
| Corsair iCUE RGB Elite Fans | Buy here on Amazon | |
| NVIDIA RTX 5070 | Buy NVIDIA RTX graphics cards here on Amazon |
| We may earn a commission if you purchase from our affiliate links in this content – TFTCentral is a participant in the Amazon Services LLC Associates Programme, an affiliate advertising programme designed to provide a means for sites to earn advertising fees by advertising and linking to Amazon.com, Amazon.co.uk, Amazon.de, Amazon.ca and other Amazon stores worldwide. We also participate in a similar scheme for Overclockers.co.uk, Newegg, Bestbuy and some manufacturers. |
Motion Clarity
We captured some pursuit camera photos of the screen at it’s native 240Hz refresh rate, as well as when using the dual-mode function at 480Hz. These can be compared it against other modern OLED panels with other refresh rates supported. These photos are designed to capture real-world perceived motion clarity and gives you a good indication of how the screen looks in real use, beyond G2G response time measurements.
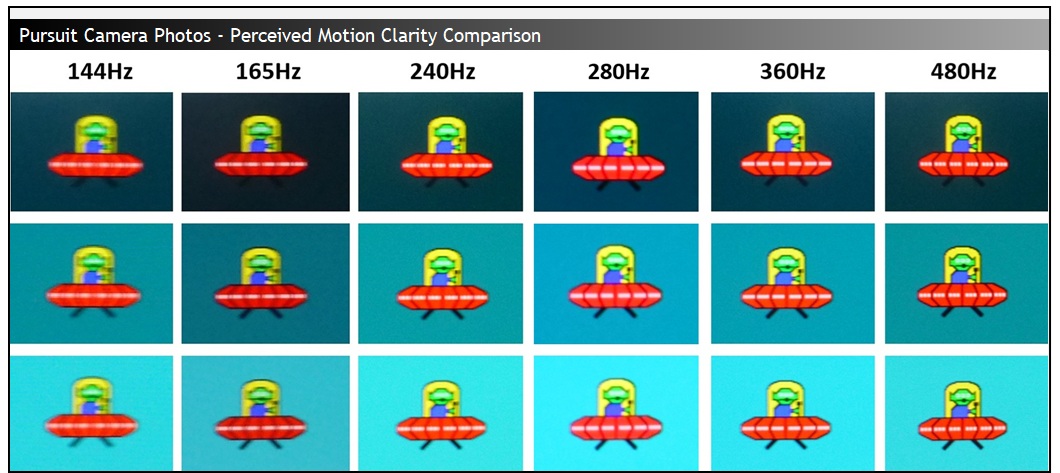
The motion clarity in 240Hz native mode is identical to all other 240Hz OLED screens available, and is already very impressive. Similar in practice roughly to a ~360Hz LCD monitor thanks to the near-instant response times of OLED panels. The higher refresh rates shown here are available in the 27″ space and can provide further small improvements compared to a 240Hz OLED. There’s currently no 32″ OLED monitors with a higher native refresh rate though than 240Hz, you’d have to settle for a smaller sized screen and lower resolution (1440p) to push up to native 360Hz or 480Hz.

The screen does however support the dual-mode function, which can be enabled through the press of a single button on the bottom edge of the screen and it takes around 5 seconds to switch over to the new mode. You can also activate it manually from within the OSD menu. The resolution is dropped to 1920 x 1080 in this mode and so on a 32″ sized screen that is a low resolution for sure, although at least there is a 4:1 ratio between resolution and available pixels which helps with interpolation. It isn’t actually too bad if you move your viewing position further back than you might normally be, and we found that in dynamic content and gaming it was certainly less obvious than when using Windows desktop.
The improvements in motion clarity are very good though as you can see from the pursuit camera photos above, along with improvements in system latency, frame rate support and the stroboscopic effect that this higher refresh rate can offer. It’s nice to have the option available we think, and some gamers will like to use this mode for older games where frames rates can be pushed higher, and where resolution is less of a focus.
Aspect Ratio Controls
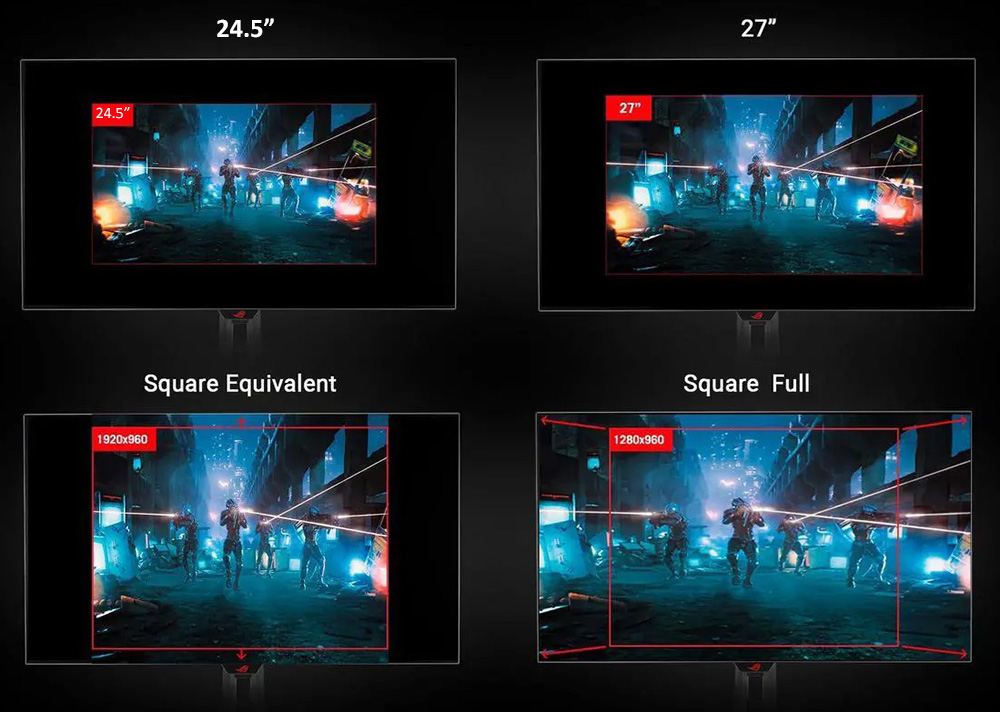
There are also a couple of ‘aspect control’ options in the menu which can simulate smaller screen sizes, and unlike on the PG32UCDP model you don’t need to disable variable refresh rates (VRR) from the menu for these to be accessible which is good news. The only things not available when using these aspect ratio modes are ELMB (BFI) mode and PiP/PbP.
These simulated screen sizes give you the ability to reduce the screen area to common 27″ and 24.5″ sizes if you want a smaller area to focus on, potentially making lower resolution gaming more comfortable too.
You’ve got various options including gaming with the correct number of pixels for the size of the screen (e.g. 2944 x 1656 for the 24.5″ simulated size). You can also fill up the screen using whatever resolution you’ve selected if you prefer, or use various “square” modes to support other aspect ratio configurations. You can also choose 1:1 pixel mapping, although low resolutions like 1920 x 1080 only then cover a small screen size of around 15.6″ to use which isn’t very practical.
Stroboscopic effect

As well as improving motion clarity as we’ve discussed earlier, a higher refresh rate can also help reduce (but not fully eliminate) the stroboscopic effect (aka the Phantom Array Effect) that can be seen as you focus on a single area of the display, and objects move past your line of sight. For instance this might happen if you are focused on a crosshair or target in a fast FPS game like CS:GO, while the scenery around you scrolls past your line of sight.
In the example above we’ve used the mouse cursor animation which you can try for yourself from Blurbusters here. Taking a fixed position photo captures how this appears to the naked eye, as shown above where the test simulates a 240fps and 480fps scroll.
As the mouse cursor (or any moving image in dynamic content) move past your line of sight, low refresh rates can result in noticeable “stepping” or “strobing” of the image. This is one reason why higher refresh rates feel more fluid and smooth. As the refresh rate increases, the step distance reduces as you can see from the 240Hz vs 480Hz image above that we captured from the PG27AQDP. It is also demonstrated in the reference image below from Blurbusters at other lower refresh rates. The step distance is halved as you go from 240Hz to 480Hz in fact which significantly reduces its visibility.

Not everyone is susceptible to this stroboscopic effect in dynamic content, but those who are will see benefit in the increased refresh rate here, with decent and noticeable gains compared with traditional and common 240Hz OLED screens if you use the 480Hz mode. So not only are you getting motion clarity benefits from the higher refresh rate, but you’re also getting benefits when it comes to this stepping, stroboscopic effect which impacts some users. More on the stroboscopic effect here on Blurbusters.com.
ELMB / BFI Mode
Like other recent Asus OLED monitors, the XG32UCWMG has an added BFI (Black Frame Insertion) mode for blur reduction. Asus call this ELMB (Extreme Low Motion Blur) and it’s the alternative to a strobing motion blur reduction backlight you might find on some LCD monitors. Rather than the backlight being strobed off and on rapidly (because there is no backlight on an OLED panel), a black frame is inserted periodically in to the image instead. With the panel manufacturers not offering native panel support for this feature Asus have introduced a scaler based BFI function on several of their new OLED monitors, including this model.
ELMB activation and operation
ELMB is available in a pretty limited configuration still, and its operation remains cumbersome. To use ELMB you have to first disable VRR in the menu, and then drop your active refresh rate to half of the native. So in normal mode you can use ELMB at 120Hz, or in dual-mode you can use it at 240Hz. It’s fiddly to go through those changes, only to have to reverse the steps as and when you want to turn ELMB back off and game at the native refresh rates. Given Asus haven’t updated this since the earliest iterations of OLED ELMB, we can only assume this is tricky to improve. There are also a range of other limitations around usage including:
- There’s no support at the moment to use BFI at any other refresh rates like 60Hz or 100Hz for instance
- It cannot be used at the same time as variable refresh rate, only for a fixed 120Hz input
- It can also only be used in SDR mode, not in HDR.
- Uniform Brightness mode is not available when you enable ELMB. We confirmed that the screen shows ABL dimming when using this mode, depending on the content / APL shown.
- Many other settings such as blue light settings, aspect ratio modes and PiP/PbP modes are also not available.
| Motion Blur Reduction Mode | ||
| Motion Blur Reduction mode / BFI | ||
| Refresh rates supported | 120Hz (in native mode) 240Hz (in dual-mode) | |
| 60Hz single strobe operation | ||
| Blur reduction available with G-sync/FreeSync VRR | ||
| Available in SDR mode | ||
| Available in HDR mode | ||
| Viable with games consoles | ||
| Brightness capability (SDR, max refresh rate supported) | ||
| Brightness control available | ||
| Independent brightness between on/off modes | ||
| Motion blur OFF – Max brightness | 256 nits (in uniform brightness mode) | |
| Motion blur ON – Max brightness | 208 nits | |
ELMB Performance
With ELMB enabled, the brightness control is available all the way up to 100, which is good news, although annoyingly the setting is not remembered independently between ELMB on and off modes, even though it was on another recent Asus screen we tested. We’ve fed that back to Asus for a potential FW update. At the moment that means another setting you potentially have to alter each time you want to use this function.
Maximum luminance reached 208 nits which is quite a lot brighter than we’d seen on many previous Asus OLED monitors. For instance the 32″ 4K PG32UCDM had reached only 96 nits and the 27″ 4K PG27UCDM reached 134 nits. On the other hand some of their screens have reached similar or higher brightness levels, such as their new XG27AQWMG (4th Gen WOLED) which reaches 294 nits. Anyway, this means that the ELMB mode is good in terms of brightness.

Above is the perceived motion clarity of the screen at 120, 240 and 480Hz when running in normal mode, and then also at 120 and 240Hz with ELMB enabled. You can see that the motion clarity looks the same at 120Hz with ELMB as it does at 240Hz with the mode turned off. Likewise it looks the same with 240Hz ELMB as at 480Hz native. This is to be expected given the 50:50 duty cycle of the BFI function.
This clarity is the same across the entire screen though thanks to the super-fast response times of the OLED panel, you don’t need to worry about which area of the screen is the cleanest and clearest, like you do on an LCD screen with a strobing blur reduction backlight.
The great thing about ELMB mode is that it can be a short-cut to improved motion clarity. For instance if your system is only powerful enough to run 4K at 120Hz, you could turn ELMB on and get a boost to 240Hz-like motion clarity for free. Same thing if the device you’re gaming on can only support 120Hz maximum, like on a modern games console for example. If you’re using dual-mode and playing at 1080p resolution, you can also short cut your way to 480Hz-like motion clarity, even if you can only power up to 240Hz. It’s a potentially very useful feature and it’s great to see it offered. A few improvements to the operation and settings would be welcome though.
VRR Flicker
All OLED monitors can show flicker and gamma fluctuations in VRR situations and this is something we studied and tested in detail in our detailed article here.
Asus have included their OLED Anti-flicker (v1) options on this screen to give you some modes that will hopefully help reduce flicker, should you experience any in your usage. Remember that just because a screen can show flicker, doesn’t mean you’ll necessarily experience it during your usage and from your system. Please see our detailed article for loads more information about this issue on OLED monitors. The provided modes offer caps to the VRR range.
The modes are available via the OSD menu. The screen switches to black for a couple of seconds when you change this setting. We found that sometimes it would revert our refresh rate to 60Hz, so if you enable these modes just make sure you’re still set at the desired refresh rate in your graphics card control panel afterwards.
Normal operation (anti-flicker modes = off)
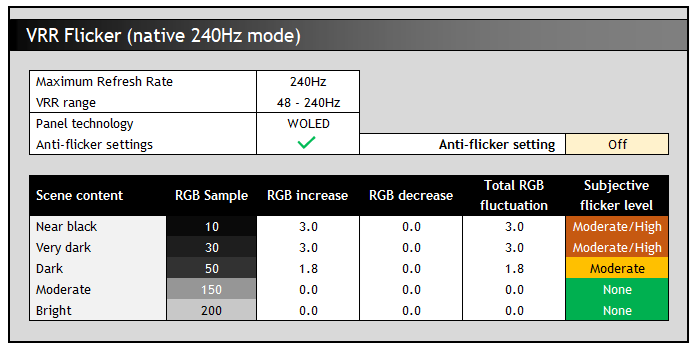
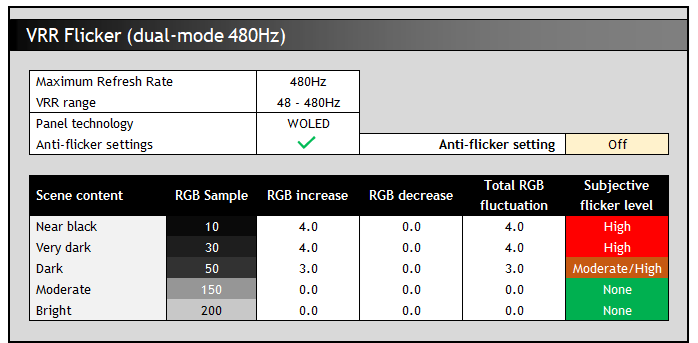
With the anti-flicker modes turned off we saw an active VRR range of 48 – 240Hz in native mode and 48 – 480Hz when using the dual mode function. Like other WOLED technology panels we tested in our detailed study, the gamma response seemed to be directly tied to the frame rate during VRR situations. For instance at RGB 10 this gets progressively brighter up to RGB 13 as the frame rate drops from 240fps to 48fps in the normal mode. This only applies when using VRR we should reiterate.
As a result it is large swings in frame rate that cause the most noticeable gamma variation and flicker, although it isn’t nearly as severe as we’ve seen on some WOLED panels, only reaching moderate/high levels in darker scenes in both modes. It’s a bit higher in the dual-mode operation as there’s a wider VRR range in which the gamma can shift, resulting in potentially more flicker.
The trick with this panel would be to keep frame rates as consistent as possible, at whatever level you can achieve, to reduce the likelihood of flicker. Remember that this data represents the maximum potential flicker, and it would be less with more steady frame rates. We saw the most noticeable flicker in darker scenes and content, with basically none visible in lighter content which was good.
Anti-flicker modes
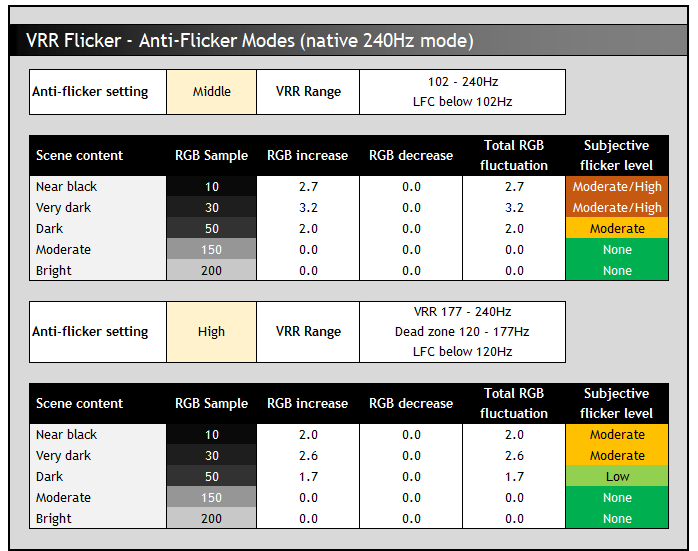
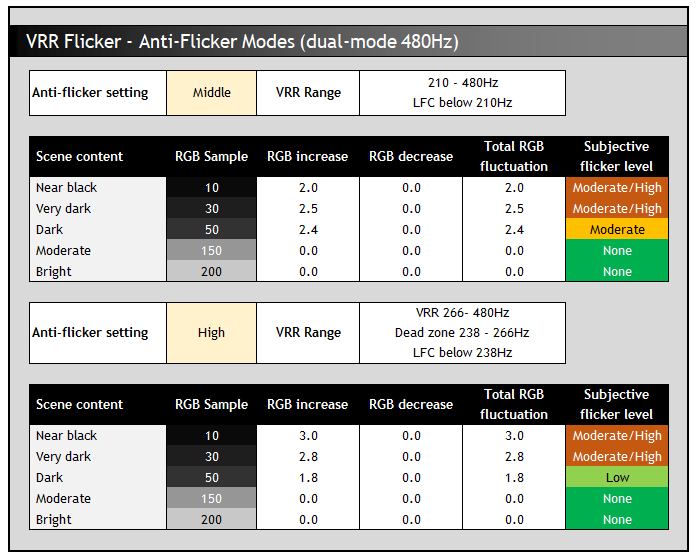
The anti-flicker modes restrict the VRR range in an effort to reduce the gamma shift that can occur with large frame rate swings. The ‘middle’ setting caps the VRR range somewhat, but still leaves a wide active range, especially in the dual-mode operation. LFC is used below the VRR range. It doesn’t seem to have much impact in the 240Hz mode but helps a little in the dual-mode operation, mainly because the maximum swing of frame rate is cut from 48 – 480Hz down to 210 – 480Hz. This only really impacts situations where the frame rate varies hugely, with no real benefit if frame rates are pretty consistent anyway.
At the LFC boundary and below you can also get some more noticeable flicker and jumps in gamma as the frame rate is multiplied to different values and their corresponding gamma level. As a result not only do you want consistent frame rates if possible, but you want to avoid crossing the LFC boundary if you can.
The ‘high’ mode helps reduce visible flicker in VRR situations a bit in situations where there is a very large swing in frame rate, but this is mainly because it disables VRR for a significant portion of the range in the middle. For instance in normal mode VRR is active between 177 – 240Hz but there’s a big main chunk of the middle of the range between 120 – 177 Hz which sees VRR disabled entirely. Below that, LFC is again used. That “dead zone” results in no flicker, but could introduce some stuttering and tearing potentially.
Lag
Read our detailed article about input lag and the various measurement techniques which are used to evaluate this aspect of a display. The screens tested are split into two measurements which are based on our overall display lag tests and half the average G2G response time, as measured by our oscilloscope. The response time element, part of the lag you can see, is split from the overall display lag and shown on the graph as the green bar. From there, the signal processing (red bar) can be provided as a good estimation of the lag you would feel from the display. We also classify each display as follows:
Lag Classification (updated)
- Class 1) Less than 4.17ms – the equivalent to 1 frame lag of a display at 240Hz refresh rate – should be fine for gamers, even at high levels
- Class 2) A lag of 4.17 – 8.33ms – the equivalent of one to two frames at a 240Hz refresh rate – moderate lag but should be fine for many gamers. Caution advised for serious gaming
- Class 3) A lag of more than 8.33ms – the equivalent of more than 2 frames at a refresh rate of 240Hz, or 1 frame at 120Hz – Some noticeable lag in daily usage, not suitable for high end gaming
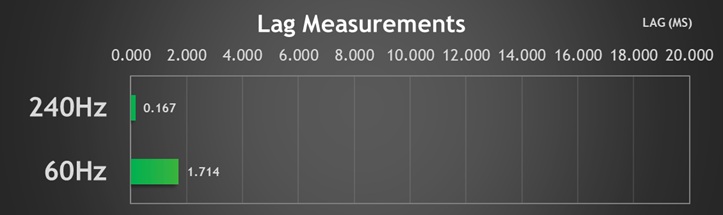
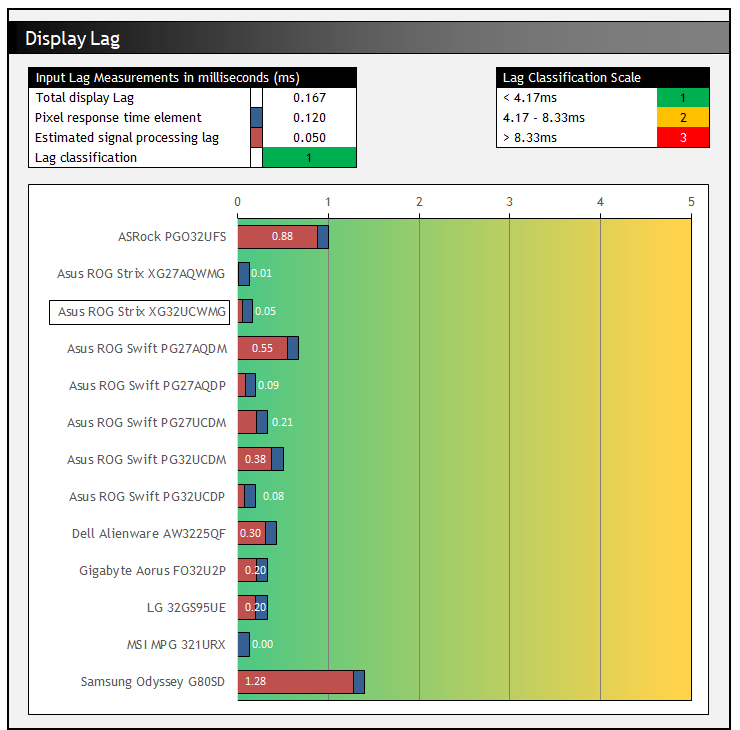
There is an extremely low lag on the XG32UCWMG measured at 0.167 ms total display lag, and leaving us with only ~0.05 ms of estimated signal processing lag. This is perfectly fine for competitive gaming and basically zero. This was also excellent for a fixed 60Hz input at only ~1.7ms, a decent improvement over many monitors, including the PG32UCDP model (11ms). Remember that it is the lower number (0.167 ms) that will be relevant for VRR gaming as well, even where frame rates drop. The 60Hz figure is only applicable for fixed 60Hz input sources.
Console Gaming
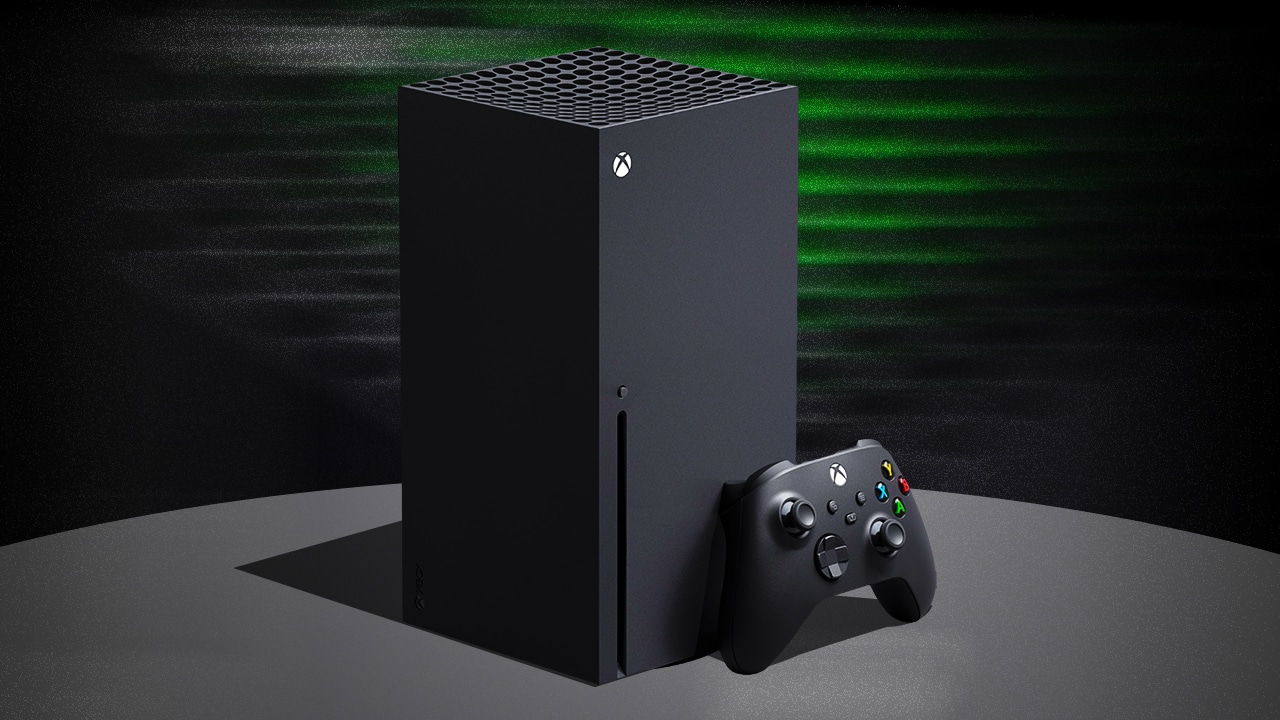
The screen features offers a 4K resolution and support for high refresh rates including 4K @ 120Hz, making it very well suited to modern games consoles like the Xbox Series X and PlayStation 5. Asus have included two full-bandwidth HDMI 2.1 ports, delivering 48 Gbps speed and therefore supporting the max bandwidth capabilities of the two consoles.
The support for 4K resolution (natively here) means you can make use of HDR from the Xbox where that mode is only available at 4K, which is of course one of the key capabilities of this screen. The OLED panel with its amazing contrast and blacks comes in to its own here for HDR gaming, providing an excellent image quality and HDR experience. More on HDR in a moment.
| Console Gaming | |
| Native panel resolution | 3840 x 2160 “4K” |
| Maximum resolution and refresh rate supported | 4K @ 120Hz |
| 4K at 24Hz support | |
| 4K at 50Hz support | |
| HDMI connection version | 2.1 |
| HDMI connection bandwidth | 48Gbps |
| HDMI-CEC auto switch | |
| HDMI-VRR | |
| Auto Low Latency Mode (ALLM) | |
| HDR10 support | |
| Dolby Vision HDR support | |
| Black Frame Insertion (BFI) support | (at 120Hz only) |
| Integrated speakers | |
| Headphone connection | |
| Ultra high speed HDMI 2.1 cable provided | |
Console support was overall very good thanks to the native 4K panel and HDMI 2.1 connections. There was support for 4K 120Hz which also allows you to use ELMB (BFI) mode if you want, for improving motion clarity up to 240Hz-like levels. One issue we spotted was that the Xbox Series X reported that there was (oddly) no support for 4K @ 60Hz, resulting also in no support for 4K 50Hz signals. By changing the resolution to something lower like 1080p we were able to trick the console in to saying that 4K 60Hz was now supported in the ‘display details’ section (but not 50Hz still), but we were never actually able to set the console to 4K 60Hz. This seems to just be a firmware bug which we’ve fed back to Asus, and probably doesn’t matter to most users as you can just set the console to 4K @ 120Hz anyway in display settings. The only other gaps for console gaming were the lack of integrated speakers (so you need an external sound system or headphones) and the lack of Dolby Vision HDR content support.
HDR
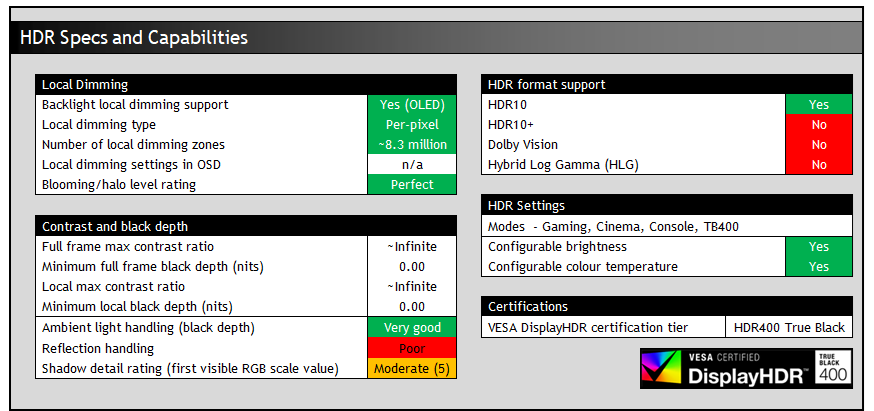
Being an OLED panel, the XG32UCWMG is well equipped to handle HDR content with its per-pixel level dimming allowing for true blacks, a basically infinite contrast ratio and the avoidance of all blooming and halos. In these regards it can easily surpass any Mini LED backlit LCD monitor. However, it cannot reach the same luminance levels as Mini LED screens, and carries a “peak brightness” spec of 1300 nits, which will then also lower as the content on your screen changes and the APL increases which is normal on this technology. This is one key area where Mini LED screens can look brighter and deliver a more impactful HDR experience.
The WOLED panel maintains better contrast and black depth in the presence of ambient light than alternative QD-OLED panels, which show raised blacks that start to go grey as ambient light increases, especially where those light sources are in front of the screen.
TrueBlack glossy WOLED (left) vs QD-OLED (right)
TrueBlack glossy WOLED (left) vs QD-OLED (right)
The new TrueBlack glossy coating also helps with black depth retention, as it doesn’t diffuse light across the panel like a matte AG coating would on alternative WOLED screens using this panel. We talked about this a lot more earlier in the review. You do need to be more mindful of mirror-like reflections with this coating as there’s no AG layer, so keep that in mind. HDR is best enjoyed in a darkened room anyway.
There’s support for HDR10 content only here, with Dolby Vision HDR missing on this and the matte WOLED PG32UCDP here, despite it being available on the QD-OLED PG32UCDM.
HDR Demo and Test Video
Test and demo the HDR on your display using our handy compilation, highlighting black depth, contrast and peak brightness capabilities.
[View here]
HDR Modes and Operation
There are 4 HDR modes available within the OSD menu – Gaming, Cinema, Console and True Black 400. Most settings are locked by default, including for brightness, contrast and the whole colour menu. Asus do provide an option called ‘adjustable HDR’ which once enabled allows you to make adjustments in those other areas if you want to make tweaks. That will become important later when considering the brightness potential of this screen.
HDR Testing Methodology Explained
Performance is measured and evaluated with a high degree of accuracy using a range of testing devices and software. The results are carefully selected to provide the most useful and relevant information that can help evaluate the display while filtering out the wide range of information and figures that will be unnecessary. For measurement, we use a UPRtek MK550T spectroradiometer which is particularly accurate for colour gamut and colour spectrum measurements. We also use an X-rite i1 Pro 2 Spectrophotometer and a X-rite i1 Display Pro Plus colorimeter for various measurements. Several other software packages are incorporated including Portrait Displays’ Calman color calibration software – available from Portrait.com.
We measure the screen at default settings (with all ICC profiles deactivated and factory settings used). The results presented can be interpreted as follows:
HDR accuracy section
- Greyscale dE – this graph tracks the accuracy of each greyscale shade measured from 0 (black) to 100 (white). The accuracy of each grey shade will be impacted by the colour temperature and gamma of the display. The lower the dE the better, with differences of <1 being imperceptible (marked by the green line on the graph), and differences between 1 and 3 being small (below the yellow line). Anything over dE 3 needs correcting and causes more obvious differences in appearance relative to what should be shown. In the table beneath the graph we provide the average dE across all grey shades, as well as the white point dE (important when considering using the screen for lots of white background and office content), and the max greyscale dE as well.
- RGB Balance and colour temperature – the RGB balance graph shows the relative balance between red, green and blue primaries at each grey shade, from 0 (black) to 100 (white). Ideally all 3 lines should be flat at the 100% level which would represent a balanced 6500k average colour temperature for all grey shades. This is the target colour temperature for desktop monitors, popular colour spaces like sRGB and ‘Display DCI-P3’ and is also the temperature of daylight. It is the most common colour temperature for displays, also sometimes referred to as D65. Where the RGB lines deviate from this 100% flat level the image may become too warm or cool. Beneath this RGB balance graph we provide the average correlated colour temperature for all grey shades measured, along with its percentage deviance from the 6500k target. We also provide the white point colour temperature and its deviance from 6500k, as this is particularly important when viewing lots of white background and office content.
- ST 2084 EOTF (PQ) tracking – this graph tracks the PQ curve in HDR mode, akin to gamma measurements in SDR. The yellow line represents the ideal PQ curve, while the grey line plots the monitors measured performance.
- Luminance, black depth and contrast ratio (top right hand table) – measuring the brightness, black depth and resulting contrast ratio of the mode being tested. The luminance figure captured here is from a standard 10% APL window area measurement, although further luminance measurements are included in a separate section to capture “peak brightness” and the luminance at other APL areas. This section also measures the black depth on the screen and the resulting contrast ratio.
For HDR, any local dimming is left enabled, and so we measure the black depth adjacent to a white test image and calculate the “local contrast ratio” from there. We also measure the black depth towards the edges of the screen, away from the white test area in order to calculate the “maximum full frame contrast ratio” across the whole panel. These figures will often be different on LCD screens with local dimming, as this dimming can be more effective for dark areas further away from light areas.
HDR colours section
- Gamut coverage (2D) – we provide measurements of the screens colour gamut for HDR relative to the very wide Rec.2020 colour space. Coverage is shown in absolute numbers as well as relative, which helps identify where the coverage extends beyond a given reference space. A CIE-1976 chromaticity diagram (which provides improved accuracy compared with older CIE-1931 methods) is included which provides a visual representation of the monitors 2D colour gamut coverage triangle as compared with Rec.2020. The higher the coverage, the better.
- dE colour accuracy – a wide range of Rec.2020 colours are tested and the colour accuracy dE measured. An average dE and maximum dE is provided along with an overall screen rating. These numbers are calculated based on the colour tone and hue, and ignore any luminance error. The lower the dE the better, with differences of <1 being imperceptible (marked by the green area on the graph), and differences between 1 and 3 being small (yellow areas). Anything over dE 3 needs correcting and causes more obvious differences in appearance relative to what should be shown. dE 2000 is used for improved accuracy and providing a better representation of what you would see as a user, compared with older dE methods like dE 1994, as it takes into account the human eye’s perceptual sensitivity to different colours.
Default Settings
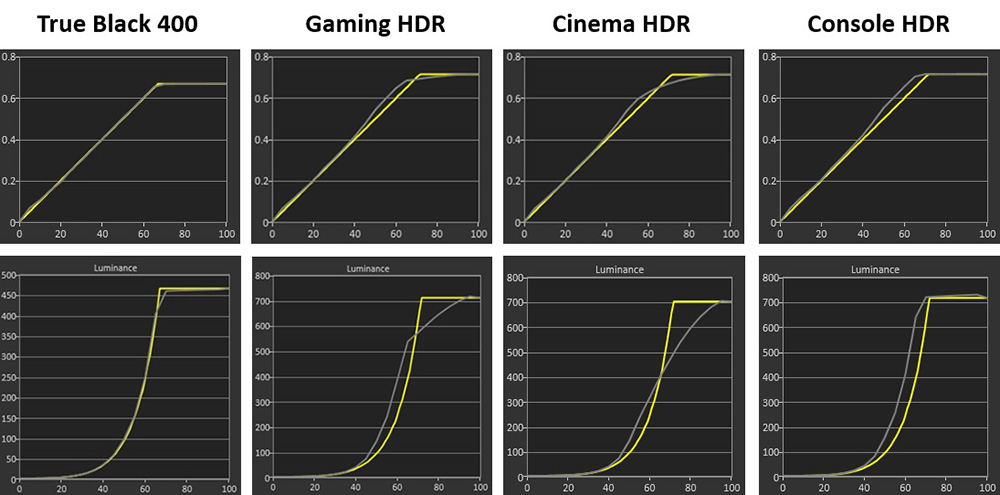
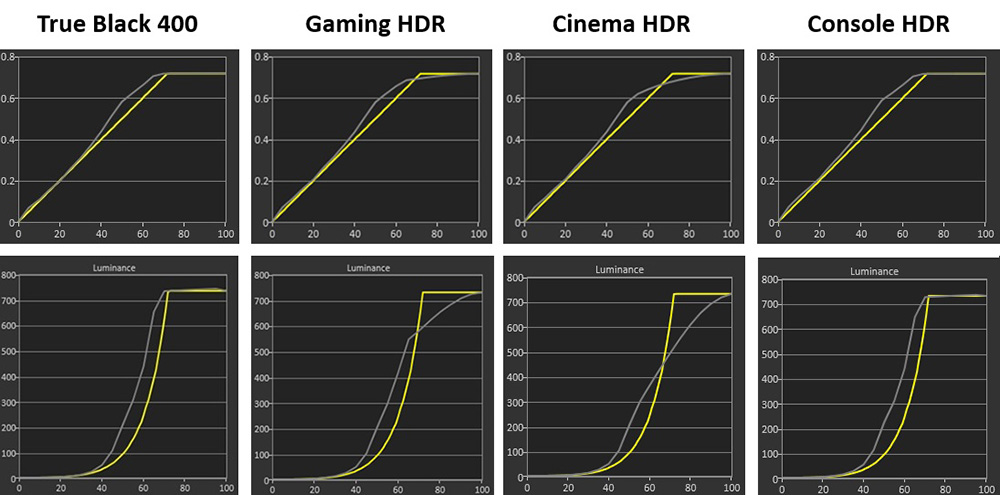
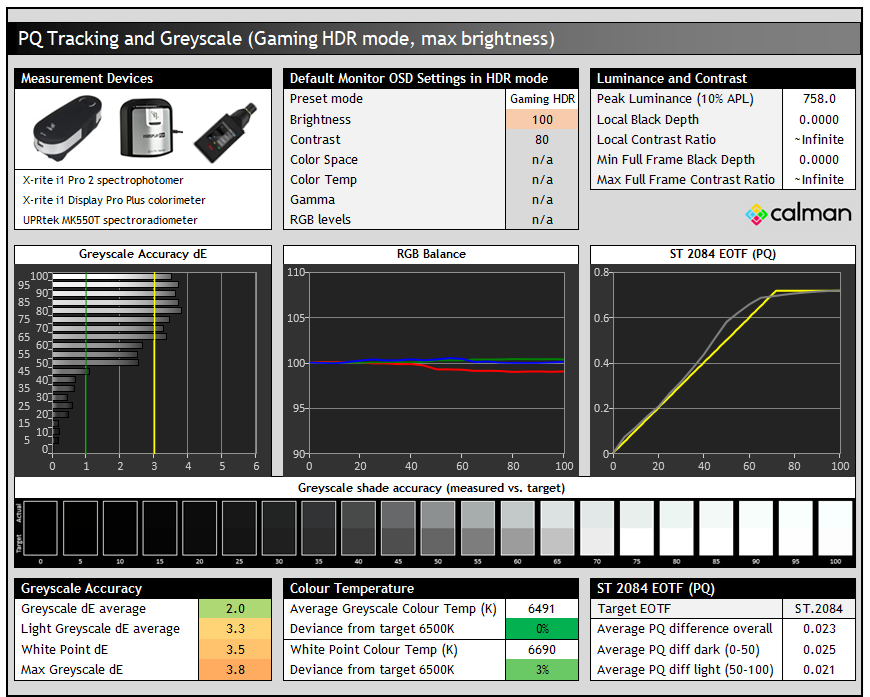
We first measured the PQ EOTF tracking in each of the four modes which is shown above using a standard 10% APL test, carried out at their default brightness settings (80% for TB400 mode, 90% for the other 3 modes). You can see that by default the True Black 400 mode provides the most accurate EOTF tracking with the 3 other modes showing some over-brightening of the image in mid to light grey shades.

The above example gives you an idea of what’s happening to the greyscale in those modes. The upper samples represent the measured shades, and the lower samples represent the target shade. As well as some slightly blue/green tinting to the greyscale caused by a slightly off RGB balance (more on that in a moment), you can see that from about sample 40 onwards, the measured shade is quite considerably brighter than the target. By about sample 60, the measured shades are basically all the same, so you lose detail when those shades should be produced as they’re getting crushed by the over-brightening.
Those 3 modes reach a higher brightness, but it’s at the cost of accuracy, with loss of detail in those grey shades and crushing to white. The 3 modes show varying degrees of roll-off with the Gaming HDR probably providing a slightly better balance between brightness and accuracy we felt. The console mode gets a little brighter overall, but at the cost of more light grey shade crushing.
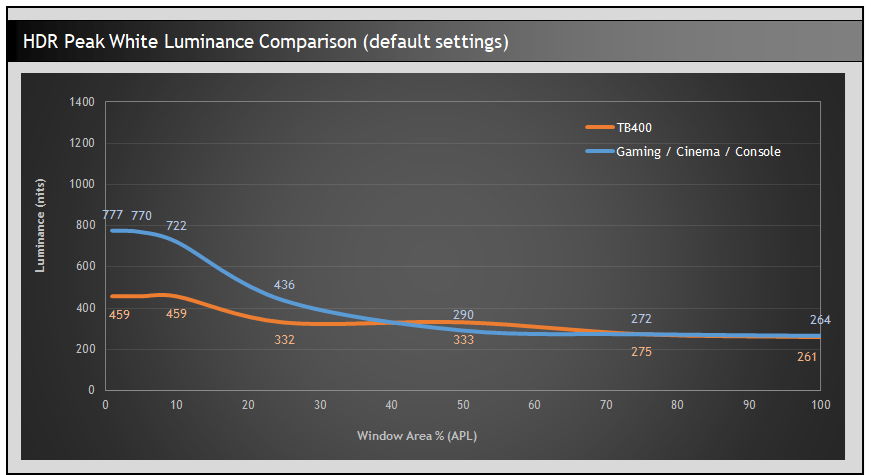
You can see the measurements for peak white luminance here as well, with the Gaming/Cinema/Console mode offering basically the same higher luminance since their default brightness setting is at 90%, whereas the TB400 mode is at 80%. Remember, this doesn’t tell the full story for screen brightness in HDR, but it’s a good initial comparison alongside the EOTF tracking performance. We expect most people will want to push for a brighter HDR experience than the capped TB400 mode.
Maximum brightness
If you push brightness up to 100% in each, you see over-brightening occurring in all modes now, even the TB400 mode which has gone from brightness 80% to 100%. This leads to loss of detail in mid to light grey shades as we explained earlier. The TB400 mode ends up being pretty similar to the Console HDR mode actually here, there’s no benefit in terms of accuracy once you start changing from its default brightness setting.
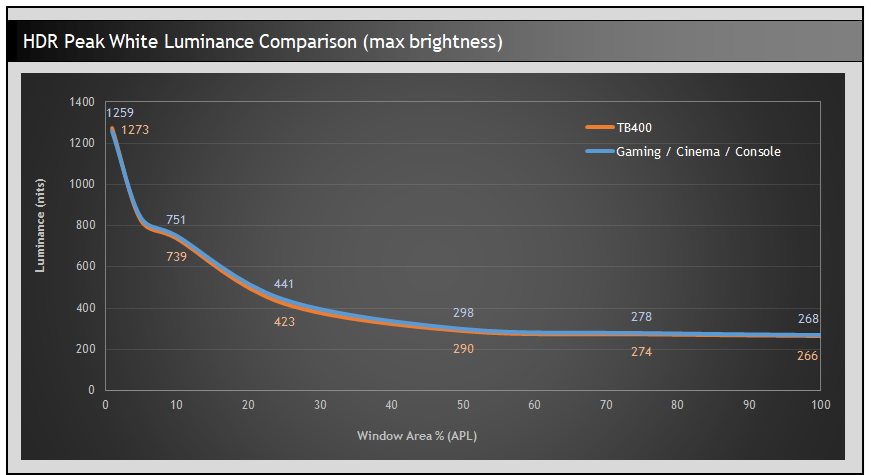
Peak white luminance is basically the same in all modes now. It reaches very close to the advertised 1300 nits peak brightness. The remaining differences are really down to roll-off and how the EOTF is handled. You can experiment with all 3 modes, but we felt like Gaming HDR provided a slightly better balance overall.
EOTF Accuracy
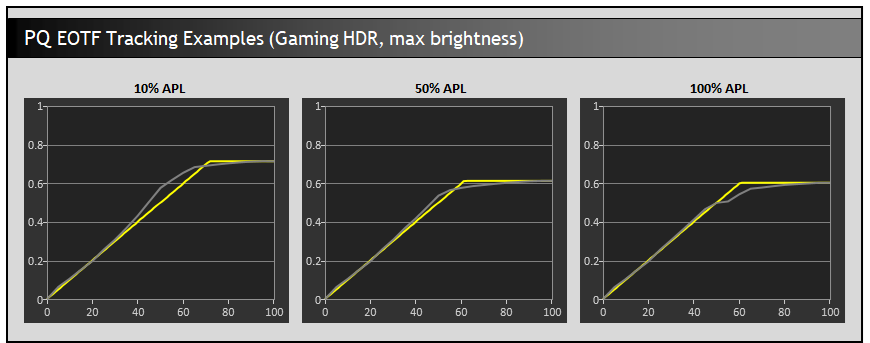
We also tested the Gaming HDR mode at a range of different APL to reveal its accuracy in different scenes, beyond the typical 10% APL measurements we’d considered earlier. As the APL increases the over-brightening of mid/light grey shades reduces which is good news. The slightly more pronounced roll-off to the EOTF curve in those higher APL scenes helps preserve tonal values for the now overall lower luminance of the panel.
It’s a very similar result to the PG32UCDP which uses the same panel, just with a matte AG coating. Although we had seen crushing of shadow detail on that screen at the time we tested it on the initial release firmware, which isn’t present here.
Greyscale and colour temp
We’ve already analysed the EOTF tracking in detail in the previous section, but we can also look at the greyscale colour temp and white point here which is the same in all the modes, regardless of whether you use the default brightness or bump that up to max. You can see that there’s a small 3% deviance from the 6500K white point target, with lighter grey shades being a little weighted towards blue and green, causing a slight bluish-green tint to those shades. This caused greyscale accuracy to drop, reaching up to dE 3.8 maximum.
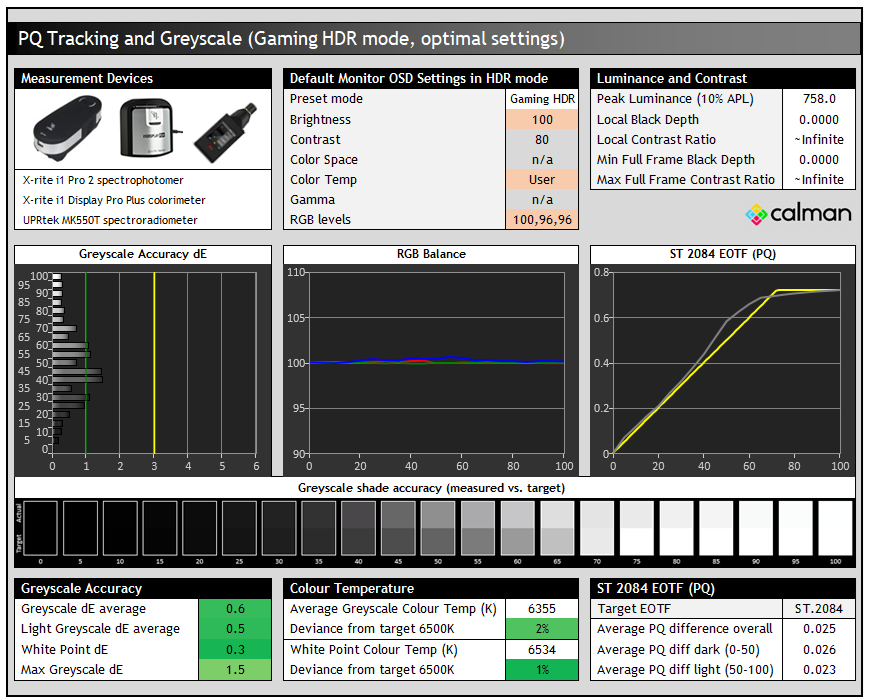
If we take it a step further, we can improve the colour temp and white point very nicely by using the ‘color’ menu and the ‘adjustable HDR’ configuration. A few tweaks to the RGB levels and we’ve got a much more accurate greyscale with dE 0.6 average / 1.5 max. The bluish-green tint has disappeared now as well.
Colour Accuracy and gamut
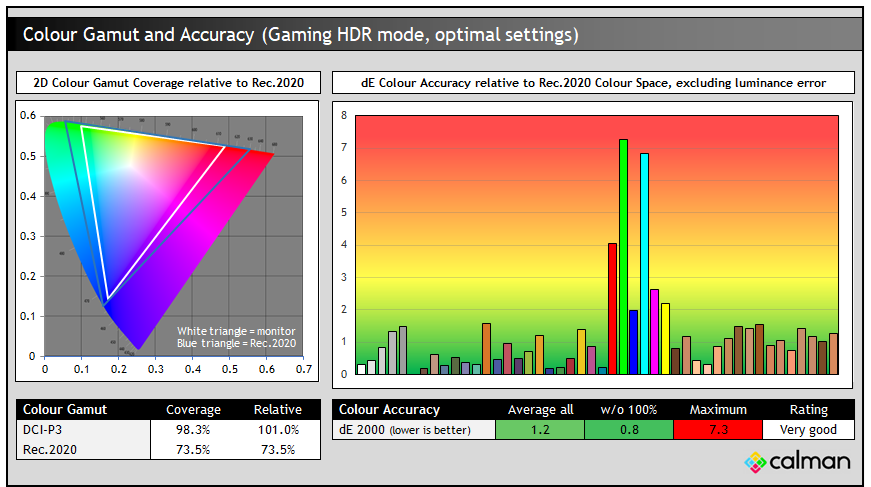
All four modes showed very similar colour gamut and colour accuracy in HDR so we’ve provided the results from the Gaming HDR mode above after we’ve adjusted for the maximum brightness and improved greyscale accuracy. The colour gamut was very close to the DCI-P3 colour space with no real change here from the SDR mode. It doesn’t look quite as vivid and colourful as the new 4th Gen WOLED panels, or QD-OLED panels which can reach higher colour gamut and colour volume. It’s basically on par with other WOLED panels we’ve tested though in this area, including the PG32UCP which has the same panel but a matte AG coating.
Conclusion
It’s great to see a glossy WOLED monitor released in the popular 32″ segment, and now we have options available from Asus for both 27″ 1440p and 32″ 4K displays. The new TrueBlack glossy coating is great, removing the minor grain from the old gen 1 glossy coating from last year while at the same time also improving black depth and reflections. If you’re a fan of glossy panels for their image clarity, sharpness and the “pop” they give to the image then you will really like this new coating. It might not be for everyone, some may prefer matte AG coatings still to help eliminate reflections and glare, but now we have the option in the 32″ WOLED segment for the first time which is great news.
A lot of the panel performance was very similar to the previous PG32UCDP model, unsurprising given it’s basically the same panel as this model. It’s very similar in terms of SDR brightness, factory calibration and HDR performance which are all solid. HDR accuracy could be improved a bit we think, as the over-brightening causes some issues in some scenes, but it still ends up being a better overall experience than most QD-OLED monitors.
It’s also got the same high pixel density and resolution and the improved sub-pixel layout which makes text clarity excellent. You’ve basically now got a choice really between a matte AG or a glossy version, or you’ve also now got the option for lower refresh rate alternatives like the XG32UCWG (165Hz, also glossy) if you want to save a bit of money and are happy with a slightly slower panel.
Gaming performance was very strong with the glossy, high pixel density, 4K 240Hz panel providing an amazing picture quality with great motion clarity, HDR support, contrast and colours. The input lag was super low, and impressive even for 60Hz input devices if you need. The dual-mode function may be useful to some gamers, and it’s a nice feature we think that differentiates these WOLED screens from their QD-OLED competition. The ELMB (BFI) mode is welcome as well for short-cutting your way to better motion clarity, helpful for lower frame rate systems and external devices that only support up to 120Hz. It’s still quite fiddly to activate and use though unfortunately and we hope Asus can add an independent brightness control between ELMB on and off modes though to make that easier to use.
It’s nice to see Asus haven’t completely stripped away the features and connections on this screen, even though it’s officially part of their lower-tier ROG Strix line-up instead of ROG Swift. That seems to be more about the stand design and the DisplayPort version nowadays. There’s still USB-C, a KVM switch, PiP/PbP support, anti-flicker modes, ELMB blur reduction and their OLED Care Pro features with Neo Proximity Sensor offered here. The USB-C power delivery is lower (15W) than the PG32UCDP (90W) but you get improvements like the Neo Proximity sensor and things like being able to use VRR when gaming with any of the aspect ratio modes – something not available on the PG32UCDP. Some users may also like the simpler, smaller stand and less gamer aesthetic to the screen.
The ROG Strix XG32UCWMG is starting to appear in some regions now to buy or pre-order. You can check latest availability and pricing using our affiliate link above. In the US it retails for $1,099.99 USD at the time of writing which makes it only $50 more than than the PG32UCDP model which is available here. If you’d prefer a QD-OLED 32″ 4K alternative then their PG32UCDM is also a great choice and is available here. The new XG32UCWMG is a great screen and is bound to be very popular with those who’ve been eagerly waiting for a glossy WOLED option in this space.

| Pros | Cons |
| TrueBlack glossy coating provides an excellent picture and is better than earlier glossy OLED coatings | ELMB activation and configuration is fiddly |
| Dual-mode function unique to WOLED panels and useful in some gaming situations | Manual adjustments in SDR and HDR modes for RGB channels not remembered independently at the moment |
| Wide range of features still included and not dropped even though it’s in the ROG Strix line-up | HDR accuracy could be improved to avoid over-brightening |
We may earn a commission if you purchase from our affiliate links in this article- TFTCentral is a participant in the Amazon Services LLC Associates Programme, an affiliate advertising programme designed to provide a means for sites to earn advertising fees by advertising and linking to Amazon.com, Amazon.co.uk, Amazon.de, Amazon.ca and other Amazon stores worldwide. We also participate in a similar scheme for Overclockers.co.uk, Newegg, Bestbuy , B&H and some manufacturers.