Philips Brilliance 27E3U7903

Introduction
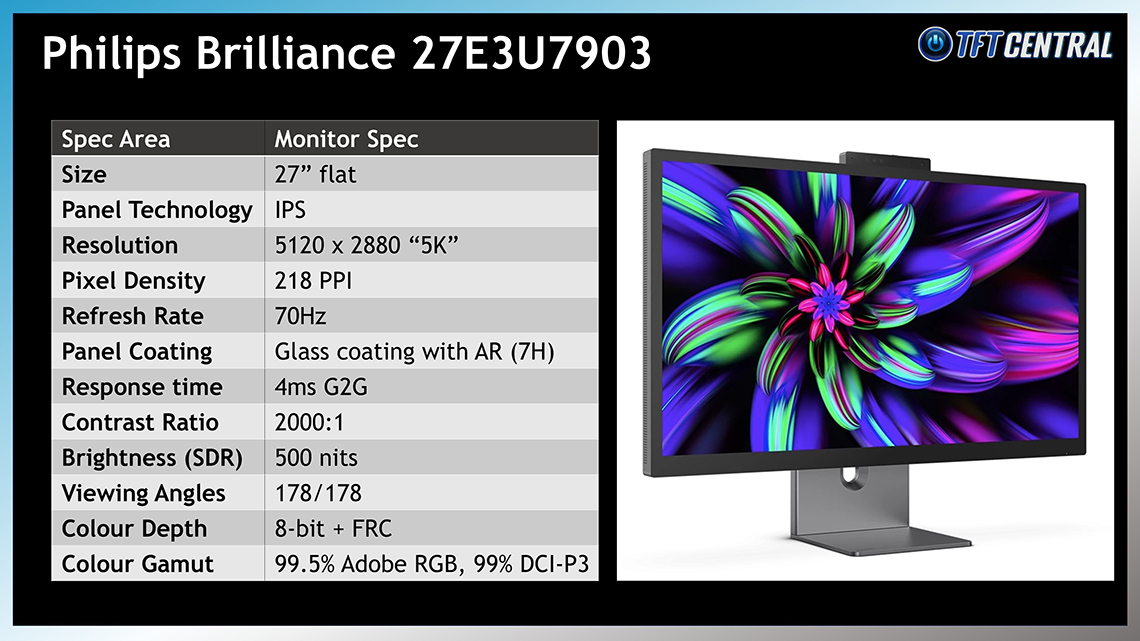
Philips have recently announced a new monitor in their ‘Brilliance’ product line-up, a model aimed at professional and office users who are looking for a super-high resolution and pixel density panel, along with a wide range of modern productivity-enhancing features. The 27E3U7903 is a 27″ sized screen built around an IPS-type LCD panel, offering a 5120 x 2880 “5K” resolution, a significant step up from the wide range of “4K” (3840 x 2160) resolution monitors you see in the market. We’ll talk a lot more about the benefits and importance of this resolution in a moment, including why it’s so highly sought-after by Apple Mac users especially.
As well as the high resolution panel, this new monitor offers a wide range of extra features that will enhance productivity and simplify your working environment. That includes modern connectivity like Thunderbolt 4, USB-C data ports and Ethernet connectivity, along with a Smart KVM function and MultiView PiP/PbP support for handling multiple inputs and systems. There’s hardware level calibration with ‘Calman Ready’ support, an integrated AI-enhanced 5MP webcam, built-in speakers, a mic input and even a glossy glass screen coating. It’s got a really extensive feature set which we will explore throughout this review.
This new Philips monitor is a direct competitor to the Apple Studio Display 5K, using (as far as we can tell) the same underlying IPS panel, offering the same panel spec, a similar feature set and even a very similar overall aesthetic design – but importantly at a fraction of the cost. We’ll make some further comparisons later on in the review as well, but let’s see how it performs in our testing.
Key Specs
- 27″ size, flat format
- IPS-type LCD panel technology
- 5120 x 2880 “5K” resolution
- Glossy glass screen coating (7H hardness, anti-reflective and anti-finger print finish)
- ‘Calman Ready’ hardware calibration support
- AI-enhanced Auto-framing 5MP webcam with Windows Hello support, integrated mic, 2x 5W speakers
- VESA DisplayHDR 600 certification and 8-zone edge lit local dimming
- 1x Thunderbolt 4 input (96W), 1x Thunderbolt 4 output (15W), 1x HDMI 2.1 video connections
- 2x USB-A and 1x USB-C (15W) data ports, 1x headphone jack, 1x RJ45 Ethernet
- Smart KVM function, PiP/PbP support, PowerSensor 2 motion sensor
- Full ergonomic adjustments from stand with tilt, height, swivel and rotate

Video Showcase
If you want to know all about the screens features, capabilities and use-cases then you might want to check out our accompanying showcase video linked above.
5K Resolution Benefits
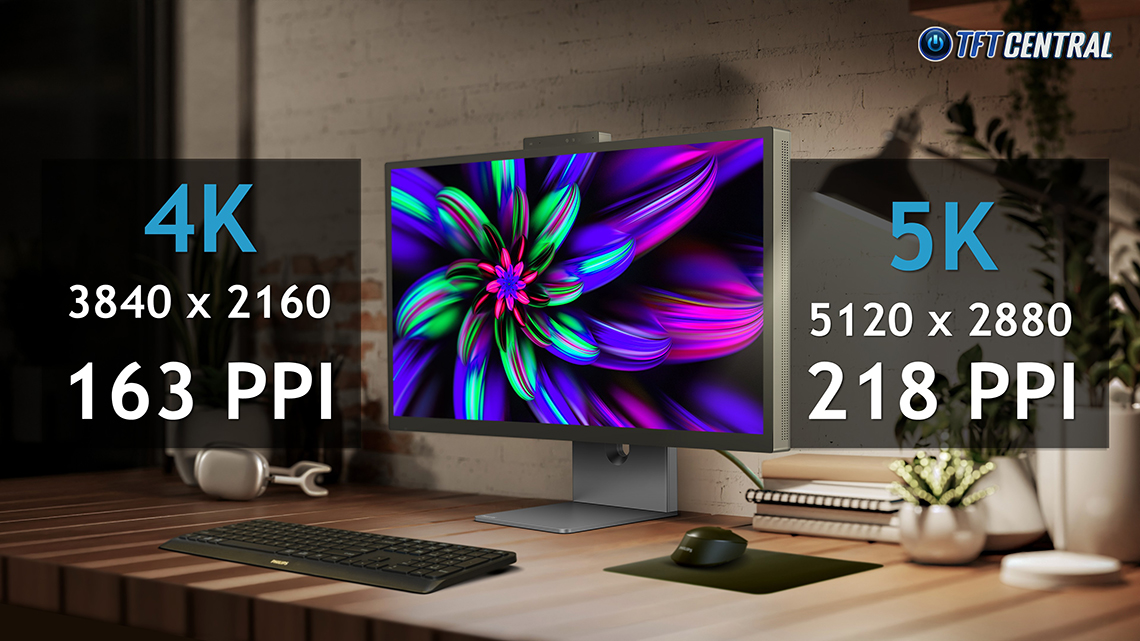
The headline spec of the new screen is its “5K” (5120 x 2880) resolution , which has been packed in to this common 27” screen size to offer a very high pixel density for an amazingly sharp and crisp image. It’s a bigger step up from common “4K” (3840 x 2160) resolutions than you might think, it’s only 1 extra “K” as it were, but 5K is actually 78% more pixels than 4K, and a 34% improvement in pixel density. Not quite double the number of pixels, but close.
As a result the image looks even clearer and sharper than those already impressive offerings. It avoids any pixelation even when you’re inspecting it up very close, and offers a really impressive image quality and clarity that gives you razor sharp text, UI elements and images, with potentially more desktop real-estate to work with as well.
On a screen of this size it’s what Apple refer to as a “Retina display resolution”, a term they use to describe displays with such high pixel density that the human eye cannot detect individual pixels at their normal viewing distance. 5K is the same resolution that’s featured on Apple’s own 27” Studio Display, a screen with a very similar design and spec, and using the same underlying panel as this Philips model, but at over double the price.
The importance of scaling
When connected to a Windows PC system, you need to use operating system scaling on a screen this size, otherwise everything is really tiny and uncomfortable. 200% scaling is what Windows recommends by default for this physical panel resolution, and that would give you the equivalent desktop area as a normal 2560 x 1440 resolution on a 27” screen, just with double the pixel density for a much sharper and clearer image.
| Scaling % | Equivalent resolution |
| 100% | 5120 x 2880 |
| 125% | 4096 x 2304 |
| 150% | 3413 x 1896 |
| 175% | 2926 x 1632 |
| 200% | 2560 x 1440 |
175% scaling is also very useable as well and would give you a nice boost in desktop area compared with a typical 1440p (2560 x 1440) monitor, while running at 150% would have similar small font size to a 31.5” monitor running at 4K without scaling that some people may find ok. You’ve got flexibility to run at lower scaling factors here anyway if you want, but the 5K resolution is really all about offering a super-high pixel density so that everything is really sharp and crisp.
5K for Mac users
A 5K resolution is considered important for Apple Mac users, where 5K is recognised by Mac OS as a Retina resolution on a screen this size, whereas common 4K resolutions are not. Mac OS natively handles scaling best where there’s a direct integer multiplication of the resolution. So having a 5K resolution that is 2x the vertical and 2x the horizontal resolution of 1440p, is optimal for pixel perfect scaling.
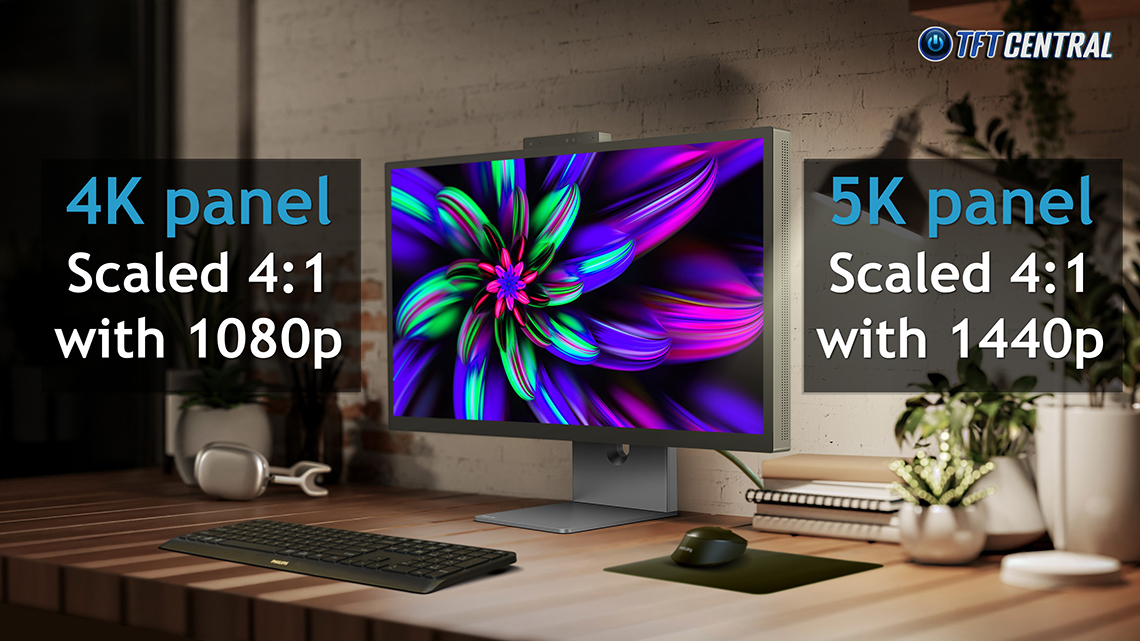
The physical resolution of the panel is exactly 4x the so-called logical resolution of 2560 x 1440 set on Mac OS and it is scaled perfectly as a result. That helps ensure a really sharp image and avoids any potential challenges or compromises. We don’t use Mac OS ourselves but some users report sub-optimal performance at non-integer scaling, 1440p doesn’t fit properly in to 4K for instance.
If you had a 4K screen then the more optimal logical resolution would be 1080p (1920 x 1080) instead as that’s exactly a quarter of the 4K resolution. You can set the logical resolution to 1440p still when connecting a 4K screen, but it may not be as sharp and free from artefacts on close inspection as if you’d done that from a 5K screen like this. There are utilities that can help improve things with Mac OS scaling, but the general view is that it’s better to have a true integer-scaling support, like going from 1440p to 5K. We’re not saying that 4K looks bad on Mac OS and many people may not notice any difference, but the pixel-perfect scaling from 1440p to 5K, combined with the obviously much higher pixel density on offer, leads to a sharper image if you have a 5K screen. That’s the resolution Apple have selected for Retina on a screen this size, and so a lot of Mac users are looking for a 5K resolution display to pair with their Mac devices.
Usage scenarios
In terms of usage scenarios, a 5K display is great for video editors and post production professionals when working on 4K content because you can view all of the content at their true native 4K resolution, and still have a fair amount of leftover extra screen space around it for UI interfaces, controls, icons, and text areas. That could be important for 4K content creation and video production. Actual media content is often in a lower 4K resolution, so it’s not really about supporting videos and multimedia any better than a 4K screen might, it’s about creating additional space for content creation in this scenario.
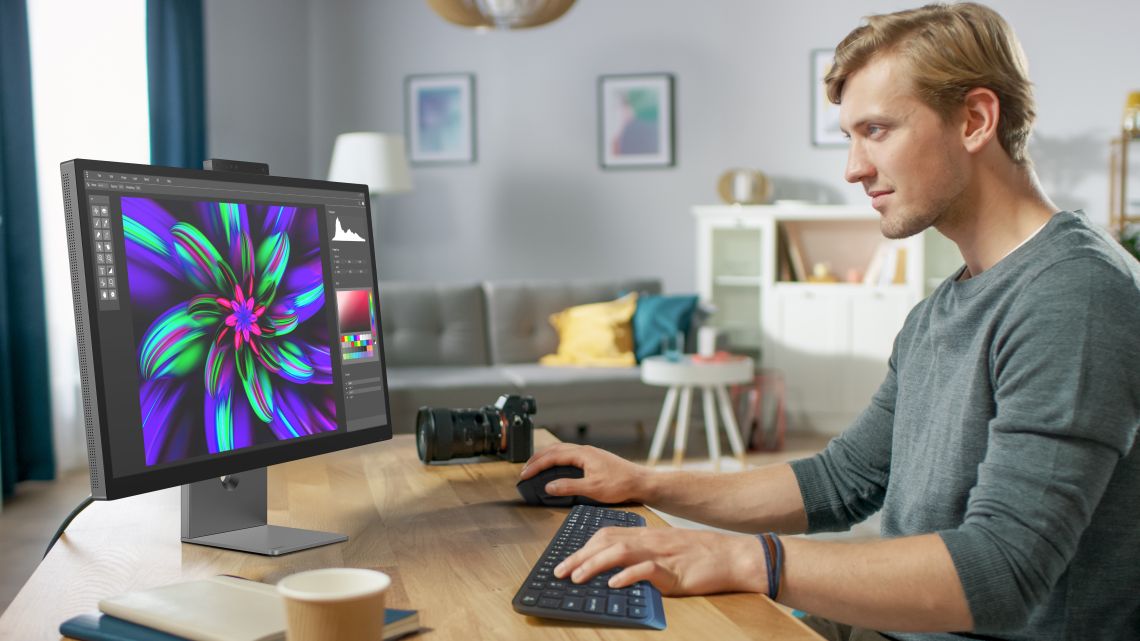
It’s also great for photographers who want to view and edit their images in amazing detail, any kind of 3D modelling or design work which needs high detail, CAD/CAM work, or for graphic designers who might want an expanded workspace.
While it will also add further detail and sharpness to games (if the resolution is supported) it’s not really a classic use-case of this kind of spec, and you should also consider the substantial additional system demands that this resolution would require. Some gamers might enjoy the much higher pixel density and sharpness for slower-paced RTS or simulation games, but it’s not a screen aimed at fast or competitive gaming due to its demanding resolution and low refresh rate (70Hz max).
Design and Features
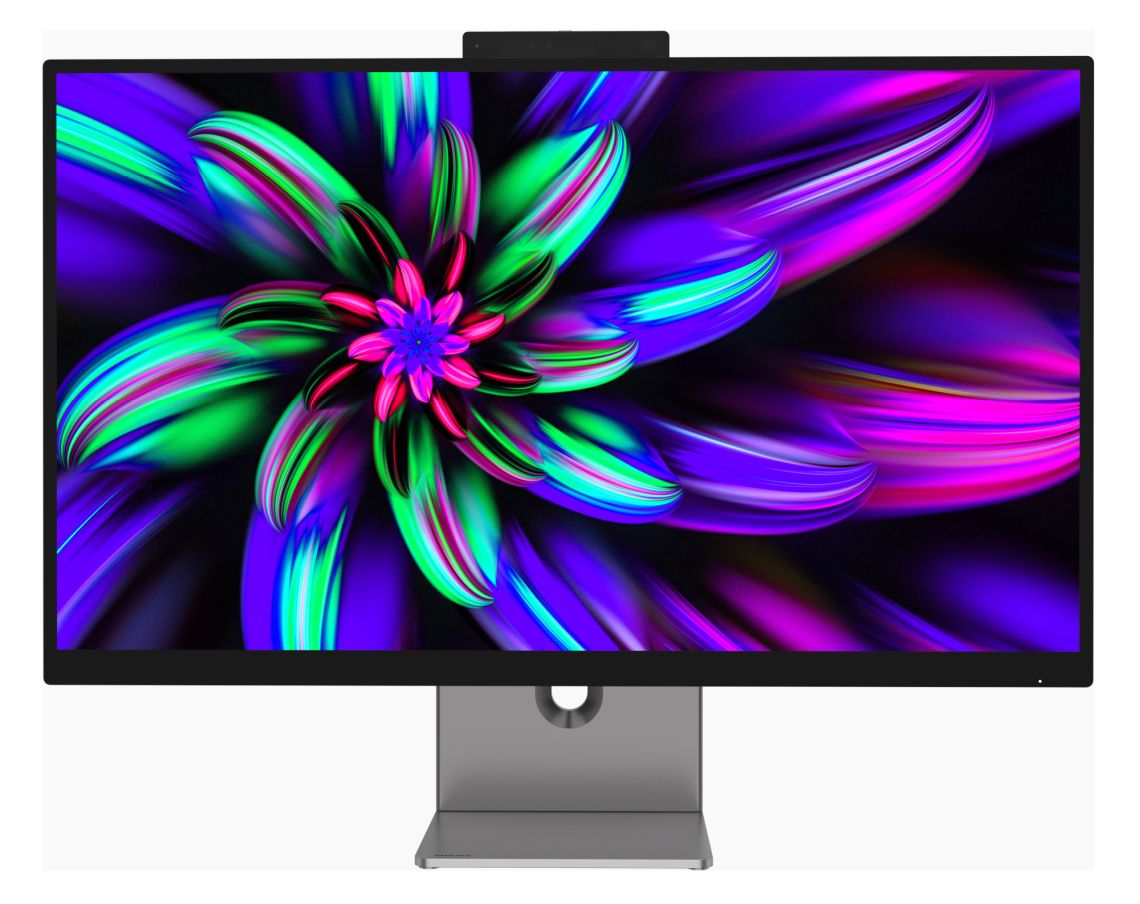
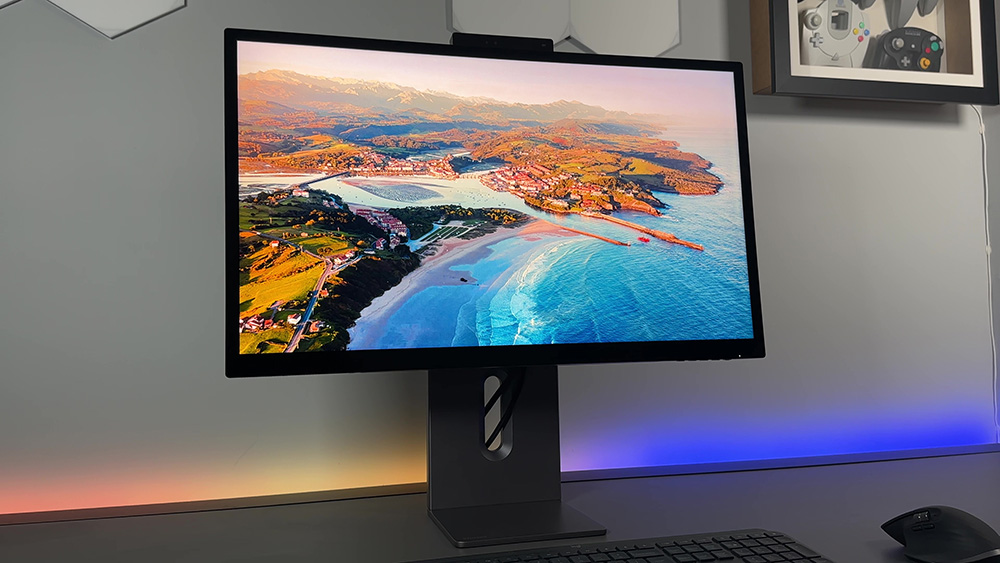
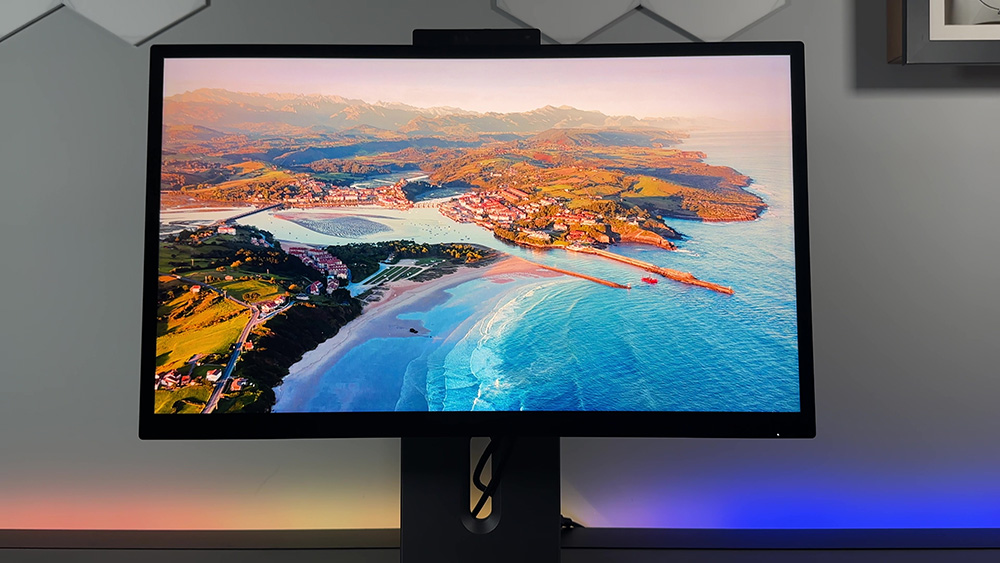
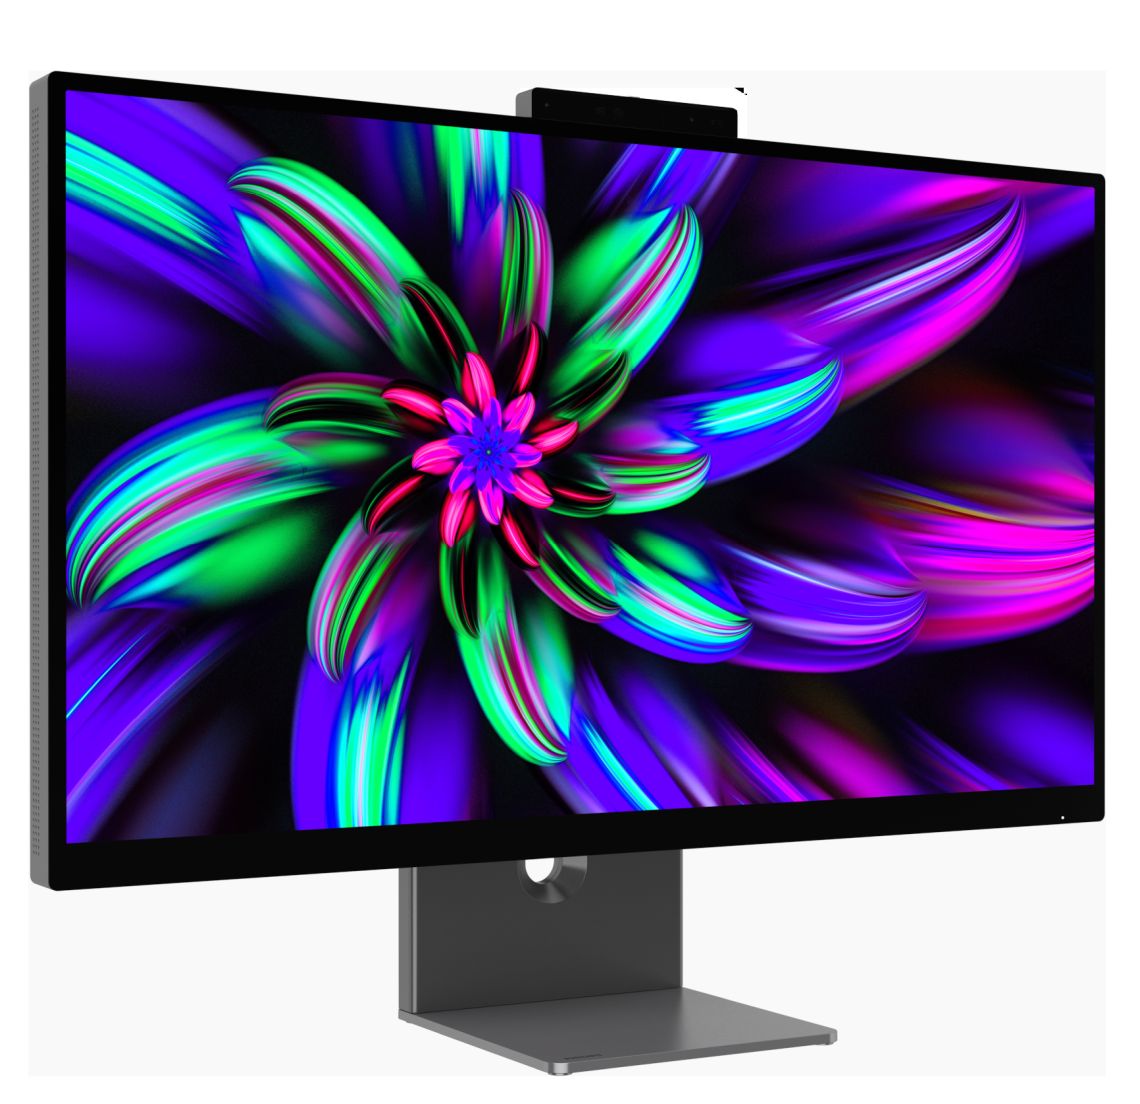
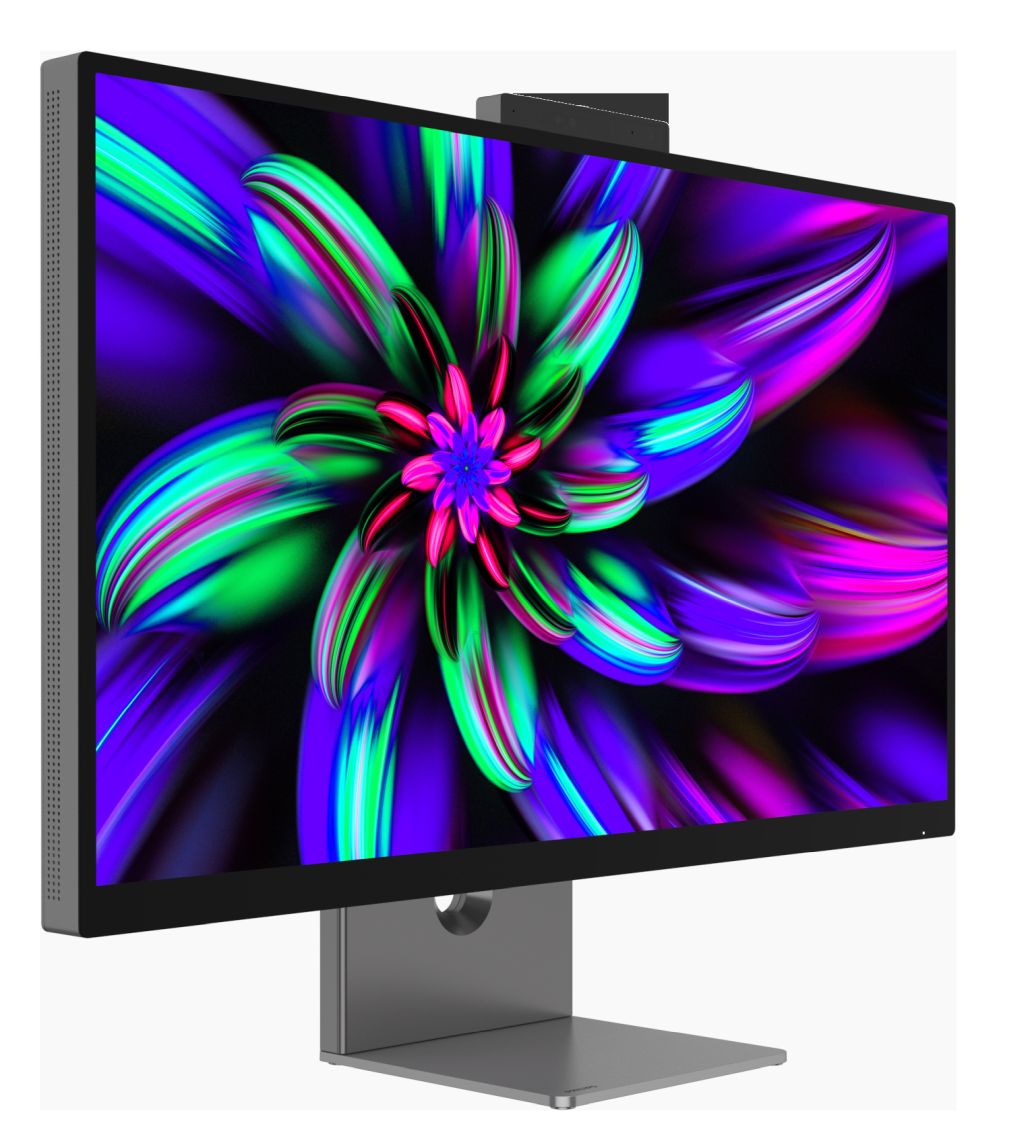
The screen offers a sleek and professional design which is very reminiscent of an Apple Studio Display in style. There’s a glossy glass screen coating which covers the entire front of the screen, including the black borders. Those borders measure 13.5mm along the side and top and 24mm along the bottom edge and are a little thicker than some of the product images suggest. Here’s a couple of real-life photos to give you a better idea:
The glass screen coating is rated with a 7H hardness and including an anti-reflective and anti-fingerprint treatment. This provides a sharp and clear image, free from any kind of grain that you might see on typical matte anti-glare coatings, helping the image “pop” more. The anti-reflective treatment does a reasonable job of reducing mirror-like reflections too, although of course you need to be more mindful of the positioning of the screen relative to external light sources and windows, as it will suffer from more glare and reflections than a matt AG coating would. The glass coating offers a harder and more robust finish than standard glossy coating as well, and adds to the premium feel of the screen.
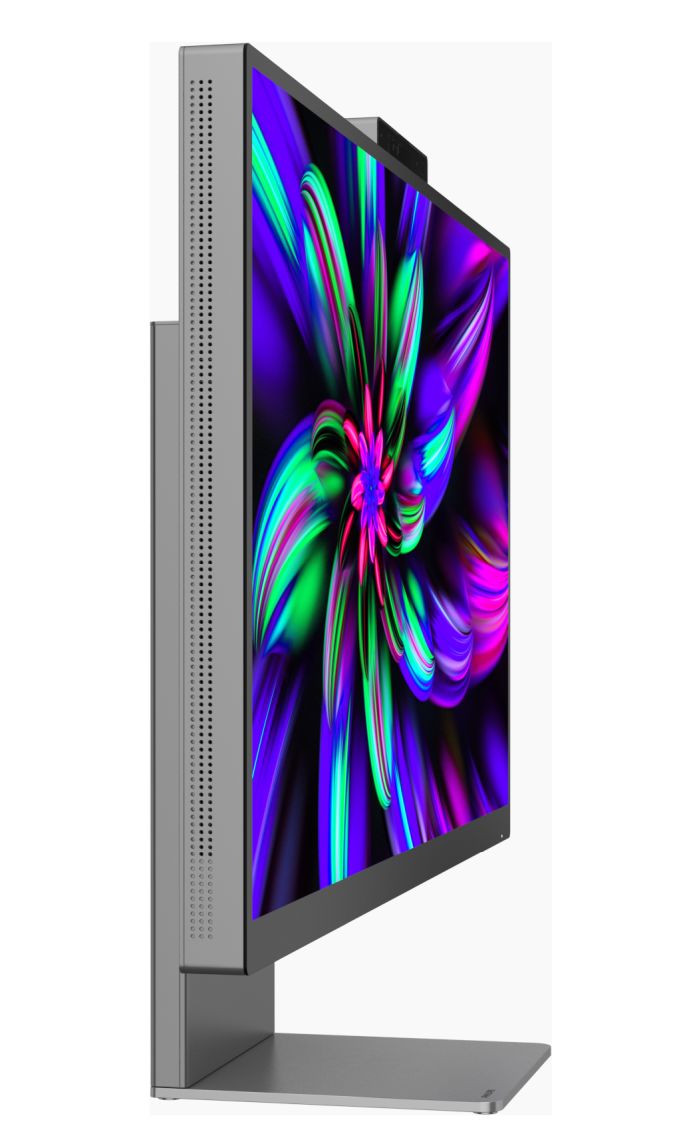
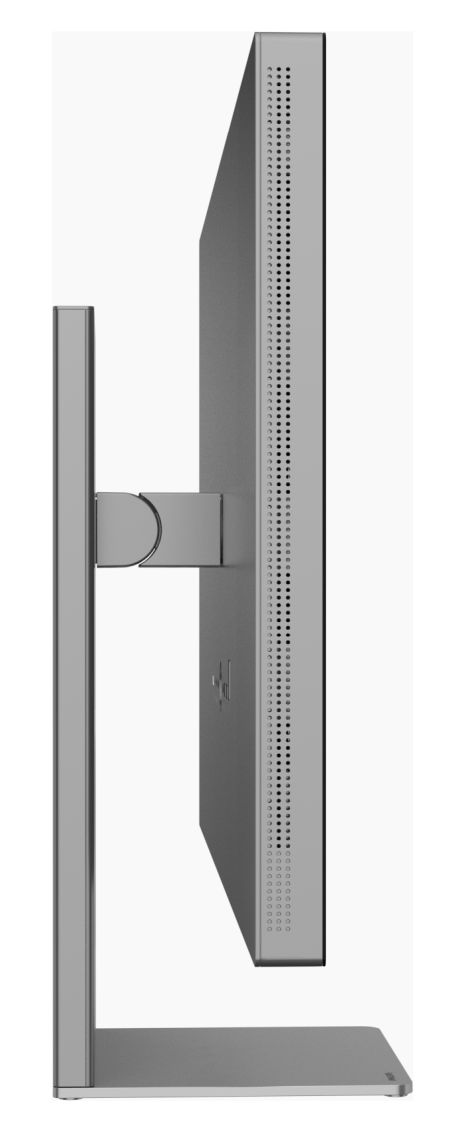
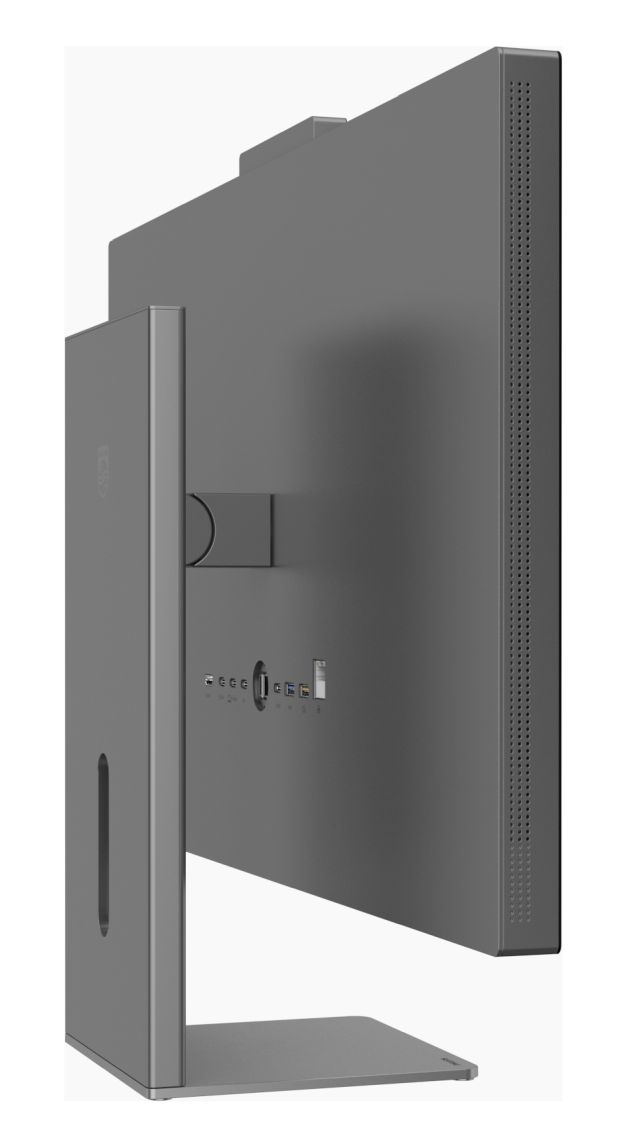
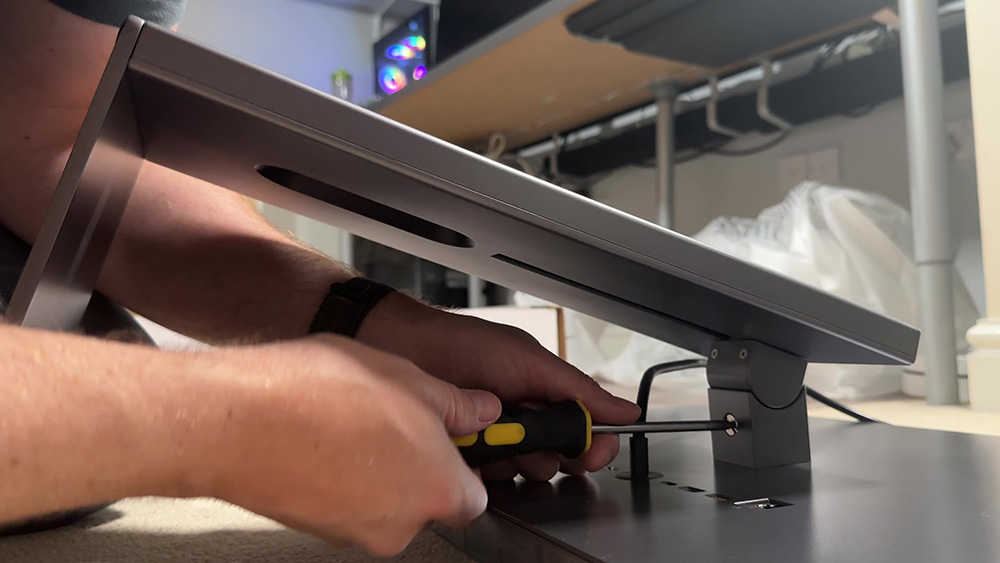
The panel and all the electronics are contained within a single housing which has a uniform thickness across the whole screen area, measuring 28mm, which gives a nice appearance. This is encased in a dark silver matte plastic with some small ventilation holes around the sides and top. The stand is packaged separately in the box and needs to be screwed in to the back of the screen so there’s no quick-release attachment here. There is a VESA 100 x 100 bracket provided in the box as well in case you want to wall- or arm-mount the screen instead.
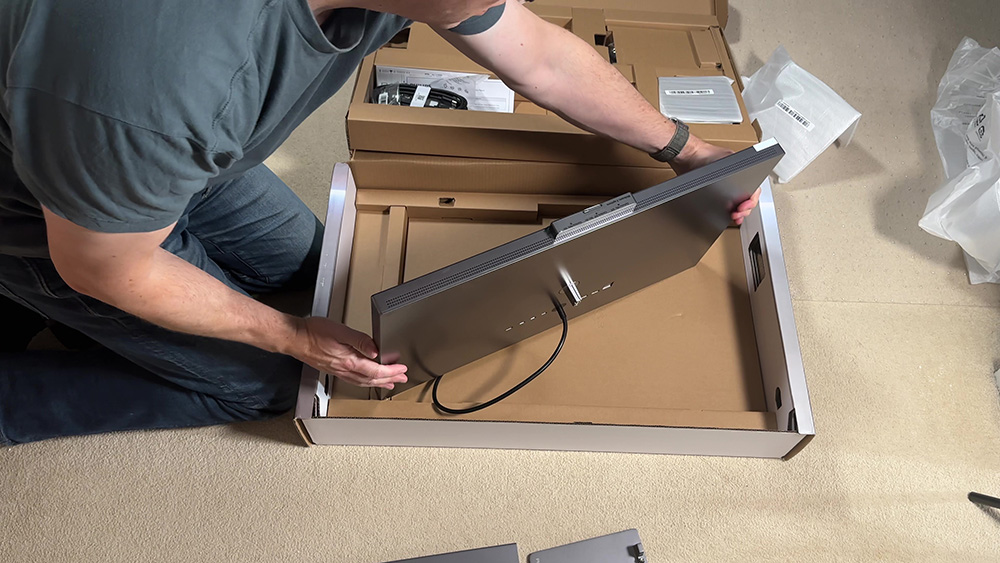
One thing we should note that we’ve never seen on any monitor we’ve tested is that there is a power cord permanently connected to the back of the screen that you can see in some of our unboxing photos above. This has a kettle lead female socket on the end, so you just plug a normal kettle power lead in to it, rather than plugging it in to the monitor directly. The power supply is built in to the screen so there’s no need for any external power brick, and ultimately it makes no real difference, it’s just unusual.
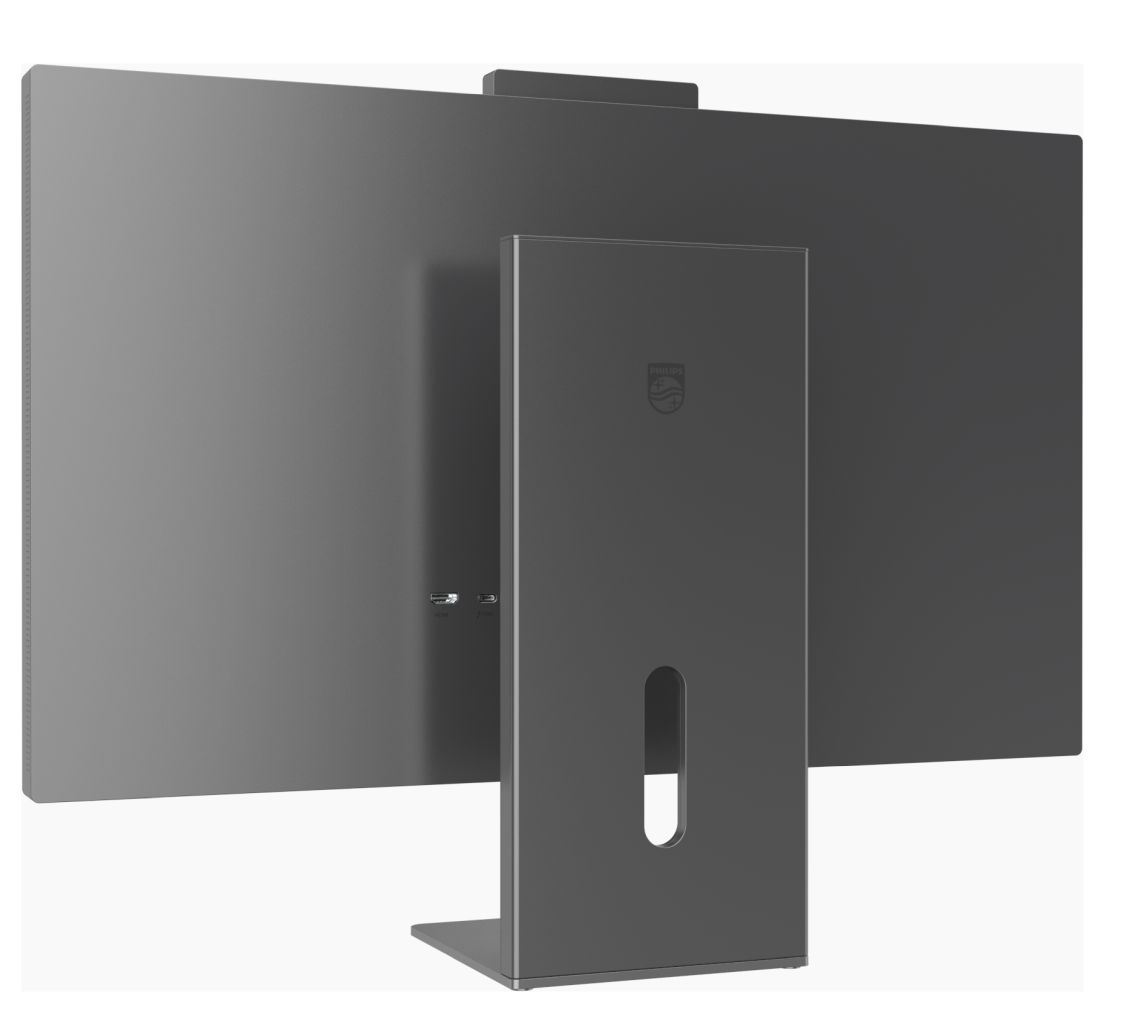
The stand is finished in the same dark silver matte plastic with a simple but nice-looking design. There’s a cable tidy hole in the back of the stand as you can see from the photos above, and a thin and small dark silver metal foot which has to be screwed on to the stand as well when you unbox it. Sometimes the angles of the cables are tricky to thread through the cable tidy hole due to their perpendicular connection in to the back of the screen, especially if you then want to alter the stand positioning and angle.
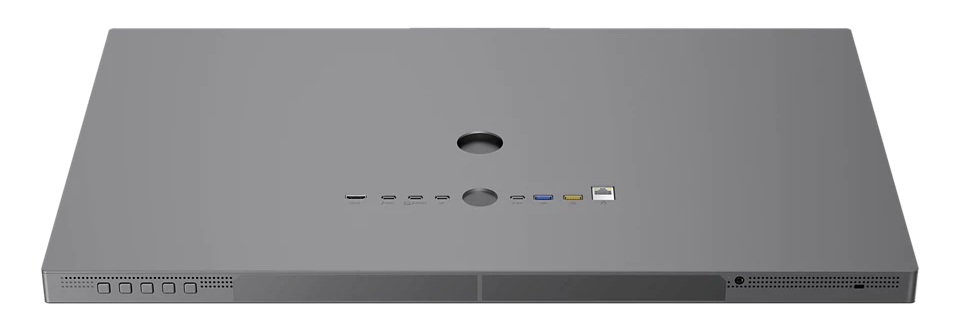
On the back of the screen there’s a wide range of connectivity options available including 1x Thunderbolt 4 input (including video, data and 96W power delivery), 1x Thunderbolt 4 output for daisy chaining (with video, data and 15W power delivery) and 1x HDMI 2.1 input video connections. It would have been useful to see an additional DisplayPort connection provided here to support PC connectivity more simply, as not everyone has an HDMI 2.1-capable graphics card and the spec is beyond the bandwidth of HDMI 2.0 connections considerably. If you’ve got only an older graphics card with HDMI 21.0 you won’t be able to use that here.
You could potentially use DisplayPort > USB-C (via the Thunderbolt input) to connect to the screen as well, although you may have wanted to keep that connection free for other devices perhaps.
Along with the video connections there are also 1x headphone jack, 1x RJ45 Ethernet (10M / 100M / 1G), 2x USB-A (Gen 2: 10G, 1 for FC) and 1x USB-C (data only, with 15W power delivery) available. There’s also a USB-C upstream port to connect back to your system.
The stand offers a full range of tilt, height, swivel and rotate adjustments. They’re all smooth to use, although tilt and height are a little stiff to operate. The whole screen swivels side to side thanks to a rotating section built in to the bottom of the stand foot. There’s a bit of wobble to the screen as you move it around or use the OSD-control buttons, but it remains pretty sturdy on the desk during normal day to day usage.
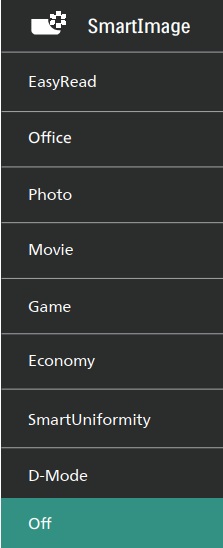
The OSD menu is controlled via 5 buttons on the bottom right hand edge of the screen with a decent range of options to configure. Navigation is quick, but not always as intuitive and simple as screens which have a joystick toggle for navigation. There’s quick access to the ‘SmartImage’ preset mode menu (shown above) and the colour space modes which is useful.
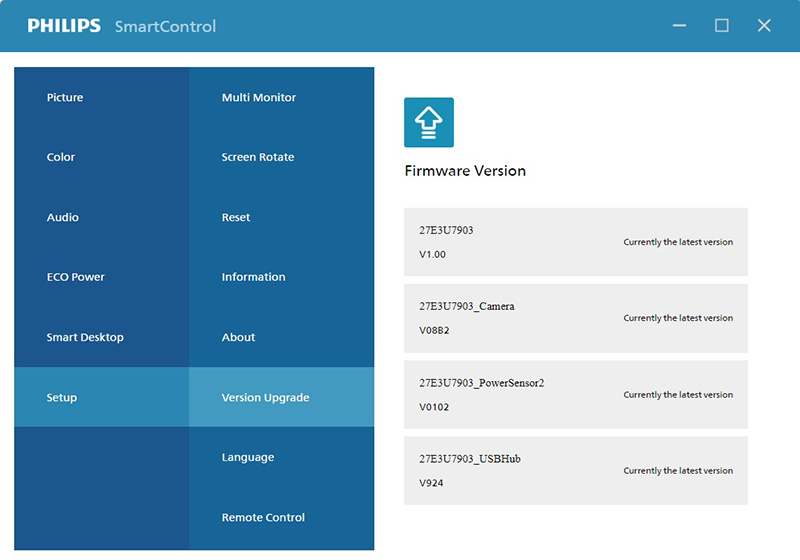
You can also control the screen using Philips’ “SmartControl” software, and that includes support for firmware updates too.
| OSD Menu | |
| Joystick toggle controller | |
| Quick and snappy | |
| Intuitive to use | Moderately |
| User updatable firmware |
Brightness and Contrast (SDR)
For this testing we moved out of the default power saving configuration, but left all other settings at their default. The screen operates in its full native gamut mode, configured in the menu to 6500K colour temp and 2.2 gamma.

The brightness adjustment range from the backlight was very wide, with a maximum luminance of 671 nits measured, considerably beyond the specified 500 nits in fact. At the bottom end of the brightness control adjustment the screen could reach a nice low luminance of 45 nits which should be fine for users wanting to use the screen in darkened room conditions and low ambient lighting. Contrast was stable across the adjustment range, measured at 2005:1 average which was very good for an IPS-type LCD panel, and in line with the 2000:1 spec nicely. Backlight dimming is flicker free without the need for PWM which is great news.
Testing Methodology Explained (SDR)

Performance is measured and evaluated with a high degree of accuracy using a range of testing devices and software. The results are carefully selected to provide the most useful and relevant information that can help evaluate the display while filtering out the wide range of information and figures that will be unnecessary. For measurement, we use a UPRtek MK550T spectroradiometer which is particularly accurate for colour gamut and colour spectrum measurements. We also use an X-rite i1 Pro 2 Spectrophotometer and a X-rite i1 Display Pro Plus colorimeter for various measurements. Several other software packages are incorporated including Portrait Displays’ Calman color calibration software – available from Portrait.com.
We measure the screen at default settings (with all ICC profiles deactivated and factory settings used), and any other modes that are of interest such as sRGB emulation presets. We then calibrate and profile the screen before re-measuring the calibrated state.
The results presented can be interpreted as follows:
- Gamma – we aim for 2.2 gamma which is the default for computer monitors in SDR mode. Testing of some modes might be based on a different gamma but we will state that in the commentary if applicable. A graph is provided tracking the 2.2 gamma across different grey shades and ideally the grey line representing the monitor measurements should be horizontal and flat at the 2.2 level, marked by the yellow line. Depending on where the gamma is too low or too high, it can have an impact on the image in certain ways. You can see our gamma explanation graph to help understand that more. Beneath the gamma graph we include the average overall gamma achieved along with the average for dark shades (0 black to 50 grey) and for lighter shades (50 grey to 100 white).
- RGB Balance and colour temperature – the RGB balance graph shows the relative balance between red, green and blue primaries at each grey shade, from 0 (black) to 100 (white). Ideally all 3 lines should be flat at the 100% level which would represent a balanced 6500K average colour temperature for all grey shades. This is the target colour temperature for desktop monitors, popular colour spaces like sRGB and ‘Display DCI-P3’ and is also the temperature of daylight. It is the most common colour temperature for displays, also sometimes referred to as D65. Where the RGB lines deviate from this 100% flat level the image may become too warm or cool, or show a tint towards a certain colour visually. Beneath this RGB balance graph we provide the average correlated colour temperature for all grey shades measured, along with its percentage deviance from the 6500K target. We also provide the white point colour temperature and its deviance from 6500K, as this is particularly important when viewing lots of white background and office content.
- Greyscale dE – this graph tracks the accuracy of each greyscale shade measured from 0 (black) to 100 (white). The accuracy of each grey shade will be impacted by the colour temperature and gamma of the display. The lower the dE the better, with differences of <1 being imperceptible (marked by the green line on the graph), and differences between 1 and 3 being small (below the yellow line). Anything over dE 3 needs correcting and causes more obvious differences in appearance relative to what should be shown. In the table beneath the graph we provide the average dE across all grey shades, as well as the white point dE (important when considering using the screen for lots of white background and office content), and the max greyscale dE as well.
- Luminance, black depth and contrast ratio (static) – measuring the brightness, black depth and resulting contrast ratio of the mode being tested, whether that is at default settings or later after calibration and profiling. We aim for 120 cd/m2 luminance which is the recommended luminance for LCD/OLED desktop monitors in normal lighting conditions. Black depth should be as low as possible, and contrast ratio should be as high as possible.
- Shadow detail – this is evaluated with the screen configured to a 200 nits white luminance for consistency between different monitors, and viewed in a dimly lit room. This first 16 greyscale shades are measured using our UPRTek MK550T spectro device (0.002 nits lower limit) for shades near-black, and the results are plotted on a graph relative to a target gamma curve (usually 2.2 gamma). Where the measurement line crosses the 0.01 nits point on the Y-axis is typically the visual threshold for where we would start to be able to detect luminance compared with black (0.00 nits). We combine these objective measurements with visual tests using a grey shade test pattern to determine the first visible shade, and then rank the shadow detail performance accordingly.
- Gamut coverage – we provide measurements of the screens colour gamut relative to various reference spaces including sRGB, DCI-P3, Adobe RGB and Rec.2020. Coverage is shown in absolute numbers as well as relative, which helps identify where the coverage extends beyond a given reference space. A CIE-1976 chromaticity diagram (which provides improved accuracy compared with older CIE-1931 methods) is included which provides a visual representation of the monitors colour gamut coverage triangle as compared with sRGB, and if appropriate also relative to a wide gamut reference space such as DCI-P3. The reference triangle will be marked on the CIE diagram as well.
- dE colour accuracy – a wide range of colours are tested and the colour accuracy dE measured. We compare these produced colours to the sRGB reference space, and if applicable when measuring a wide gamut screen we also provide the accuracy relative to a specific wide gamut reference such as DCI-P3. An average dE and maximum dE is provided along with an overall screen rating. The lower the dE the better, with differences of <1 being imperceptible (marked by the green area on the graph), and differences between 1 and 3 being small (yellow areas). Anything over dE 3 needs correcting and causes more obvious differences in appearance relative to what should be shown. dE 2000 is used for improved accuracy and providing a better representation of what you would see as a user, compared with older dE methods like dE 1994, as it takes into account the human eye’s perceptual sensitivity to different colours.
Default Setup (SDR)
The screen comes out of the box set to the 6500K ‘color temperature’ mode, and operates with the full native colour gamut of the backlight. Other emulation and preset modes are available in the menu for more accurately working with different targets, but we measured the default out-of-the-box setup here first:
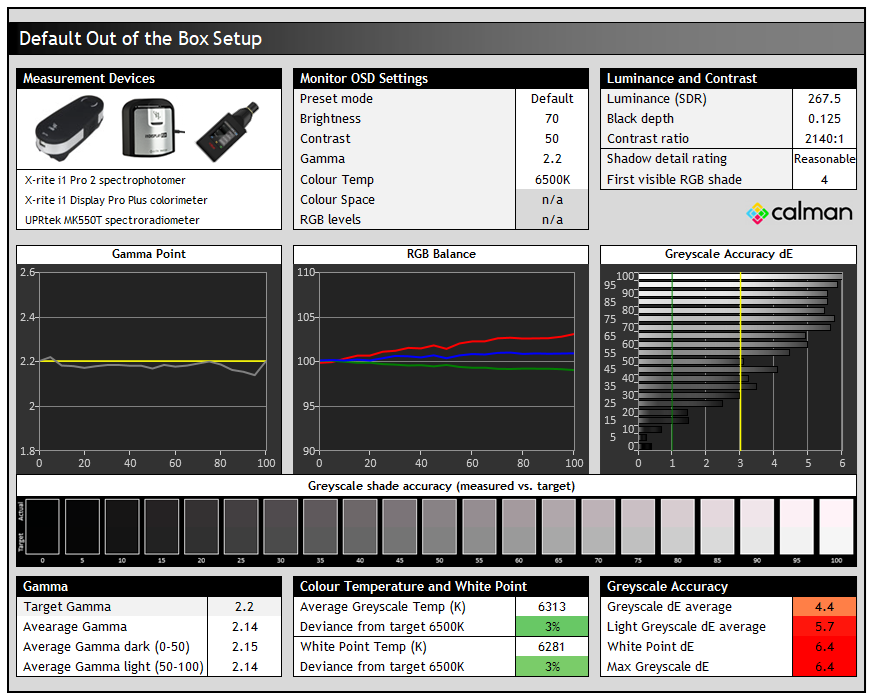
Gamma tracking was very good overall and we measured a 2.14 average with a strong performance across the greyscale which was only a little lower than the target of 2.2. The colour balance on the middle graph showed a weighting towards red and blue channels which resulted in a slight pinkish tint to grey shades, demonstrated by the actual vs. target sample patches shown in the middle section. That impacted greyscale accuracy unfortunately with a poor dE 4.4 average measured. Shadow detail was reasonable with the first greyscale shade visible being RGB 4, somewhat restricted here by the IPS LCD panel and the limited contrast ratio and black depth inherent to this panel technology.
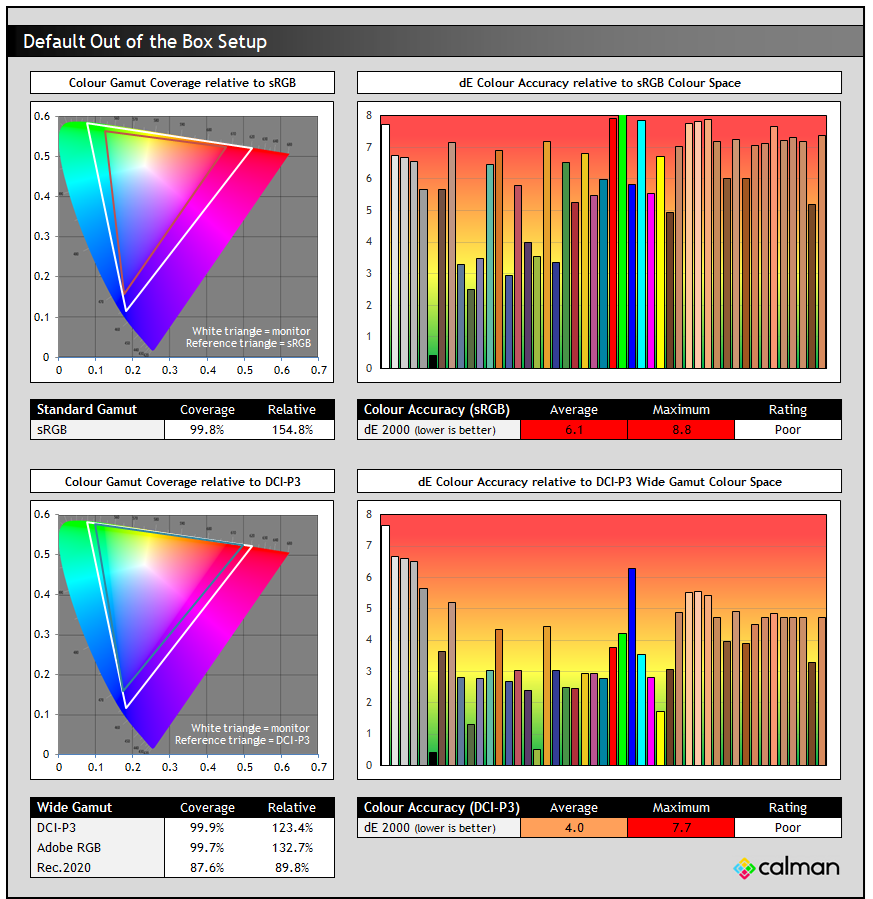
The native colour gamut of the screen was very wide, with massive over-coverage compared with the sRGB reference space used for SDR content. We measured ~154.8% relative coverage in fact, and this led to the usual poor accuracy for sRGB colours. That’s common on wide gamut screens and we’ll look at ways to improve this in a moment for sRGB content.
In the bottom section you can see that the native colour space covers DCI-P3 and Adobe RGB very well at ~100% absolute coverage, but again extends a considerable way beyond those spaces by about 23 – 33%. DCI-P3 colours were still rated as “poor” with dE 4.0 average because of this over-coverage and because of the pretty poor greyscale accuracy we’d seen before.
You’ll almost certainly want to use one of the other modes or calibrate the screen yourself for more accurate performance.
sRGB emulation mode

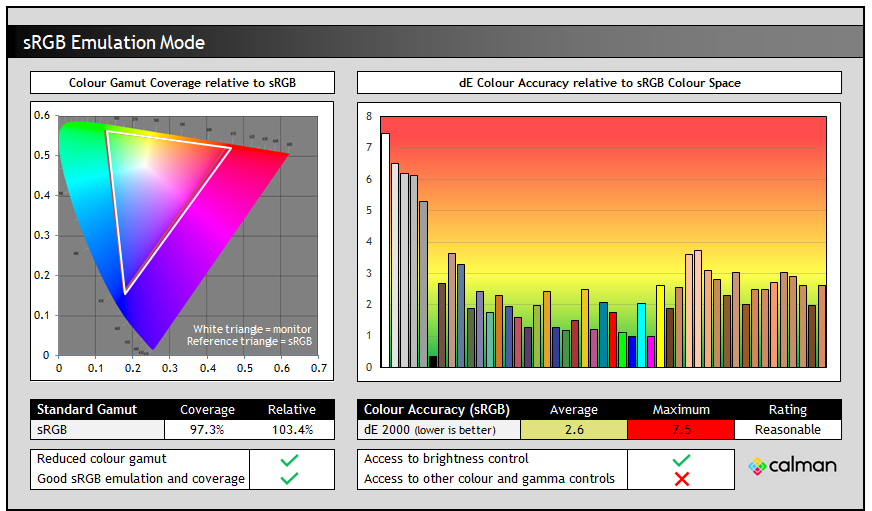
The screen provides a dedicated sRGB preset mode which offers a clamping of the very wide native colour space back to very close to the sRGB references space, used for SDR applications and content. Gamma remains excellent in this mode, but there’s still a slight pinkish tint to grey shades caused by an imbalance in the RGB channels. The main difference in this mode is the drastically reduced colour space, now being nicely clamped back close to sRGB. That in turn improves the accuracy of sRGB colours with a dE average of 2.6 measured which was reasonable.
We’d have liked to have seen a better greyscale accuracy here, which would have in turn improved colour accuracy a bit too. You have access to some settings in the OSD menu still in this mode, including brightness thankfully so that you can adjust that to your preference. But the colour temp, RGB and gamma controls are all unavailable when using this and the other preset modes. Note that the gamma setting is accessible, but if you change it, the screen just moves you back to the native mode again.
DCI-P3 emulation modes
Philips provide two preset modes designed to be used for DCI-P3 content, one for ‘Display P3’ and the other for ‘DCI-P3’. The former is configured to a 2.2 gamma and D65 white point, while the latter is configured to the 2.6 gamma and D65 white point associated with that standard.
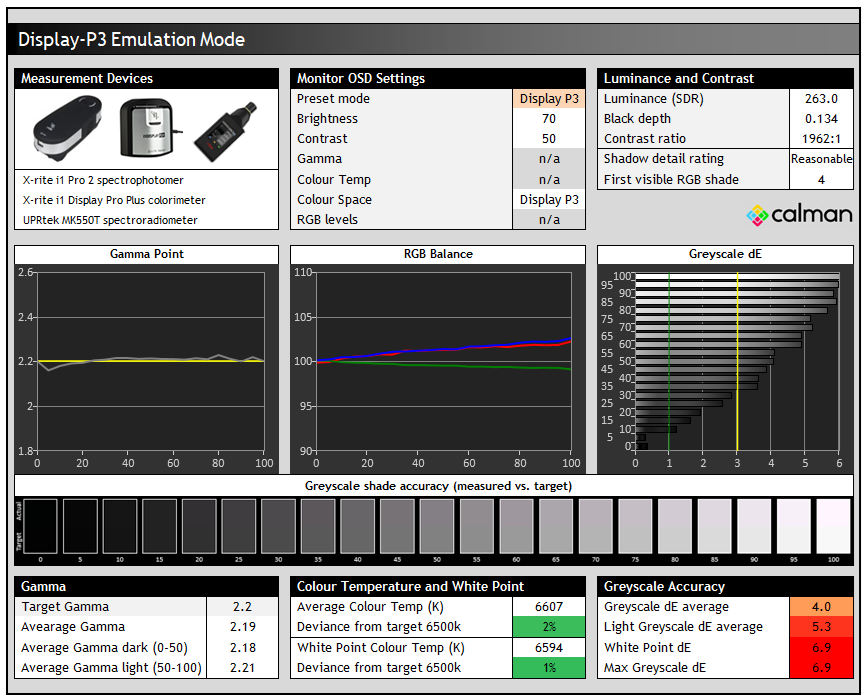
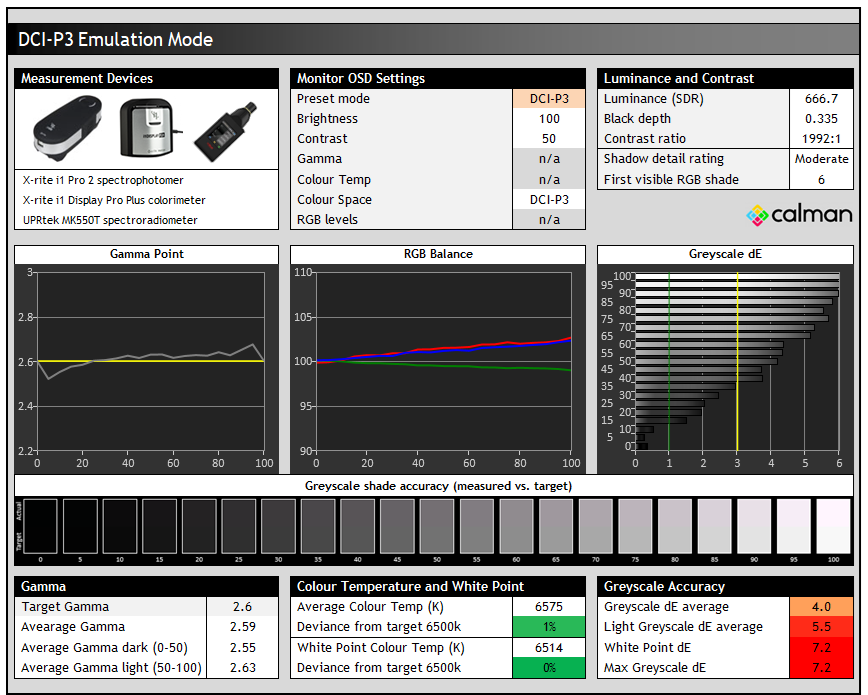
The main difference between the two modes is with the gamma, with the Display P3 mode following 2.2 gamma very closely and the DCI-P3 mode following 2.6 gamma instead. With the higher gamma in the DCI-P3 mode, shadow detail is not quite as good so keep that in mind but then this configuration is designed for specific use cases and for those wanting to work with a 2.6 gamma. The DCI-P3 mode also has a higher default brightness setting of 100%, whereas the Display P3 mode is on 70% by default.
There is one other configuration available which is labelled ‘DCI-P3 (D50)’ which is configured to a 2.6 gamma but a much warmer white point of 5089K from our testing, very close to the intended D50 target. No other changes in that mode other than the warmer colour temp.
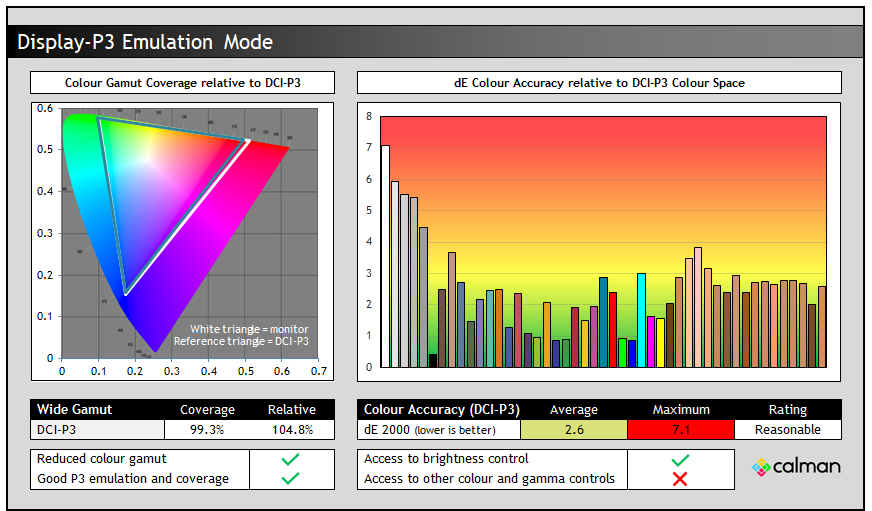

There’s no real difference at all when it comes to colour space clamping or colour accuracy in these two modes, with both offering a good clamping back close to the DCI-P3 colour space which is great. That’s a colour space commonly used in HDR content creation and consumption. Like the sRGB emulation mode there was access to the brightness control but no other colour or gamma settings.
Adobe RGB emulation mode
There’s also a couple of Adobe RGB emulation modes available. The main mode is configured to 2.2 gamma and D65 white point, while a separate D50 mode is configured to that warmer colour temp if you need.
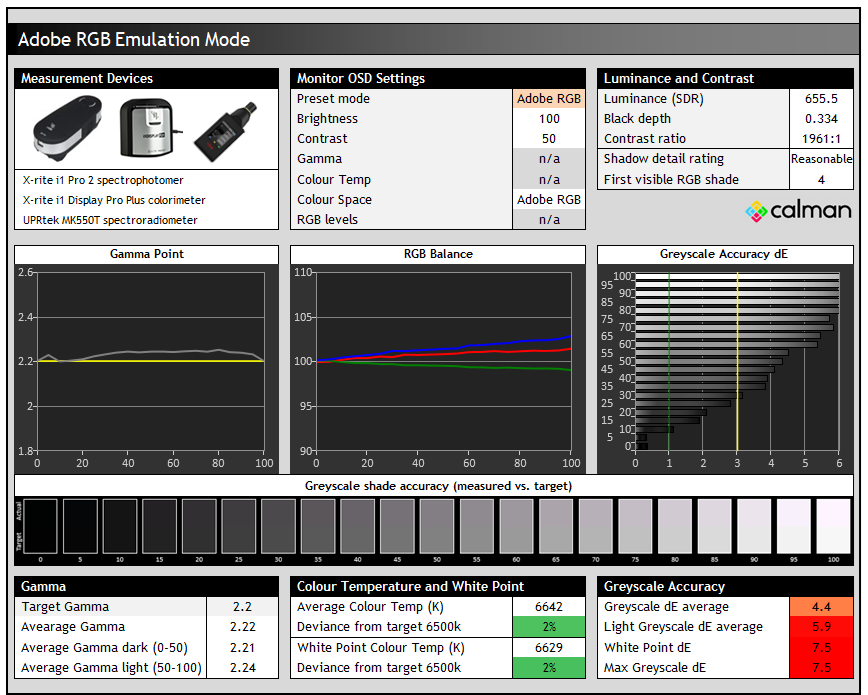
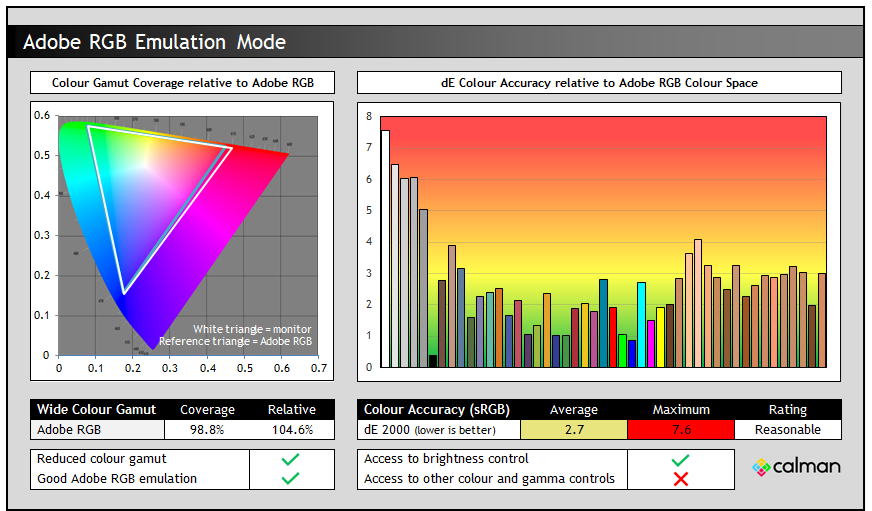
It’s much the same story with the Adobe RGB mode as it was for sRGB and DCI-P3 options. Very well configured and accurate gamma but a slightly too cool colour temp with some slight pinkish tint due to the slightly imbalanced RGB channels. The separate Adobe RGB (D50) mode again delivers the same performance but with a much warmer colour temp, average of 5017K measured across the greyscale.
There’s good clamping to the target colour space, one that’s commonly used in professional applications and the photography market although colour accuracy remains only reasonable with dE 2.7 average measured.
Calibration (Profiling)
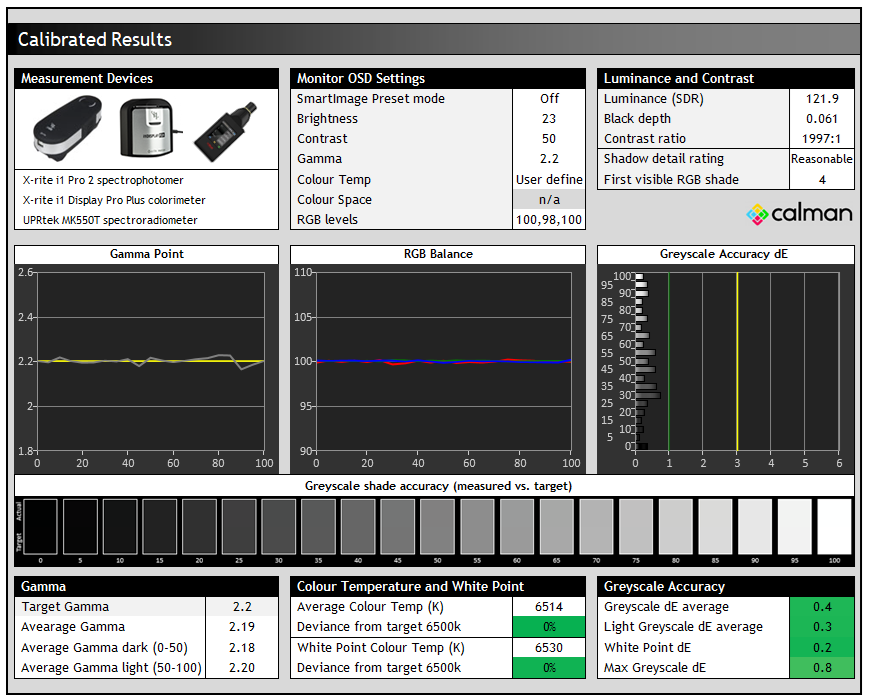
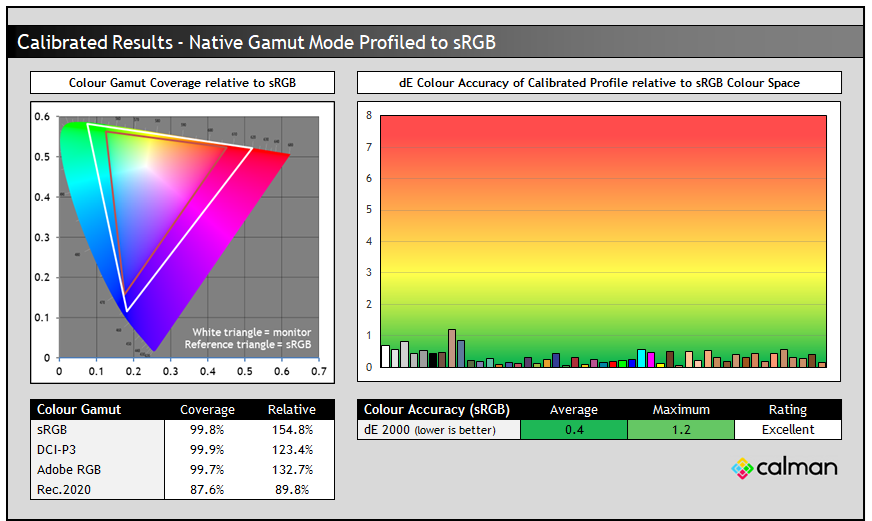
Calibration and profiling can produce some very good overall results and could be useful though if you wanted to operate the screen within its native wide gamut mode, but then map the colour space back to something else like sRGB or Adobe RGB for instance for colour-aware applications (e.g. Photoshop). You would need a suitable calibration device and software but that would give you a lot of flexibility for profiling the screen and clamping to different colour spaces and targets.
In this section the screen was profiled to 2.2 gamma, 6500K colour temp and to the sRGB colour space. The screen was left in its native wide gamut mode, but this profile will be used in colour-aware applications to map back to sRGB in this instance. Overall the calibrated results were very good as you’d hope.
Get the best settings for this screen
- On our Patreon Insider tier and above you can find our full ‘Best settings guide’ for this screen which includes all our recommended calibrated settings and ICC profile for SDR mode, as well as other best settings guidance for other configurations, modes, HDR, and gaming.
- If you only want just our standard SDR settings and calibrated profile, that is available via our ICC database (without all the other best settings guide).
ICC Profiles and Monitor Calibration Database
Find the recommended settings and a calibrated ICC profile for your display.
[View here]
Hardware Calibration

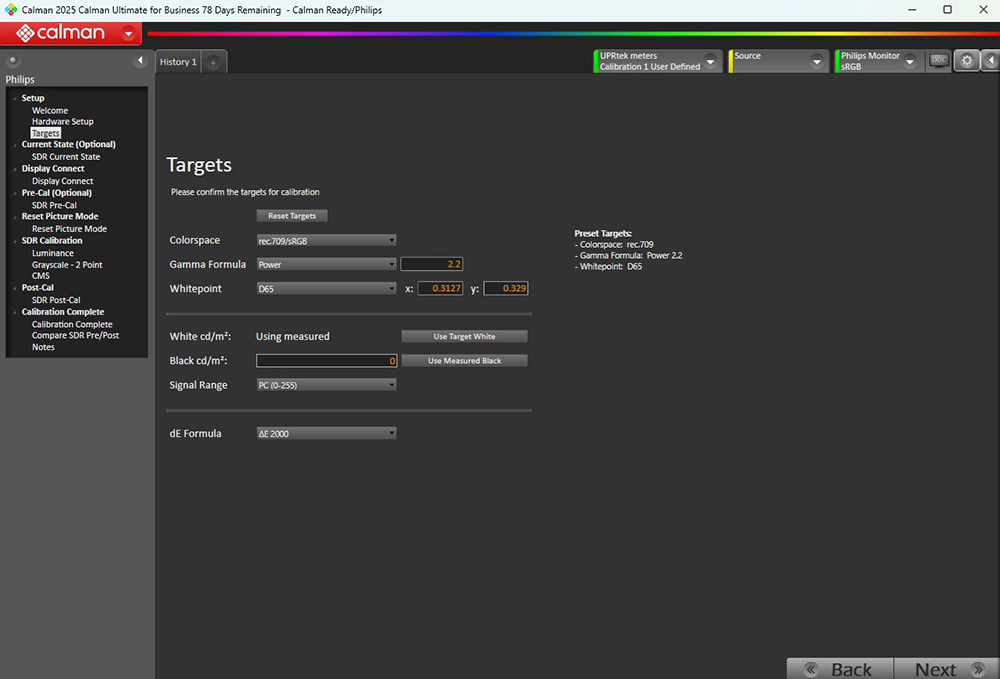
The screen also supports hardware-level calibration, allowing for excellent levels of accuracy and control over your settings and configuration. You can programme the screens internal LUT (Look Up Table) via supporting software if you have that and an appropriate calibration device. The screen is also certified as ‘Calman Ready’, allowing for a specific advanced workflow within the Portrait Displays Calman software, guiding you through a process to get the most out of your screen through customised calibration.
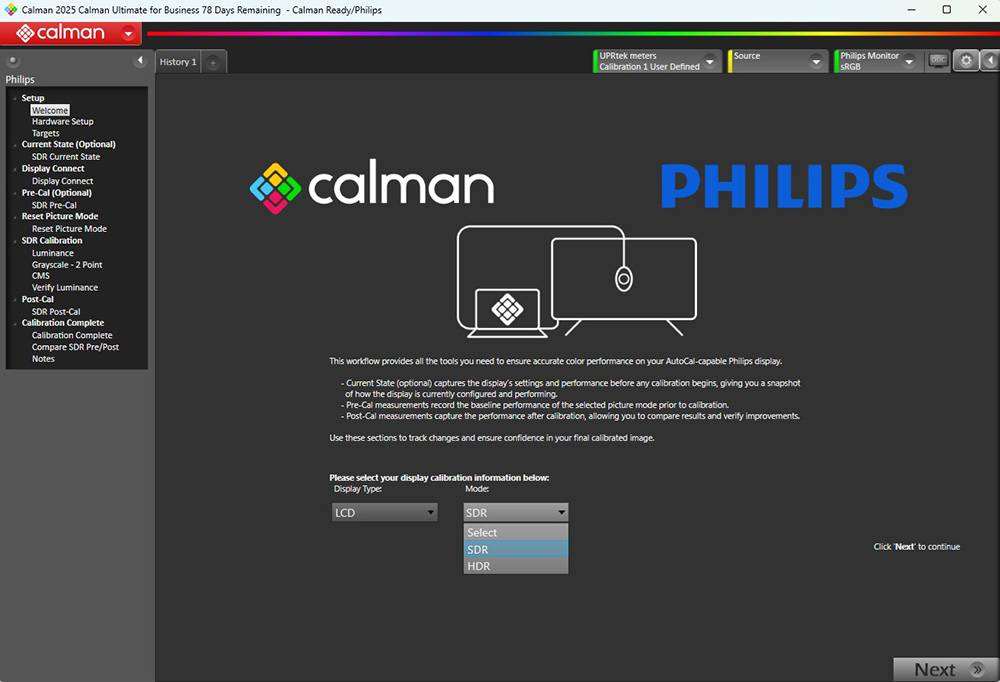
We confirmed the screen was present in the Calman software process and that you can select from a wide range of options and settings, no matter what your workflow requires. The screen also correctly connects to the software, allowing you to calibrate loads of different preset modes to your liking. We’re planning to take a look at this process in a lot more detail, so for now we will leave this as a placeholder in the review and update it when we’ve carried out some further testing of the Calman Ready process and results.
General and Office
We’ve already spoken earlier in this review about the benefits of 5K resolution, some use-cases and its importance for both Windows and Mac users. We won’t repeat that here, but needless to say the very high resolution and pixel density provides a fantastic image clarity and sharpness. Text, UI elements and images look amazingly clear and sharp. You’ll need to use scaling of some sort, most likely at either 200% or 175% which will give you the same desktop space as a 1440p resolution (at 200%) or a modest boost in area (at 175%).
The amazing image clarity and picture quality is aided by the glossy glass coating as well, which helps ensure a sharp and clear image with no visible grain. It can help colours and blacks “pop” more as well, and it looks really nice. You need to be mindful of the positioning of external light sources to minimise any issues with reflections and glare though compared with a standard matte anti-glare coating.
| Brightness | |
| Maximum brightness (SDR) | 671 nits |
| Minimum brightness | 45 nits |
| Uniform brightness behaviour available | |
| Flicker free |
There’s a very wide adjustment range available from the brightness control which should give you great flexibility for using the screen in a range of different ambient light conditions.
| Flicker | |
| Flicker free verified | |
| PWM / flicker frequency | n/a |
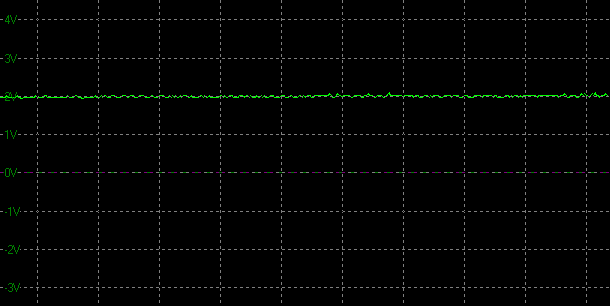
Backlight operation was confirmed as flicker free with no PWM dimming used at any brightness setting which is great news as always.
Blue Light and Eye Care Modes
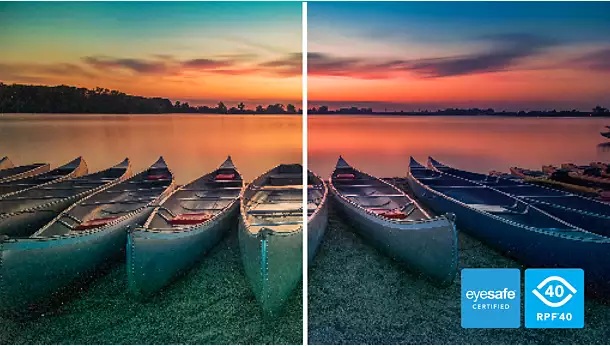
The screen is certified under the ‘Eyesafe’ scheme as well as rated as ‘RPF 40’ for its low blue light output. The latter refers to a blue light reduction standard where RPF (Radiance Protection Factor) is used to measure the level of blue light emitted by displays, with “40” indicating a certification of 40% blue light reduction, providing a baseline for eye health.
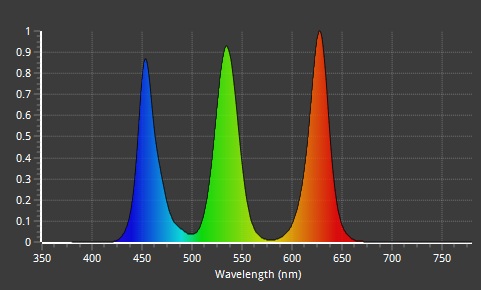
| Blue light output | |
| Blue peak wavelength | 454 nm |
| Blue light portion | 28.91% |
| Low blue light modes available | |
| Low blue light mode temp | n/a |
The native panel spectral distribution is shown above at a calibrated 6500K white point, where the blue peak is at 454 nm with a blue light percentage of 28.91%. There’s no specific low blue light modes or options on this screen but in the ‘Smart Image’ menu there’s a preset mode for ‘office’ which is a little warmer at 6200K although there’s quite a lot of steps to get to that option via the menu so it’s not that practical to use.
Features list
| Features | Notes | |
| USB type-C connectivity (DP Alt mode) | via Thunderbolt 4 | |
| USB type-C power delivery | 96W via Thunderbolt 4 downstream | |
| Daisy chaining support | via Thunderbolt 4 | |
| KVM switch | Smart KVM with keyboard control | |
| PiP and PbP support | MultiView options | |
| USB data ports | 2x USB-A and 1x USB-C (with 15W PD) | |
| Easy access USB data ports | ||
| Integrated speakers | 2x 5W | |
| Audio output / headphone out | ||
| Mic input | integrated with webcam | |
| Integrated webcam | 5MP AI-enhanced auto-framing | |
| Ambient light sensor | ||
| Motion sensor | PowerSensor 2 feature | |
| Stand adjustments | Tilt, height, swivel, rotate | |
| VESA mount support | 100 x 100mm via provided bracket | |
| Power supply | Integrated, with attached cable | |
| Tripod socket | ||
| Firmware updates | Via ‘SmartControl’ software | |
| Fan-less design |
The screen has a very wide range of features and extras for office and general uses, designed to enhance productivity and convenience. We’ll explore some of the key features a bit more below:
Thunderbolt 4 connectivity

The screen features 1x Thunderbolt 4 input and 1x Thunderbolt 4 output for daisy chaining. The physical port is the same as a USB-C connection, but Thunderbolt 4 Alt mode is supported for transmitting data, video, power and even 1 Gbit/s Ethernet on this screen. The connection provides 40 Gbps data transfer, faster than many standard USB type-C connections, as well as video (via DisplayPort Alt mode), and 96W power delivery. That’s a high power delivery compared with many monitor USB type-C connections. The daisy chaining output can also transmit data, video and a lower 15W power delivery.
With this connectivity available it allows for simple and convenient single cable connectivity for compatible devices, such as a laptop or tablet for instance. Our detailed article covering exactly what Thunderbolt is and what it can offer is available here. We also recently wrote an article exploring USB type-C in more detail which you may find useful if you want to know more.
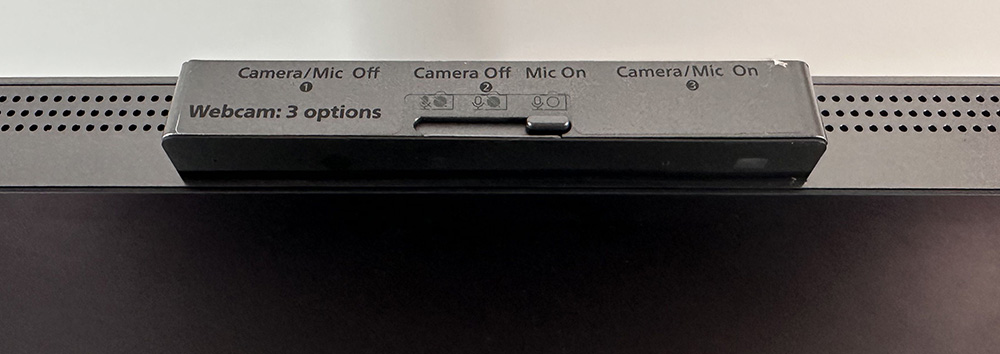
5MP Windows Hello Webcam
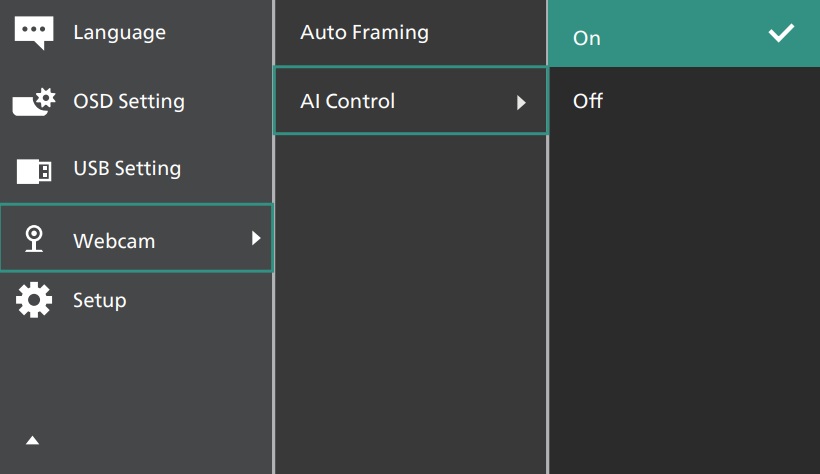
On the top of the screen is an integrated webcam which supports an auto-framing feature to ensure you’re always in focus during your video calls and an “AI Control” function for some zooming in and out where needed. Note that this always sticks out from the top, it doesn’t retract in to the top of the screen unfortunately.
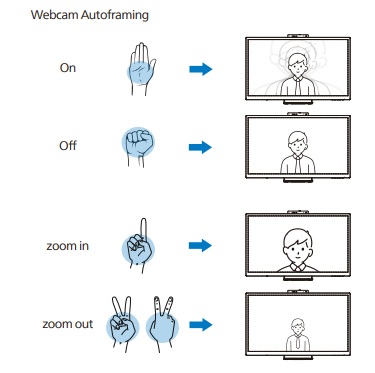
Users can make an open-handed gesture or a fist to activate and deactivate the Webcam auto-framing within the monitor’s webcam viewing range of 180cm. Additionally, the webcam supports gesture-based zoom in and out. To zoom out, simply spread your fingers apart in a “V” shape. To zoom in, change from the “V” shape to the “number 1” gesture. To notify the user of the webcam’s status, an advisory message will pop up for three seconds on the top right of the screen.
The camera itself offers a 5MP resolution and supports Windows Hello. There’s also a built-in mic, and the screen features 2x 5W integrated speakers so it can act as an all-in-one solution for video conferencing if you need it to. A slider on the top of the screen allows you to easily switch between off and on configurations too.
The webcam is also equipped with advanced sensors for Windows Hello facial recognition, which conveniently logs you into your Windows devices in less than 2 seconds, faster than a password for most users. You need Windows 11 for this.
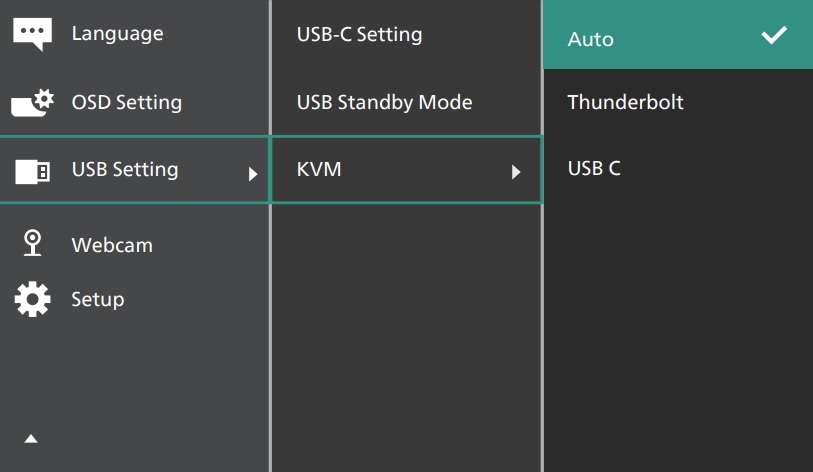
KVM switch
With the “MultiClient” Integrated KVM switch, you can control two separate PCs with one monitor-keyboard-mouse set up. This can be done via the OSD menu, or you can also use the ‘Smart KVM’ function which allows you to switch between input devices by pressing the “Ctrl” key three times on your keyboard. This feature could be useful for users who want to control multiple connected devices from a single keyboard and mouse setup.
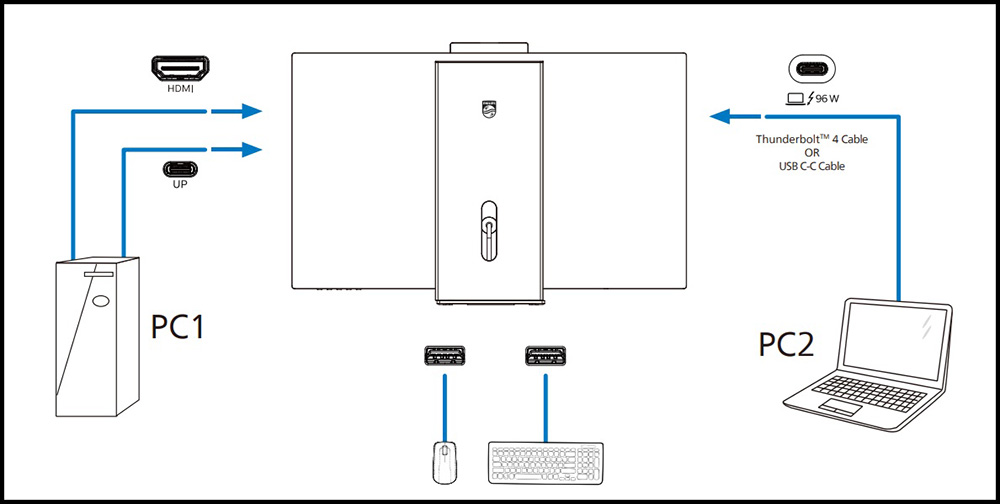
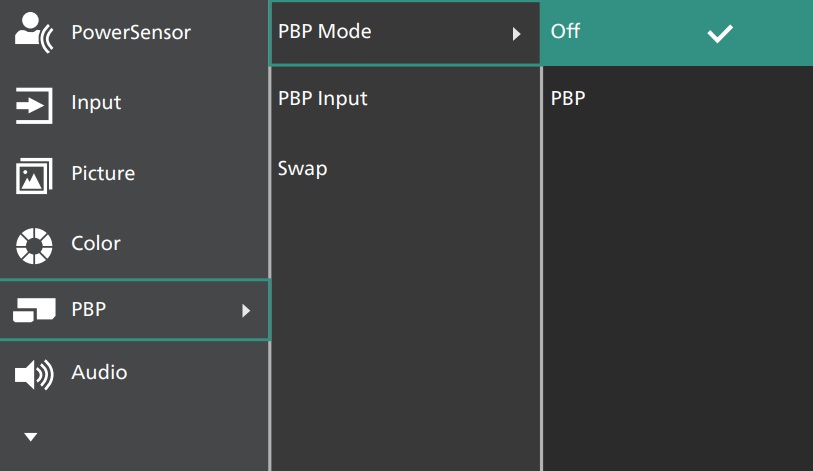
MultiView PiP and PbP Support
Multiview enables active dual connect and view so that you can work with multiple devices like PC and Notebook side-by-side simultaneously, which could be very useful for multi-tasking between connected devices. There’s a wide range of PiP and PbP modes and configurations available in the menu for this function.
PowerSensor 2.0
The PowerSensor 2 feature reduces energy consumption by detecting when users move closer and further away from the screen, turning the screen off when its not in use. You can also use the Windows 11 integration if you want. The monitor and connected PC/laptop will wake when someone approaches it and sleep when someone walks away, effectively reducing the amount of wake time. The distance for detection can be set to 50, 75 or 120 cm from the user’s laptop.

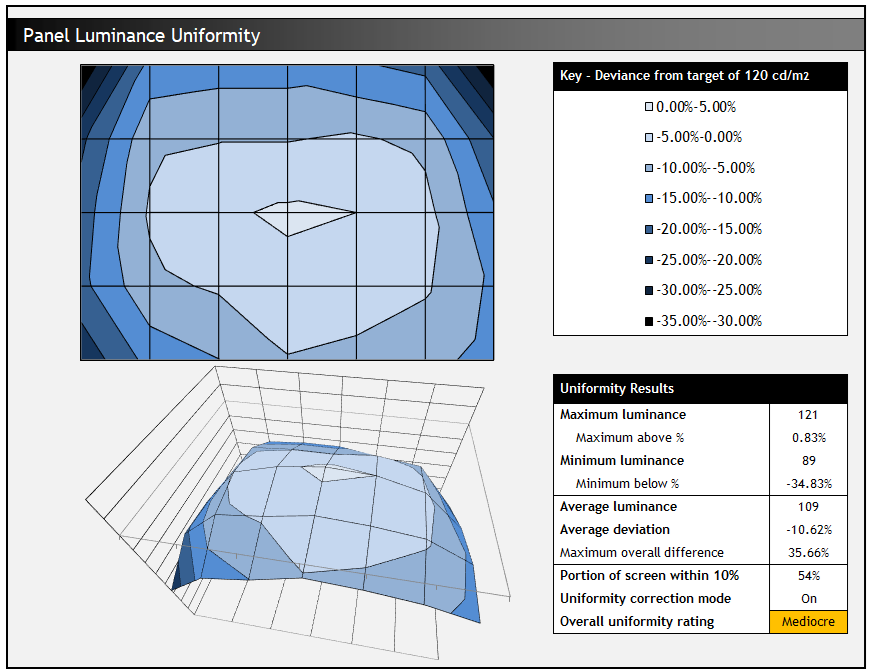
Uniformity correction
The screen includes a ‘SmartUniformity’ preset mode in the OSD menu. The user manual for this screen says that “typical uniformity is measured around 75 – 80% [and that] by enabling Philips SmartUniformity feature, display uniformity is increased to above 95%.”
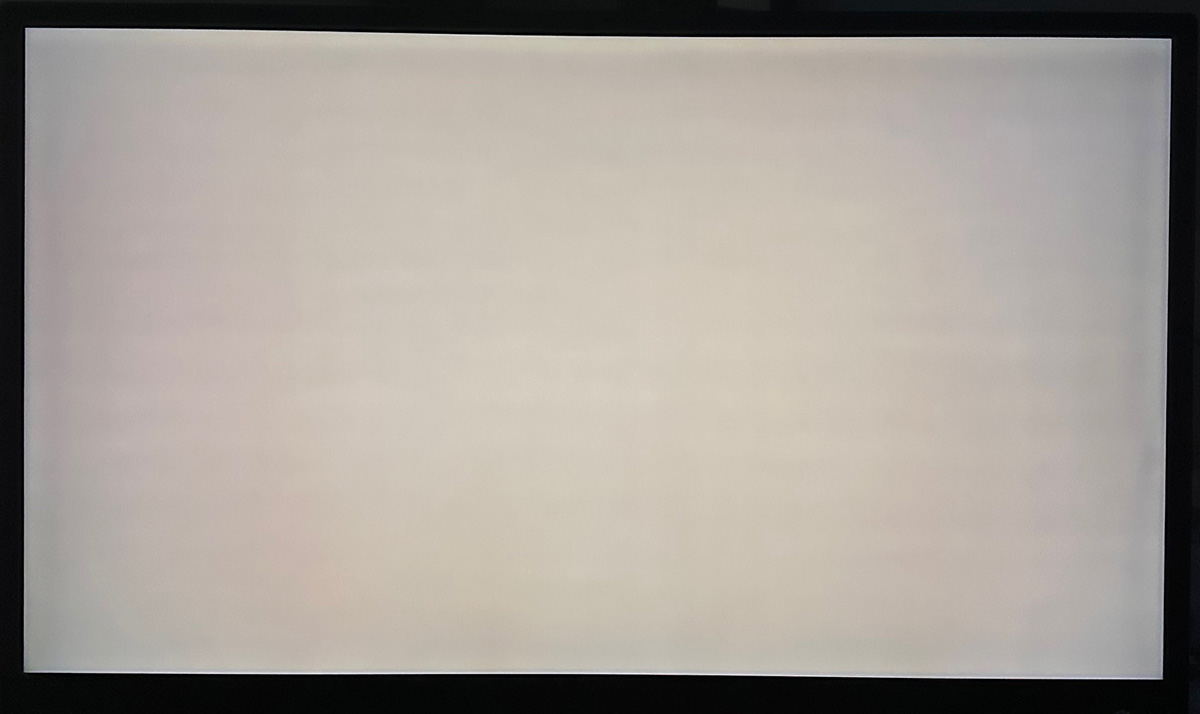
Normal mode
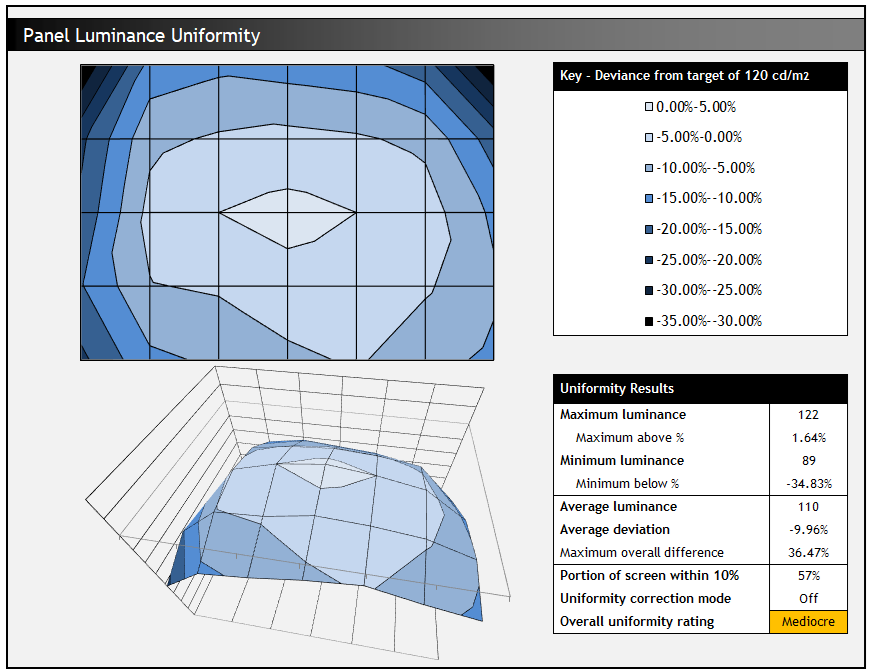
In the normal mode we found that the edges of the screen were quite a bit darker than the central area, by about 30 nits or so which on plain backgrounds you could spot with the naked eye. In real-world content and day to day usage we didn’t really notice any issues in this area, although those darker edges on our sample were a little disappointing.
SmartUniformity mode
Strangely the ‘SmartUniformity’ mode didn’t seem to do anything, we saw no improvements in panel uniformity of note. Perhaps this function isn’t working at the moment, we’ve flagged it back to Philips for investigation and hopefully a firmware update to address it. In theory this could have been a useful mode, and it seems that you can activate it and still make adjustments to the other screen settings.
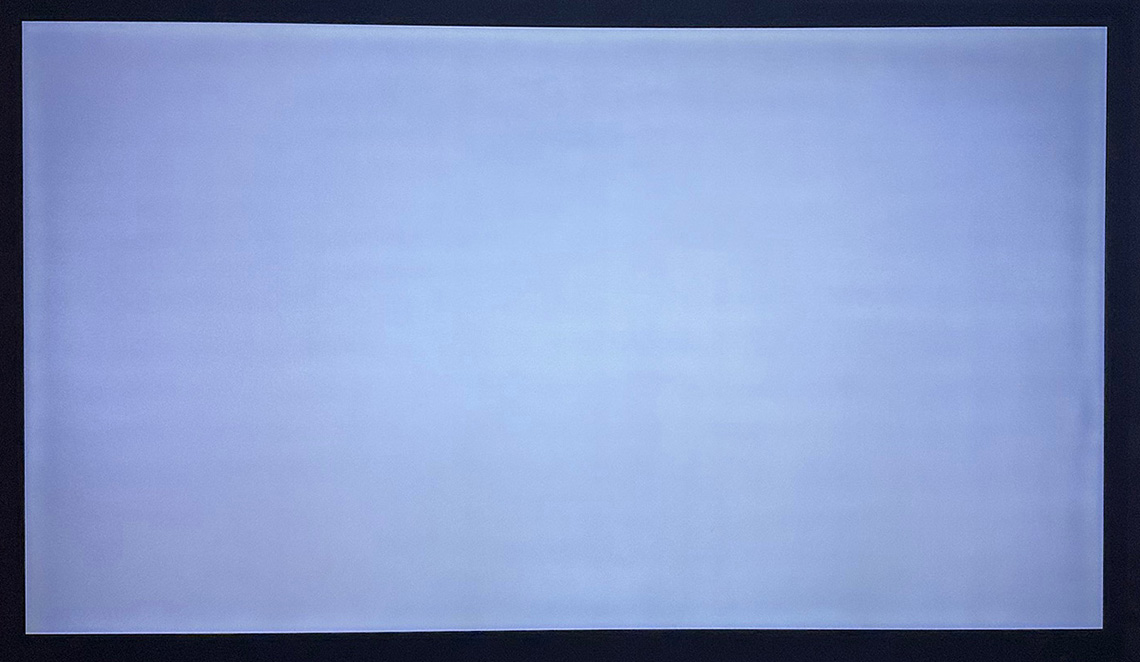
In practice you could occasionally see darker bars along the left and right hand sides of the screen but only really evident when viewing certain darker and duller colour test patterns or backgrounds. For brighter coloured or lighter grey tests these darker areas were not really visible, and in normal varied and dynamic content there was no real issue either. If you’re specifically working with uniform colour blocks or images, you may need to be mindful of this but we expect for most people you would be unlikely to see issues during normal day to day usage. Uniformity could also vary between different samples.
HDR
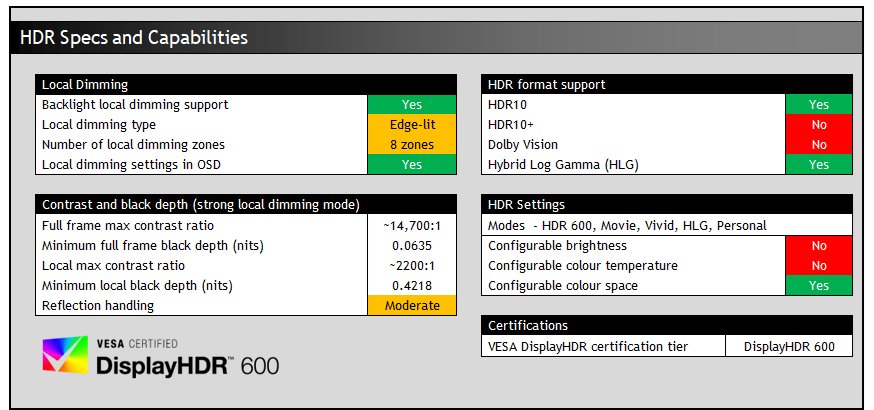
The screen offers some lower/mid-tier HDR support for an LCD with some decent improvements in brightness available compared with SDR, although limited when it comes to local dimming hardware capabilities. There is only an 8-zone edge-lit local dimming backlight, capable of dimming some parts of the image and brightening others for improved overall contrast, but don’t expect anything amazing. Blooming and halos around small highlights are minimal because only large zones can be dimming anyway, but the improvements to contrast are very limited. If you want better HDR support and improved local dimming you’d need a much larger number of local dimming zones, preferably from a full-array or Mini LED backlight.
There are a number of HDR preset modes available in the OSD menu, each with pre-configured settings as shown below. Those in white are selectable between various settings:
| HDR mode | Tone mapping | Local dimming | Color space |
| HDR 600 | n/a | Off (selectable) | Rec.2020 |
| Movie | More details | Off (locked) | n/a |
| Vivid | Brighter | Off (locked) | n/a |
| HLG | n/a | Off (locked) | n/a |
| Personal | Balanced | Off (selectable) | Rec.2020 |
Oddly the only HDR modes where you can actually enable the backlight local dimming are the HDR 600 and the Personal mode, with the setting being locked and turned off in the others. You may or may not want to use the local dimming given the low number of dimming zones, but without it you can’t improve the contrast ratio at all beyond the (already decent for an IPS panel) ~2000:1 static contrast ratio performance. If you leave local dimming off, or are using any of the modes where it is not available, you’d still benefit from the screen handling an HDR10 or HLG content input signal, with PQ tone mapping, a wide colour gamut for vivid colours and also improved brightness over SDR mode. You just won’t get an improved contrast ratio which is a big part of what makes it High Dynamic Range in the first place.
We tested the local dimming modes when using the HDR 600 preset and found decent improvements in overall max contrast as you increased the setting, although again keep in mind there’s only a few zones available so these are the maximum potential benefits, and real-world contrast enhancements will lie somewhere between these figures and the native panel contrast ratio.
| Local dimming | Luminance (nits) | Local black depth (nits) | Local contrast ratio (:1) | Min black depth (nits) | Max contrast ratio (:1) |
| Off | 962 | 0.4816 | 1997 | 0.4816 | 1997 |
| Weak | 956 | 0.4335 | 2206 | 0.1181 | ~8100 |
| Medium | 947 | 0.4249 | 2228 | 0.0837 | ~11,300 |
| Strong | 933 | 0.4218 | 2213 | 0.0635 | ~14,700 |
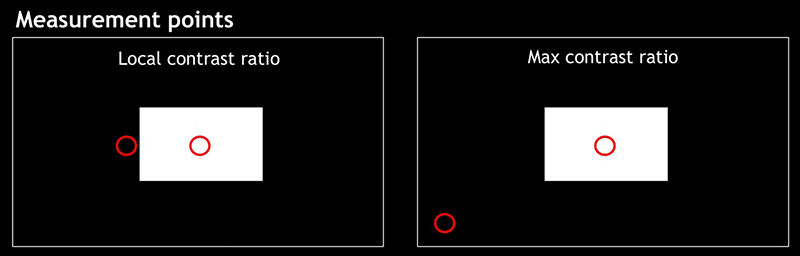
You can see that local contrast ratio didn’t really improve at all due to the limited number of dimming zones available, incapable of dimming areas of black that are near to white areas in this test. But the maximum full-frame contrast ratio did increase quite nicely as you moved up through the settings. The ‘strong’ mode delivered the most noticeable improvements and will probably be the one you’d want to use for HDR multimedia. In real world content it helped improve contrast in some situations, and improved black depth noticeably in darker scenes or where there’s large areas of black on the screen in backgrounds or night time scenes. With only a few local dimming zones the contrast enhancements are limited, but it does a reasonable job in some situations.
Default DisplayHDR 600 mode
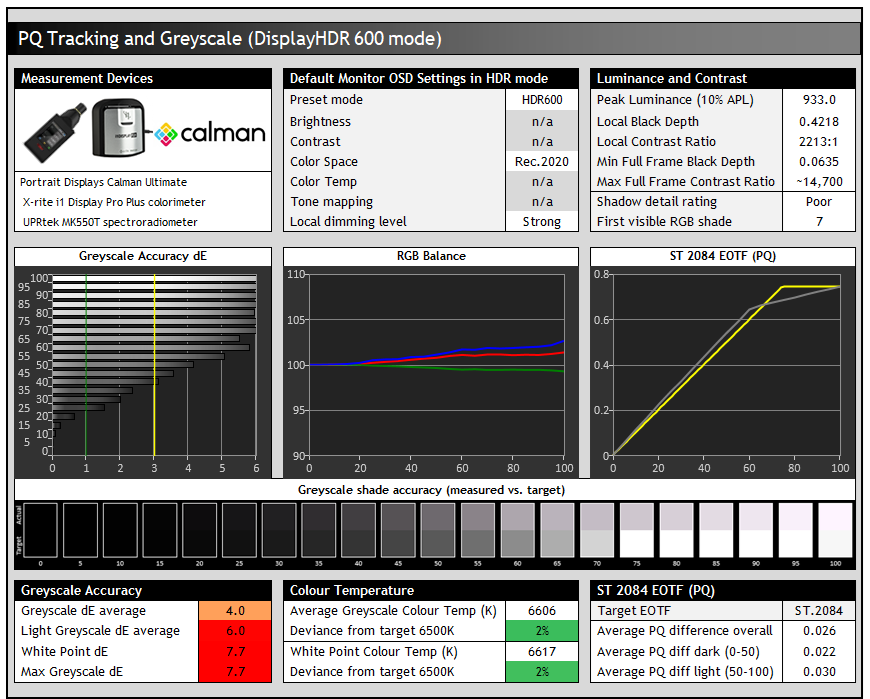
The default mode allows access to the local dimming control if you want to enable that. Its EOTF tracking is not particularly good though, with some over-brightening of dark to mid grey shades, and then a noticeable roll-off for light grey shades which causes them to look a lot darker than intended. You can see this represented by the actual vs. target greyscale samples in the middle section too. This EOTF tracking is consistent across different APL window sizes, not just for the standard 10% APL used here. It doesn’t vary like it typically does on OLED monitors.
The colour temp remains a little weighted towards blue and red like in the SDR mode, resulting in a pinkish tint to grey shades and weakening the greyscale accuracy. Shadow detail was also pretty poor in this mode (and the other HDR configurations in fact) with the first visible shade being RGB 7 in HDR. We’d have liked some better near-black shadow detail in HDR.
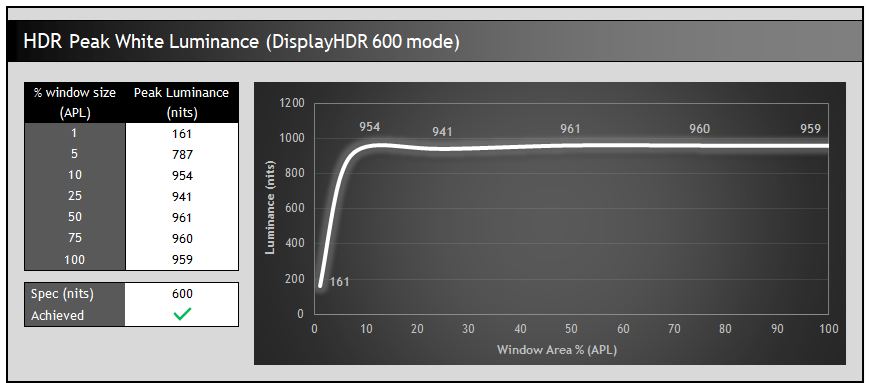
Peak white luminance reached up to 961 nits maximum which was well beyond the listed 600 nits spec and offers a high luminance potential in HDR content. The panel is capable of sustaining this luminance for all APL scenes thanks to the LED backlight which doesn’t have the same limitations and need for ABL that an OLED panel does. Remember this is the capability of the backlight, and in real-world content the actual target luminance will vary. You’re not really going to reach a 960 nits full screen white in real content as it wouldn’t be mastered in that way.
In these tests this is maintained in all situations except for the smallest APL sample patterns (1 – 5% tests) which here represent small highlights in dark content. The luminance is toned down significantly for small highlights due to the very limited number of local dimming zones, otherwise you’d end up with large areas of blooming around the light area, and scenes being over-brightened just because a small highlight is present. Higher APL (brighter) scenes show off the panels brightness capabilities more than darker scenes.
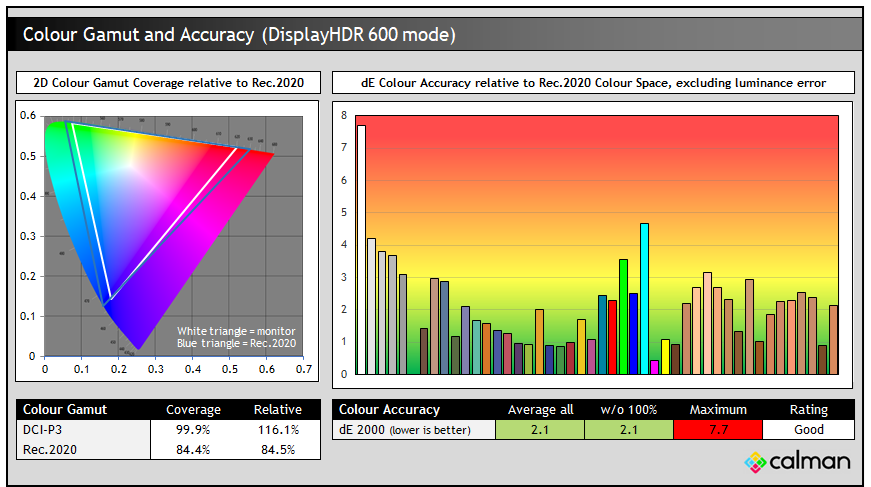
The colour space was very close to the native panel performance we’d seen in SDR mode, dropping it slightly to remove the over-coverage from Rec.2020 present natively. We measured 84.4% absolute coverage of Rec.2020 though which was high, and we had good accuracy for Rec.2020 HDR content with dE 2.1 average measured.
Configurable ‘personal’ HDR mode
We’d found the EOTF tracking in the default DisplayHDR 600 mode to be quite poor, leading to a lot of over-darkening of light grey shades and impacting real-world HDR scene brightness. The ‘personal’ HDR mode opens up various options to configure ‘tone mapping’ if you want to tweak the EOTF tracking further. There is a mode in there for ‘HDR 600’ which performs exactly the same as the standard DisplayHDR 600 preset mode measured above. There are also options for ‘more details’, ‘balanced’ and ‘brighter’. We tested the EOTF tracking in each of these modes:
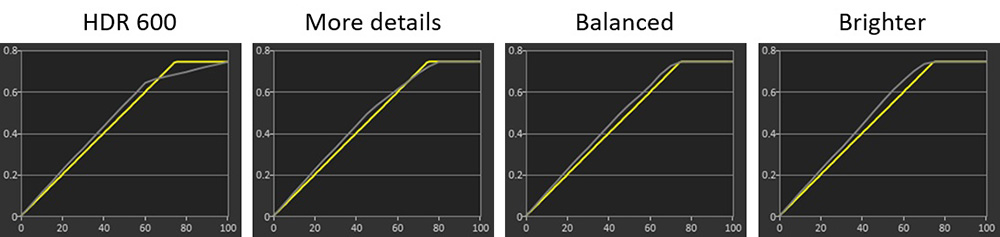
Each of these modes raises the brightness of dark to mid grey shades a bit, as well as helping to address the significant roll-off for lighter grey shades we’d seen before. The brightness of those lighter grey shades is increased progressively here, and you may want to experiment with each to see which you prefer in real content. The balanced mode is likely to offer the best balance we think without over-brightening the image too much, but improving the lighter grey tracking. They’re all very close to one another visually though in practice.
You can also make an adjustment in the colour menu to switch from the Rec.2020 colour space to DCI-P3 if you want to more closely work with content in that reference space. It does impact colour vividness a considerable amount, and we expect most people will prefer the more colourful image that the default Rec.2020 configuration offers. We measured the colour gamut and accuracy of DCI-P3 colours in that configuration as well:
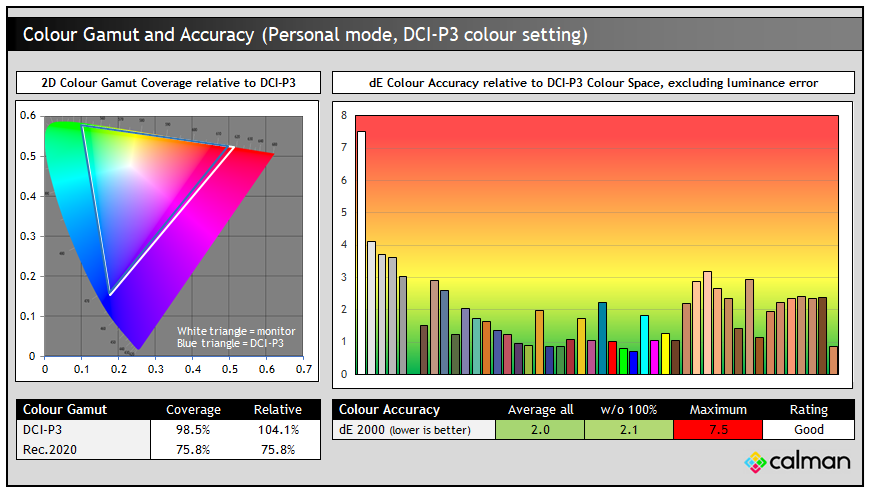
You can see that in this mode that most of the over-coverage compared with DCI-P3 is removed, reducing from 116% relative coverage to 104% now. That more closely matches the DCI-P3 reference space now and we had good accuracy (dE 2.0 average) for DCI-P3 colours too. This mode could be useful to some HDR content creators potentially.
HDR Demo and Test Video
Test and demo the HDR on your display using our handy compilation, highlighting black depth, contrast and peak brightness capabilities.
[View here]
Gaming
| (at native resolution) | Refresh Rate |
| Maximum Refresh Rate DisplayPort | No DisplayPort connection |
| Maximum Refresh Rate USB type-C | 70Hz |
| Maximum Refresh Rate HDMI | 70Hz |
| VRR support | |
| Response time control | |
| Motion blur reduction mode |
This monitor is not aimed at gaming, it’s targeted at professional and office users and is fairly limited in its gaming capabilities. Hopefully you’re not considering buying this screen as a gaming display, that’s really not the intended use case for it at all. Having said that, the super high resolution and pixel density provide an amazingly detailed and sharp image, and so for slow paced RTS-type games, or those focused on image detail instead of speed, you will find it offers a great image. It’s ok for some occasional gaming on the side, but that shouldn’t be your primary usage.
There is an option in the OSD menu to control the overdrive level via the ‘SmartResponse’ setting with options for off, fast, faster and fastest available. The screen has a low 70Hz refresh rate, slightly higher than standard 60Hz screens but clearly not anywhere near the speed of modern gaming screens. There’s no support for adaptive-sync for VRR here though.
Response Times
As discussed in our detailed article about Response Time Testing – Pitfalls, Improvements and Updating Our Methodology we are using an improved and more accurate method for capturing G2G response times and overshoot, based on figures that are more reflective to what you see visually on the screen in real-World usage. Our article linked above talks through why this is better and how we arrived at this improved method in much more detail.
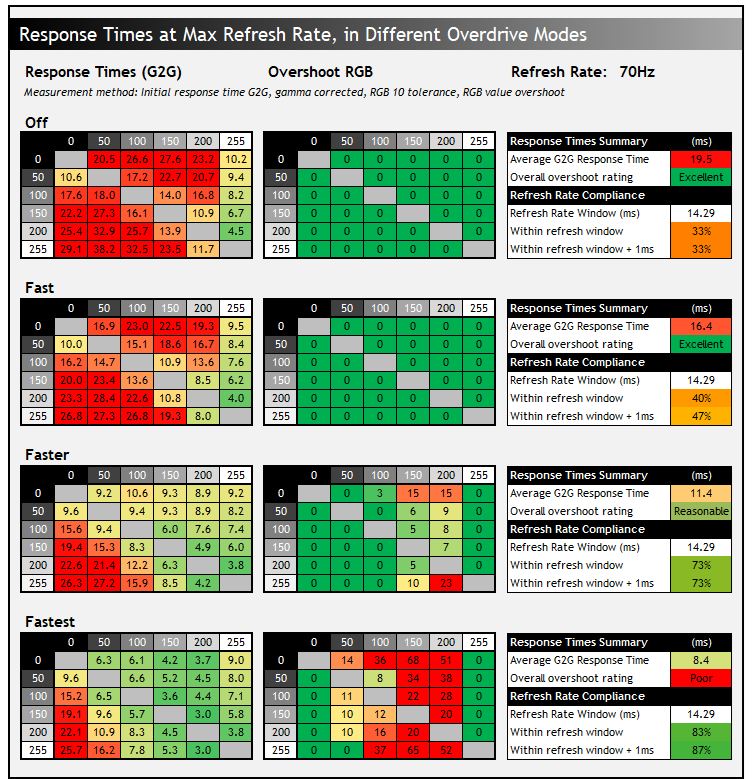
We measured the response times times in each of the 4 overdrive modes and also tested the screen in a range of visual tests to determine the optimal mode. In the ‘off’ mode the pixel transitions were horribly slow, measured at 19.5ms G2G average. There was no overshoot at all, but the response times aren’t even fast enough to keep up reliably with the low 70Hz refresh rate, and so you get a smeary and blurry image on moving content. They weren’t really much different or better in the ‘fast’ mode either.
Moving up to the ‘faster’ mode provided a noticeable improvement in visual performance and measurements. There was still a lot of blurring on the moving image, this is still only a 70Hz-max refresh rate screen after all. You get a bit of added smearing on changes from light to dark shades where the response times were especially slow (bottom left hand corner of the table), but overall the image looks a lot better than the lower modes. There’s some minor overshoot creeping in now, but in practice it was not very obvious. This mode definitely looked the best in our testing. The maximum ‘fastest’ mode pushed things even further, resulting in excessive overshoot that produced obvious pale and dark halos in practice so should be avoided.
Lag
Read our detailed article about input lag and the various measurement techniques which are used to evaluate this aspect of a display. The screens tested are split into two measurements which are based on our overall display lag tests and half the average G2G response time, as measured by our oscilloscope. The response time element, part of the lag you can see, is split from the overall display lag and shown on the graph as the green bar. From there, the signal processing (red bar) can be provided as a good estimation of the lag you would feel from the display. We also classify each display as follows:
Lag Classification (updated)
- Class 1) Less than 4.17ms – the equivalent to 1 frame lag of a display at 240Hz refresh rate – should be fine for gamers, even at high levels
- Class 2) A lag of 4.17 – 8.33ms – the equivalent of one to two frames at a 240Hz refresh rate – moderate lag but should be fine for many gamers. Caution advised for serious gaming
- Class 3) A lag of more than 8.33ms – the equivalent of more than 2 frames at a refresh rate of 240Hz, or 1 frame at 120Hz – Some noticeable lag in daily usage, not suitable for high end gaming
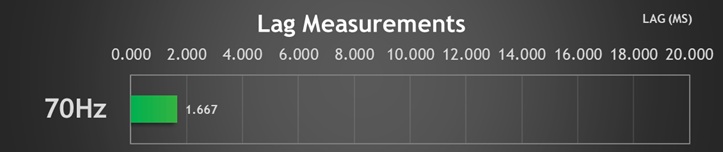

Lag was measured at ~1.667ms total which can pretty much all be accounted for by pixel response times, suggesting a near-zero signal processing lag which is excellent.
Console Gaming
| Console Gaming | |
| Native panel resolution | 5120 x 2880 “5K” |
| Maximum resolution and refresh rate supported | 4K @ 60Hz |
| 4K at 24Hz support | |
| 4K at 50Hz support | |
| HDMI connection version | 2.1 |
| HDMI connection bandwidth | 48 Gbps |
| HDMI-CEC auto switch | |
| HDMI-VRR (over HDMI 2.1) | |
| Adaptive-sync (FreeSync) over HDMI | |
| Auto Low Latency Mode (ALLM) | |
| HDR10 support | |
| Dolby Vision HDR support | |
| Black Frame Insertion (BFI) support | |
| Integrated speakers | |
| Headphone connection | |
| Ultra high speed HDMI 2.1 cable provided |
Console support is fairly limited, again because this is a screen not really aimed at gamers. It can support 4K @ 60Hz content fine, as well as 4K @ 50Hz. It lacks the refresh rate support for 120Hz though and is missing features like VRR too. We should probably keep in mind that a lot of lower-end TV’s only offer these kind of specs, so if you’re looking for something for some occasional console gaming perhaps, it could still be ok. It’s just not got the full suite of capabilities you’ll find on many gaming monitors nowadays. There are at least integrated speakers which could be handy for some users too, along with a headphone connection.

Conclusion
The Philips Brilliance 27E3U7903 is a sleek and attractive looking screen with an amazing picture quality and impressive feature set for professional and office users, looking to enhance productivity and convenience. Not everyone will necessarily see the value in such a high resolution of 5K on a screen this size, but the upgrade from 4K is noticeable in terms of image quality and sharpness, and it provided an incredibly clear and sharp image. It’s also an important and sought-after resolution and “retina resolution” pixel density for Mac users, scaling perfectly at 200% for an equivalent logical resolution of 1440p, but with a hugely improved sharpness and picture. The glass screen coating also helps ensure a clean and clear image that looks great and pops more, while also giving it a premium design aesthetic.
Speaking of the design, its minimalist and professional and (perhaps not so coincidentally) very similar in appearance to Apple’s 27″ 5K Studio Display. The stand is versatile and there’s a good range of modern connectivity options including Thunderbolt 4, USB-C data and HDMI 2.1, along with various other USB, Ethernet and audio ports. We’d have liked to have seen a separate DisplayPort connection available for simpler PC connectivity though without needing to use up the Thunderbolt/USB type-C input for that.
There’s a very wide range of colour preset modes and configurations, including reliable emulation modes for sRGB, DCI-P3, Display P3 and Adobe RGB content. Hardware calibration support will be very useful for professional users and the photography segment, and the ‘Calman Ready’ workflow provides comprehensive support and flexibility to calibrate the screen to very high levels of accuracy. More information from our testing and a deep-dive in to this feature coming soon. We did find luminance uniformity of the panel to be fairly weak on our sample, with darker edges to the screen and a supposed ‘SmartUniformity’ mode which didn’t seem to work at this time.
Luminance range is impressive for both SDR and HDR, and there’s a very good static contrast ratio for an IPS-type panel like this. HDR luminance is high, and the colour space very wide, but there’s limited local dimming capabilities on this screen. We’d have loved to have seen a high-zone Mini LED backlight, although no doubt that would drive the cost up significantly. Perhaps a future update model with Mini LED would be worth Philips exploring. Because of the limited local dimming capabilities, contrast and dynamic range improvements are limited in practice, certainly compared with Mini LED and OLED monitors.
Gaming support is limited due to its low refresh rate, but its ok for some occasional slower gaming and the image quality should be excellent, even if response times are pretty slow and refresh rate is low. It’s a screen aimed at professional and office uses and there’s an impressive set of extra features that users will probably find useful. That includes USB-C data and Ethernet ports, a built-in webcam/mic/speakers, a useful motion sensor, MultiView modes for handling PiP and PbP, and a Smart KVM switch too. Pretty much all the modern features and conveniences you could need.
The new Philips 5K monitor is available now in some European regions at a competitive price point of £899 GBP in the UK at the time of writing from Amazon (affiliate link), and will be available across other European regions too, but at the moment there’s no plans to release it in North America unfortunately. This price point makes it over £1,000 less than Apple’s 27″ 5K Studio Display (with adjustable stand option) which has the same panel and a pretty similar design and feature set.
The Apple screen does have a higher-end 12MP camera and speaker system, although it has a Thunderbolt 3 connection instead of the Thunderbolt 4 used here on the Philips. There’s a few differences of course and some people will have a preference for one over the other, but Philips are offering an interesting new choice for those in the market for a professional-focused 5K monitor who want something at a more attractive price. It’s a great looking screen with an impressive feature set, and could be a great choice if you’re after a 5K display.

| Pros | Cons |
| 5K resolution provides amazing picture quality and sharpness with “retina resolution” pixel density | A DisplayPort input would have been useful |
| Glass screen coating and elegant design give a premium and professional feel to the screen | Panel uniformity was fairly weak and the provided uniformity correction mode didn’t seem to do anything |
| Wide range of colour modes and configurations, as well as hardware level calibration support | Limited local dimming capabilities for HDR |
We may earn a commission if you purchase from our affiliate links in this article- TFTCentral is a participant in the Amazon Services LLC Associates Programme, an affiliate advertising programme designed to provide a means for sites to earn advertising fees by advertising and linking to Amazon.com, Amazon.co.uk, Amazon.de, Amazon.ca and other Amazon stores worldwide. We also participate in a similar scheme for Overclockers.co.uk, Newegg, Bestbuy , B&H and some manufacturers.


