Dell UltraSharp U5226KW
Introduction
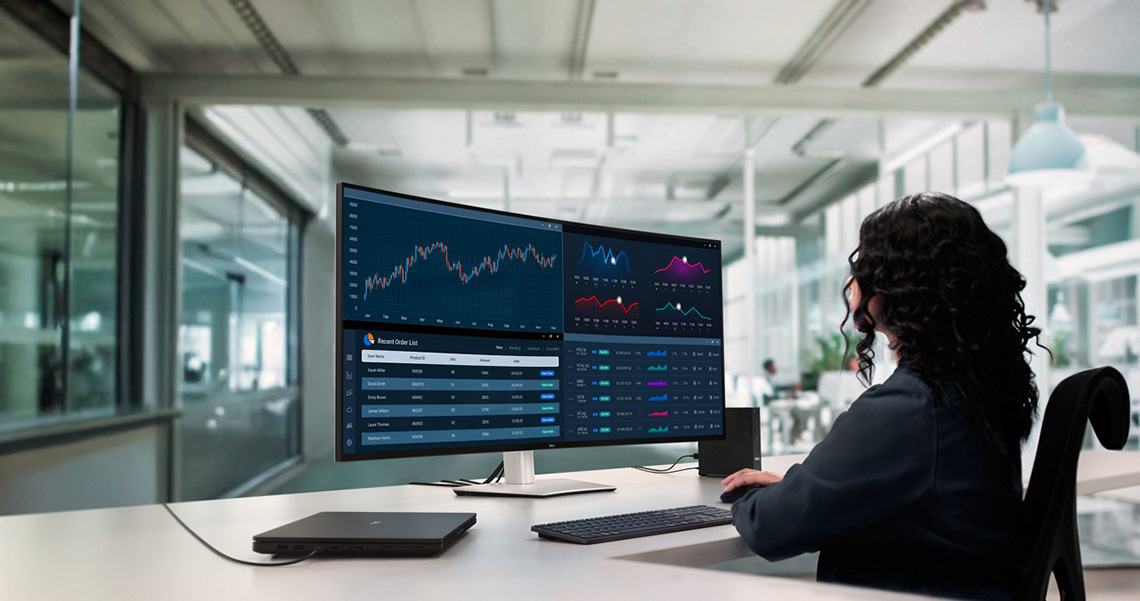
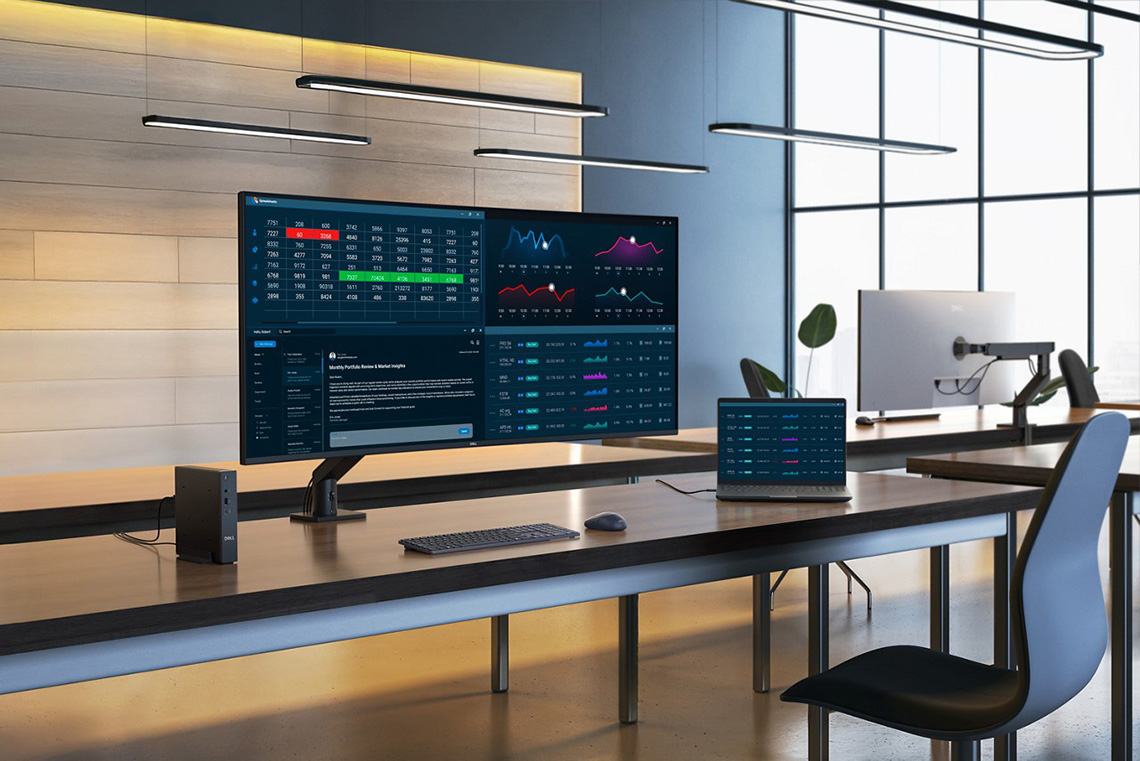
Today we’re reviewing a one-of-a-kind new display launched by Dell at CES in January this year. It’s a massive 52″ ultrawide screen with a 24:10 aspect ratio, 6K-ultrawide resolution (6144 x 2560) and a wide range of connectivity and productivity enhancing features. It’s designed to be a single-display alternative to multi-monitor setups, especially for traders, financial analysts, engineers, designed and executives who need large desktop areas to work with, and need a comfortable screen that enhances productivity and user experiences. With a 6K-ultrawide resolution and 129 PPI pixel density it offers an impressive combination of screen real-estate and image clarity.
As well as the huge screen size and resolution the U5226KW offers a load of modern connectivity and convenience features. This includes a Thunderbolt 4 hub, loads of USB-A and USB-C data ports, a KVM switch function, PiP/PbP support and an ambient light sensor that can adjust your screen brightness and colour temp to suit varying working conditions. Let’s see how it performs in our testing and whether it’s a good choice as a large-format productivity and office screen.
#affiliate. We may earn a commission if you purchase from our affiliate links in this content – TFTCentral is a participant in the Amazon Services LLC Associates Programme, an affiliate advertising programme designed to provide a means for sites to earn advertising fees by advertising and linking to Amazon.com, Amazon.co.uk, Amazon.de, Amazon.ca and other Amazon stores worldwide. We also participate in a similar scheme for Overclockers.co.uk, Newegg, Bestbuy, Walmart, B&H and some manufacturers.
Key Specs
- 52″ ultrawide (51.5″ exactly), 24:10 aspect ratio (marketed as 21:9)
- Subtle 4200R curvature
- IPS Black panel technology (LCD), anti-glare coating
- 6144 x 2560 resolution, 0.1964 mm pixel pitch, 129 PPI pixel density
- 5ms G2G response time and 120Hz refresh rate
- Wide colour gamut covering 99% DCI-P3, 100% sRGB
- Tilt, height, swivel adjustable stand
- Ambient light sensor with brightness and colour adjustment
- Video connections: 2x DisplayPort 1.4, 2x HDMI 2.1, 1x Thunderbolt 4 (DP Alt mode, 40Gbps data, 140W power delivery)
- Other connections: 4x USB-A data ports (back), 1x USB-A (10Gbps + fast charging 1.2 – bottom), 3x USB-C data ports (10Gbps, back), 2x USB-C data ports (10Gbps, 27W, bottom), 1x RJ45 Ethernet 2.5GbE
- KVM switch and PiP/PbP support (including ‘Screen partition’ support), 2x 9W integrated speakers

First Impressions
We first saw this screen in person at CES and loved its unique size, format and spec, so we were keen to get hold of one and excited to see how it performs in all our testing. Dell have a long-standing reputation for making versatile and quality screens in their UltraSharp line-up, so as a “World’s first”, it will be interesting to see what this new screen can offer. If you want to see some footage of the screen from CES, check out our round-up video here (time-stamped to the relevant section).
It comes packaged in a huge and heavy (34.85Kg) box, and once set up on your desk it really is massive! Our day to day editing monitor is a 37.5″ ultrawide screen (24:10, 3840 x 1600 res), and even that looks small next to this 52″ monster. A more common 27″ sized screen looks really small side by side. You obviously need a large desktop space to accommodate something of this size and it’s a two person job to unpack it and get it in to position as it’s heavy at 18.23Kg with the stand. It took us probably a week or so to really get used to the size, and comfortable with using such a large screen and so much desktop space, and that’s even coming from another large day-to-day screen. We’ll talk more about the user experience later on in the review too.
Potential Use Cases
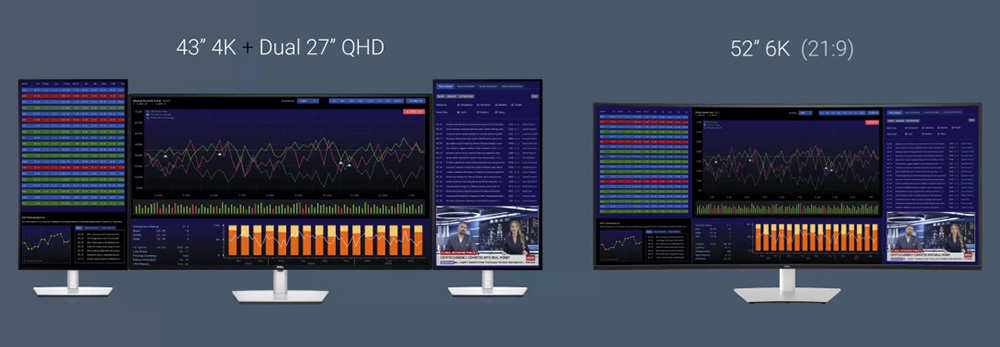
The screen is designed to be an alternative to multi-screen setups which are quite common in these target markets (e.g. traders, financial analysts, engineers, designed and executives). For instance it could be a good replacement for something like a large 43″ 4K screen with dual 27″ screens in portrait mode as shown above, one on either side.
That combination would offer a total resolution area of 6720 x 2160 (or a little higher with the 27″ monitors on the sides which reach 2560), so the switch to a single screen at 6144 x 2560 could be attractive without losing much overall resolution space, especially when that eliminates all the borders between the screens and the complexity of having multiple displays connected and configured. It also offers a better pixel density and image clarity, especially compared with that central 43″ screen which has a lower 102 PPI density, with larger text size and a less sharp image. The Dell screen offers a 129 PPI for a sharper and clearer image overall.
You lose some of the flexibility with positioning of the side screens, no longer being able to angle those separately to the central screen or move them to different positions, but a single-screen solution could be a more sleek and professional setup for many “power user” and office environments.
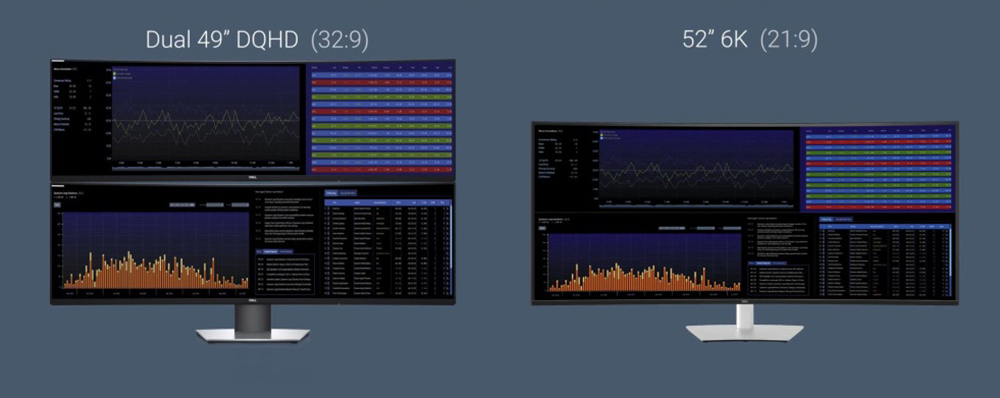
Another potential scenario in these markets is using dual 49″ super ultrawide screens stacked on top of each other, as shown above. That would offer a 5120 x 2880 total resolution area, which is a little more vertically but a fair bit less horizontally than the Dell’s 6144 x 2560 resolution. Again the Dell screen eliminates the borders between the screens and avoids complications with mounting and positioning of the dual 49″ screens.
This is just looking at the screen size, space and resolution at this stage, we’ll talk about some of the added productivity features and capabilities more later in the review, as that’s another consideration when comparing this screen to various multi-monitor configurations. You get a lot of capabilities and connections from this new display which may be very useful to some people.
Design and Features
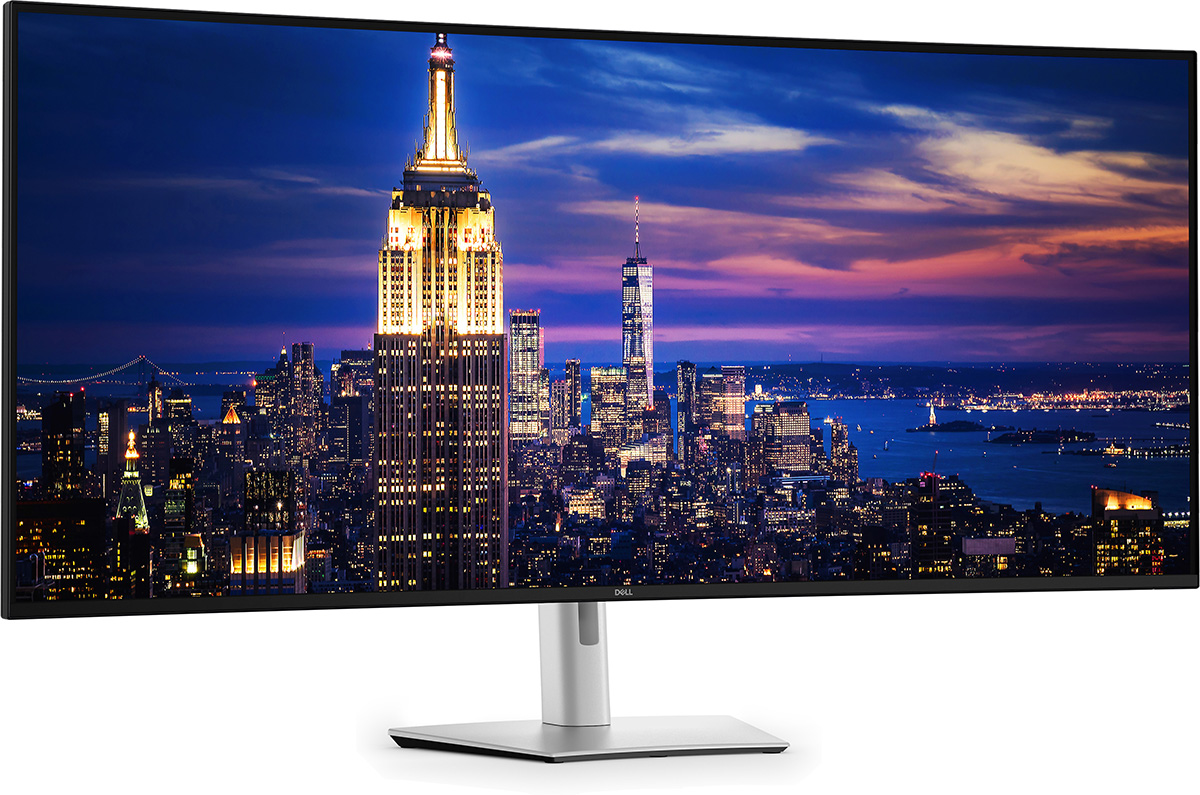
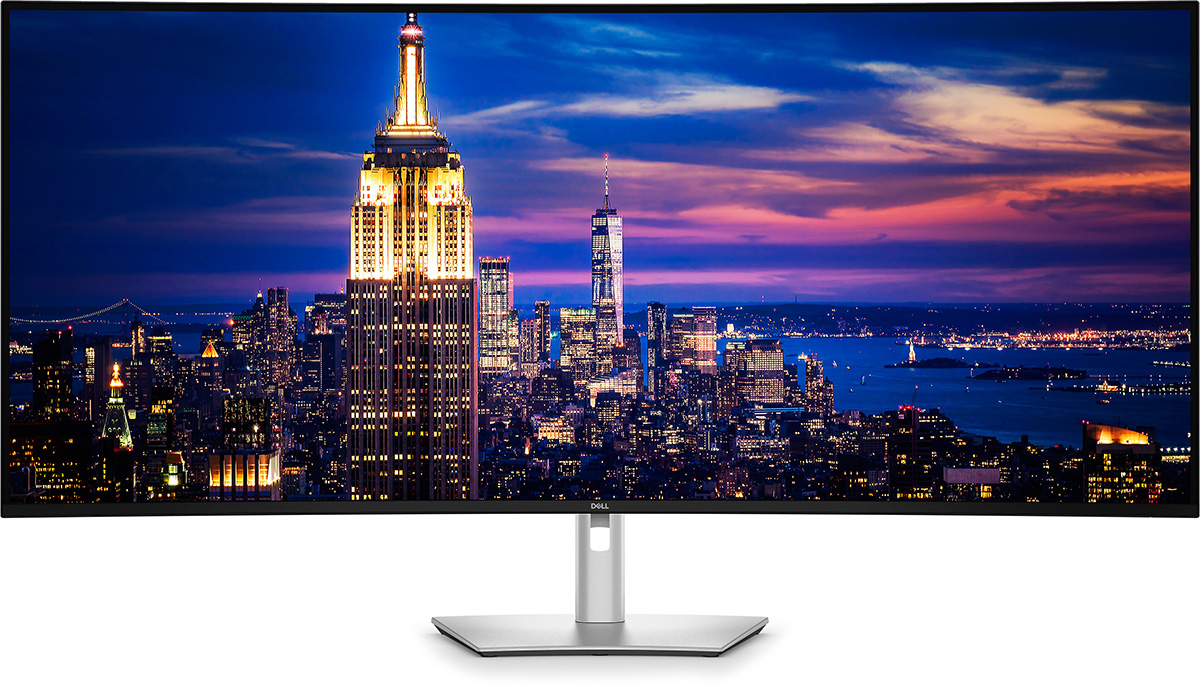
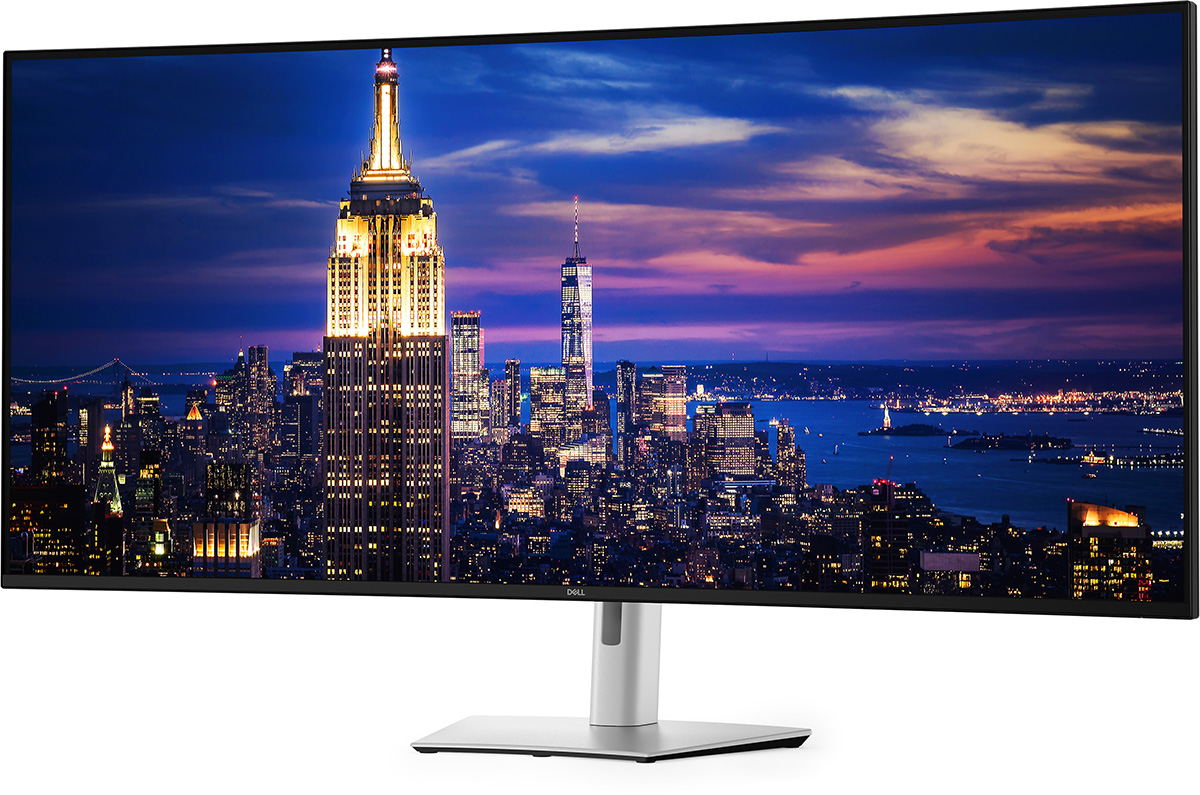
The screen comes in a black and silver design, with a 3-side “borderless” panel. This means that on the sides and top there is a thin 2mm black plastic edge, but then there’s an additional 8mm black panel border before the image starts, giving a total 10mm black edge to the screen. Along the bottom is a 14.5mm black plastic bezel with a small silver Dell logo in the middle, and with a small 1.5mm black panel border, the bottom edge is ~16mm thick. There’s a small power LED on the bottom right hand edge which glows white during operation, but no other logos or markings on the front of the screen. It looks sleek and minimalist as a result.
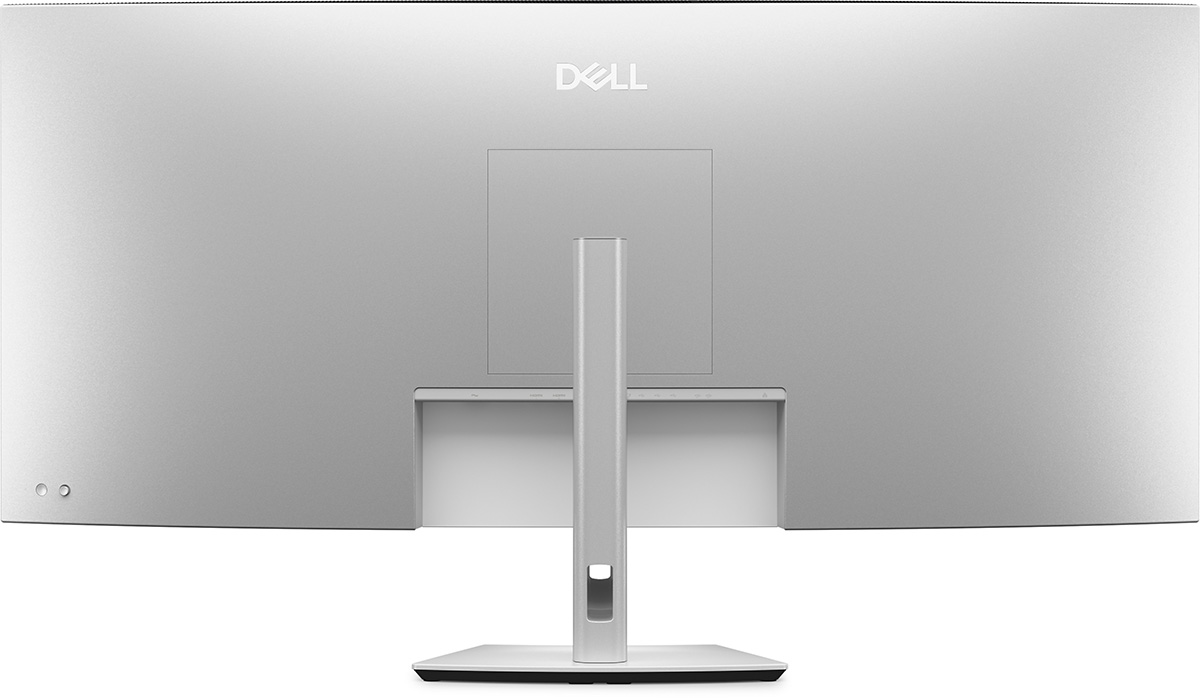
The rear of the screen is encased in a simple matte silver plastic. The stand has a quick release mechanism and attaches in the middle, but can also be removed if you want to VESA mount the screen (various support including 100 x 100, 200 x 100 and 200 x 200mm). The arm for the stand is finished in the same light silver plastic and there’s a cable tidy hole in the back. The foot of the stand provides a large base for such a massive screen and is also finished in the light silver plastic. The OSD control joystick and power button are located on the left hand side of the screen (when viewed from the back) as you can see above.
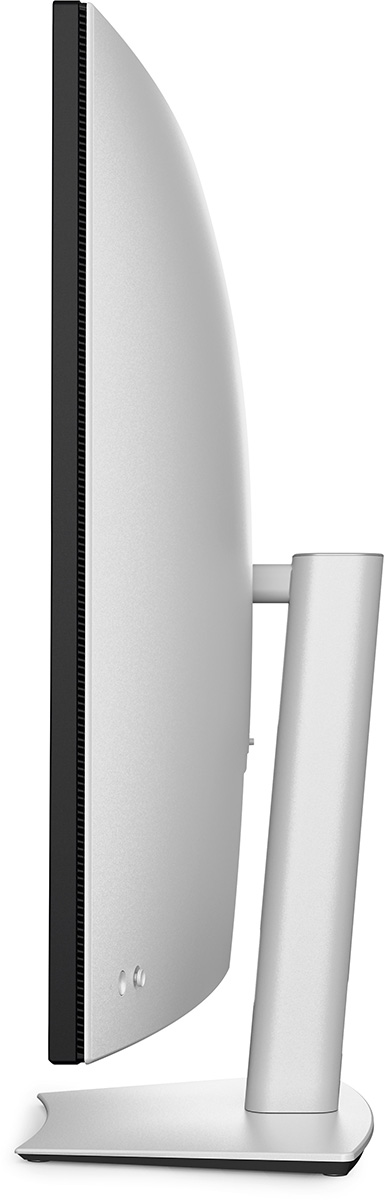

The screen has a subtle 4200R curvature, very slight on such a large screen like this. Given the very wide horizontal size, we might have liked a slightly steeper curve to improve user-comfort, but at the same time the screen is designed for lots of office and productivity applications where a lot of straight lines could look strange if it was too curved. A small amount of curve helps with comfort, but avoids a distorted look so it’s a nice overall balance we felt.
The stand offers tilt, height and swivel adjustments which are all smooth and easy to use. There is a fairly limited height adjustment range of 9 cm, although given the very large screen size this is sufficient. At the lowest setting the bottom edge of the screen is 5 cm above the top of the desk, and at maximum height adjustment it is 14 cm. There is a fair amount of wobble to the screen when you push the edges of the screen and use the OSD menu control buttons, owing to the very large and heavy panel. During normal usage it remains stable on the desk though and the stand feels solid and robust. You can buy the screen without the stand if you want as well.
Connectivity

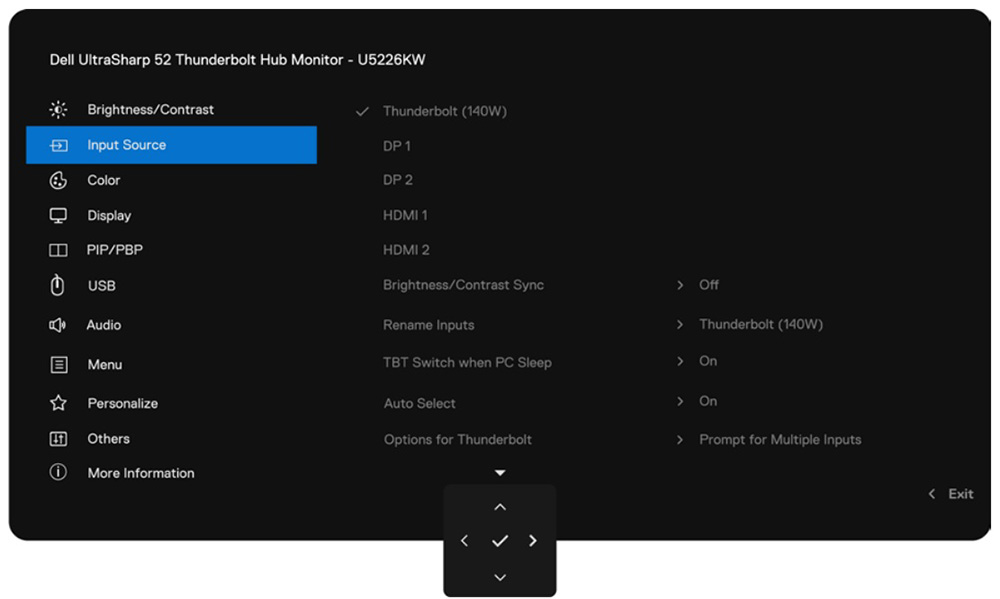
There’s a really wide range of connectivity on this screen with pretty much everything you could need. For video there are 2x DisplayPort 1.4, 2x HDMI 2.1 and 1x Thunderbolt 4 (DP Alt mode, 40Gbps data, 140W power delivery) available. It’s great to see Thunderbolt included and this offers a range of capabilities that we discussed in detail in our article here, if you want to know a lot more about Thunderbolt.
There’s also a load of other connections on the back of the screen including 4x USB-A data ports , 3x USB-C data ports (10Gbps) and 1x RJ45 Ethernet 2.5GbE port. The only thing missing really is a headphone connection, which seems an odd omission when there’s some integrated speakers on this screen. Those are reasonably powerful with 2 x 9W channels.
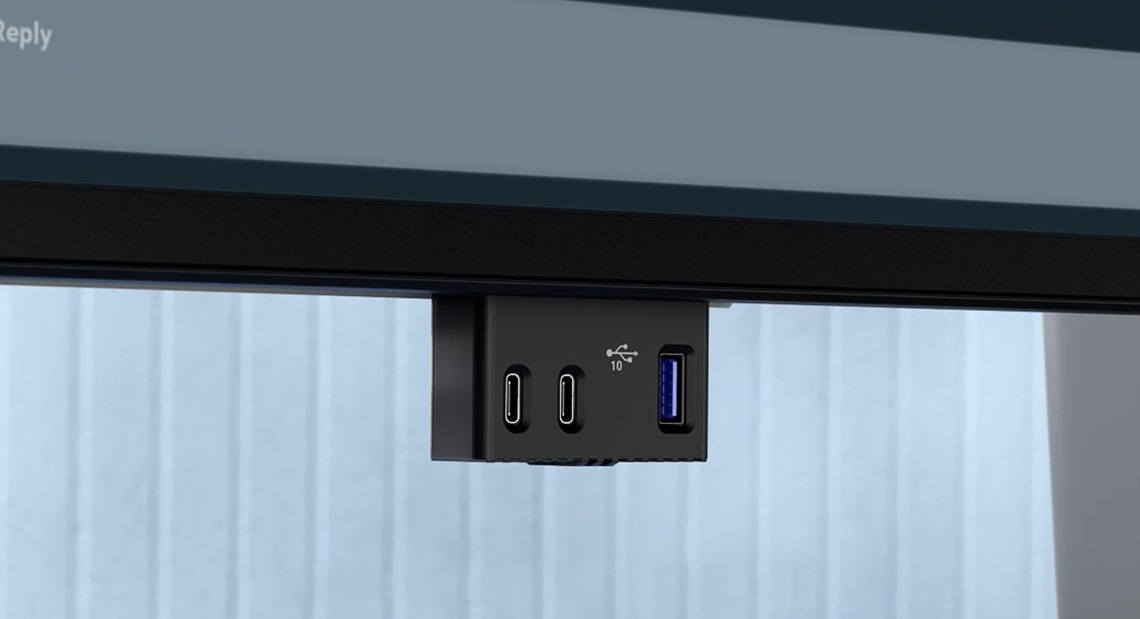
There’s also a small pop-out section on the bottom of the screen, about half way between the centre and the left hand edge. You can press this section and out pops some useful easy-access ports. There’s 1x USB-A (10Gbps + fast charging 1.2) and 2x USB-C data ports (10Gbps, 27W) available here which is really useful. Nice to see some easy-access ports as getting to those on the back is not easy at all with the large screen size. You’ll want to connect everything up and leave them we think, deferring to these easy-access ports if you need to connect anything else temporarily.
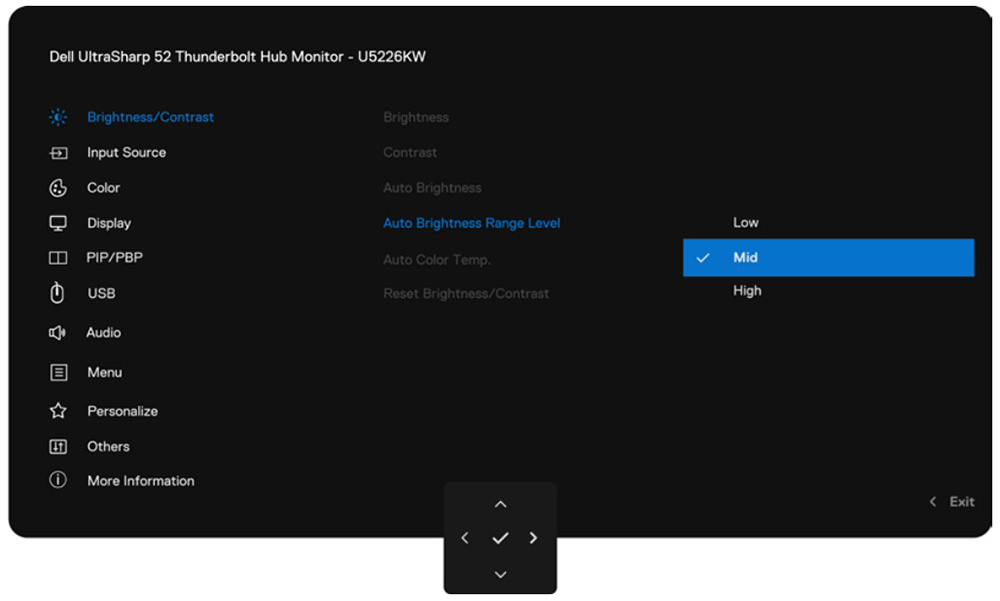
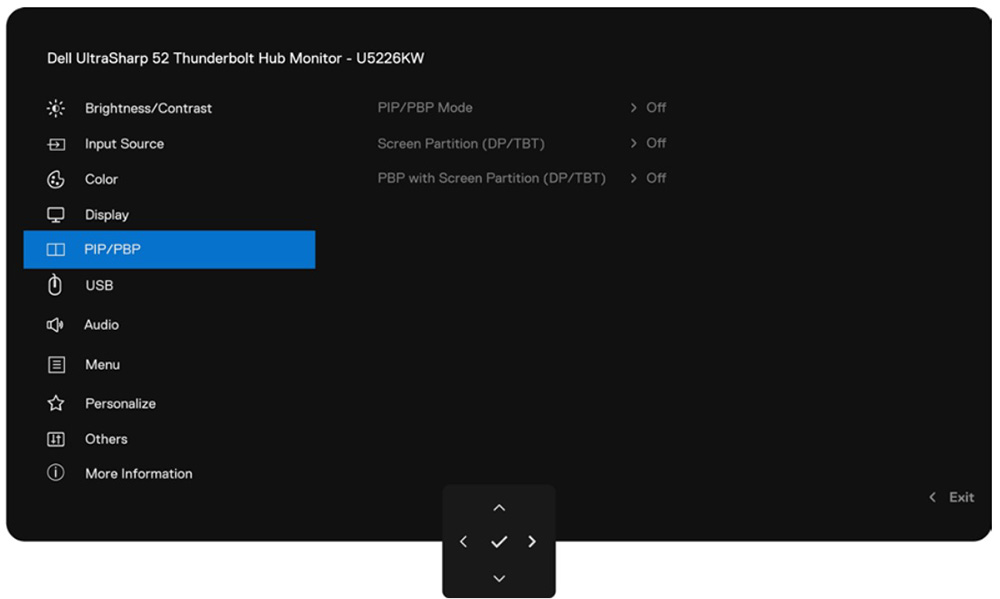
OSD menu
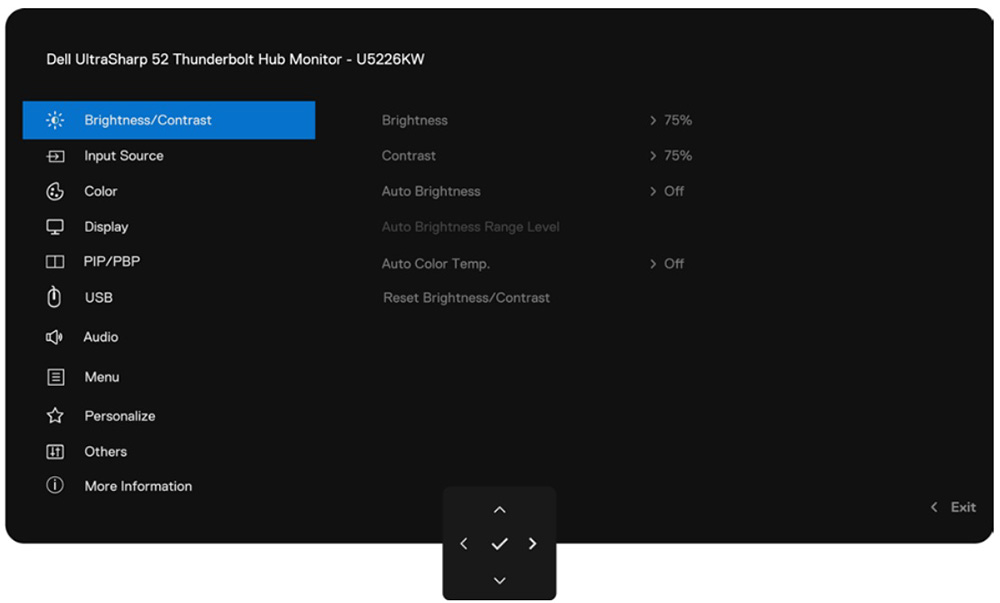
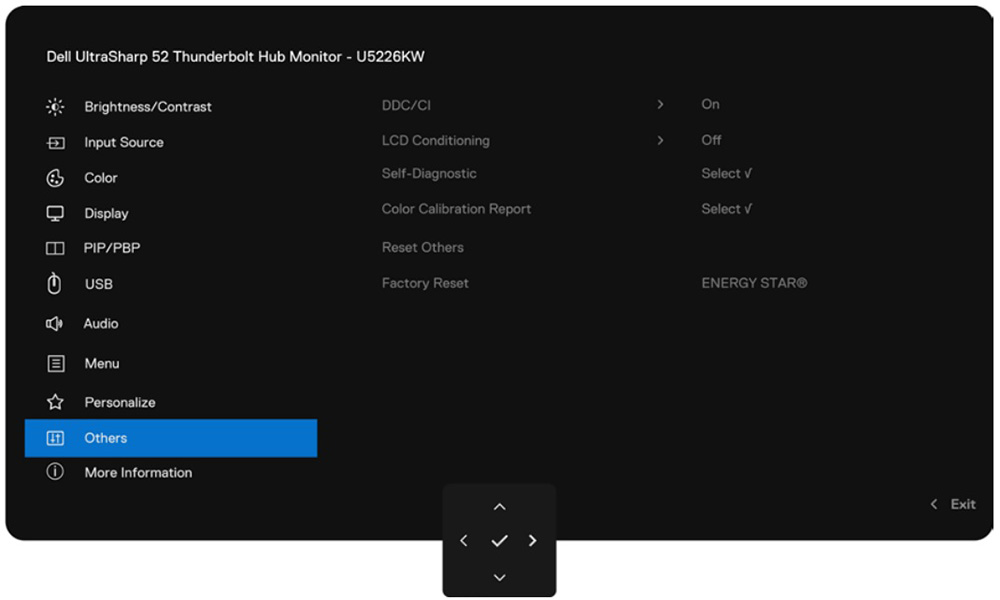
The OSD menu is split in to 11 sections and navigation is quick, easy and intuitive with the joystick toggle on the back of the screen in the lower right hand area (when viewed from the front). The button does make quite a loud clicking noise when selecting an option so it’s not very quiet, but that’s a minor quibble. You can set various shortcut actions in the menu if you want, although these still require a button press and scrolling to get to them. It might have been nice if you could trigger shortcuts just by pressing a given direction on the joystick.
| OSD Menu | |
| Joystick toggle controller | |
| Quick and snappy | |
| Intuitive to use | |
| User updatable firmware | |
| Software application |
There’s a wide range of settings and configurations available in the menu which was great. One other minor quibble is not being able to re-size or move the menu, it always opens in the bottom right hand corner.
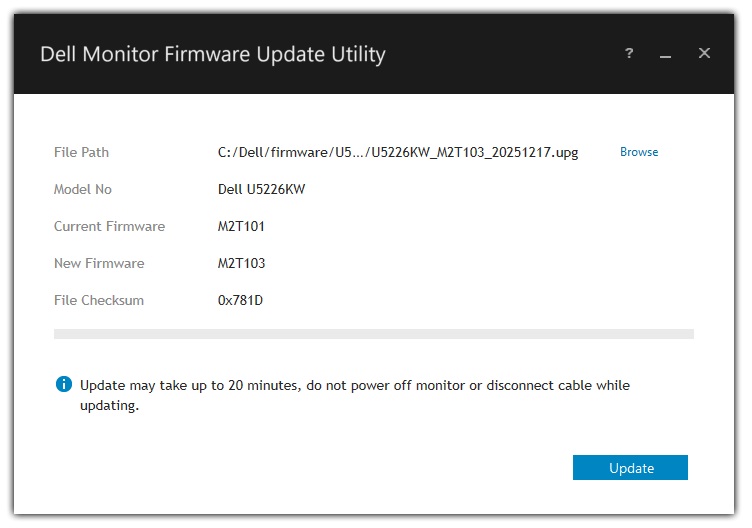
Firmware updates are supported as well – we were using the latest M2T103 firmware during our testing. Those are easy to carry out via Dell’s support page.
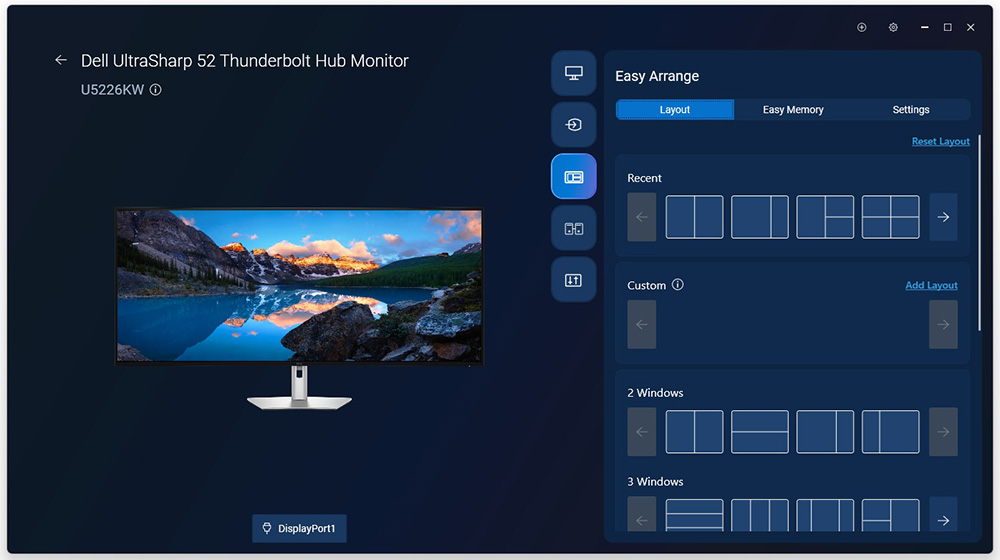
There is also support for Dell’s ‘Display and Peripheral Manager’ software which can be useful for quickly and easily controlling the screen setup, without having to fiddle around with the OSD menu. It also offers various additional shortcuts and features that are worth exploring.
Testing Methodology Explained (SDR)

Performance is measured and evaluated with a high degree of accuracy using a range of testing devices and software. The results are carefully selected to provide the most useful and relevant information that can help evaluate the display while filtering out the wide range of information and figures that will be unnecessary. For measurement, we use a UPRtek MK550T spectroradiometer which is particularly accurate for colour gamut and colour spectrum measurements. We also use an X-rite i1 Pro 2 Spectrophotometer and a X-rite i1 Display Pro Plus colorimeter for various measurements. Several other software packages are incorporated including Portrait Displays’ Calman color calibration software – available from Portrait.com.
We measure the screen at default settings (with all ICC profiles deactivated and factory settings used), and any other modes that are of interest such as sRGB emulation presets. We then calibrate and profile the screen before re-measuring the calibrated state.
The results presented can be interpreted as follows:
- Gamma – we aim for 2.2 gamma which is the default for computer monitors in SDR mode. Testing of some modes might be based on a different gamma but we will state that in the commentary if applicable. A graph is provided tracking the 2.2 gamma across different grey shades and ideally the grey line representing the monitor measurements should be horizontal and flat at the 2.2 level, marked by the yellow line. Depending on where the gamma is too low or too high, it can have an impact on the image in certain ways. You can see our gamma explanation graph to help understand that more. Beneath the gamma graph we include the average overall gamma achieved along with the average for dark shades (0 black to 50 grey) and for lighter shades (50 grey to 100 white).
- RGB Balance and colour temperature – the RGB balance graph shows the relative balance between red, green and blue primaries at each grey shade, from 0 (black) to 100 (white). Ideally all 3 lines should be flat at the 100% level which would represent a balanced 6500K average colour temperature for all grey shades. This is the target colour temperature for desktop monitors, popular colour spaces like sRGB and ‘Display DCI-P3’ and is also the temperature of daylight. It is the most common colour temperature for displays, also sometimes referred to as D65. Where the RGB lines deviate from this 100% flat level the image may become too warm or cool, or show a tint towards a certain colour visually. Beneath this RGB balance graph we provide the average correlated colour temperature for all grey shades measured, along with its percentage deviance from the 6500K target. We also provide the white point colour temperature and its deviance from 6500K, as this is particularly important when viewing lots of white background and office content.
- Greyscale dE – this graph tracks the accuracy of each greyscale shade measured from 0 (black) to 100 (white). The accuracy of each grey shade will be impacted by the colour temperature and gamma of the display. The lower the dE the better, with differences of <1 being imperceptible (marked by the green line on the graph), and differences between 1 and 3 being small (below the yellow line). Anything over dE 3 needs correcting and causes more obvious differences in appearance relative to what should be shown. In the table beneath the graph we provide the average dE across all grey shades, as well as the white point dE (important when considering using the screen for lots of white background and office content), and the max greyscale dE as well.
- Luminance, black depth and contrast ratio (static) – measuring the brightness, black depth and resulting contrast ratio of the mode being tested, whether that is at default settings or later after calibration and profiling. We aim for 120 cd/m2 luminance which is the recommended luminance for LCD/OLED desktop monitors in normal lighting conditions. Black depth should be as low as possible, and contrast ratio should be as high as possible.
- Shadow detail – this is evaluated with the screen configured to a 200 nits white luminance for consistency between different monitors, and viewed in a dimly lit room. This first 16 greyscale shades are measured using our UPRTek MK550T spectro device (0.002 nits lower limit) for shades near-black, and the results are plotted on a graph relative to a target gamma curve (usually 2.2 gamma). Where the measurement line crosses the 0.01 nits point on the Y-axis is typically the visual threshold for where we would start to be able to detect luminance compared with black (0.00 nits). We combine these objective measurements with visual tests using a grey shade test pattern to determine the first visible shade, and then rank the shadow detail performance accordingly.
- Gamut coverage – we provide measurements of the screens colour gamut relative to various reference spaces including sRGB, DCI-P3, Adobe RGB and Rec.2020. Coverage is shown in absolute numbers as well as relative, which helps identify where the coverage extends beyond a given reference space. A CIE-1976 chromaticity diagram (which provides improved accuracy compared with older CIE-1931 methods) is included which provides a visual representation of the monitors colour gamut coverage triangle as compared with sRGB, and if appropriate also relative to a wide gamut reference space such as DCI-P3. The reference triangle will be marked on the CIE diagram as well.
- dE colour accuracy – a wide range of colours are tested and the colour accuracy dE measured. We compare these produced colours to the sRGB reference space, and if applicable when measuring a wide gamut screen we also provide the accuracy relative to a specific wide gamut reference such as DCI-P3. An average dE and maximum dE is provided along with an overall screen rating. The lower the dE the better, with differences of <1 being imperceptible (marked by the green area on the graph), and differences between 1 and 3 being small (yellow areas). Anything over dE 3 needs correcting and causes more obvious differences in appearance relative to what should be shown. dE 2000 is used for improved accuracy and providing a better representation of what you would see as a user, compared with older dE methods like dE 1994, as it takes into account the human eye’s perceptual sensitivity to different colours.
Brightness and Contrast
Measured in the default ‘Standard’ preset mode, ambient light sensor disabled
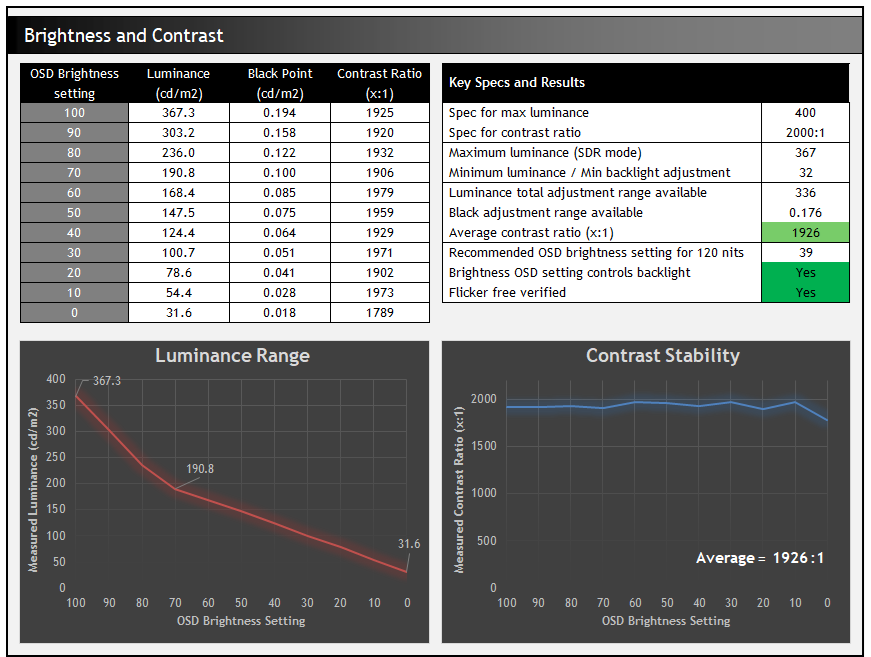
The brightness setting in the OSD menu controls an adjustment range between 367 and 32 nits. At the top end it reaches close to the advertised 400 nits, falling slightly short but still offering a good overall luminance potential. At the bottom end there’s a good minimum adjustment range which is useful when using the screen in darker room conditions.
The contrast remained mostly stable across the adjustment range and reached 1926:1 average which was very good for an IPS-type technology panel, thanks to the use of a modern IPS Black panel, and basically on spec with the advertised 2000:1.
Default Setup
The screen comes out of the box in the ‘Standard’ preset mode, which doesn’t carry any specific factory calibration. Those modes are available using the ‘Color Space’ setting which we will explore in a moment. We left the ambient light sensor disabled for these tests as well.
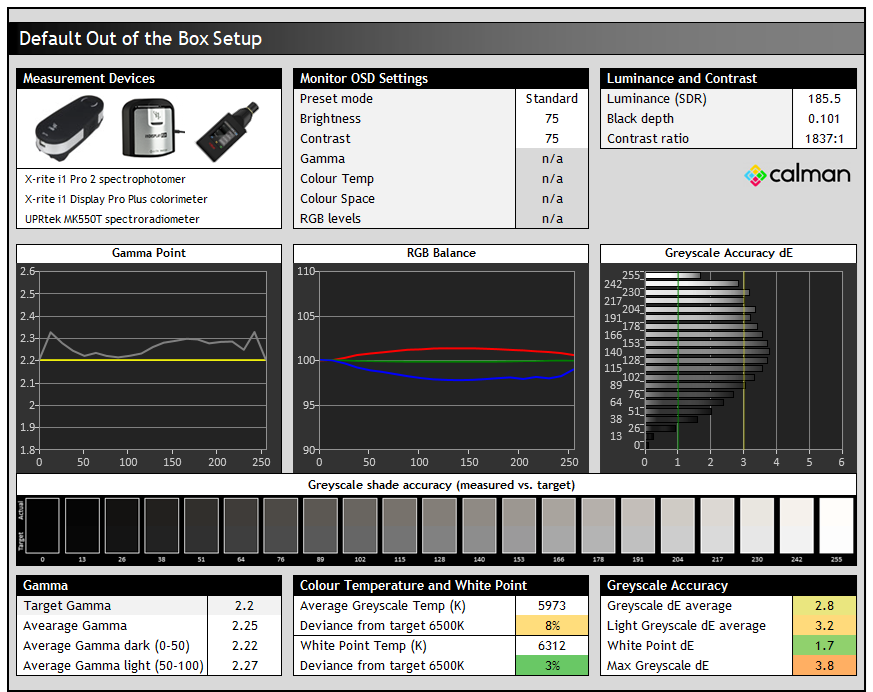
Default gamma is pretty close to the 2.2 target which is good, and while the white point is close to the 6500K target (3% error), there is some variation in the balance of red, green and blue across the grey shade range, which leads to some weaker greyscale accuracy. Contrast was strong for an IPS-type panel at 1837:1 in this default mode too.
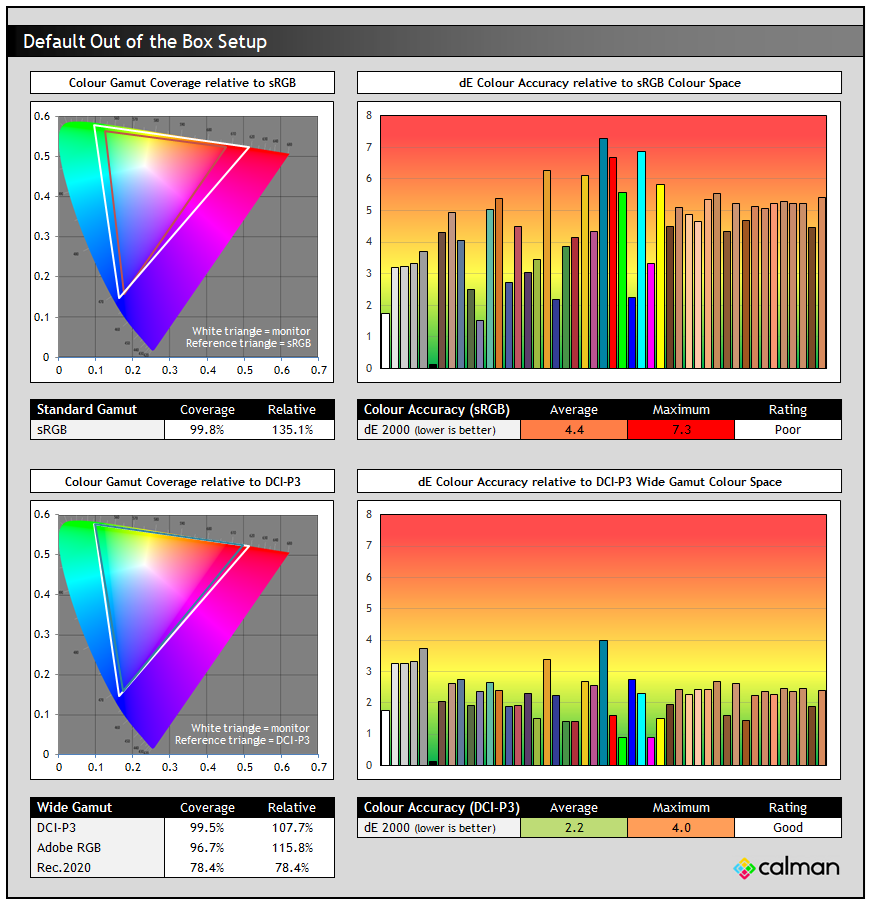
The screen has a wide colour gamut with a 99% DCI-P3 coverage quoted. As a result this extends a way beyond the sRGB reference space, giving 135% relative coverage, which results in poor accuracy for sRGB colours as is expected on wide gamut screens due to over-saturation and over-coverage compared with that smaller colour space. We’ll see how we can improve SDR / sRGB colours in a moment.
The native gamut is closer to the DCI-P3 reference space, with 99.5% absolute coverage and a small amount of over-extension to reach 107.7% relative coverage. With a closer match to this colour space, the accuracy of DCI-P3 colours was good though, with dE 2.2 average.
Factory Calibrated modes
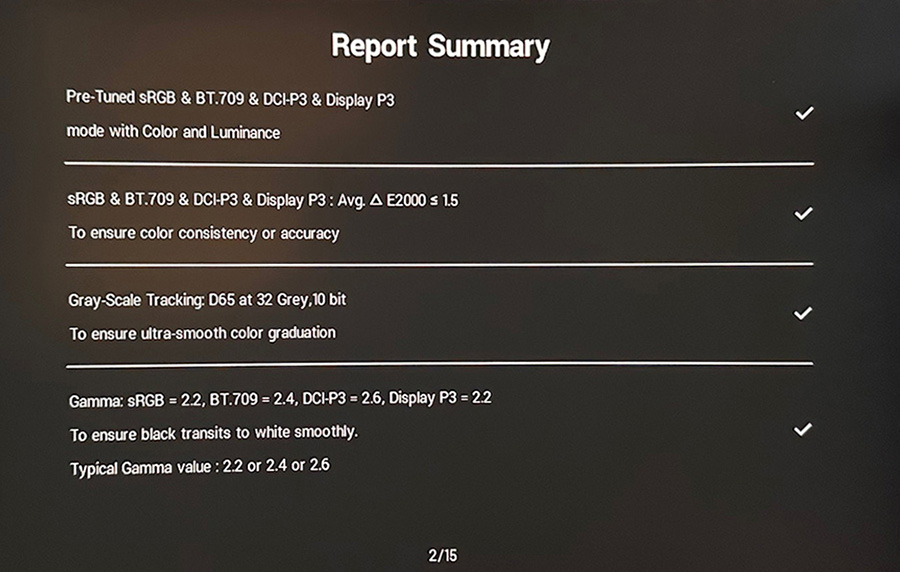
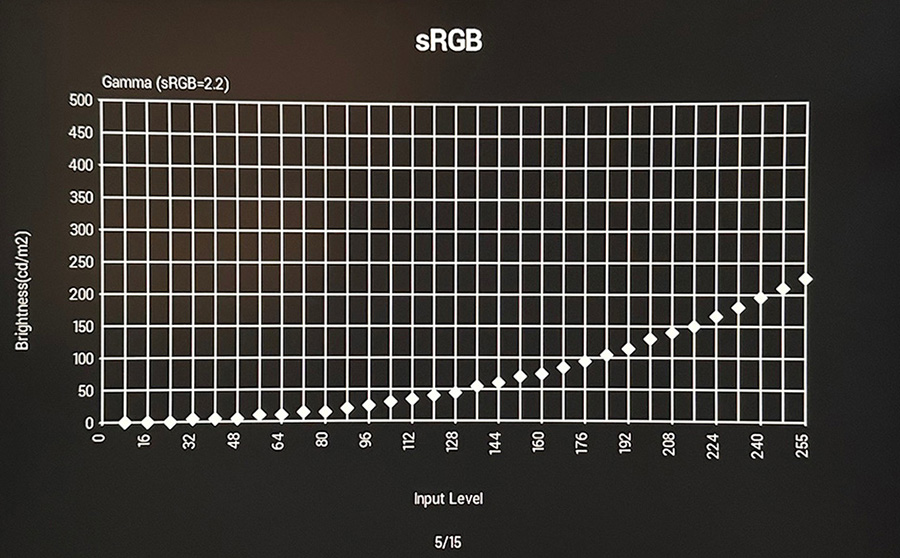
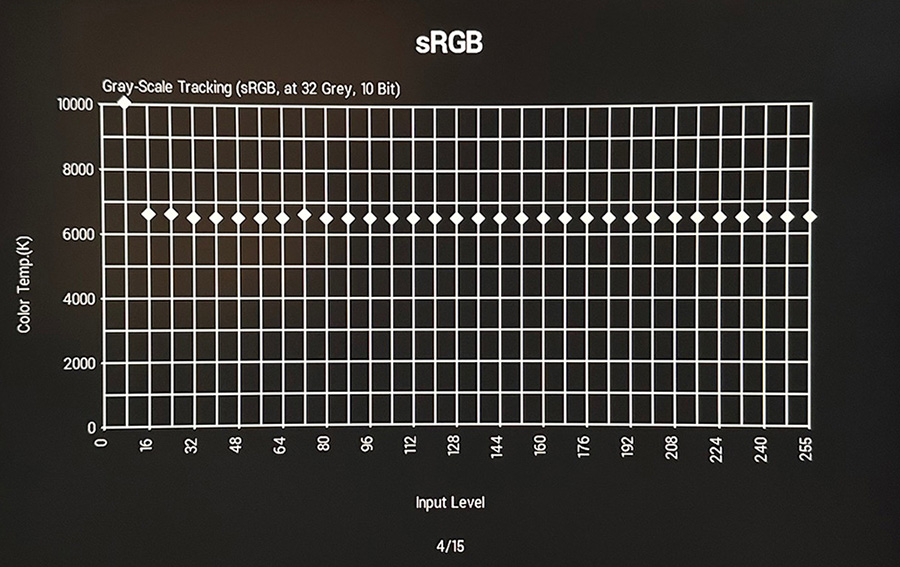
The screen offers 4 different factory calibrated modes. You can view a calibration report for your screen sample in the OSD menu which breaks down the gamma, greyscale and colour performance in each mode. We’ve included some examples below:
We’ve provided some photos from the sRGB report above as an example. Targets are listed for each of these in each of the presets, but we did find actually some were configured to different targets it seems than what the report suggests. We’ll comment on that further as we test each preset below.
In all of the colour space modes you still have access to adjust the brightness and contrast settings which is good news, although there’s no options to change the gamma, colour temperature or RGB channels unfortunately, so we are at the mercy of Dell’s configuration.
sRGB mode
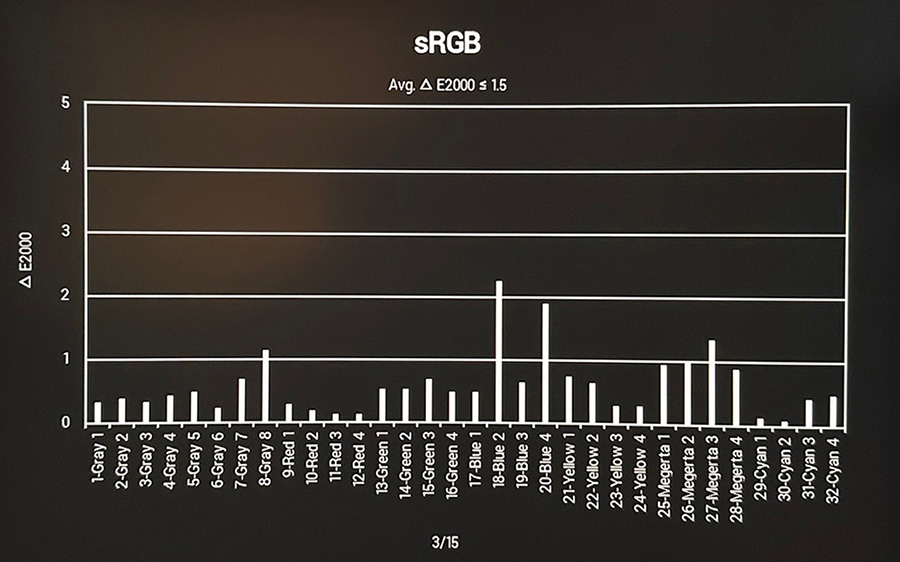
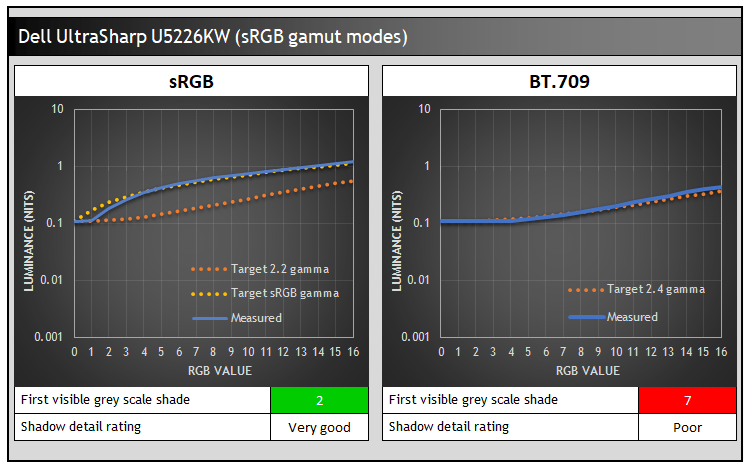
First up is the sRGB mode which according to the OSD menu calibration report should be configured to a 2.2 gamma, D65 colour temp and with dE colour accuracy of <1.5.
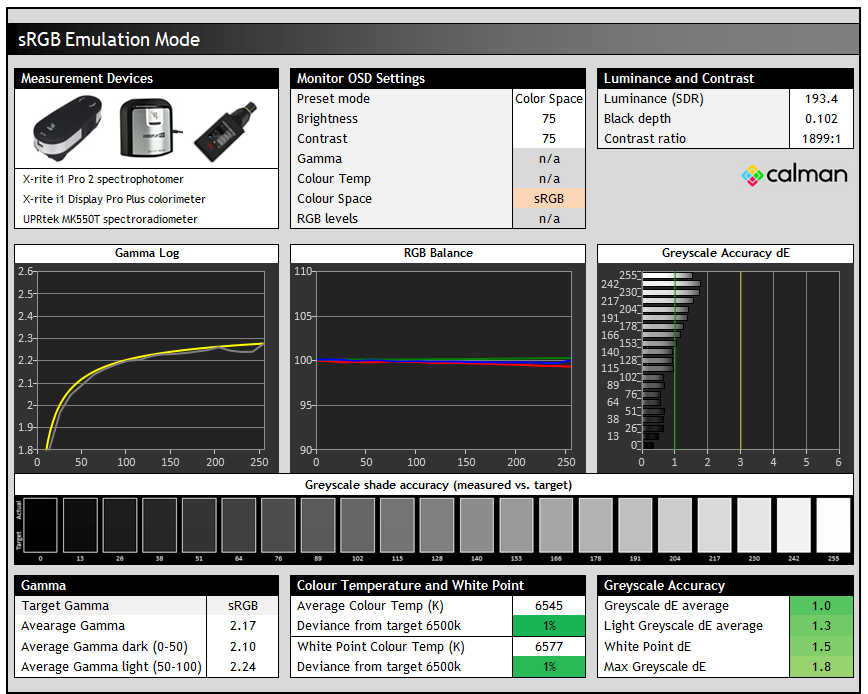
Actually in this mode we found the gamma seemed to be configured to the slightly different sRGB gamma curve instead of 2.2, confirmed later again in our shadow detail testing and also listed in the Dell ‘Color Management’ software as the default configuration. It seems like the calibration report in the menu is slightly wrong here. This gamma is very close to 2.2 anyway, just with some adjustments near black to make shadow detail brighter and easier to see so it’s probably a welcome update anyway.
We had a much better RGB balance in this mode than the ‘standard’ mode too with a white point basically spot on with D65 (1% out). This left us with a very accurate greyscale too.

This mode also offered a good clamping of the colour space back to sRGB, reducing all the over-saturation from the native mode. It had gone slightly too far we found and left us with some minor under-coverage, but the accuracy of sRGB colours was now very good, with dE 1.2 average measured, meeting the calibration spec.
BT.709 mode
The BT.709 mode offers an alternative approach to working with the sRGB colour space and is configured to a target 2.4 gamma which is sometimes used for television and mastered content in a dimly lit room. It should also offer a D65 white point and dE < 1.5 colour accuracy according to the calibration report in the menu.
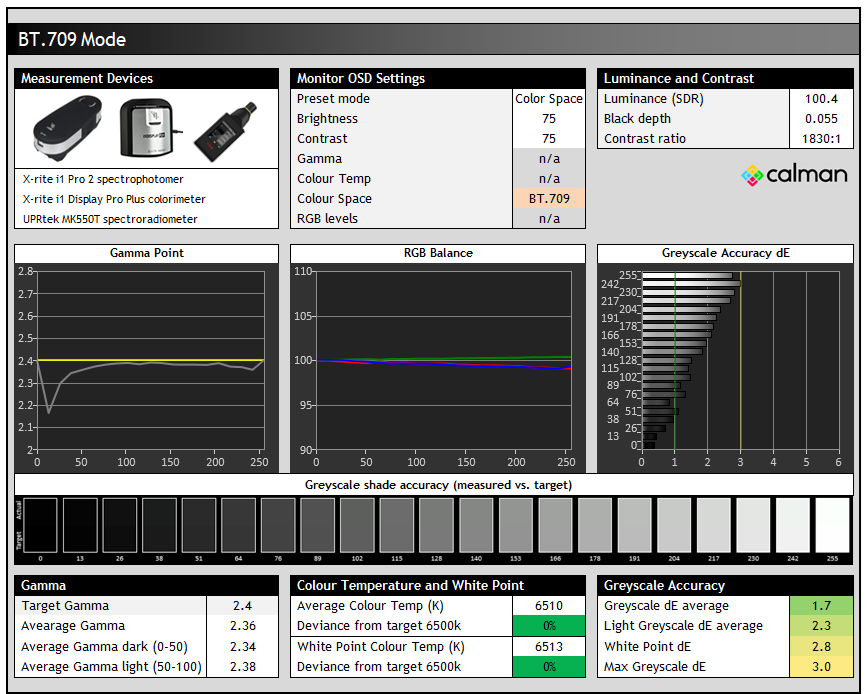
Gamma is indeed higher in this mode, tracking very close to 2.4 according to our measurements, with a little adjustment to a lower gamma near black to help preserve some tonal values. This mode looks darker by default as a result of the higher gamma, and it has an impact on near-black detail as we will explore in a moment in our shadow detail testing. Greyscale temp and white point remain very good, and we had a good greyscale accuracy overall.
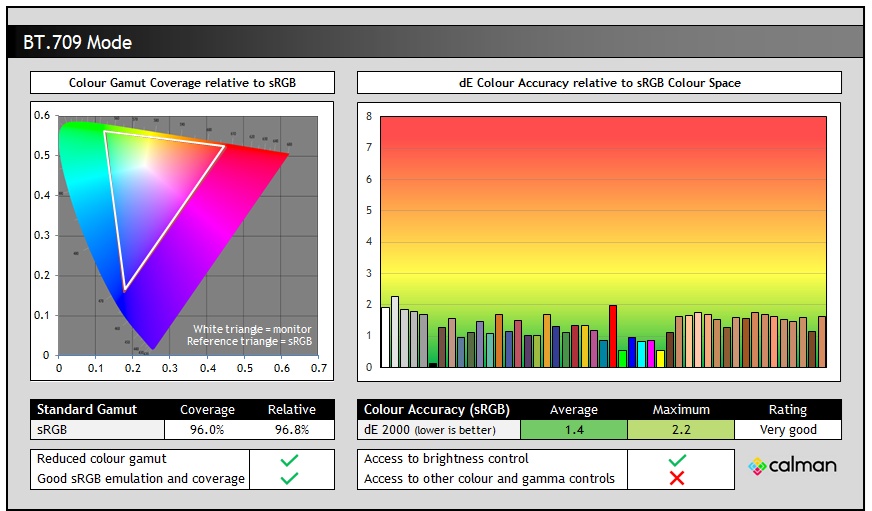
Like the sRGB mode, this mode also offered a good clamping of the colour space back to sRGB, reducing all the over-saturation from the native mode. It had gone slightly too far we found and left us with some minor under-coverage, but the accuracy of sRGB colours was still very good, with dE 1.4 average measured, meeting the calibration spec. This mode could be useful if you wanted to work with sRGB colour space content but with a higher 2.4 gamma instead of the sRGB gamma curve operating in the ‘sRGB’ mode.
DCI-P3 mode
The DCI-P3 mode is configured to a 2.6 gamma according to the calibration report in the menu, the target for the DCI-P3 Theatre standard. The menu suggests in one place that it is configured to the D65 white point, but actually if you look at the provided graphs it shows it’s probably configured to the D63 white point (6300K) instead which is actually the target for this standard anyway. We believe the D65 mention is an error in the menu calibration report, our testing shows it is actually configured to D63. There should also be a dE < 1.5 colour accuracy offered according to the report.
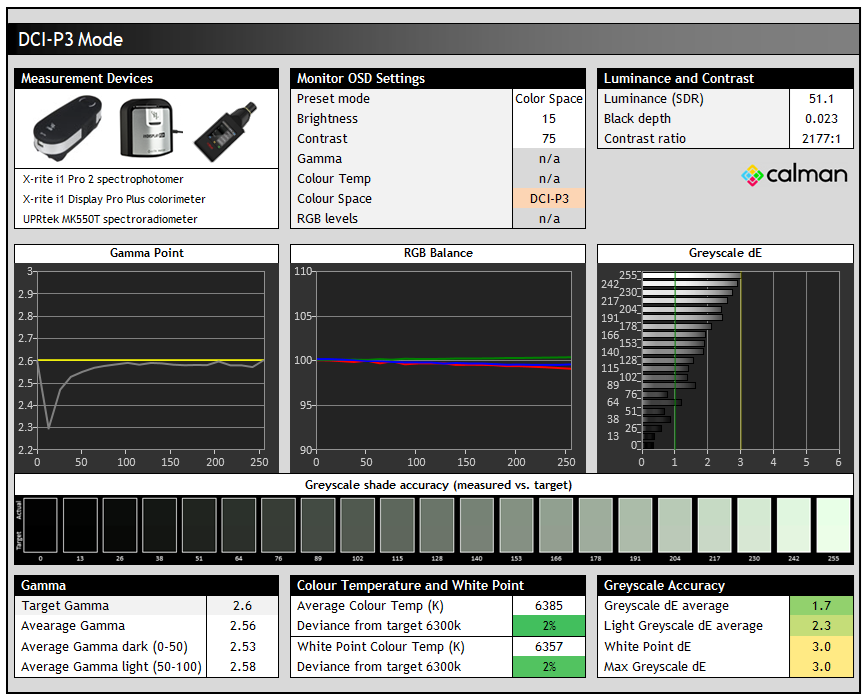
This mode has a higher gamma which we measured at very close to 2.6 overall, with a small adjustment near black to try and help preserve tonal values a little more. As we mentioned, the greyscale is configured to D63 (6300K) instead of the mentioned D65, and it tracks this very well. This does give a greenish tint to the greyscale, but that’s intended for this DCI-P3 Theatre standard. The brightness control is set to a much lower 15% in this mode by default, which delivers a 51 nits luminance, very close to the target of 48 nits for this standard as well- that’s an added configuration step not referenced in the calibration report. You can still adjust the brightness control if you want.
We found also that the contrast ratio was a bit higher in this mode than the others by ~300:1 or so more, although with the much higher gamma the shadow detail was poor (covered below), but that’s to be expected.

This mode clamps the native colour space of the backlight back to the DCI-P3 reference as intended, going a little too far but overall offering good coverage and very good colour accuracy for DCI-P3 colours. If you want to work to this DCI-P3 theatre target, this mode is nicely configured. Note by the way that this screen doesn’t support HDR at all, you can’t even enable an HDR10 input signal.
Display P3 mode
An alternative option for working with the DCI-P3 colour space is to use the ‘Display P3’ mode which according to the calibration report should be configured to a more typical 2.2 gamma, D65 white point and with dE < 1.5 colour accuracy.
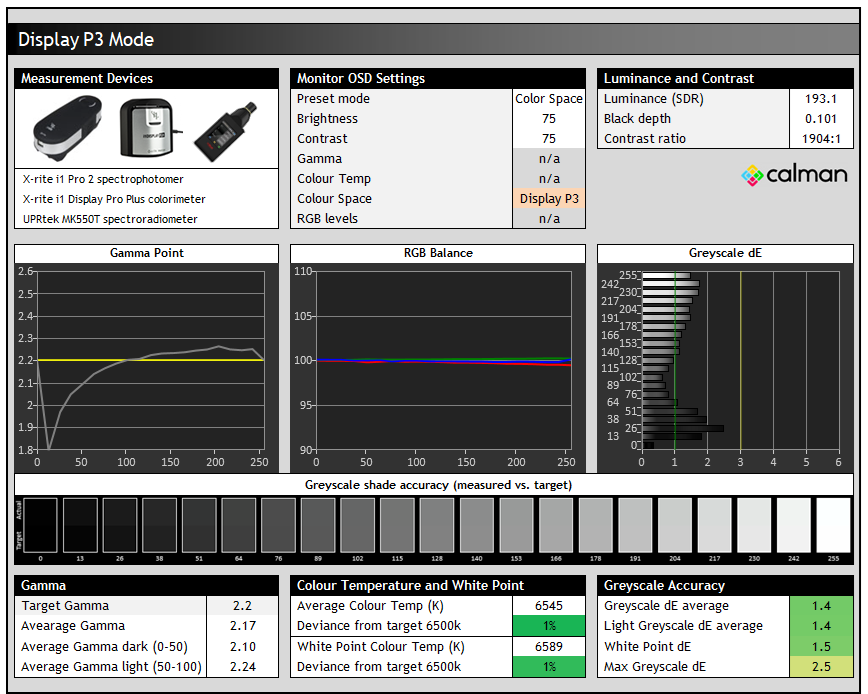
We found in this mode that despite the calibration report suggesting a 2.2 gamma configuration, it was actually configured to sRGB, adjusting the near-black shades to help bring out shadow detail. This was the same setup as in the ‘sRGB’ mode we tested earlier and the ‘Dell Color Management’ software again confirms it is actually configured to sRGB gamma as well. Greyscale temp and accuracy were very good in this mode again, with white point very close to D65 as intended.
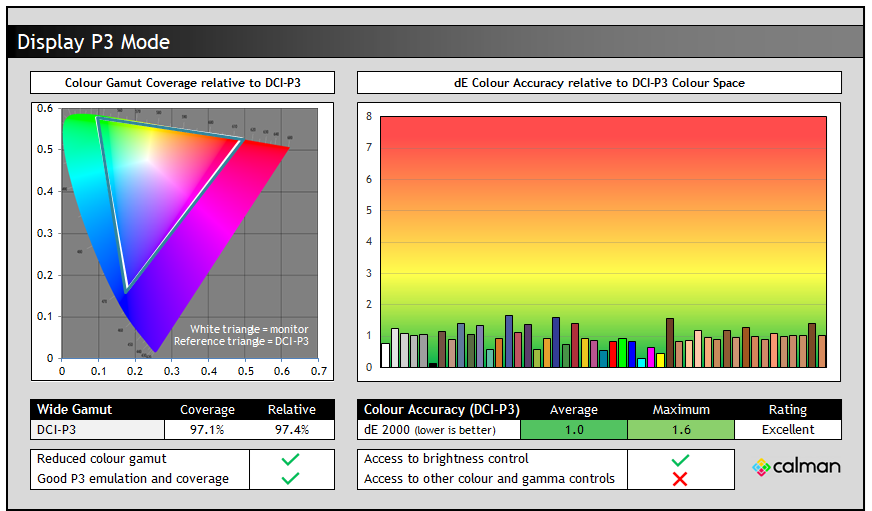
We again had good clamping of the DCI-P3 colour space in this mode and excellent colour accuracy overall for DCI-P3 colours. This provides another very good factory mode for working with DCI-P3 content if you need, commonly used for HDR content. Although as we said earlier, there’s no support for HDR signals on this screen at all.
Shadow Detail
We also explored and tested the near-black shadow detail which can sometimes be a challenge on lower contrast LCD panels, although this screen does use an IPS Black panel with an increased 2000:1 contrast ratio spec so it should offer a better black depth and potentially better near-black detail as a result. The screen was configured to 200 nits white luminance, and we tested the screen in each of the 4 colour space modes as shown below.
Keep in mind that some of these modes have a different target gamma and so some black crush is expected/intended.
The black depth of the IPS panel can only reach around 0.1 nits and so at no point will any shade be below the typical minimum luminance threshold of 0.01 nits in a dimly lit room (more information on this and the topic of shadow detail in our article here). The performance does vary between different configurations and modes though.
In the sRGB mode there was very good shadow detail and we could make out RGB 2, with RGB 1 being measured to a very close luminance to black and therefore being crushed. Still, the performance was very good in this mode. As we commented on earlier, this mode is actually configured to the sRGB gamma curve instead of 2.2, which is very close overall but with some near-black adjustment which is why these darker shades are more easily visible. You can see the near-black performance tracks sRGB gamma better than 2.2, confirming this earlier observation.
The BT.709 mode might operate with the same colour space clamping for sRGB, but its configured to a 2.4 gamma and so a lot of shadow detail gets crushed. The shades from RGB 1 – 6 are basically the same luminance as black, and so the first visible shade where luminance increases is RGB 7. To be expected given the 2.4 gamma and you can see it tracks the target very closely.
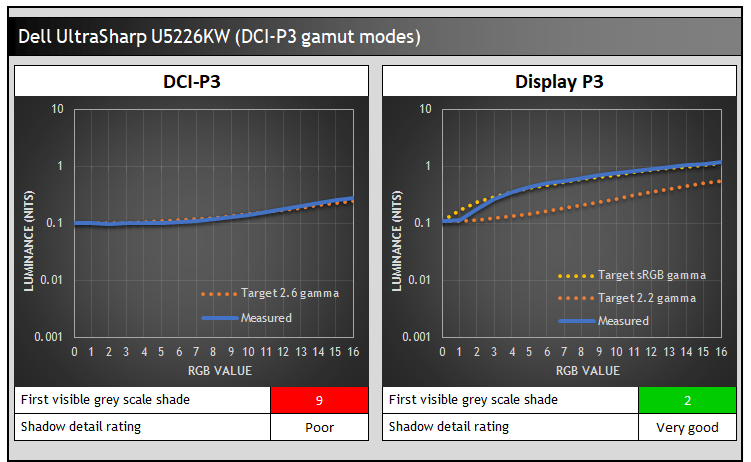
The DCI-P3 modes again show some different performance. The ‘DCI-P3’ mode is configured to a 2.6 gamma and so there’s a lot of expected black crush. The luminance of near-black shades is the same as black until around RGB 9 which is the first visible shade. Certainly very limited shadow detail in this mode (as intended with the gamma). The ‘Display P3’ mode seems to be configured to an sRGB gamma instead of 2.2, like the sRGB mode was. This helps bring out near-black detail well and we could see RGB 2 now in this mode which was very good.
Calibration
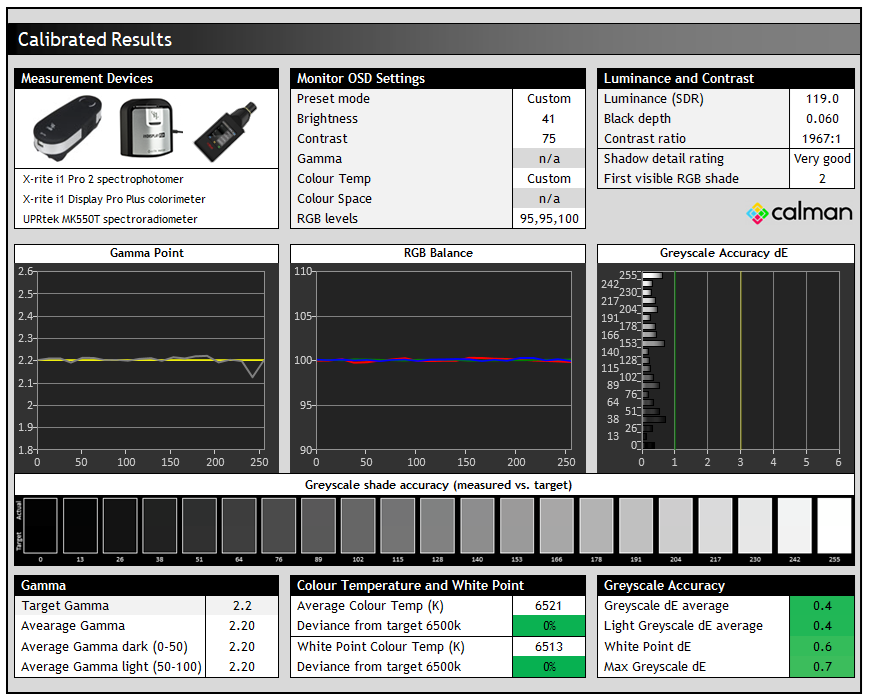

Calibration and profiling can produce some very good overall results and could be useful though if you wanted to operate the screen within its native wide gamut mode, but then map the colour space back to something else like sRGB for instance for colour-aware applications (e.g. Photoshop). You would need a suitable calibration device and software for this, or you could also try our calibrated ICC profile.
The screen was profiled to 2.2 gamma, 6500K colour temp and to the sRGB colour space. The screen was left in its native wide gamut mode, but this profile will be used in colour-aware applications to map back to sRGB in this instance. Overall the calibrated results were excellent as you’d hope.
Get the best settings for this screen
- On our Patreon Insider tier and above you can find our full ‘Best settings guide’ for this screen which includes all our recommended calibrated settings and ICC profile for SDR mode, as well as other best settings guidance for other options and gaming.
- If you only want just our standard SDR settings and calibrated profile, that is available via our ICC database (without all the other best settings guide).
ICC Profiles and Monitor Calibration Database
Find the recommended settings and a calibrated ICC profile for your display.
[View here]
General and Office
The U5226KW is very well suited to office and general uses thanks to its massive screen size, high resolution, decent pixel density and wide range of features and extras. As we mentioned earlier, it took us around a week of use to really get somewhat used to the huge size of the screen and all the desktop space, but once we did, it was a very enjoyable experience. You get so much room to work with thanks to the 6144 x 2560 resolution, and this makes split screen work and multi-tasking a joy.
At this resolution the pixel density of the panel is 129 PPI, so it sits in between a typical 27″ 1440p (~110 PPI) and a 32″ 4K (~140 PPI) monitor. We found it perfectly fine to use 100% OS scaling at this resolution, giving you full access to the resolution’s real estate, without needing to use scaling. You could perhaps switch to 125% scaling if you find text and icons too small natively, but we found it perfectly useable after a short period of getting used to it. Switching to 125% scaling would give you the equivalent resolution of a 4915 x 2048 monitor. The panel has a standard RGB-stripe sub-pixel layout so there’s no concerns there around text clarity and sharpness as you’d expect from an LCD monitor.
The screen features a light matte anti-glare coating which is the same as other modern IPS panels, free from any noticeable grain issues and providing solid glare and reflection handling. That makes the screen well-suited to brighter office and working environments which is important for a screen of this type. The panel has a subtle 4200R curvature which provides a very slight curve. We commented earlier about how it could have perhaps been a little steeper on such a large screen to improve user comfort, although at the same time it’s important to avoid distorted images and lines when a screen like this is aimed at professional users and content which could have a lot of straight lines. It’s probably a sensible overall balance we think.
The IPS Black panel provides wide viewing angles, good colours, an improved contrast ratio and a stable image and is well-suited to a monitor for this target market. There is some typical IPS glow if you view darker content from an angle though.
Features and connections
| Features | Notes | |
| USB type-C connectivity (DP Alt mode) | via Thunderbolt 4 | |
| USB type-C power delivery | 140W via Thunderbolt 4 | |
| Daisy chaining support | ||
| KVM switch | ||
| PiP and PbP support | Many options including screen partition | |
| USB data ports | 4x USB-A and 3x USB-C (on back) | |
| Easy access USB data ports | 1x USB-A and 2x USB-C (on bottom) | |
| Integrated speakers | 2 x 9W | |
| Audio output / headphone out | ||
| Mic input | ||
| Integrated webcam | ||
| Ambient light sensor | Brightness and colour control | |
| Motion sensor | ||
| Stand adjustments | Tilt, height, swivel, | |
| VESA mount support | Various options supported | |
| Integrated power supply | ||
| Tripod socket | ||
| Firmware updates | ||
| Fan-less design |
There’s a really wide range of connections and features available on this screen, notably including a Thunderbolt 4 hub connection (with DP Alt mode, 140W power delivery) and a load of USB-A and USB-C data ports. It’s good to see a few of these available easy-access on the bottom of the monitor via the little pop-out section, and it’s also useful to see some pretty decent integrated speakers (2x 9W) included. The only thing really missing from the connectivity is a headphone / audio out connection of some sort we felt.
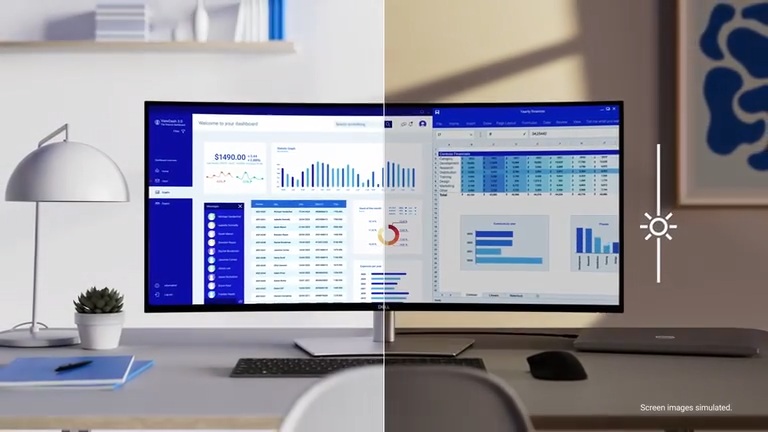
A built-in Ambient Light Sensor on the top of the screen can be useful to intelligently adjust brightness and colour temperature to suit your surroundings and varying ambient light conditions. This can be customized a bit via the OSD menu as well and does a decent job of dynamically controlling your screen brightness and colour temp during different times of the day.
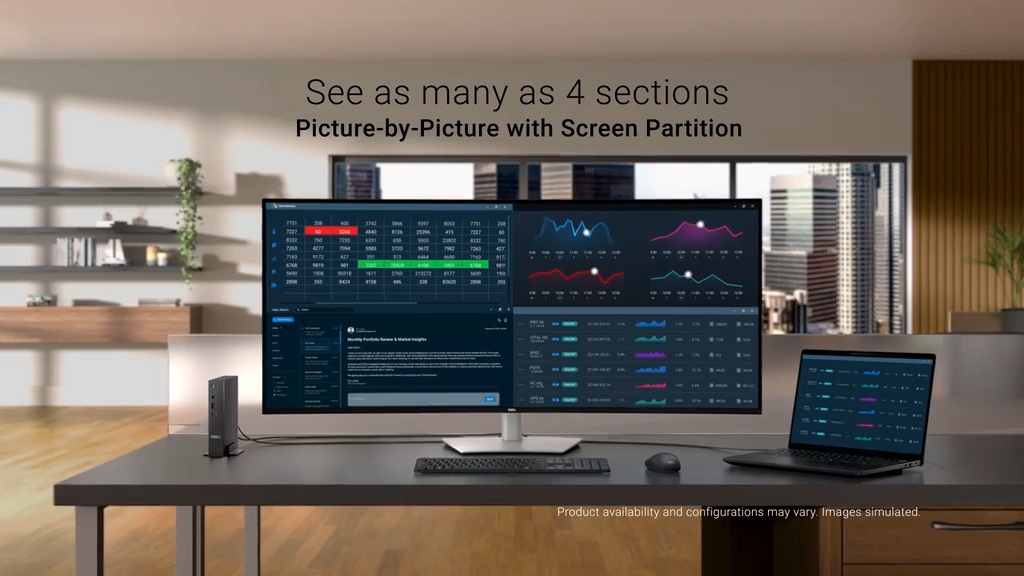
Dell say that this is “the world’s first monitor to implement Picture-by-Picture (PbP) with Screen Partition”. This allows you to connect up to 4 PCs simultaneously and display content across four unique areas of separately partitions. For instance you could split it in to 4 equal sections using the PbP modes, with each offering a 3072 x 1280 @ 120Hz resolution. See Dell’s user manual for loads more information on available configurations and modes for these features. The KVM (Keyboard, Video, Mouse) and Auto KVM features empower you to control them with a single keyboard and mouse as well which some people may find useful.
Blue light

| Blue light output | |
| Blue peak wavelength | 462 nm |
| Blue light portion | 30.98% |
| Low blue light modes available | |
| Low blue light mode temp | n/a |
Dell say that this is “the world’s first monitor to achieve TÜV category one hardware low blue light certification”, which reduces harmful blue light emissions to ≤20%. There’s no low blue light modes or settings in the menu on this screen so this is a “hardware low blue light” approach. The spectral distribution at a calibrated 6500K white point is shown above, with the blue peak at 462 nm wavelength.
Backlight dimming

| Flicker | |
| Flicker free verified | |
| PWM / flicker frequency | n/a |
The backlight operates with a DC dimming method, and is PWM-free / flicker free at all brightness settings.
Gaming

The U5226KW is clearly not aimed at gamers, but some owners may want to enjoy the occasional gaming session perhaps, and make use of the massive screen size, immersive form-factor and highly detailed image. The U5226KW does have a 120Hz refresh rate, so it at least offers something a bit beyond typical 60Hz-only office/productivity monitors. That’s nice even just for desktop and general usage to give a more fluid and responsive feel for the desktop and as you move windows and apps around.
Adaptive-sync is available (no certifications from NVIDIA, AMD or VESA though) and supports a 48 – 120Hz VRR range with LFC used below that. There’s two overdrive modes available in the OSD menu and we tested each of these:
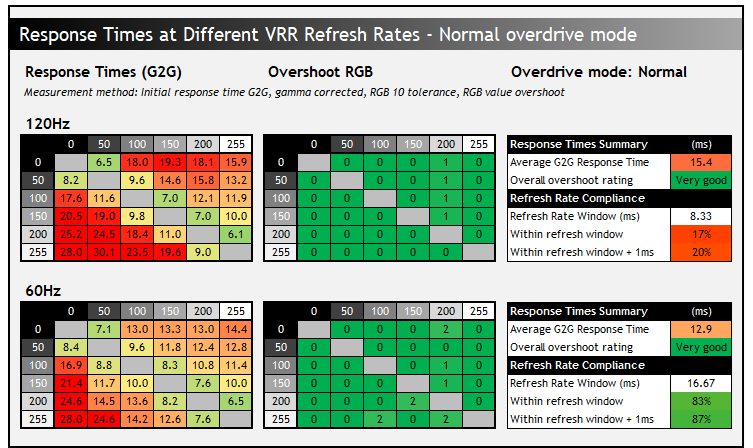
In the ‘normal’ mode the response times were slow, not being able to keep up hardly at all with even a 120Hz refresh rate, although at least not introducing any visible overshoot. For lower refresh rates like 60Hz, including for external multimedia devices, the response times were adequate to keep up but they were still slow. You get a lot of smearing and blurring on fast-moving content as you’d expect, although that’s to be expected on any 60Hz LCD monitor.
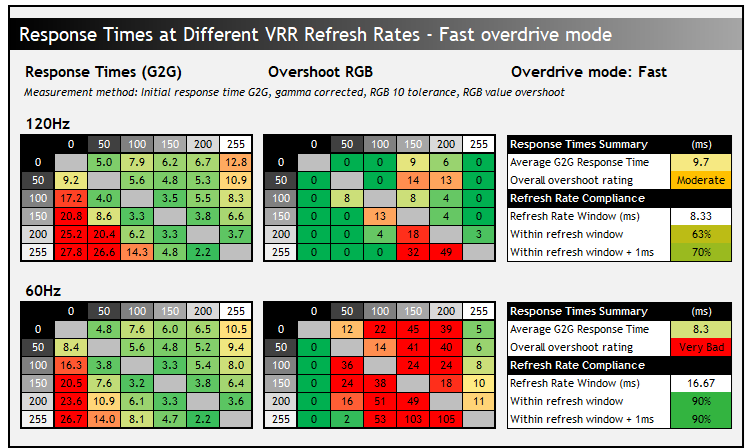
The ‘fast’ mode improves the response times quite a lot, and they’re now able to keep up a lot better at 120Hz than the ‘off ‘normal’ mode. Smearing and blurring is reduced quite significantly, although a bit of overshoot starts to appear in places at this maximum refresh rate. The problem with this mode is that at lower refresh rates, including in VRR situations when the frame rate drops, the overshoot increases to very high levels. You get very noticeable pale and dark halos and artefacts.
There isn’t a single overdrive mode experience on this screen, you’re best using the ‘fast’ mode at 120Hz and the ‘normal’ mode for 60Hz and low refresh rate situations. We’d have liked some better performance here really from a modern IPS panel, in case people did want to game on this huge screen. It doesn’t cause any issues during desktop and general uses, but for gaming, the experience is let down in some situations by the slow panel.
Additional gaming extras and settings
Note also that there’s zero gaming extra or settings on this screen – no preset modes, FPS counters, black equalizer settings, dual-mode functions, blur reduction modes or anything else. Not surprising given the target market and use-cases, but something to keep in mind if you are looking for a hybrid monitor for gaming as well as other uses. Note also that this screen does not support HDR at all.
Console support
| Console Gaming | |
| Native panel resolution | 6144 x 2560 |
| Maximum resolution and refresh rate supported | 4K 120Hz |
| 4K at 24Hz support | |
| 4K at 50Hz support | |
| HDMI connection version | 2.1 |
| HDMI-CEC auto switch | |
| VRR support | |
| Auto Low Latency Mode (ALLM) | |
| HDR10 support | |
| Dolby Vision HDR support | |
| Display aspect ratio controls for 16:9 | 16:9, 1:1 mapping, auto |
| Black Frame Insertion (BFI) support | |
| Integrated speakers | |
| Headphone connection | |
| Ultra high speed HDMI 2.1 cable provided |
Console support is reasonable with the panel resolution supporting 4K content natively. You can switch the aspect ratio setting in the OSD menu to either the 16:9 or Auto mode which will stretch the image to fill the screen as much as possible while keeping the 16:9 source aspect ratio; or use the 1:1 mode which adds black borders to the top and bottom, as well as the sides to fit 3840 x 2160 exactly in to the 6144 x 2560 native panel area. The screen supports 4K 120Hz, 60Hz and 24Hz content but not 50Hz so there could be a small gap there for video playback from a console. The decent integrated speakers are useful here for consoles and external devices.
Input lag
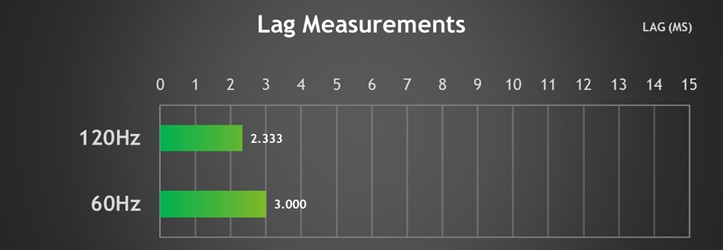
There is at least very low overall lag on this screen, including for 60Hz fixed refresh rates. A large portion of the total display lag shown here will be made up from pixel response times as well, and we would estimate ~1ms worth of signal processing lag at 120Hz which is very good. From that point of view there’s no issues at least for gaming.
Conclusion
The Dell UltraSharp U5226KW makes a big initial impression for sure, it really is a huge screen and unlikely anything really that we’ve tested before in the monitor space. While we’ve used various 4K TV-sized screens (42″ – 48″ for instance), the ultrawide format and higher resolution and pixel density make this far more suited to general usage, professional and office applications. The 6K ultrawide resolution is very well suited to this screen size with a comfortable text size, no need for any OS scaling, and a sharp and clear image. It offers a huge area to work in, ideal for multi-tasking, split screen work or handling multiple inputs and devices. The wide range of PiP and PbP modes along with the KVM function make this very easy and versatile as well if you need to connect multiple systems or devices to the screen. The sheer size takes some getting used to, especially if you’re coming from a normal ~27″ sized screen, but after a while you can really start to enjoy the massive space at your disposal.
The IPS Black panel offers a great image as well, with good colours and an enhanced contrast ratio which is pleasing. There’s some strong factory calibration too with quite a few modes available, although we’d have perhaps liked a little more flexibility in some of the modes for user control. We’ll forgive minor discrepancies in the calibration report targets, the actual configuration is still very good.
The screen is however limited outside of the target markets and productivity uses. The panel is slow and there’s very little in the way of gaming features, although at least there’s low input lag and a 120Hz refresh rate – Dell could have easily opted for a 60Hz panel here for this market. That extra refresh rate has noticeable benefits for general and desktop apps too, so we’re pleased to see that offered. There’s no HDR support as well, which feels like a bit of a potential gap for HDR content creation and multimedia usage.
The design is sleek, simple and modern and there’s a huge range of connections – including the pop out section on the bottom which is really handy and Thunderbolt 4 which will be useful to some people, especially Mac users. The ambient light sensor is useful as well we thought, especially if you’re using the screen for work in the day and in the evening. You can buy the screen with the stand or without if you’d rather, with arm/wall mounting being a good option too, but the stand is strong and stable and surprisingly adjustable for such a large screen.
The Dell UltraSharp U5226KW is available now at a price of $2,899.99 USD at the time of writing from Dell in the US, or £2,571.60 GBP in the UK. You can check latest pricing and availability for your region using our affiliate link here.

| Pros | Cons |
| Massive screen size and resolution provides a huge desktop area for productivity and multi-tasking | Slow pixel response times |
| Wide range of PiP/PbP modes and a KVM switch make it versatile for multiple system usage | No HDR support at all |
| Nice extra features like Thunderbolt 4 and ambient light sensor | Limited gaming capabilities (not that this is a target market keep in mind) |
We may earn a commission if you purchase from our affiliate links in this article- TFTCentral is a participant in the Amazon Services LLC Associates Programme, an affiliate advertising programme designed to provide a means for sites to earn advertising fees by advertising and linking to Amazon.com, Amazon.co.uk, Amazon.de, Amazon.ca and other Amazon stores worldwide. We also participate in a similar scheme for Overclockers.co.uk, Newegg, Bestbuy , B&H and some manufacturers.