LG OLED TV Calibration Guide – AutoCal and Hardware Calibration
Originally published 1 June 2021, updated last 20 July 2023 – see changelog for details
Introduction
Over the last couple of years we have been exploring the hardware calibration feature of the LG OLED displays (CX and the latest C2 and C3 models particularly) and how to optimise the picture for various uses. To do this we’ve been making use of Portrait Display’s Calman calibration software and the “AutoCal” feature that it provides to directly calibrate the screen at a hardware level. This isn’t the only package available to hardware calibrate these screens, but it’s the mostly widely used and popular. We weren’t intending to write a guide or article about this really, other than maybe providing some results as an update and brief overview in our LG CX OLED review and LG 42C2 OLED review. But the more we tested and experimented, the more we realised how potentially complicated and confusing this topic can be. There is a mass of great information out there on various forums and webpages, but it is scattered around and hard to make sense of sometimes. There’s also a lot of great information on Portrait’s website, but nothing that lays the process out from start to finish.
So we thought we would write this guide which covers everything you might need to know for a typical calibration of the LG OLED TV’s. It’s not meant to be definitive or include every possible option, and we aren’t going to cover things like complicated manual calibration steps or professional-usage setup. This is meant as a guide that will hopefully be useful to your average owner who wants to invest a bit of time and money in hardware calibrating the screen for their normal uses like TV, movies and gaming. Our thanks to Portrait Displays for all their time talking to us about this topic and answering our many questions as we went.
If you found this guide useful and enjoy our work and want to say thanks, donations to the site are very welcome.

If you would like to get early access to future reviews and articles please consider becoming a TFT Central supporter.
| Check Availability and Pricing – Affiliate Links |
|---|
| Display Calibration Devices at Amazon X-rite i1 Display Pro colorimeter at Amazon LG OLED TVs at Amazon |
| TFTCentral is a participant in the Amazon Services LLC Associates Programme, an affiliate advertising programme designed to provide a means for sites to earn advertising fees by advertising and linking to Amazon.com, Amazon.co.uk, Amazon.de, Amazon.ca and other Amazon stores worldwide. We also participate in a similar scheme for Overclockers.co.uk. |
What You Will Need

- An LG OLED TV (preferably 2019 models or later) – we have written this guide while using the 2020 CX model but equally this also applies to other 2020 models like the GX for example. It should also apply to the 2019 C9 models, and the more recent 2021 C1 range. Support for the 2022 C2 range is not yet officially available in the Calman software although the pipeline is the same as the C1 models, and having tested this out on our C2 sample we have confirmed it works fine. So you should be good to calibrate even the latest C2 (and other 2022) models. For a full list of LG OLED TV’s that support LG AutoCal and this process see Portrait Display’s list here.
Some parts might change a bit but the gist of it should be the same. The 48″ CX48 and C1 models have become particularly popular for use as a monitor given their relatively small size (for a TV) and was introduced in 2020 as the smallest OLED offering in this space. We reviewed the LG CX OLED back in October 2020 specifically looking at its use as a desktop monitor by the way if you want to know more.
More recently in the 2022 C2 range there is also now a 42″ model if you want something smaller still. We reviewed the LG 42C2 OLED model in April 2022. In 2023 LG also launched 42″ and 48″ models in their new C3 range. We are currently reviewing the 42″ C3 too.

- Calman calibration software – in order to access the TV’s hardware calibration feature you will need Portrait Display’s Calman software package. They have worked hand in hand with LG to optimise this performance and process and their software provides full control over the screen, it’s settings and access to the hardware Look Up Tables (LUT). The software carries out the so-called “AutoCal” process for you on the screen once you’ve set a few things up.
The most popular choice specifically for calibrating LG TV’s is ‘Calman Home for LG‘ which is available from Portrait Display’s website at a modest price of $145.00 USD for a one year license. If you have one of their more advanced professional software packages such as Calman Ultimate ($2,995) then the same process is available within those packages too, you don’t need both. For most general consumers looking to hardware calibrate their LG OLED TV the Home package is what they need. For the 2020 CX models it needs to be Calman 2020 v5.11.0 or newer but if you’re buying it new you will get the latest version anyway. If you already have a live license then you should be able to download the latest version of the software from their website for free. The software version is independent of the licence, you can always download and use whatever the latest version is as long as your license is still live.

- A calibration device (known as a meter) – to carry out the measurements and calibration of the screen you will need a calibration device. There’s a really wide range of devices available but one of the most popular devices for this is the X-rite i1 Display Pro (or more recent Pro Plus model) which is available in all key regions from Amazon (affiliate link). This can of course be used for calibrating your PC monitor as well but it’s a great device to use with the LG AutoCal process. If you have access to a higher end and more expensive spectroradiometer device then that can also help add some additional accuracy which we will discuss later when it comes to the optional Meter Profiling step. Pretty much all of the mainstream meters are supported as well as many more niche offerings. If in doubt check with Calman.
- A pattern generator (included in the TV for 2019 models and later) – this is the part that displays all the colours and test patterns on the TV for the calibration process. Thankfully for 2019 LG OLED models and later these are built in to the TV so you don’t need to worry, so that includes the 2020 CX models and later C1, C2 and C3 range. This supports SDR, HDR and Dolby Vision (DV) calibrations. If you are wanting to calibrate an earlier TV like a 2018 model you will need to purchase an external pattern generator for HDR and DV calibration as unfortunately there are no test patterns built in to the TV. Portrait Displays have some available to buy on their website, we won’t go in to more detail here about those as they aren’t needed for the 2019 models or later (C9, CX, C1, C2, C3 etc)
- A USB stick with some (free) test files on it – You will need to download this free HDR sample video and this free Dolby Vision sample video that are provided by Portrait displays (main page here). You might as well also download the 10 hour SDR video and put it on the same memory stick although if you’re connecting your laptop directly to the screen and running the software from that you won’t need it as it will already be in SDR mode there. The HDR and Dolby Vision videos will be needed to put the TV in to the relevant HDR and DV modes so you can calibrate them. Download them and save them on a USB stick.
Optional but recommended are the free MediaLight Shadow Detail test videos available here. Follow the process and you should be able to download those. Put the normal video versions on the same USB stick (you can discard the Mac OS folder) and there should be four videos, for DV, HDR, HDR10 and SDR. There are useful at the end of the calibration for tweaking and improving the shadow detail. We will explain that in the process later. Plug this USB stick in to the TV in to any of the ports and it should show up in your list of inputs on the TV.
- A PC or laptop that is connected to the LG OLED TV you are going to calibrate – this should be preferably with its own screen as you won’t be able to use the LG TV while it’s being calibrated. This also needs to be connected to the same home network as the TV, and the TV needs to be connected either using Wi-Fi or Ethernet to that network.
Connect a Laptop/PC to the Display

You’re going to need to be able to run the Calman software on a laptop or PC that is on the same local network as the TV. You are also going to need to have your calibration device (“meter”) connected to this laptop/PC and nearby to the TV so that it can take the measurements. The easiest method is to connect the laptop/PC to the TV via HDMI and run dual screen in Windows, where you can see the output on both the TV and the laptop. During the calibration itself you will not be able to view the laptop/PC input on the TV itself, so you need a second screen. For our calibration we had a PC connected to the TV but didn’t have a second screen near by, so we just used a free VNC app from an iPad to control and view the software on the PC while AutoCal was running. Make sure you have HDR turned OFF in Windows and are just running in normal SDR mode.
We won’t run through the installation of the software or your calibration device, that should be pretty self-explanatory or you can refer to the Portrait Displays website for more support.
Preparing the Screen for Calibration

Before you carry out the AutoCal process to calibrate your screen there’s a few things you will want to do and check first in the TV menu:
- It is recommended to give your TV a decent amount of time to “break in” after you first purchase it. This gives the screen time to stabilise and a total usage of around 100 – 200 hours is recommended before you bother going through the calibration process. You can do it earlier if you want, and then revisit the calibration process again later but it is probably worth waiting before bothering as it can be time consuming to do this.
- When you’re ready to calibrate we would suggest a reasonable warm-up period for the TV of 30 minutes or more normal use
- Make sure you’ve connected the TV to your Wi-Fi network and it is on the same local network as your PC/laptop where the Calman software will be run from
- You will need to make a note of your TV’s IP address which can be found in the network section of the OSD menu
- Check that the firmware is up to date on the TV via the update section of the OSD menu
- In the Picture menu turn OFF the Energy Saving settings. This avoids the screen altering the luminance during calibration. If you like this ambient light sensor you can turn it back on after the calibration if you want although this has a big impact on HDR and DV brightness. We would recommend leaving this off. From our testing the so-called ‘Auto’ mode (which is supposed to dynamically control the OLED light level) seemed to dim SDR to about 130 nits regardless of the ambient light, both for day time viewing, or night viewing with some lamps on. This in itself is ok for SDR, but for HDR/DV it reduces the max peak brightness the content will reach which is really not good! We measured a peak luminance of around 370 – 400 nits with this Energy saving turned to ‘Auto’. The other settings like low, medium and high are just other preset caps to the OLED light setting. For HDR and DV you want OLED light to always be at 100 if you want the screen to reach the maximum peak luminance it is capable of. So having Energy saving enabled in any more will not allow that. We would leave Energy Saving off for everything and instead focus on calibrating the screen to a comfortable brightness, which we will talk about later. This energy saving setting spans across SDR, HDR and Dolby Vision modes so you only need to disable it once.
- Likewise in the ‘general’ section of the OSD menu turn off the ‘AI brightness’ setting which also dynamically controls screen brightness depending on the surrounding light in some modes. You may need to disable this in each SDR, HDR and DV calibration modes when you come to calibrate each depending on the preset you are configuring. For now disable it in all the modes you are calibrating, and we will talk in the relevant section about which modes it might be useful for, and what it does.
- Some people like to turn off OLED protection features like the logo dimmer and pixel shift feature while they carry out the calibration, although given the actual test patterns you will display this seems a bit unnecessary to us
- Enable the Picture mode that you are going to calibrate
- SDR should be easy as you should have the Laptop/PC connected already and running in normal SDR mode. For instance if you want to calibrate the ‘Expert (bright)’ mode, select that in the TV menu. You don’t need to be using the actual mode you’re going to calibrate necessarily but it’s easier just to switch to that mode to start with. Also that way you’re in the mode once it’s finished ready to enjoy your newly calibrated state.
- To get to the necessary Dolby Vision or HDR picture modes there is an additional step needed, explained in the relevant sections later
- Set the OLED light setting in the selected Picture mode to your taste for your room and lighting conditions. For SDR calibration there is a step within the software to adjust this later too, so a good starting point is around 70 for the OLED light setting (which should be around 200 nits). For the HDR and DV calibrations you won’t need to do this, as you’d want to leave OLED light set at 100 which is the default.
- Not vital but maybe worth doing is to turn off things like Noise reduction, Tru Motion etc and other image processing enhancements. If you need to, you can turn some of these back on after the calibration for the HDMI input you’re using.

You’re ready to calibrate the screen now! We have provided step by step guidance using the Calman Home for LG software below which is the most common (and affordable) package applicable here. The steps are very similar with their other packages like Calman Ultimate but you’d need to first load up the ‘display specific – AutoCal LG’ workflow from the main menu on those. Plug in your meter to the laptop/PC then load up the Calman software.
You can do these first few steps to connect the meter, source and display controls later as part of the calibration process, but we personally prefer to do them before we follow the calibration process. Either way is fine, and it’s the same steps to do them during the actual calibration process just at different points.
Connecting and Configuring Your Calibration Device (Meter)
This step connects and sets up the calibration device you are going to use for the process.

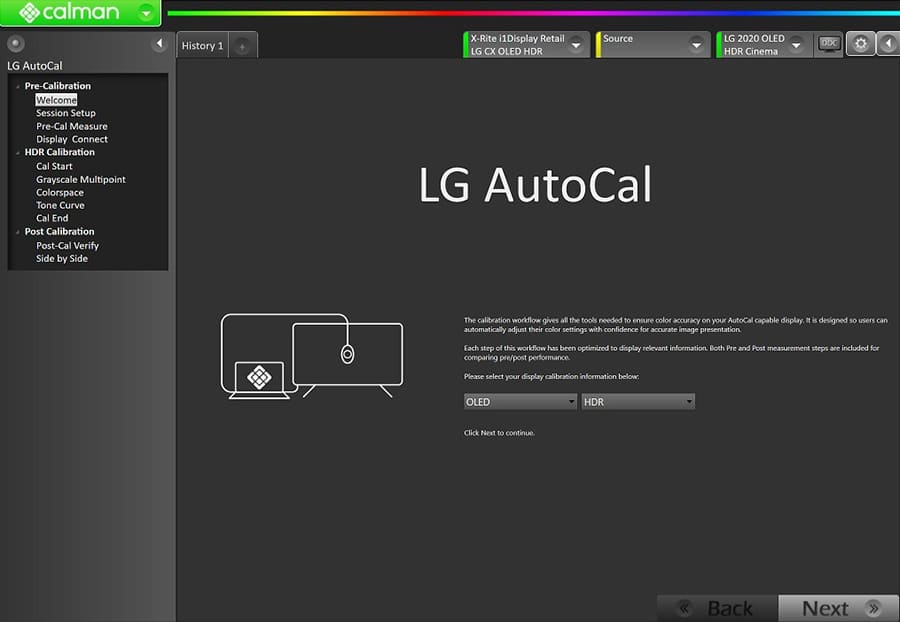
When you load up the Calman Home software you should get the welcome screen like the above. The steps to the calibration process are shown down the left hand side, or you can follow each of them through with the ‘next’ button at the bottom right of the page.
Before you do that we need to configure and set up a few key parts using the 3 currently yellow tabs at the top right. This will set up the calibration device/Meter, connect the source test patterns for measurement and give control of the TV to the software. There is also an additional settings section under the gears icon. We will take you through each step, don’t worry.

The first step is to connect your calibration device to the software. If you had this plugged in before opening the software it should be auto-detected.
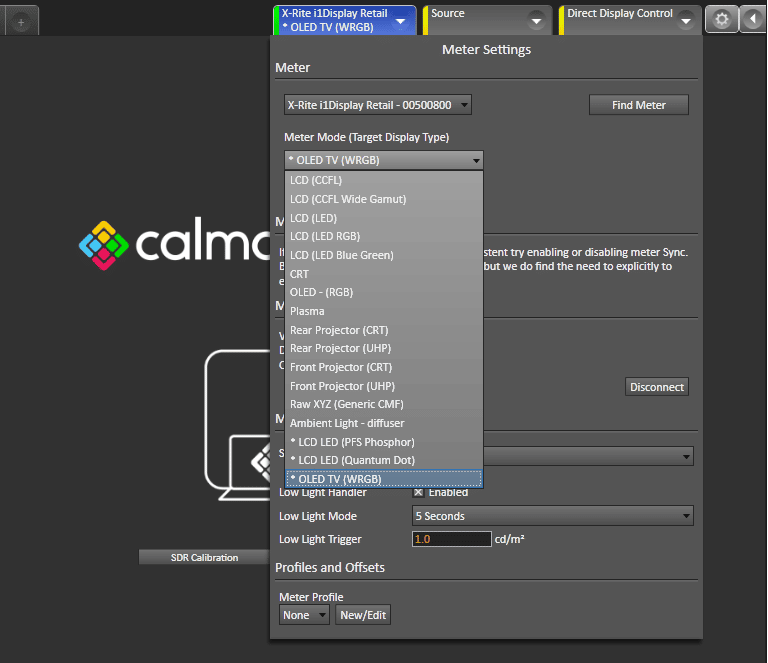
- Open the first of the 3 tabs in the top right hand area for ‘Meter Settings’ as shown
- Instead of ‘simulated meter’ (which won’t be usable or do anything here) your calibration tool/meter should be listed in the drop down box at the top of this section, select it here and the tab should turn green to signify it’s connected

- If it’s not there you can trigger a scan for connected meters by pressing “find meter”. In the window that pops up tick the device you’re searching for if it is listed and press ‘search’. If your device isn’t in the list just press search anyway. After the search the device should appear in the Meter selection drop down box. If that fails to find it, try closing the software, unplugging your device, plugging it back in then loading the software up again. We’ve found the detection of devices very simple so it shouldn’t cause you issues.
- Back in the ‘meter settings’ tab you should now be able to select your meter and the tab should turn green. Below we have used an X-rite i1 Display Pro Plus
With the meter selected at the top there are a few other things you need to configure for it. Some of the following settings depend on the actual meter you are using but are likely to be the same, or at least our explanations should hopefully help you choose the right option. These settings are for the X-rite i1 Display Pro which is a commonly used and recommended colorimeter for this process:
- Select ‘OLED TV (WRGB)’ for the meter mode – this menu adds a correction profile for the meter based on the screen you are calibrating. It’s not needed for spectro devices like the X-rite i1 Pro or other high-end devices like that, but is there for colorimeters like the commonly used i1 Display Pro. LG OLED TV’s have a WRGB (White, Red, Green, Blue) pixel structure and the correction profile was added in to the Calman software as of v5.12.0 in April 2021. Note that there is also an ‘OLED – (RGB)’ option, but that is designed for OLED screens with a normal RGB pixel structure, not used in the TV space. Previously this was labelled simply as ‘OLED’ in this menu which led to some confusion in the past. Now that Calman have added a specific ‘OLED TV (WRGB)’ mode, you should select that for your colorimeter device for optimal performance.
If you’re interested in finding out how accurate this meter correction mode is, and how it compares to an uncorrected mode, check our our supplementary article here.
- Select Sync Mode as ‘Auto’ – The Auto mode is the recommended option for the greyscale 1D LUT calibration. After that stage you could if you wanted go back to this menu and use the ‘AIO’ option instead for the colour 3D LUT which will speed up the process a bit, but we prefer to stick to the ‘Auto’ mode here for improved accuracy, even at the cost of some additional calibration time.
- At the bottom tick the box to enable the ‘Low Light Handler’ mode – this is useful to optimise the darkest measurements during the calibration. Recommended settings are 5 seconds for the ‘Low Light Mode’ drop down, and then 1.0 cd/m2 as the ‘Low Light Trigger’. Note that the low light handler mode only works with the ‘Auto’ Sync mode and not with ‘AIO’ mode, another reason to use ‘Auto’ there.
- We discuss Meter Profiling in our supplementary article here, for those who might have access to a higher end spectroradiometer device, which can help improve accuracy of your meter further than the provided correction profiles. There is also some guidance for this on Portrait’s website anyway if you have access and want to improve things further.
- Your meter should now be connected to the software and the tab should turn green and look like the below (if you’re using the i1 Display Pro)

For connection and configuration of other meters and devices you may need to check out Portrait Display’s device resource centre for further information.
Connecting Your Source (Pattern Generator)
This step connects the test patterns that will be shown on the screen and used for the measurements and calibration. You can use external pattern generators for this if you want, but we won’t go in to that here and they will cost extra money. Thankfully the LG 2019 OLED TV’s onwards, including the 2020 CX, 2021 C1 and 2022 C2 models, have featured built-in pattern generators, so you can tell the Calman software to access and use those which makes life simpler (and cheaper).
Update 20 July 2023 about 2022 TV models – over the last year or so users have had difficulty using the built-in pattern generator on 2022 LG OLED screens including the popular C2 series. After a firmware update middle of 2022 from LG, the pattern generator was producing incorrect colours and making calibration impossible. There was a firmware update in Jan 2023 which seemed to fix part of it, but there were still ongoing problems. For a while the only working option was to use an external pattern generator, but that is an excessive and expensive step. Some users were reporting success for SDR calibration, but not for HDR or Dolby Vision calibration on 2022 LG OLED TV’s although a work around was needed to get the pattern generator to show properly.
In June 2023 Portrait Displays released an update to their Calman software (v5.14.2.3) which appears to have addressed this problem with “LG internal Pattern generator support added for supported 2022 and 2023 model TVs” listed in the released notes. This should make calibration on the 2022 (and also new 2023) models possible again.
If you are calibrating the HDR or Dolby Vision modes there is an extra step you need to do before connecting the source to get the TV first in to the relevant HDR/DV mode. We will cover that later on in the relevant sections. For now let’s assume we’re calibrating normal SDR mode.

- Click the Source Settings tab in the top right hand area
- Press the ‘Find source’ button.

- In the pop-up that appears you need to select LG as the manufacturer
- Select the relevant model for your TV – here we have selected LG – 2020/2021 OLED as we are calibrating an LG CX OLED TV. We should note here that you might see some references online to selecting your TV source as LG 2019 when calibrating the HDR mode, even if your TV is a 2020 model. This relates to an issue with an older 2020 model firmware where it was not generating the right HDR test patterns, but this has been resolved and as long as your TV is running a recent/current firmware you can select the 2020 TV model here without issue for all calibrations (SDR, HDR and DV). For 2022 models like the C2, select “2020/2021 Alpha 9” as well, that will work with those models even though Portrait Displays haven’t yet updated the software “officially”.
- Enter the IP address for the TV that you should have made a note of earlier from the TV network OSD menu and press connect
- The screen will pop up a message with a pin code, which you need to enter in to the prompt box on the software
- The TV itself should switch in to a grey scale pattern page which means the pattern generator is now active, at which point you will need to use your laptop or other display to continue using and controlling the Calman software. This has activated the internal pattern generator from the TV and you should see the Source tab turn green and have ‘LG’ listed
Connecting the TV DDC Controls
The last step is to connect the software to the TV so that it can automatically control its settings, options and Look Up Tables (LUT) for you during the calibration. This is done using the ‘Direct Display Control’ (DDC) menu in the top right.

- Click the ‘Direct Display Control’ tab in the top right
- Press ‘find display’

- In the pop-up select LG and the relevant TV model. For the LG CX selection the options shown above. For the C1 or C2 select the “2021 Alpha 9” option listed
- Enter your IP address for the TV again (that you got from the network section of the TV OSD menu) and press ‘connect’
- If you connected the source first then you should not be asked to enter a pin from the TV, but if that pops up then just enter the pin shown on the TV in the software and continue

- The tab should turn green and confirm you are connected to the TV (here it shows as LG 2020 OLED).
- In this menu you can select the picture mode you want to calibrate in the ‘Display Mode Selection’ drop down. Only some of the TV preset modes are accessible for hardware calibration but you have a good range you can use. You can also select the mode you’re going to calibrate later on in the software but it doesn’t hurt to do it here first. If the TV isn’t already in that mode it will switch in to it as well so you may see a visual change to the image on the screen.
- Leave the other settings at default here
- For SDR = Active Greyscale points for SDR mode calibration = LG 26 pts SDR 16-255 (the default).
- For HDR/Dolby Vision = active greyscale points = LG 20 pts HDR (the default)
- Don’t bother increasing this to more points like 42 for SDR for instance as that is really intended only for use with a professional meter and if you use it with a normal colorimeter like the i1 Display Pro for instance it can lead to less accurate results than 26 pts, and take much longer to complete.
- You can do a ‘Full DDC reset‘ here if you want, but it might be better to do it at the relevant step during the calibration so that you can measure the pre-calibrated state properly and compare it to your end results. Save this for later, we will explain what it does at that step.
Additional General Settings
You shouldn’t need to change much in the general settings but you can also click the little gear icon in the top right hand corner to access some further settings.

In the “Workflow Basic Options” section we would ensure the following are selected:
- Don’t worry about setting the colour space or gamma targets here, you can do that within the actual calibration steps and most of it will be automatically handled for you anyway, just leave them for now.
- Luminance levels ensure ‘Video (16 – 235)’ is selected. Note that LG AutoCal is not designed to work for ‘PC (0 – 255)’ mode. You can calibrate in the video mode anyway and if your input device operates with full PC RGB just ensure that’s switched on within the TV menu and your device settings afterwards.

- In the ‘Application Measurement options’ section select the DelteE formula as ‘de_ITP’ for the highest level of accuracy. This is the default for Calman 2021 software anyway, previous versions of the software may have used a different default.
- Everything else in these sections can be left at default
Found this guide useful? Say thanks and support our site here
SDR Calibration
After connecting your meter, source and TV you’re ready to carry out the calibration process itself. All three of those tabs at the top right should be green now (ignore the fact they aren’t in some of our screenshots). Most of the calibration process is automated for you, but we will talk through each step. Note that these might look slightly different as Calman update the software over time, but it should be largely the same.

- On the welcome page select OLED as the screen type and SDR from the second drop down menu, press next

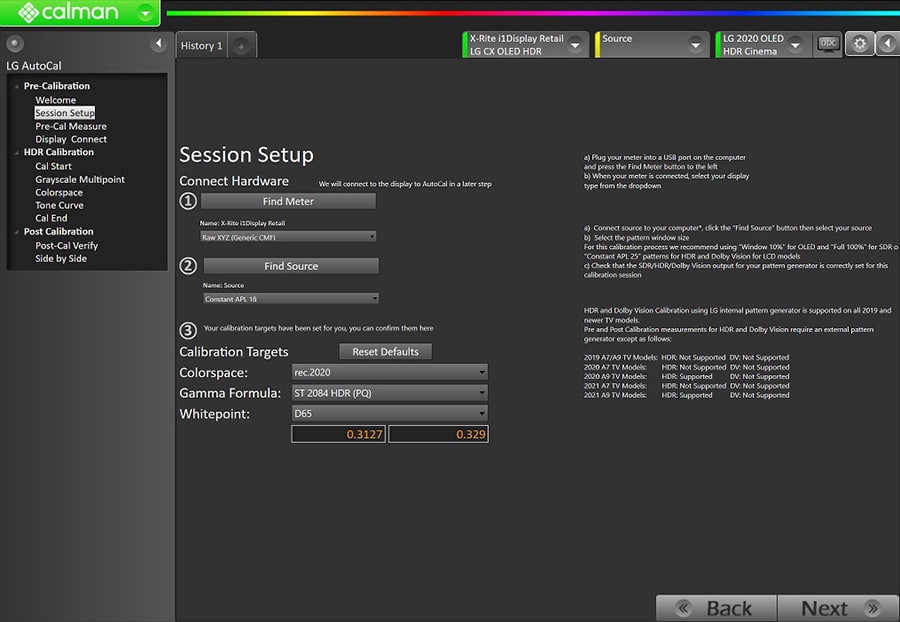
- The ‘session setup’ page makes sure you’ve got the meter and source connected properly (which you should have done earlier), and then sets the targets for the calibration. If you haven’t got them connected, using these options here follows the same process basically as we did earlier.
- Colour space for SDR calibration = rec.709/sRGB
- Gamma formula = Power, then enter the value as 2.2. This is our preferred gamma for daytime and evening usage, but if you want to use the screen in a really dark room at night you could enter 2.4 instead. Some people like to calibrate one mode like ‘Expert (bright)’ for daytime use, and another like ‘Expert (dark)’ for evening use.
- Whitepoint = D65 (which is 6500k)
- Press next at the bottom to proceed to the following section

Here you will be able to take measurements of the screen before the calibration so you can compare before and after results. If you have done a ‘full DDC’ reset earlier when we were connecting the TV controls, this default performance of any’ SDR mode will be really poor. We get high dE errors for colours (6.4 average) and greyscale (8.6 average) so clearly this is going to need correcting. You might not have done the full DDC reset yet though, so if not it will measure the current settings of the mode you’ve selected.
- Press the ‘read series’ button (which looks like a capital H) in the bottom right hand corner to take these pre-calibration measurements. It should take around 5 minutes. Once finished, press next.

- You can connect the TV here if you have not done so already – which we did within the DDC tab at the top right
- You can also perform the full DDC reset here if you didn’t do that earlier. No need to do it again if you did. This step is necessary as it will reset the picture mode selected that you are going to calibrate to panel native settings, preparing it for the AutoCal process. This is a step beyond just resetting the preset mode in the TV menu which would only restore it to the factory calibrated profile. This Full DDC reset removes that factory profile and starts everything from new for the selected picture mode. Obviously you don’t want to do this for any modes you are keeping, and only do it is you’re going to perform an AutoCal completely. The Native mode has really skewed RGB balance, looks too cool/blue and has large dE errors for greyscale and colours by default. Doing the full DDC reset sets it up ready for the AutoCal process. Don’t change anything in the TV OSD menu once you’ve done this.
- Check you’ve selected the picture mode you want to calibrate here – we are doing ‘Expert (bright)’ in this example
- For SDR calibration leave the HDR box un-ticked
- Select BT.709 as the colour space for SDR calibration (this is the same as sRGB gamut by the way)
- Press next

- On the next screen check the ‘enable calibration’ box. This should pop up a message on the TV at the top right saying ‘calibration start’ to signify that it is connected and being controlled by the software for calibration. Click next at the bottom

- In the ‘luminance’ section you can use the slider to change the OLED light setting of the TV and control how bright you want it to be for SDR mode. If you press ‘measure luminance’ the meter will take measurements as you go continuously. This OLED light setting will depend on your ambient light conditions, viewing distance and preferences.
- If you’re calibrating for daytime brighter viewing then something that reaches around 200 nits after calibration is a common target.
- For night time viewing maybe around 100 nits instead after calibration. So if you’re calibrating two modes, one for day and one for night you could do something like that.
- If you only want one mode and don’t really want to have to bother switching between the different presets at different times of the day maybe target 150 nits, we found this a comfortable level for all day usage as long as you have some lamps on when watching at night.
- As the guidance says here, you want to get the TV set to about 15% brighter than your target in this step to account for the changes the following calibration sections will make. So if you want to reach 200 nits after calibration, use the “OLED light” slider and measurement step here to get the screen to about 230 nits. If you want to reach 100 then aim for 115 here. If you want to reach 150 aim for around 172.5.
- You will have chance to re-tweak this after the calibration anyway, but get it close to what your target is as it’s recommended to get as near as possible first
- It’s not recommended to change the OLED light setting in the TV OSD menu later on after calibration as it could impact other aspects of the setup (gamma, colour temp, colours) a little. Although minor changes to the OLED light aren’t going to make a huge difference so you don’t need to worry about that too much. If you need to tweak the OLED light later on in real use that’s not a huge issue. If you plan to enable the ‘auto’ energy saving feature (ok for SDR but really not good for HDR/DV) then you also don’t need to worry about this step much, as that feature would help control the OLED light setting using the ambient light sensor and could be useful for varying room lighting conditions. For optimal accuracy it’s not recommended to use that energy saving feature as it alters the OLED light, but it is never going to make major changes so won’t impact things that much. Through our testing the validated results were still very good even with auto energy saving enabled later.
- We left this at 70 for now. Click next to proceed

- This is where the real calibration starts! On this greyscale multipoint screen you need to press the ‘AutoCal’ button in the bottom right corner (the circular arrow icon next to “123”).

- A pop up will appear asking you to confirm number of greyscale points you want to calibrate, leave it as 26 and press continue
- This process calibrates the 1D LUT and corrects the colour temperature, white point and gamma of the display automatically for you, making adjustments to the screen’s hardware LUT. It takes around 28 minutes with an X-rite i1 Display Pro
- At the end the results should look a bit like the above. Note the EOTF (gamma) curve for the monitor is not even visible behind the yellow reference line. The RGB balance line is now flat at the 0 level and there are very low dE for the greyscales too, almost impossible to see on the graphs.
- Once this has finished, press next

- The next step does the colour mapping and corrections to the 3D LUT, ensuring the gamut you’ve defined is achieved and colour accuracy is improved.

- Press the ‘AutoCal’ button in the bottom right hand corner. Press the ‘optimize’ button which runs a few sample tests and determines the optimal pattern delay speed for this process, and can help account for varying meter specs. Elsewhere in this pop-up select the calibration type as ‘Fixed Grid, 9 points’. This is quite time consuming but should provide a high level of accuracy. Selecting more points adds to the time and won’t provide any major improvements so is unnecessary. If you’re wanting a quicker calibration then the Lighting LUT option can be used and produces pretty decent results still.
- This process takes a lot longer, around 40 – 50 minutes with the X-rite i1 Display Pro

26. The brightness and contrast adjustment steps of the ‘dynamic range’ page are not needed for LG AutoCal, they will likely be removed in a future update to the software.
After the calibration you can also click the “100” patch at the bottom of the screen and press the play button on the right. That will measure a single white patch and on the screen it will confirm your peak luminance. You have the option here to tweak the OLED light control using the slider to get back to your target of 200 nits or whatever you’d targeted earlier.
Separate Shadow Detail Corrections Before You Finish AutoCal

The AutoCal calibration has ended, but do not un-tick the ‘enable calibration’ box yet. We want to make some shadow detail corrections before we finish. This will make corrections to the very darkest shades to ensure you can see all the relevant detail in dark scenes. This step is necessary because each OLED panel sample varies somewhat and in the very darkest tones it’s hard for AutoCal and most meters to do this for you.
Shadow detail before or after the 3D LUT stage?
Some people choose to complete this step after the 1D LUT (greyscale) but before the 3D LUT (colour gamut) stage. We have spoken at length in the past with Tyler Pruitt, formerly of Portrait Displays and the man behind their own video guides and the software’s functionality for Shadow Detail Correction. He confirmed on several occasions that it does not actually matter at which stage you complete the Shadow Detail Correction (SDC), and in fact on balance he found it better to complete this step after BOTH 1D and 3D LUT. That’s how we have it written in this guide as we believe most people will find it simpler, but by all means complete it after 1D and before 3D LUT if you prefer.
Guidance from Portrait displays nowadays is to do it before the 3D LUT, but we believe this is probably based on the old guides which Tyler produced, which were all recorded based on doing it at that stage, probably more for convenience and time saving when creating the guide than any real reason from a calibration point of view. i.e. you definitely need to have completed the 1D LUT stage for greyscale before you do shadow detail, but for creating the video there was no real need to complete the 3D LUT stage with extra time. We are not aware of any technical reason why it needs to be completed before the 3D LUT instead of afterwards and there are some arguments for doing it at the end we think.
Having run a lot of tests and experiments we can see no difference in the visual or measured results when doing SDC at either stage. We really don’t think this matters. I prefer to do it after both personally, so you don’t have to mess around going to SDC patterns on the USB stick, and disabling the internal pattern generator mid-way through the calibration only to have to reverse that to carry on with the 3D LUT afterwards. You can just run through 1D and 3D LUT stages, then disconnect the pattern generation, and do the SDC patterns then so it’s simpler and easier. Ultimately I don’t think it matter at which stage you do the SDC.
Back to the guide…
- First we need to disable the screen’s pattern generator ‘ pattern for a moment to perform these checks. Press the source tab at the top right and untick “pattern on/off”. You can fully disconnect the source if you’d rather, but it’s not necessary. The TV should end the patterns being shown and return to your normal mode – probably the laptop screen you had connected. Do not disconnect the DDC controls though or anything else.
- You should have your USB stick already plugged in to the TV with the Media Light shadow detail files on them. If not, go back to that step, download them and put them on a stick and plug that in to the TV.
- Change the input source on your TV to select the USB stick that’s plugged in
- Navigate to the Media Light shadow detail folder and select the SDR shadow detail video file and play it. Put it on repeat if you need to, or we also find pausing it on the ‘flashed’ image easy enough
- Important: via the TV remote control, make sure that you are running in the correct preset mode you’ve been calibrating. It won’t necessarily be in the same mode for the USB stick playback, so set it to the one you’re adjusting while playing the video.
- You will need a dark room for these final corrections ideally

- Get close up to the TV and you will see small flashing boxes for different dark shades on the screen like in the above screenshot in a greyscale, the idea here is that the box for 64 is “reference black”, and everything below that should also be black (everything < 64). Everything above 64 would then be different levels of grey. You should not be able to see boxes 65 and 66 either with the naked eye as those are immeasurably dark and well below what even a professional meter can measure. It’s effectively black. Box 67 should probably be the first you can start to make out just, but you don’t want it to be too light. You may find that quite a few of these shades above 67 are currently visually black as well, which is why you need to do this shadow detail correction
- While watching this test pattern video press the little screen icon in the top right hand corner of the Calman software that says ‘DDC’

- This should pop up the DDC control menu, it should be on the ‘RGB adjust’ page as shown above, you need to use the scroll arrows to move to the ‘display controls’ menu page.

- You should see some of your settings in this page from earlier on (ignore the screenshot here). Scroll down to the bottom to the ‘OLED shadow detail’ sliders
- For SDR leave ‘OLED shadow detail point’ set at 23 (note: this will be different for HDR and DV calibrations, explained later)
- The setting to adjust is the ‘OLED shadow detail value’. While observing the test patterns on the screen move the slider up a fair amount (200 or so to start with) and press the ‘commit = on/off’ button to activate the change. This should update the appearance of the grey shades on your screen. Having made a fairly big change on the slider here, you will hopefully see a fairly noticeable change on the shades. You need to then move it up or down, pressing ‘commit’ each time, until you’ve honed in on the right level for your panel. You can change this as many times as you want, so just experiment. There is no default or recommended value here, as it will depend on your individual TV sample, and the calibration you’ve just performed.
- You want box 64 to be black and not show any “flashing” while the video plays – this is reference black
- Everything lower than 64 should also be black/invisible
- You should also not be able to see boxes 65 and 66 either with the naked eye, they are too dark and only a high-end professional meter could pick out a difference here from pure black.
- Everything from 67 and above should be progressively brighter grey shades, with 67 being the first barely distinguishable shade you can see flashing. You will find you can only make this just visible in the flashing without impacting box 64 – 66 and below and it will be very subtle. You will need to be in a dark room and up very close to the screen to pick it out.
- Use the ‘OLED shadow detail value’ slider to get to the right level for your panel
- Once you’re happy with the shadow detail correction, close the DDC menu and return to the main software
Should I un-tick “enable calibration” when viewing the shadow detail test patterns?
In SDR shadow detail correction there is a very minor difference between the visual grey shade values you can see when you disconnect the calibration session by unticking the “enable calibration” box on this tab. For the highest level of accuracy some people recommend that you should untick “enable calibration”, observe the shadow detail test pattern, re-tick “enable calibration”, move the slider, press commit to make the change, un-tick, observe the patterns again and repeat. This is the “recommended” approach from Portrait Displays as well from recent conversations we’ve had with them (since Tyler has now left), although it is worth noting that this was not included in any of Tyler’s original guidance or videos (still used and live on Portrait’s website), and at no point did it come up in our discussions and his proof-reading of this guide.
In practice following that process is a bit of a pain and given the differences are extremely minor visually, almost certainly unnecessary for most people. Try it for yourself, observe the shadow detail patterns (perhaps pause it at the right moment on the video) and simply un-tick and re-tick “enable calibration” in the DDC menu repeatedly. This will not impact your calibration by the way as long as you’re doing it from within the same calibration session. We found that in SDR mode there was some very minor difference in grey shades visually, but only really visible in the lighter shades. It was basically impossible to see any visual difference in the darkest shades around 67 – 70 which is what we’re trying to hone in on here. By all means follow that process if you want, but we feel that for most average users it will be much easier to hone in on the correct value by leaving “enable calibration” ticked, moving the slider and pressing commit to make minor tweaks.
Back to the guide…
- You should be back on this page, you can now un-check the ‘enable calibration’ box to end the connection to the screen. Note, do not ever go back in to try and tweak these shadow details separately outside of the full calibration process as it will reset your 1D LUT greyscale calibration as soon as you try!
Post calibration validation stage
- If you want to complete the final validation reports then you need to re-enable the source pattern again that we disabled to do the shadow detail videos. Go in to the source menu, and select the pattern on again. Once connected it should return back to the grey/white test pattern screen. Click next in the software.

- Now you’re on the ‘post-cal verify’ page. Press the ‘run series’ button in the bottom right (the one that looks like the capital H). This will re-check the results and you should get low delta E errors now and flat RGB balance graph. Once finished, press next.

- The final ‘side by side’ page compares the pre-calibrated state against the calibrated results for a nice quick verification of your results.
- For those interested we also re-validated the screen using our UPRtek MK550T spectroradiometer as the meter to confirm that the white point (D65) had been met properly, and that the greyscale and colour performance was accurate. i.e. we made sure that our spectro device agreed with the results the X-rite i1 Display Pro was reporting above. They did, since we had profiled our meter against this spectro first, so they agreed nicely with one another. We talk about Meter Profiling in our supplementary article here. Without it you may find some varied results in visual performance when using a non-profiled colorimeter on a screen like this. Some people report some slight colour tints on white content. For optimal accuracy you will ideally want to profile your meter against a spectro reference device if you can.
Final SDR calibration notes
That should be everything, you’ve calibrated in SDR for one of the preset modes. Here we did it for the ‘Expert (bright)’ mode. You may want to go in to each of your HDMI connections (TV, PC, built-in apps or whatever you’ve got connected to the screen) and make sure that this Expert (bright) mode is selected for each of them.
You can turn back on any video features you might want like the motion features, increase the sharpness control or whatever you like which are independent for each input selection. So again make sure you’ve set those up for each input as you like them. Do not change the settings for brightness, contrast or anything to do with colour as this would disrupt your calibration you’ve just spent all that time doing. While it’s best to leave OLED light at the setting you selected during calibration you can change it a bit without impacting anything much as that just controls the brightness of the pixels/screen. If you find you need to tweak this afterwards that’s ok. Again check this is set to the desired level for each input. We would NOT recommend using ECO mode though as that will impact all modes and particularly impact HDR and Dolby Vision content.
You can make the other changes above for each HDMI input individually to your liking but the calibrated state applies for that preset mode where it’s selected for all the inputs, so you only need to do it once. The calibration is at a preset mode level, not specific to any input source. The built-in apps like Netflix and Disney+ for instance also operate from a single profile, so again check that Expert (bright) is selected for them, and you’ve got the other settings how you like.
Calibrating SDR Game mode
You might also want to complete the same process but for the Game mode in SDR. That is the mode you’d want to use for games consoles, and probably also for PC gaming as it reduces the input lag quite significantly. You will also find that as long as you’ve got the normal settings turned on, the screen jumps in to this Game preset mode when it detects a console connected via the “ALLM” (Auto Low Latency Mode) feature. It’s easy to calibrate in the Game mode if you’re connecting a laptop or PC to the screen to run the Calman software. That is sufficient as an input to allow you to switch the screen in to Game mode from the OSD, and then you just select Game SDR mode within the software during the calibration process.
For Game mode you won’t be able to complete the shadow detail correction (SDC) using the video files on a USB stick plugged in to the TV, as when you play those videos from the USB stick, you cannot put the TV in to “Game” mode any more. Given those are minor corrections, it’s no major problem to skip that stage for calibration of SDR Game mode. If you’re calibrating via a connected PC/laptop, you will have been able to trigger Game mode from the TV OSD anyway, and you can play the same shadow detail videos straight from your PC instead, allowing you to do the SDC in Game mode that way.
We like to calibrate the ‘Expert (bright)’ mode to be used for TV, Netflix etc, and then the Game mode as well for console inputs like the Xbox Series X or PS5. We will talk about HDR and Dolby Vision Game mode calibration later on.
An SDR Mode with wide gamut?
One final note is that maybe you also want a mode with a wide gamut enabled but for SDR content. Perhaps you like the more vivid and colourful look for certain content like anime or cartoons, accepting that this won’t be “accurate” to the defined SDR colour space but might be desirable. If you want you can calibrate a different preset mode (we used ‘SDR Cinema’) but this time select the target colour space as Rec.2020 instead of BT.709, or maybe DCI-P3 if you want to have it a little less wide. Rec.2020 mode will use the panels full native gamut. Follow the other calibration steps and settings as above. At the end of it you should then have one mode ‘Expert (bright)’ configured for normal SDR content with a standard sRGB/BT.709 gamut, and another for SDR with a wide gamut.
Found this guide useful? Say thanks and support our site here
HDR Calibration
We will now talk through the process for calibrating the HDR mode which will be used for a lot of content including HDR movies, games and content from your PC (if connected) and some other HDR TV sources. There is a separate mode for Dolby Vision (DV) content that we will go through after. We like to calibrate two of the HDR modes on the LG OLED TV’s. We use ‘HDR Cinema’ for movies, videos and general HDR content. That’s the mode we have active when watching HDR PC content, or other general HDR 10 or HLG input sources. Then we calibrate a second mode ‘HDR Game’ which we set as active for PC gaming, or as the default for consoles connected when they enter HDR mode (PS5, Xbox Series X etc). The HDR Game mode carries the low input lag mode so is optimal for gaming.
Getting the TV ready
- Let’s start with getting the TV in to HDR mode first. You have two choices here as you need to trigger first of all the screen to enter HDR mode by displaying some kind of HDR input signal
- The normal option is to use Portrait Display’s free 1 hour HDR sample video. Download it and put this on a USB stick and connect that stick directly in to the TV via one of the USB ports on the back or side. Using the TV remote, navigate to the USB folder input where you can then play that file directly. It will put your TV in to HDR mode. One limitation of this method is because the TV detects the file as a media movie, you cannot use or enter or calibrate the ‘HDR Game’ mode when using this method. If you’re using this method then you need to leave the HDR video playing, and then control the Calman software on the laptop screen, as the TV will now be playing that video in HDR mode instead of showing the Calman software.
- The other option seems to be to just enable HDR in Windows from your connected laptop/PC. You should see the HDR logo flash up in the top right hand corner of the screen to signal you are in HDR mode, the image will probably look brighter and noticeably different. This is also the best way to give you access to all the HDR modes including the ‘HDR Game’ mode (with low input lag), which you might well want to calibrate for connected HDR-ready consoles.
- Use your TV remote to enter the desired HDR picture mode you want to calibrate – here in our example we are calibrating the HDR Cinema mode having triggered HDR source via the 1 hour video on a USB stick. Before we get going with the Calman software, In the TV menu:
- Leave OLED Light at 100 (we don’t want to change this for HDR or DV modes at all as it would then limit peak brightness)
- Leave the brightness and contrast at default. These will be reset during the calibration anyway, but don’t change them after or anything
- Make sure Energy Saving Mode is turned OFF – while this is perhaps ok to use in SDR mode, it will massively restrict your peak brightness for HDR and DV modes (down to around 400 nits) so we would definitely leave it off all the time.
- In the ‘Advanced Controls’ menu turn OFF ‘Dynamic Tone Mapping’ for now – you can re-enable this after calibration if you want as it can help boost darker scenes, although that will then impact the precision of the calibration somewhat. For the actual calibration process we want to turn it off
- In the ‘General’ section of the menu make sure AI Picture Mode and AI Brightness are turned OFF
- Your TV should now be ready for calibration in the selected HDR picture mode
Calman Software steps
- Load up the Calman software (leaving the video playing on the TV if you’ve used that method above) and follow the workflow steps. On the welcome page select OLED and HDR from the drop down menus.
- On the sessions setup page start by connecting your meter. Pressing ‘find meter’ will load up the menu to choose and configure your meter, and will be the same steps as we outlined earlier in this article.
- Next, click ‘find source’ to connect the LG TV, again as explained earlier in the article. This will begin the test pattern on the screen, but importantly it should still be in HDR mode. You can check this by opening up the TV menu and checking you’re still in the target HDR picture mode. HDR Cinema in our case.
Update 20 July 2023 about 2022 TV models – over the last year or so users have had difficulty using the built-in pattern generator on 2022 LG OLED screens including the popular C2 series. After a firmware update middle of 2022 from LG, the pattern generator was producing incorrect colours and making calibration impossible. There was a firmware update in Jan 2023 which seemed to fix part of it, but there were still ongoing problems. For a while the only working option was to use an external pattern generator, but that is an excessive and expensive step. Some users were reporting success for SDR calibration, but not for HDR or Dolby Vision calibration on 2022 LG OLED TV’s although a work around was needed to get the pattern generator to show properly.
In June 2023 Portrait Displays released an update to their Calman software (v5.14.2.3) which appears to have addressed this problem with “LG internal Pattern generator support added for supported 2022 and 2023 model TVs” listed in the released notes. This should make calibration on the 2022 (and also new 2023) models possible again. - You do not need to connect your TV to the software yet using the ‘DDC’ menu at the top right, that’s probably better to do in a moment on the relevant step. Leave that disconnected for now
- In the session setup you should now have your meter and source connected, so you just need to make sure the software is configured to use following targets for HDR calibration. These should be automatically set based on selecting “HDR” earlier, so you probably won’t need to change them:
- Colour space = Rec.2020 – this will try and cover as much of this wide gamut colour space as possible
- Gamma formula = ST 2084 HDR (PQ) – this is the gamma curve for HDR content, note that it is different to the 2.2 power we used for SDR
- Whitepoint = D65 (6500k)
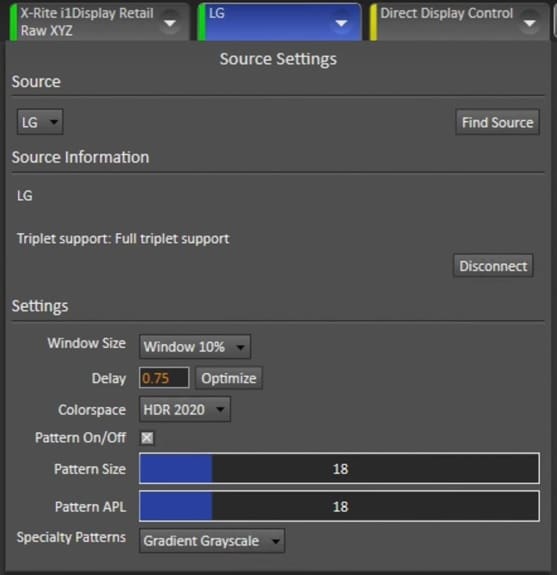
- Click the ‘source’ tab and make sure that the colour space is set to ‘HDR 2020’ in the drop down here.
Click ‘next’ to move to the following page

- On the ‘pre-cal measure’ page you can take measurements of the screen before calibration if you want by pressing the ‘H’ icon in the bottom right to ‘read series’. This will take a few minutes but measures the current state of the screen.
A note about possible pre-calibration capture errors and oddities
Note that if you find you have wildly inaccurate results and the luminance curve looks more like a normal curve than the yellow reference one shown here, it might be that the software is getting confused between gamma modes in HDR. Basically for HDR calibration the pre-calibration and post-calibration capture should measure in ST 2084 PQ gamma which is intended for HDR content, but during the actual calibration steps itself the PQ processing is turned off and it calibrates to 2.2 gamma greyscale instead. Sometimes we found that the software got confused between which mode it was operating in and this can lead to very odd results in the pre- and post-calibration capture.

If you find that happens, make sure that the TV connection DDC section is not connected in the top right hand corner. If it is already disconnected (we found this still caused the same problem sometimes), we would recommend connecting it so that the tab turns green like in the screenshot above.
Then press the ‘DDC’ little screen icon to the right, navigate through the menus to the right until you get to the one shown above. Make sure ‘enable calibration’ is un-checked. If it already is, then tick it, then un-tick it after. This should move the screen out of the calibration mode (where it’s trying to use 2.2 gamma) and put it back in to PQ gamma mode so you can do the pre-calibration capture properly.
Anyway, we digress, back to the process steps….

- After the pre-calibration capture, progress to the next page.
- On the ‘Display Connect’ page you might already have the TV DDC connected from before. If not, click ‘find LG TV’ and connect that as per the steps explained earlier in the article for connecting the TV. Beneath that, make sure you select the correct preset mode you want to calibrate (here we are using HDR Cinema) then press “Full DDC reset” to restore that mode to the native panel state.
- Make sure HDR box is ticked and colour space is set to BT.2020 (note this is the same as Rec.2020). Click next to progress

- On the ‘Cal Start’ page tick the “enable calibration” box which will start the session and connect the screen to be calibrated fully

- Before you start doing more on the next screen, just have a quick check that the HDR video playing still has plenty of time left on it. Although your TV will show a test pattern (or probably a black image at this point), if you use the TV remote to scroll up, you should see the video controls / progress bar. It’s a 1 hour video which should last you for the full process, but if need be just move the cursor back to the start of the hour again. If you let it run to the end, the screen will exit HDR mode and then also go in to screensaver mode which will mess up your calibration potentially mid-way through. We like to start the 1 hour clock again before we do these next steps.
- On the ‘Greyscale Multipoint’ page click the ‘autocal’ button in the bottom right hand corner to begin the calibration process.

- A pop up will appear after a few seconds, select ‘LG 20 points HDR’ from the drop down. Don’t bother with any further points, it will just slow down the calibration and won’t bring any additional benefits of note. This Autocal process will then run automatically for you. It takes around 35 – 40 minutes to complete typically with an X-rite i1 Display Pro meter
- The end results will hopefully look like our example above with nice gamma and luminance curves, low greyscale dE and flat RGB balance.
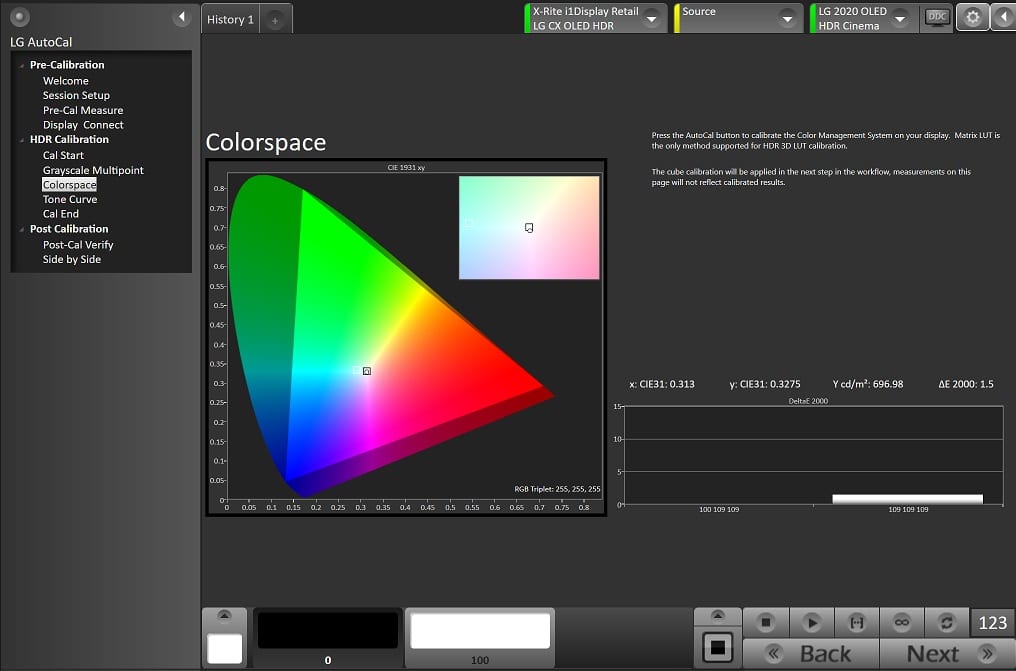
- On the next ‘Colorspace’ screen click ‘Autocal’ in the bottom right hand corner. This will carry out a Matrix LUT calibration which is the only method for 3D LUT calibration in HDR mode. In the pop up that opens, leave everything as it is although make sure ‘Matrix_LUT’ is selected in the drop down at the bottom. This colour space calibration is also automated for you and takes only around 1 – 2 minutes to complete. Nice and quick!

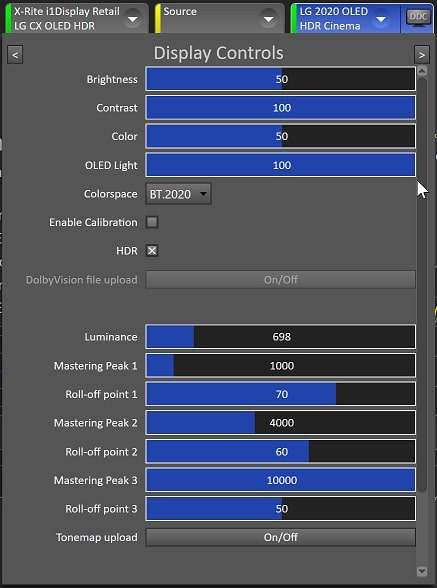
- Proceed to the next ‘Tone Curve’ page. This feature is used to modify the way the TV’s internal processing handles HDR content that exceeds the panels peak luminance. This is referred to as a Roll-Off point. HDR content is mastered with specific peak luminance in mind, which determine how bright the brightest highlights in the content are displayed. These are most commonly 1,000, 4,000, and 10,000 nits. Since the mastered peak luminance may exceed the maximum luminance of the display panel (e.g. around 700 nits typically for even the latest 2022 OLED panels) this features allows you to modify how content that exceeds your specific maximum luminance is handled.
- Start by pressing the ‘Measure peak lum’ button to measure the peak luminance of the display. We would recommend taking around 5 measurements first of all via the “measure peak lum” button as you will probably find that with each one, the reading gets higher. This is because the 10% test window warms up on the panel until it can reach its peak luminance. Taking around 5 measurements should give you a more accurate result, or you will find it settles at a peak brightness value each time.
- Change the top blue slider for ‘luminance’ to match this peak brightness you just measured
- You can leave everything else at default unless you are doing anything advanced. We have had various conversations with Portrait Displays who recommend the defaults as optimal for most situations after a lot of testing. Only if you had some kind of reference display would it be practical to start messing around with these roll-off points is the general view. Note that the default values set in the software may have evolved over time as Portrait tweak them, but just leave them at whatever you have as the default.
- Press the ‘Tonemap upload’ button at the bottom. The software will flash a couple of times and the tonemap will have been uploaded to the TV
Separate Shadow Detail Corrections Before You Finish AutoCal
Like in the SDR calibration the AutoCal calibration has ended, but do NOT un-tick the ‘enable calibration’ box yet. We want to make some shadow detail corrections before we finish. This will make corrections to the very darkest shades to ensure you can see all the relevant detail in dark scenes. This step is necessary because each OLED panel sample varies somewhat and in the very darkest tones it’s hard for AutoCal to do this for you. If you’re wondering about whether this should be done before or after the 3D LUT stage, see our explanation and notes in the SDR calibration section of this guide further up, where it’s discussed in detail.
- First we need to disable the screen’s pattern generator ‘ pattern for a moment to perform these checks. Press the source tab at the top right and untick “pattern on/off”. You can fully disconnect the source if you’d rather, but it’s not necessary. The TV should end the patterns being shown and return to your normal mode – probably the HDR video screen you had running before. Do not disconnect the DDC controls though or anything else.
- You should have your USB stick with the Media Light shadow detail files on them. If not, go back to that step, download them and put them on a stick.
- If you’ve triggered HDR mode just by enabling HDR in Windows then you can plug that USB stick in to the same laptop/PC and play the files from a media player that supports HDR content.
- Sometimes it is easier to just play them from the TV’s built in player app by plugging the USB stick directly in to the TV though. If you were already playing the HDR 1 hour video to get to this stage, just exit that video and find the Media Light files on the same USB stick instead.
- Navigate to the Media Light shadow detail folder and select the HDR10 shadow detail video file and play it. This will look the same as the SDR shadow detail video we used earlier for SDR calibration.
- Important: via the TV remote control, make sure that you are running in the correct preset mode you’ve been calibrating. It won’t necessarily be in the same mode for the USB stick playback, so set it to the one you’re adjusting while playing the video.
- Put it on repeat if you need to, or we also find pausing it on the ‘flashed’ image easy enough
- You will need a dark room for these final corrections ideally
- Get close up to the TV and you will see small flashing boxes for different dark shades on the screen like in the above screenshot in a greyscale, the idea here is that the box for 64 is “reference black”, and everything below that should also be black (everything < 64). Everything above 64 would then be different levels of grey. You should not be able to see boxes 65 and 66 either with the naked eye as those are immeasurably dark and well below what even a professional meter can measure. It’s effectively black. Box 67 should probably be the first you can start to make out, but you don’t want it to be too light. You may find that quite a few of these shades above 67 are currently visually black as well, which is why you need to do this shadow detail correction
- While watching this test pattern video press the little screen icon in the top right hand corner of the Calman software that says ‘DDC’
- This should pop up the DDC control menu, it should be on the ‘RGB adjust’ page as shown above, you need to use the scroll arrows to move to the ‘display controls’ menu page.
- You should see some of your settings in this page from earlier on (ignore the screenshot here). Scroll down to the bottom to the ‘OLED shadow detail’ sliders
- For HDR leave ‘OLED shadow detail point’ set at 14 (note: this will be different for SDR calibrations, explained earlier in that section which had 23 as the setting)
- The setting to adjust is the ‘OLED shadow detail value’. While observing the test patterns on the screen move the slider up a fair amount (200 or so to start with) and press the ‘commit = on/off’ button to activate the change. This should update the appearance of the grey shades on your screen. Having made a fairly big change on the slider here, you will hopefully see a fairly noticeable change on the shades. You need to then move it up or down, pressing ‘commit’ each time, until you’ve honed in on the right level for your panel. You can change this as many times as you want, so just experiment.
- You want box 64 to be black and not show any “flashing” while the video plays – this is reference black
- Everything lower than 64 should also be black/invisible
- You should also not be able to see boxes 65 and 66 either with the naked eye, they are too dark and only a super high end professional meter could pick out a difference here from pure black.
- Everything from 67 and above should be progressively brighter grey shades, with 67 being the first barely distinguishable shade you can see flashing. You will find you can only make this just visible in the flashing without impacting box 64 – 66 and below and it will be very subtle. You will need to be in a dark room and up very close to the screen to pick it out.
- Once you’re happy with the shadow detail correction, close the DDC menu and return to the main software
Should I un-tick “enable calibration” when viewing the shadow detail test patterns?
We talked about this earlier in the SDR calibration section where ticking and unticking “enable calibration” had very little impact on the visual grey shades, only really impacting the lighter shades very slightly and seeming to offer no difference at the darker end where you’re trying to refine the shadow detail anyway. There was no major reason to un-tick this for the SDR calibration process we didn’t feel, although you of course can do if you want.
In HDR mode shadow detail correction there is certainly a more pronounced visual difference between the visual grey shade values you can see when you disconnect the calibration session by unticking the “enable calibration” box on the DDC tab. This is much more noticeable than in the SDR shadow detail correction process, you will probably see more obvious differences in the grey shade samples, especially in mid to lighter tones. Try it for yourself, observe the shadow detail patterns (perhaps pause it at the right moment on the video) and simply un-tick and re-tick “enable calibration” in the DDC menu repeatedly. This will not impact your calibration by the way as long as you’re doing it from within the same calibration session. The reason why this makes a more noticeable difference in HDR mode is because there is conversion between 2.2 gamma and PQ going on in the software, unlike in SDR mode where that is not in play.
For the highest level of accuracy some people recommend that you should untick “enable calibration”, observe the shadow detail test pattern, re-tick “enable calibration”, move the slider, press commit to make the change, un-tick, observe the patterns again and repeat. This is the “recommended” approach from Portrait Displays as well from recent conversations we’ve had with them. That would seem to make more sense in HDR shadow detail correction than in SDR correction given the more pronounced visual differences you can easily see between ticked and un-ticked, right? Well, possibly.
While the grey shades are different between ticked and un-ticked, this is much less apparent in the darkest shades we are trying to refine and hone in on. We found that whichever way we did the correction, we ended up with a very similar slider value anyway. The lighter grey shades might look different, but those darkest shades are so close to black, it makes very little visual difference, if any. Either way we would expect you would end up with basically the same slider value, but it’s probably wise to adjust with “enable calibration” ticked for ease, get that looking right, then un-tick it and just check it’s still looking correct. The lighter grey shades will look darker with it unticked, and you might need a few moments to adjust your eyes, but it still leaves you with box 67 being the first barely distinguishable grey shade above black at the end of the day. If it needs a bit of refining from there with it un-ticked, that’s fine. You will need to tick “enable calibration” again before you can commit any more changes with the slider. For most people we’d expect the end result to be the same or very similar.
Post calibration validation

- You should be back on the ‘Cal end’ page, you can now un-check the ‘enable calibration’ box to end the connection to the screen. Note, do not ever go back in to try and tweak these shadow details separately outside of the full calibration process as it will reset your 1D LUT greyscale calibration as soon as you try! If you want to complete the final validation reports then you need to re-connect the source again that we disconnected to do the shadow detail videos.
- If you want to complete the final validation reports then you need to re-connect the pattern in the source tab again that we disabled earlier to do the shadow detail videos. Go in to the source menu, click the pattern back on and it should return back to the grey/white test pattern screen. Click next in the software.
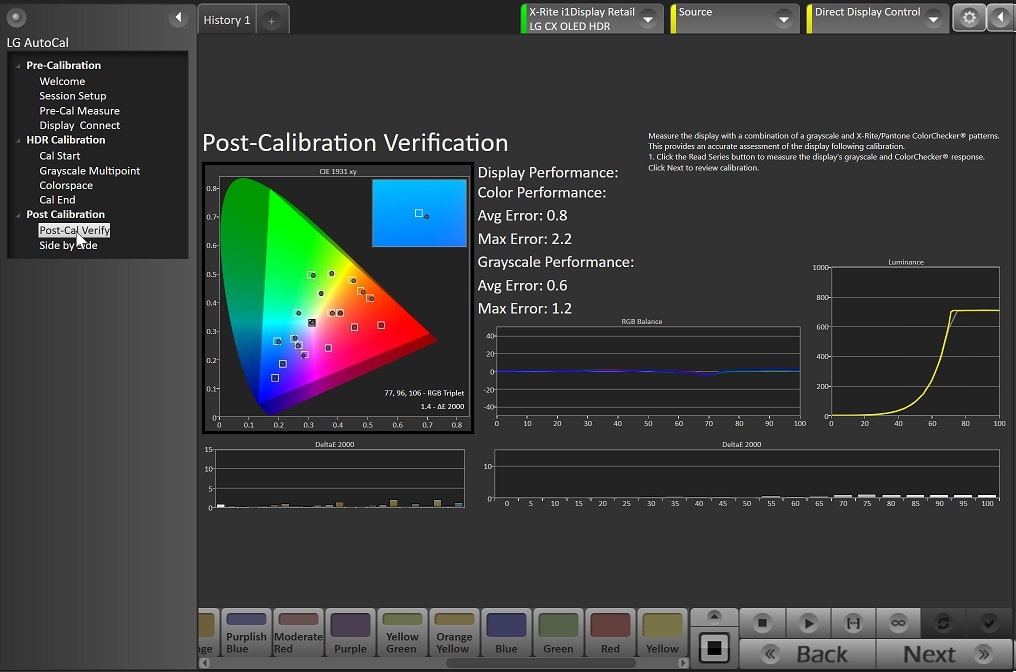
- Now you’re on the ‘post-cal verify’ page. Press the ‘run series’ button in the bottom right (the one that looks like the capital H). This will re-check the results and you should get low delta E errors now and flat RGB balance graph. Once finished, press next.
- Note that the bottom graphs capturing dE for colours (left) and dE for greyscale (right) include “luminance errors” and so will be impacted by how you configured the “tone curve” section with the roll-off points. That is to be expected, but if you right click on those graphs > select properties > in the menu that opens on the right hand side you can un-tick “include luminance errors” to see the accuracy without luminance included, at which point they should show even lower bars.

- The final ‘side by side’ page compares the pre-calibrated state against the calibrated results for a nice quick verification of your results.
Final steps (optional) – Dynamic Tone Mapping
Once that’s all completed you may want to play some HDR content from your PC, or from the TV’s YouTube app or something and just check that your calibrated mode (HDR Cinema in our case) is active. You can also experiment with turning ‘dynamic tone mapping’ back on if you want within the advanced controls menu of the TV. This will boost the brightness a bit and while it might not then be as “accurate” from your calibration, some people prefer to have it turned back on. This dynamic tone mapping is only available for HDR modes. Try turning it on and off while playing some HDR content and see which you prefer. Don’t change anything else in the TV menu though.
If you’re using the screen in HDR mode from a device which supports it (e.g. an Xbox Series X) you may instead want to switch this mode to HGiG mode which matches the tone mapping between source device and screen properly where it is supported.
Calibrating HDR Game mode
You might also want to complete the same process but for the Game mode in HDR. That is the mode you’d want to use for games consoles, and probably also for PC gaming as it reduces the input lag quite significantly. You will also find that as long as you’ve got the normal settings turned on, the screen jumps in to this Game preset mode when it detects a console connected via the “ALLM” (Auto Low Latency Mode) feature.
You cannot use the Calman HDR sample video for this though, as when you run that video to trigger HDR mode it does not give you access to the Game mode unfortunately. The screen sees it as a media/video file and doesn’t offer you the option to switch in to HDR Game mode (only modes like HDR Cinema). Thankfully it’s easy to calibrate in the HDR Game mode if you’re connecting a laptop or PC to the screen to run the Calman software. Just enable HDR in Windows, the TV will switch in to HDR mode and that is sufficient as an input source to allow you to switch the screen in to HDR Game mode from the OSD. Then you just select Game HDR mode within the software during the calibration process. You will also have to play the shadow detail correction video from your PC and not from the USB stick if following that step, ensuring the media player you’re using supports HDR content.
We like to calibrate the ‘HDR Cinema’ mode which to be used for TV, Amazon Prime etc where HDR content is available, and then the ‘HDR Game’ mode as well for console inputs like the Xbox Series X or PS5. We will talk about Dolby Vision Game mode calibration later on.
Found this guide useful? Say thanks and support our site here
Dolby Vision (DV) Calibration
Update 20 July 2023 about 2022 TV models – over the last year or so users have had difficulty using the built-in pattern generator on 2022 LG OLED screens including the popular C2 series. After a firmware update middle of 2022 from LG, the pattern generator was producing incorrect colours and making calibration impossible. There was a firmware update in Jan 2023 which seemed to fix part of it, but there were still ongoing problems. For a while the only working option was to use an external pattern generator, but that is an excessive and expensive step. Some users were reporting success for SDR calibration, but not for HDR or Dolby Vision calibration on 2022 LG OLED TV’s although a work around was needed to get the pattern generator to show properly.
In June 2023 Portrait Displays released an update to their Calman software (v5.14.2.3) which appears to have addressed this problem with “LG internal Pattern generator support added for supported 2022 and 2023 model TVs” listed in the released notes. This should make calibration on the 2022 (and also new 2023) models possible again.
We will now talk through the process for calibrating the Dolby Vision (DV) mode which will be used for a lot of content including movies, streaming content (e.g. Netflix) and games that support it. There are a few preset modes once you’re displaying DV content but we like to use Dolby Vision Cinema Home mode for calibration which also allows you to use Dolby Vision IQ for helping with darker content and shadow detail. If you want an image even closer to the “artistic intent” you could calibrate in the Dolby Vision Cinema mode instead which does not use Dolby Vision IQ, but will be darker as a result. Unless you’re viewing DV content in a very dark room, the Cinema Home mode is likely to be preferable.
Getting the TV ready
- Let’s start with getting the TV in to DV mode first. Like with the HDR calibration process, you have to enter DV mode by displaying some kind of DV input signal. That’s not as easy as HDR mode when you’re connecting a PC to the screen.
- The simplest option is to use Portrait Display’s free 1 hour DV sample video. Download it and put this on a USB stick and connect that stick directly in to the TV via one of the USB ports on the back or side. Using the TV remote, navigate to the USB folder input where you can then play that file directly. It will put your TV in to DV mode. One limitation of this method is because the TV detects the file as a media movie, you cannot use or enter or calibrate the ‘Dolby Vision Game’ mode when using this method. When using this method then you need to leave the DV video playing, and then control the Calman software on the laptop screen, as the TV will now be playing that video in DV mode instead of showing the Calman software.
- The simplest option is to use Portrait Display’s free 1 hour DV sample video. Download it and put this on a USB stick and connect that stick directly in to the TV via one of the USB ports on the back or side. Using the TV remote, navigate to the USB folder input where you can then play that file directly. It will put your TV in to DV mode. One limitation of this method is because the TV detects the file as a media movie, you cannot use or enter or calibrate the ‘Dolby Vision Game’ mode when using this method. When using this method then you need to leave the DV video playing, and then control the Calman software on the laptop screen, as the TV will now be playing that video in DV mode instead of showing the Calman software.
- Use your TV remote to enter the desired DV picture mode you want to calibrate – here in our example we are calibrating the Dolby Vision Cinema Home mode having triggered DV source via the 1 hour video on a USB stick. Before we get going with the Calman software, In the TV menu:
- Leave OLED Light at 100 (we don’t want to change this for HDR or DV modes at all as it would then limit peak brightness)
- Leave the brightness and contrast at default. These will be reset during the calibration anyway, but don’t change them after or anything
- Make sure Energy Saving Mode is turned OFF – while this is perhaps ok to use in SDR mode, it will massively restrict your peak brightness for HDR and DV modes (down to around 400 nits) so we would definitely leave it off all the time.
- In the ‘General’ section of the menu make sure AI Picture Mode and AI Brightness are turned OFF – AI Brightness is used to enable Dolby Vision IQ if you’re using the ‘Cinema Home’ preset mode (it doesn’t apply in the ‘Cinema’ preset), but you can decide whether you want to turn that back on later. For the calibration itself, turn it off.
- Your TV should now be ready for calibration in the selected DV picture mode.
Calman Software steps

- Load up the Calman software (leaving the DV video playing on the TV as described above) and follow the workflow steps. On the welcome page select OLED and Dolby Vision from the drop down menus.

- On the sessions setup page start by connecting your meter. Pressing ‘find meter’ will load up the menu to choose and configure your meter, and will be the same steps as we outlined earlier in this article. Check the meter settings are all correct, as per our guidance earlier on.
- Just beneath the find source button select “window 10%” from the drop down menu then click ‘find source’ to connect the LG TV, again as explained earlier in the article. This will begin the test pattern on the screen, but importantly it should still be in DV mode. You can check this by opening up the TV menu and checking you’re still in the target DV picture mode. “Dolby Vision Cinema Home” in our case.
- You do not need to connect your TV to the software yet using the ‘DDC’ menu at the top right, that’s probably better to do in a moment on the relevant step. Leave that disconnected for now
- In the session setup you should now have your meter and source connected, so you just need to make sure the software is configured to use following targets for DV calibration. Not that the software defaults to a different colour space of DCI-P3 so you might need to change that:
- Colour space = Rec.2020 – this will try and cover as much of this wide gamut colour space as possible which is the reference for DV content. Some DV content is mastered in P3 colour space, but an increasing amount is in Rec.2020 so it’s best to aim for the widest gamut as possible from the display.
- Gamma formula = ST 2084 HDR (PQ) – this is the gamma curve for HDR/DV content, note that it is different to the 2.2 power we used for SDR
- Whitepoint = D65 (6500k)
Click ‘next’ to move to the following page

- As you progress to the ‘DV Verification’ page, if the source pattern connects properly then it should load up a screen that looks hopefully like a white square on a black background, although sometimes it might not interpret the DV signal properly and rather than that, it might be yellow on red. If this happens try disconnecting your source and connecting it again for a second time. If that fails, try reloading the software again. It’s rare that this ever happens thankfully.

- The software suggests that you need to click the source tab and set the Dolby Vision mode to ‘Absolute’ as shown in the screenshot above although we understand this to be a forthcoming change with LG and not something we’ve seen before. If those settings show for you in the source tab then make sure to select ‘absolute’. If not it might look more like the below in which case just ensure Colorspace is set to HDR 2020 in the source tab. We are seeking clarification from Portrait on these settings and if something is being changed.

Press next to go to the next page

- SKIP THIS PRE-CAL MEASURE PAGE – unfortunately you cannot use the TV’s built in pattern generator to perform the pre and post calibration validation for Dolby Vision mode, if you try it you will get loads of really weird results and it will look wrong. Don’t bother with this page unless you also have some kind of external pattern generator which works with DV, just proceed to the next page.
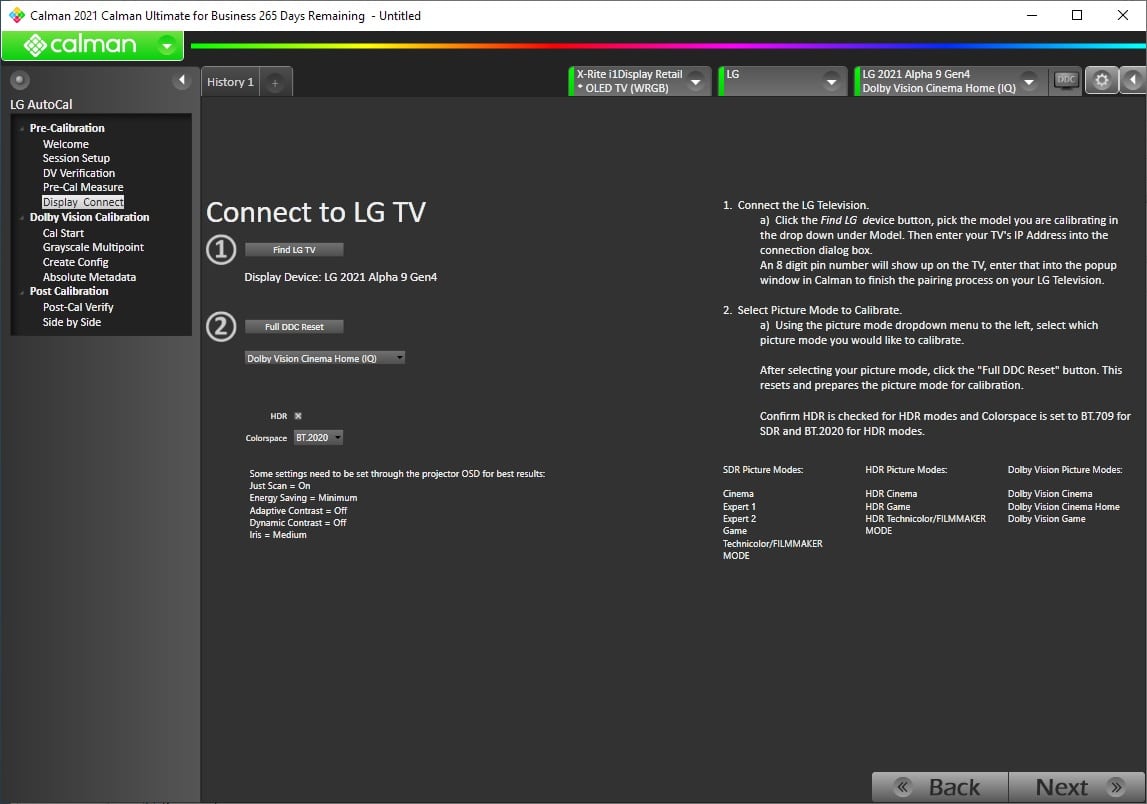
- On the ‘Display Connect’ page you might already have the TV DDC connected from before. If not, click ‘find LG TV‘ and connect that as per the steps explained earlier in the article for connecting the TV. The tab should turn green.
- Beneath that, make sure you select the correct preset mode you want to calibrate (here we are using “Dolby Vision Cinema Home (IQ)” as it is labelled. Then press “Full DDC reset” to restore that mode to the native panel state.
- Make sure HDR box is ticked and colour space is set to BT.2020 (note this is the same as Rec.2020). Click next to progress

- On the ‘Cal Start’ page tick the “enable calibration” box which will start the session and connect the screen to be calibrated fully. You might get a pop up notice on the screen itself saying “calibration start”.

- Before you start doing more on the next screen, just have a quick check that the DV video playing still has plenty of time left on it. Although your TV will show a test pattern (or probably a black image at this point), if you use the TV remote to scroll up, you should see the video controls / progress bar. It’s a 1 hour video which should last you for the full process, but if need be just move the cursor back to the start of the hour again. If you let it run to the end, the screen will exit DV mode and then also go in to screensaver mode which will mess up your calibration potentially mid-way through. We like to start the 1 hour clock again before we do these next steps.
- On the ‘Greyscale Multipoint’ page click the ‘AutoCal’ button in the bottom right hand corner to begin the calibration process.
- A pop up will appear after a few seconds, select ‘LG 20 points HDR’ from the drop down. Don’t bother with any further points, it will just slow down the calibration and won’t bring any additional benefits of note. This AutoCal process will then run automatically for you. It takes around 35 – 40 minutes to complete typically with an X-rite i1 Display Pro meter
For background and information, current HDR-compatible televisions are still based on 2.2 gamma at the panel level. The HDR EOTF (ST 2084 or HLG) is then mapped onto the native panel response of 2.2 gamma. Working with LG and Dolby, the Calman software sends special Dolby Vision “Relative Mode” metadata to put the TV’s Dolby Vision engine into pass-through mode. You then calibrate the grayscale 1D LUT to 2.2 gamma and D65 white point using AutoCal. After you calibrate the grayscale to 2.2 gamma and D65, you will use Calman to create a custom Dolby Vision config file, by taking White, Black, Red, Green, and Blue measurements. (that step is shown later).

- The end results will hopefully look like our example above with nice gamma and luminance curves, low greyscale dE and flat RGB balance. If something is wrong, try running this step again. This is one stage where you are seeing validation of your results as you go in DV mode.

- On the next ‘Create Config’ you will create a configuration file specifically for Dolby Vision. This will calibrate the colour management system in Dolby Vision Mode
- Click “create Dolby Vision Config”. It will prompt you for where you want this to be saved on your PC, it doesn’t matter where but we just save it to desktop for ease. This does a few quick readings but only takes a few minutes to complete. You should have two text files saved.
- Once completed press the Dolby Vision upload “on/off” button (strangely named). Select where you saved the file from and open it. You will only be able to select one of the two files here anyway, just select the one that was visible. That will load the config you just created back on to the TV to complete the mapping for DV content. There isn’t really any indication this has completed apart from a brief flash of the green ‘Display Control’ tab.
Optional brightness “hack” for DV mode
We couldn’t recommend this if your intent is complete accuracy, but if you find your DV calibrations too dark for your viewing conditions, and you can’t improve things enough using the Shadow Detail corrections described below enough, there is a manual “hack” you could consider. This can help improve the overall brightness of your DV mode very nicely.
To do this, you can manually edit the DV config text file created above before you upload it, to trick the TV in to being a bit brighter in this mode. Go in to the two DV text files created and saved on your PC and edit your ‘Tmax’ figure in both (the max brightness for the screen) to something lower than the actual peak. For instance if the Tmax is 700 nits, you could edit this to 500, 400 or even lower. When you upload the DV file to the TV it will trick it in to thinking the max brightness is lower than it is, altering the PQ curve accordingly. Don’t worry this won’t limit your actual peak brightness output, it will still reach 700 nits, but it will make the DV mode brighter overall including in darker scenes.
This is probably the kind of thing where you’d want to ideally observe actual DV content and see the changes as you make them. To do this, go in to the source tab of the Calman software and turn the pattern generator off using the tick box, but leave the Display Control section connected which will leave you with calibration control on the TV. Go and play some DV content – we used some darker scenes in Disney+ The Mandalorian to easily observe the impact these changes had as we made them. Find a dark scene (the opening of Season 2’s “The Marshall” episode is a good example) and pause the screen at a suitable moment. You can then edit both of the DV config text files, save them both, then using the second display you have connected where you are controlling the Calman software, upload them to the TV using the button in the software. Note that while you manually edit both files, when you upload to the TV you only select one of the files in the software window.
You should see the screen brightness change, and you can repeat this as many times as you want to find a suitable brightness for your individual preference, viewing conditions etc. Experiment with different Tmax settings in those files and see what you like. Then find other brighter scenes in the content and check that looks ok there too. You should find a nice balance easily enough with a few changes to that Tmax setting as you watch the DV content on the TV. Personally if I am using this approach from an OLED TV that can reach 700 nits peak, changing the value to 400 gives a nice boost in DV brightness and is a good starting point for many people.
As we said, this is not really recommended if you’re focused on accuracy, but is a possible option for hacking the brightness if you need as many people find DV mode just too dark overall especially in daytime viewing. What you could do is calibrate one of the DV modes (DV Cinema Home mode) like this with the brightness hack used to make it brighter for daytime viewing, then calibrate another mode (DV Cinema) for nighttime viewing, where you leave this stuff alone. That might be useful to many people.
Back to the calibration process…

- On the next ‘absolute metadata’ tab do NOT click the box for “enable calibration” yet, that will disconnect the calibration stage but we first want to complete some shadow detail corrections.
Separate Shadow Detail Corrections Before You Finish AutoCal
Like in the SDR and HDR calibration the AutoCal calibration has ended, but do NOT un-tick the ‘enable calibration’ box yet. We want to make some shadow detail corrections before we finish. This will make corrections to the very darkest shades to ensure you can see all the relevant detail in dark scenes. This step is necessary because each OLED panel sample varies somewhat and in the very darkest tones it’s hard for AutoCal to do this for you. If you’re wondering about whether this should be done before or after the 3D LUT stage, see our explanation and notes in the SDR calibration section of this guide further up, where it’s discussed in detail.

- First we need to disable the screen’s pattern generator ‘ pattern for a moment to perform these checks. Press the source tab at the top right and untick “pattern on/off”. You can fully disconnect the source if you’d rather, but it’s not necessary. The TV should end the patterns being shown and return to your normal mode – probably the DV video screen you had running before. Do not disconnect the DDC controls though or anything else. You should have your USB stick with the Media Light shadow detail files on them. If not, go back to that step, download them and put them on a stick.
- You will have been playing the DV 1 hour video from a USB stick to get in to DV calibration mode, so just exit that video and find the Media Light files on the same USB stick instead.
- Navigate to the Media Light shadow detail folder and select the DV_Media_Light_Spears video file and play it. This will look similar to the SDR and HDR shadow detail video we used earlier for those calibrations.
- Important: via the TV remote control, make sure that you are running in the correct preset mode you’ve been calibrating. It won’t necessarily be in the same mode for the USB stick playback, so set it to the one you’re adjusting while playing the video.
- Put it on repeat if you need to, or we also find pausing it on the ‘flashed’ image easy enough
- You will need a dark room for these final corrections ideally
- Get close up to the TV and you will see small flashing boxes for different dark shades on the screen like in the above screenshot in a greyscale, the idea here is that the box for 64 is “reference black”, and everything below that should also be black (everything < 64). Everything above 64 would then be different levels of grey. You should not be able to see boxes 65 and 66 either with the naked eye as those are immeasurably dark and well below what even a professional meter can measure. It’s effectively black. Box 67 should probably be the first you can start to make out, but you don’t want it to be too light. You may find that quite a few of these shades above 67 are currently visually black as well, which is why you need to do this shadow detail correction
- You may find that quite a few of these shades above the first box of 67 are currently black as well, which is why you need to do this shadow detail correction
- While watching this test pattern video press the little screen icon in the top right hand corner of the Calman software that says ‘DDC’
- This should pop up the DDC control menu, it should be on the ‘RGB adjust’ page as shown above, you need to use the scroll arrows to move to the ‘display controls’ menu page.

- You should see some of your settings in this page from earlier on. Scroll down to the bottom to the ‘OLED shadow detail’ sliders at the bottom
- For HDR and DV correction leave ‘OLED shadow detail point’ set at 14 (note: this will be different for SDR calibrations, explained earlier in that section which had 23 as the setting)
- The setting to adjust is the ‘OLED shadow detail value’. While observing the test patterns on the screen move the slider up a fair amount (200 or so to start with) and press the ‘commit = on/off’ button to activate the change. This should update the appearance of the grey shades on your screen. Having made a fairly big change on the slider here, you will hopefully see a fairly noticeable change on the shades. You need to then move it up or down, pressing ‘commit’ each time, until you’ve honed in on the right level for your panel. You can change this as many times as you want, so just experiment. The actual “detail value” will vary from panel to panel, so you will need to find what is suitable for your screen and viewing environment.
- In the DV pattern video the first box is 65, with the background being set to 64 “reference black”
- You should also not be able to see boxes 65 and 66 with the naked eye, they are too dark and only a super high end professional meter could pick out a difference here from pure black.
- Everything from 67 and above should be progressively brighter grey shades, with 67 being the first barely distinguishable shade you can see flashing. You will find you can only make this just visible in the flashing without impacting box 65 – 66 and it will be very subtle. You will need to be in a dark room and up very close to the screen to pick it out.
- Should you un-tick “enable calibration” when viewing the shadow detail test patterns? – The same discussion and advice we had for the HDR mode applies for DV shadow detail correction as well. See the earlier section for more info.
- If you always find the darkest content too dark in DV mode, and struggle to see shadow detail during viewing, you may want to consider making the grey shades a little brighter here to compensate, although if you go too high it will wash out darker images and raise the blacks too much. If you want a brighter DV mode then the better approach is probably to use the brightness hack discussed earlier. For the shadow detail, generally getting the scale smooth and progressive is the best option.
- Once you’re happy with the shadow detail correction, close the DDC menu and return to the main software
Final calibration steps
- You should be back on the ‘Cal end’ page, you can now un-check the ‘enable calibration’ box to end the connection to the screen. Note, do not ever go back in to try and tweak these shadow details separately outside of the full calibration process as it will reset your 1D LUT greyscale calibration as soon as you try! If you want to complete the final validation reports then you need to re-connect the source again that we disconnected to do the shadow detail videos.
- Normally we would go back and turn on the pattern again from the source menu to complete the final validation reports but as with the pre-calibration reporting, that does not work for DV mode so this needs to be skipped.
- Skip past the ‘Post-Cal verify’ and “Side by Side’ pages of the process for DV calibration unless you have an external pattern generator, as like the pre-calibration reporting this doesn’t work with the TV’s in built source pattern generator at this time for Dolby Vision mode.
You have completed DV calibration successfully!
Enabling Dolby Vision IQ (Cinema Home mode only) and final steps
If you calibrated the Cinema Home mode you can go back in to the OSD menu and in the general section enable AI Brightness again. This enables the Dolby Vision IQ mode for Cinema Home preset, and will help with shadow detail and making darker scenes a bit brighter.
Once that’s all completed you may want to play some DV content from maybe a game or TV streaming service that supports it and just check that your calibrated mode is active (Dolby Vision Cinema Home in our case).
Found this guide useful? Say thanks and support our site here
Further Reading
If you found this guide helpful and enjoy our work and want to say thanks, donations to the site are very welcome. If you would like to get early access to future reviews and articles please consider becoming a TFT Central supporter.
- Explaining Monitor Colour Gamut. Improving Measurement Accuracy
- LG OLED Calman AutoCal Calibration – Testing Meter Mode Profiles and Accuracy
- Display Measurement and Testing with the UPRtek MK550T Spectroradiometer
- Review and Testing Improvements with Calman Ultimate Software
- Portrait Displays AutoCal for LG Guide Resource Centre
| Check Availability and Pricing – Affiliate Links |
|---|
| Display Calibration Devices at Amazon X-rite i1 Display Pro colorimeter at Amazon LG OLED TVs at Amazon |
| TFTCentral is a participant in the Amazon Services LLC Associates Programme, an affiliate advertising programme designed to provide a means for sites to earn advertising fees by advertising and linking to Amazon.com, Amazon.co.uk, Amazon.de, Amazon.ca and other Amazon stores worldwide. We also participate in a similar scheme for Overclockers.co.uk. |
Change Log
- 20 July 2023 – updated for added support for 2022 model pattern generator after Calman software Fix. Added notes about 2023 models in relevant places.
- 26 March 2023 – updated notes for AutoCal support of 2022 LG OLED Tv’s including the C2 models. SDR calibration should work, but requires work-around process from Calman software to connect the pattern generator properly. HDR and DV calibrations still seem to be broken, pending a new firmware from LG and a software update from Calman.
- 9 February 2023 – corrections, discussion and updates to Shadow Detail Control sections for SDR, HDR and DV processes, including clarity on at which point you should complete this stage (before or after 3D LUT), and whether to un-tick the “enable calibration” option while you view the test patterns. Other improvements and clarifications elsewhere in the article too.
- 2 February 2023 – updated note about support for internal pattern generator on 2022 LG TV’s and a few minor tweaks to content.
- 16 January 2023 – added links to our supplementary article about meter profiling, and testing the accuracy of the provided meter correction modes
- 10 November 2022 – added note about current problems with LG C2 internal pattern generator which seems to be affecting all calibration options. We are doing further testing ourselves and following up with Portrait, but don’t be alarmed if the pattern generator doesn’t load or has wrong colours on the C2, you’re not alone! This seems to have been caused by an LG firmware update.
- 17 May 2022 – added Dolby Vision calibration process, added 2022 model support clarification and testing (e.g. LG C2), improved shadow detail controls guidance in all sections.
- 11 April 2022 – minor updates to wording and situation with 2022 models, details of DV calibration status.
We may earn a commission if you purchase from our affiliate links in this article- TFTCentral is a participant in the Amazon Services LLC Associates Programme, an affiliate advertising programme designed to provide a means for sites to earn advertising fees by advertising and linking to Amazon.com, Amazon.co.uk, Amazon.de, Amazon.ca and other Amazon stores worldwide. We also participate in a similar scheme for Overclockers.co.uk, Newegg, Bestbuy , B&H and some manufacturers.