Here’s Why You Should Only Enable HDR Mode on Your PC When You Are Viewing HDR Content
Introduction
This is something we’ve started to see a lot more of recently, and there’s a lot of confusion around. People get their shiny new monitors advertised with HDR support, unbox them, hook them up and then enable HDR mode in Windows straight away and leave it active. This often then leads to moans like “HDR is washed out”, or “HDR doesn’t look good on my monitor” when actually it’s nothing to do with HDR. Then there’s other problems like “x setting isn’t available“, and this is all because HDR is activated all the time, even for content that is designed for SDR operation.
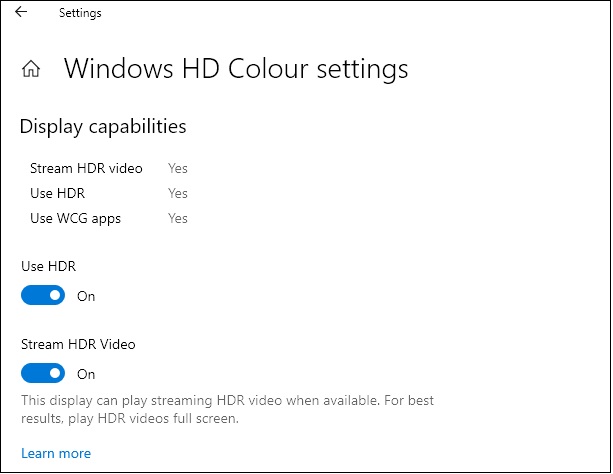
We have also seen an increase in the number of people asking whether they should leave HDR turned on all the time, to which our answer is always no – only enable it for HDR content. The confusion surrounding this situation isn’t helped by the fact that it’s generally a setting you need to turn on and off manually, as opposed to being something that Windows intelligently detects and turns on when needed for relevant content. Some games can trigger HDR mode themselves, as can some media players and of course external devices like games consoles; but for PC use normally you have to enable this setting manually in Windows. The desire to have something you set and forget is of course there.
When you get a new monitor, the first things you do are set the correct resolution and refresh rate; so if it’s an HDR monitor, why not enable that all the time? Here’s why.
View this content in Video format instead

If you’d rather watch a short video going through all this content, you can find that on our YouTube channel here.
Test and Demo HDR on your screen
If you want to show off or test the HDR capabilities of your display, this is a compilation of some of the best HDR test videos based on low APL % scenes we could find. These are darker overall scenes, with bright highlights and will allow you to test and showcase: 1) the black depth and contrast of the panel, 2) test the levels of blooming and halos if present around bright areas, 3) observe the brightest peak brightness highlights. Click the image above to check it out.
Windows desktop and general content is designed for SDR mode
Obviously enabling HDR mode in Windows is required when you want to use HDR content like games and videos, where supported by your system. What we are concerned with here is running HDR mode for general day to day normal content. Windows desktop, internet use, office use, photo apps etc are generally all designed to operate in SDR mode. They expect a specific gamma configuration, brightness and tone mapping for content. If you enable HDR in Windows and then observe this kind of normal SDR content, it will very often look bad. Some monitors handle this better than others and could look fine, but in our experience the majority of screens end up looking washed out, with colours and brightness that don’t really look right. A screen that looks decent in this mode is generally the exception rather than the norm. The monitors are poor at handling the conversion and this really falls in to two areas, gamma and colours.
“HDR looks washed out!”
Gamma
In simple terms, when you enable HDR mode you’re telling the screen you’re inputting content mapped to the ST2084 EOTF (Electro-Optical Transfer Function), more commonly known as the the PQ curve. This is basically like the HDR gamma curve. It’s the mathematical function that a TV uses to convert the digital signal encoded in the content you’re watching into brightness, with one of the key elements of HDR being the ability to show brighter highlights and specular detail. HDR isn’t about having an overall brighter image, it’s about the ability for the content to reach higher brightness in certain situations and for certain parts of the image where it’s intended to be brighter. The monitor switches to its corresponding HDR mode which is designed to follow that same PQ curve. If you’re using proper HDR content in a game or video then the input device (your Windows PC) and the output device (monitor) match, and things should look good.
The problem that arises is that actually the content you’re viewing when you first turn this on in Windows is SDR content, normally from your desktop and designed to operate with an SDR gamma, commonly sRGB (or very close to the common 2.2 gamma). The content you are viewing is trying to operate in SDR mode, while the display device is running in its HDR mode. This is what causes the common washed out appearance people complain about. HDR isn’t washed out though – using HDR mode for SDR content is washed out! This doesn’t mean your screen is broken or rubbish, it just means you’ve got a mis-match between content and display.
Gamma examples from the Asus ROG Swift OLED PG27AQDM
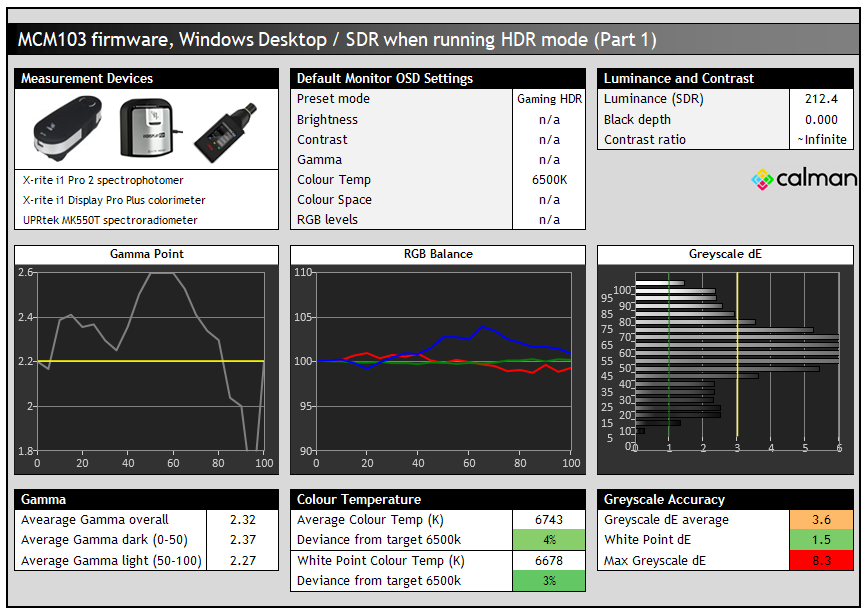
This is an example from a modern monitor, the Asus ROG Swift OLED PG27AQDM. We’ve got Windows HDR mode enabled, but we are viewing and measuring SDR content and the Windows desktop. You can see how badly the gamma curved is skewed away from the 2.2 target in the left hand graph, being handled by the monitor very poorly. It’s all over the place and the accuracy of SDR content within this mode is impacted as a result. We’ve also lost access in this mode to nearly all the monitor settings, which we will discuss more in a moment.

With the skewed gamma, the lack of other settings and the fact that the HDR mode on the monitor is really only configured to handle HDR content, the accuracy of SDR colours is really poor here too, with a dE of 6.8. If you instead run the screen in SDR mode when viewing SDR content and the Windows desktop, you get much better gamma and colours and a higher level of accuracy. That’s covered more in our review.
Colours
This is the other challenge or common cause for the “HDR is washed out” complaint. If you’re using a wide colour gamut screen, but default it will be operating in its full native colour space. You may have become accustomed to the more vivid and saturated colours this offers for both SDR and HDR content and like that appearance, especially for gaming and multimedia. If you then enable HDR mode in Windows, that wide colour gamut will be clamped back to a smaller colour space as it tries to emulate the sRGB colour space which is applicable to SDR mode.
Sometimes this works quite well and the clamping is quite accurate, sometimes it isn’t very good at all. But pretty much every time, it will be restricting the native colour space quite a lot. This might actually be more “accurate” as an active colour space when considering SDR content, but it will definitely look less colourful and vivid than the native mode, and lead images to look more washed out or dull as a result. That is one immediately obvious change to colours when switching between SDR mode and HDR mode on Windows desktop on a wide gamut capable screen.

Then on top of that as we touched on above, the accuracy of the rendered SDR colours may be worse within HDR mode than they were before. Typically a screen will carry a factory calibration mode now, but that’s only applicable in SDR operation. You will notice more inaccuracies and problems generally when viewing Windows desktop and normal SDR content within HDR mode, than if you just stuck to SDR mode instead.
Many screens look bad in HDR mode when viewing Windows Desktop and SDR content
We’ve seen some displays handle Windows desktop within HDR mode pretty well, and some can look quite decent. Normally you can tell straight away if it’s going to look alright, or just plain terrible as soon as you enable HDR mode. There are other challenges though as discussed below to be aware of and we still wouldn’t suggest leaving this turned on all the time, even if Windows does look ok in HDR mode initially. Most screens we’ve seen look sub-optimal or sometimes just terrible in Windows when you first enable HDR. This doesn’t seem to be any better between Windows 10 or 11 by the way, most monitors still look “off” when running HDR for desktop mode and SDR content. They will normally look better when you then view HDR content for which the mode is designed, but it’s very common for HDR modes to look bad initially for Windows desktop and non-HDR content you might be using.
You lose access to many monitor settings

Nearly all monitors we’ve tested and used have very restrictive OSD settings and options when running in HDR mode. When an HDR signal is detected, they switch to their designated HDR preset mode which is set up to handle the different gamma curve and tone mapping, and correctly handle HDR brightness, colours and other aspects of the content. These modes nearly always have a very locked down group of settings in the OSD menu. Normally common settings like brightness and contrast are locked, colour settings, RGB channels, gamma etc. This is generally ok for HDR content for which these modes have been configured (or should have been if it’s a decent screen), but you are at the mercy of the manufacturer, with no ability to make personal adjustments. This is probably ok for handling HDR content, but when you’re actually viewing SDR content like your Windows desktop you probably want better control over the screen’s settings.
Being able to adjust the preset mode, colour temp setting, RGB channels, gamma setting etc are all very useful in adjusting your screen to your liking and room conditions. You can’t do any of this really if you run the screen in HDR mode all the time, and this is another reason why you are better off only enabling HDR mode when you want to view HDR content.
Brightness can often be too high
Connected to the above point, another problem with running HDR mode all the time is that the screen is normally too bright for comfortable use in SDR mode, Windows desktop and general content. You normally don’t have access any more to the brightness control in the monitor’s OSD menu as its locked and designed for HDR content where you want the screen to be able to reach its highest peak brightness for relevant content. This makes the screen less comfortable for SDR content and office-type uses.
We know what you’re going to say though to counter this! “Just use the Windows SDR brightness slider to adjust it”…..the problem with that is, it completely destroys contrast!
Useful Articles
The Best OLED Gaming Monitors to Buy in 2026
The Best Recommended Gaming Monitors 2026
Making adjustments with the Windows SDR Brightness Slider Destroys Contrast

This seems like the logical option to give you control of your screen brightness back to you when running in HDR mode but working with SDR content or Windows desktop. You can move that slider up and down and it will change the screens brightness. However, and this is a major point, it also destroys contrast on LCD monitors (n/a for OLED).

Above are some measurements we’ve taken of the LG 38GL950G running in HDR mode, where the Windows Brightness slider has been used to adjust the screen brightness for desktop and SDR content. It doesn’t matter that this is a pretty poor HDR screen in terms of hardware capabilities, the operation of this setting is the same no matter the LCD screen and in every case it will ruin your contrast ratio. We took a series of measurements with the slider from max (100) all the way down to lowest (0) with the luminance, black depth and resulting contrast ratio measured at each. You can see that the luminance does reduce as you lower that slider, but unfortunately the black depth remains basically the same for all settings! At maximum brightness you get a high 420 nits which is not comfortable for SDR use at all, and a 0.48 nits black depth. This results in a moderate IPS contrast ratio of 875:1 which is around the max this older IPS panel can manage.
From there though as you lower the Windows brightness slider things get far worse. The luminance drops, but with black depth remaining constant the contrast ratio falls. By the time you reach a setting of 50 you’re still getting 256 nits (still too bright) and a very poor 533:1 contrast ratio. When you get to a common ~120 nits your contrast ratio has dropped to ~260:1! At the lowest luminance level and a setting of 0, the contrast ratio is only 153:1 which is terrible.
What is going on? With the screen running in HDR mode the monitor’s backlight is basically being set to its maximum brightness level. This allows it to reach its highest peak brightness for HDR content. That brightness is fixed then in HDR mode and when you then use the Windows brightness slider, all you are doing is lowering the digital white point which does lower the brightness, but cannot adjust the backlight intensity of an LCD screen or lower the black depth. You’re therefore left with terrible contrast ratio.

With the same screen set to SDR mode we can instead use the OSD brightness control again. Now because the backlight is being adjusted instead of just the digital white level, as the luminance lowers, so too does the black point. This maintains a stable contrast ratio across the adjustment range which is exactly how a monitor should behave. This is only possible for SDR / desktop content though when running the screen in SDR mode.
Some screens may allow you to adjust the brightness setting in the OSD menu when running in HDR mode, which could help avoid this crushing of the contrast ratio, and the need to use the Windows brightness slider. However, this is no good either, as then when you actually view HDR content you will have capped your peak brightness to something lower than it could otherwise manage. It’s not a good solution either.
Power consumption will be unnecessarily high, also impacting heat output and lifespan
With the backlight of an LCD screen being set to maximum in HDR mode, that also means the power consumption of your screen would be unnecessarily high. This will leave you with higher electricity usage and bills to worry about. Add on top of this the added heat output from the always-max backlight / brightness setting, and the potential impact this might also have on life-span and performance and there’s several other good reasons why running HDR mode all the time is not wise.
You can lower the perceived luminance via the Windows HDR brightness slider, but this is only really “cheating” to get a lower luminance by making digital white level adjustments. It’s not changing the backlight brightness setting that is operating, and therefore the power consumption. On an LCD you also get the crushed contrast ratio as well as we discussed above.
Brightness behaviour and ABL may change
This is one that applies to OLED monitors, but sometimes the screen will behave differently in SDR mode than it will in HDR when it comes to brightness. For instance the Samsung Odyssey OLED G95SC we recently reviewed did not need to use ABL (Automatic Brightness Limiter) at all for SDR desktop use, giving you a nice consistent brightness for your image no matter what content was being shown. This is optimal for office and general uses for sure.
If you enable HDR mode then the ABL behaves differently. You can now get a higher brightness from the screen, even in just normal SDR desktop situations, but ABL will now be active and cause dimming of the screen as larger bright areas are displayed. As you move or resize windows you may notice the brightness fluctuating and you no longer have a stable uniform brightness like you did in SDR mode. You want to move the screen into HDR mode for HDR content to maximise peak brightness, but for typical SDR uses you don’t really want this behaviour.
Local dimming (if featured) will often be active all the time leading to inaccuracies

For monitors that include local dimming (which many so-called HDR monitors don’t!) this feature is commonly enabled and locked when HDR mode is active. This is because for HDR to really offer its improved contrast ratios you need backlight local dimming to be used. That is fine for actual HDR content which is supposed to be offering that improved contrast and dynamic range. It may also be ok and acceptable for SDR content if you’re playing games or watching videos, as maybe the improvements there could be useful. But it does cause added complications and problems for normal SDR and desktop use.
If you’re doing photo editing, design work, reading documents and the likes you probably don’t want local dimming active. If you’re running the screen in HDR mode all the time you might not be able to turn it off. If you instead switch back to SDR mode you can use the monitor without the local dimming active. When this is being used, it can lead to unnecessary halos and blooming on darker content, brightness variations and inaccuracies with colour gradients and photo work. For anything colour critical or professional you really don’t want the local dimming causing variations across your image and complicating the workflow.
Many so-called HDR monitors are actually pretty poor at HDR anyway

Which brings us on to one of the most widespread issues – most screens advertised as supporting HDR are actually pretty bad at it, or don’t have any HDR capabilities at all anyway. We don’t want to repeat what we’ve talked about many times before, but we would encourage you to read this article which talks about why most HDR monitors don’t really support HDR, even those which carry some of the lower tier certifications supposedly there to help consumers understand HDR capabilities. If the screen is bad at HDR anyway, you really wouldn’t want to be running it in HDR mode all the time! It’s probably not even going to be any good for actual HDR content, let alone for SDR content for all the reasons we’ve talked about above.
Windows 11 HDR Calibration Tool
A quick note about the Windows 11 HDR calibration tool as well. This is a software utility similar to that you might find on a modern games console like the Xbox Series X or PS5. It takes you through a few simple steps and helps you tweak the tone mapping of your input source (i.e. the PC) to align the HDR content with your particular display. It will help tweak dark content as well as the brighter content, accounting for appropriate tone mapping and roll-off points. This can be useful for setting up your PC for HDR output to your HDR-capable monitor, mainly for games and other content that lack their own built-in tool or sliders. For those with their own settings, those are probably better to use. Keep in mind though that you’re making adjustments here based on a limited and defined APL (Average Picture Level) and so may be counter-productive in some cases for other real-life APL. Don’t expect miracles from this tool, but subjectively it may help you fine-tune the HDR performance and is worth a look at.
This doesn’t however change the guidance in this article about only using HDR mode when you’re viewing HDR content, it doesn’t make any difference to the viewing of SDR content within HDR mode and the problems that arise.
Use HDR mode only for HDR content! – Plus a handy shortcut
Hopefully you can see all the reasons why using HDR mode all the time is really a bad idea. So our recommendation after all this is to only enable HDR mode and run the screen in HDR mode when you’re viewing actual HDR content. Don’t leave it active all the time, and just enable it when you need it. If you’ve got a game, media player or external device that can trigger HDR mode for you automatically that’s even better. Just leave them to do their thing. If you need to enable HDR in Windows sometimes, just use it when needed and disable it at other times.
A handy shortcut for Windows HDR on/off = Win + Alt + B
To save some time, there is a useful quick shortcut that can be used to turn Windows HDR on and off as shown above. Note that Windows Xbox Game Bar must be active for this to be working, but that seems to be a standard feature.
Test and Demo HDR on your screen
If you want to show off or test the HDR capabilities of your display, this is a compilation of some of the best HDR test videos based on low APL % scenes we could find. These are darker overall scenes, with bright highlights and will allow you to test and showcase: 1) the black depth and contrast of the panel, 2) test the levels of blooming and halos if present around bright areas, 3) observe the brightest peak brightness highlights. Click the image above to check it out.
We may earn a commission if you purchase from our affiliate links in this article- TFTCentral is a participant in the Amazon Services LLC Associates Programme, an affiliate advertising programme designed to provide a means for sites to earn advertising fees by advertising and linking to Amazon.com, Amazon.co.uk, Amazon.de, Amazon.ca and other Amazon stores worldwide. We also participate in a similar scheme for Overclockers.co.uk, Newegg, Bestbuy , B&H and some manufacturers.