Dell U2422HE and U2422H
This is a shorter format review but we have included as much of our normal testing and results as we can, especially in relevant areas for this screen. We will of course still be carrying out our normal full, detailed reviews for the most interesting, complex and exciting new screens, but using this short format helps us cover a few additional models in the meantime. An explanation of the results and figures discussed in this short format review can be found at the bottom of the page.
Key Specs and Features
- 23.8″ IPS panel with 1920 x 1080 resolution
- Extended colour gamut backlight with 100% sRGB and 85% DCI-P3 coverage
- Factory calibrated sRGB and Rec.709 modes
- ComfortView Plus low blue light filter
- 5ms G2G response time (fast mode) and 60Hz refresh rate only
- 4-side borderless panel
- Built in KVM and RJ45 along with USB type-C hub (inc DP Alt mode and 90W power delivery) – HE model only
- Fully adjustable stand
| Check pricing and availability in your region |
U2422HE | |
| U2422H |
| TFTCentral is a participant in the Amazon Services LLC Associates Programme, an affiliate advertising programme designed to provide a means for sites to earn advertising fees by advertising and linking to Amazon.com, Amazon.co.uk, Amazon.de, Amazon.ca and other Amazon stores worldwide. We also participate in a similar scheme for Overclockers.co.uk. |
Introduction
The U2422HE is the latest 23.8″ sized (~24″ class) model in the popular UltraSharp line-up from Dell, well known for their solid all-round performance and impressive feature set over the years for general office users. There are actually two very similar new 23.8″ models in the latest refresh, the U2422H and the U2422HE, with the only difference being that the HE model includes a USB type-C hub (including DP Alt mode and 90W power delivery), and some additional features like KVM capability and RJ45 connection. You can find full specs on Dell’s website for both. This is aimed at general and office users who only have space for a smaller sized screen and don’t mind the fairly low (by today’s standards) 1080p resolution. It does have a good range of features an attractive minimalist design, as well as a wide range of connections, especially on the HE model. We have also recently reviewed the larger 27″ U2722D/DE models if you are after something similar, but in a larger screen size and with a higher resolution.
The U2422H/HE displays use a 23.8″ sized IPS technology panel and offers a 1920 x 1080 (Full HD) resolution. There is a modestly extended colour gamut promoted which offers a 85% DCI-P3 coverage, along with 100% of the sRGB space. This is lower than the 27″ U2722 models which have a wider gamut with 95% DCI-P3 quoted. The screen also comes factory calibrated, with a report provided in the box confirming it has been calibrated in the sRGB and Rec.709 preset modes. In other specs there are typical IPS performance metrics like a 5ms G2G response time (in ‘fast’ mode), 1000:1 contrast ratio, modest 250 cd/m2 brightness, 178/178 viewing angles and an 16.7m (8-bit) colour depth.
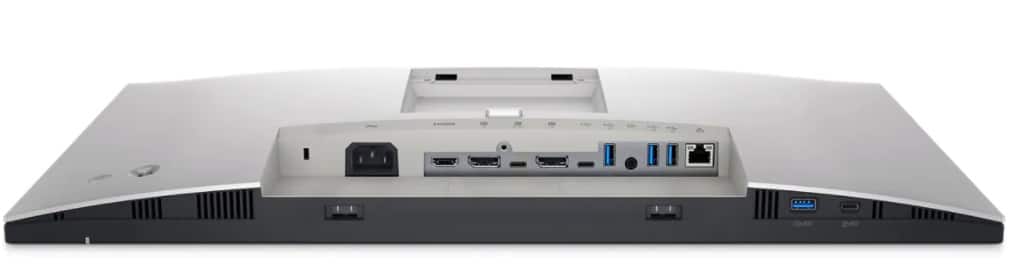
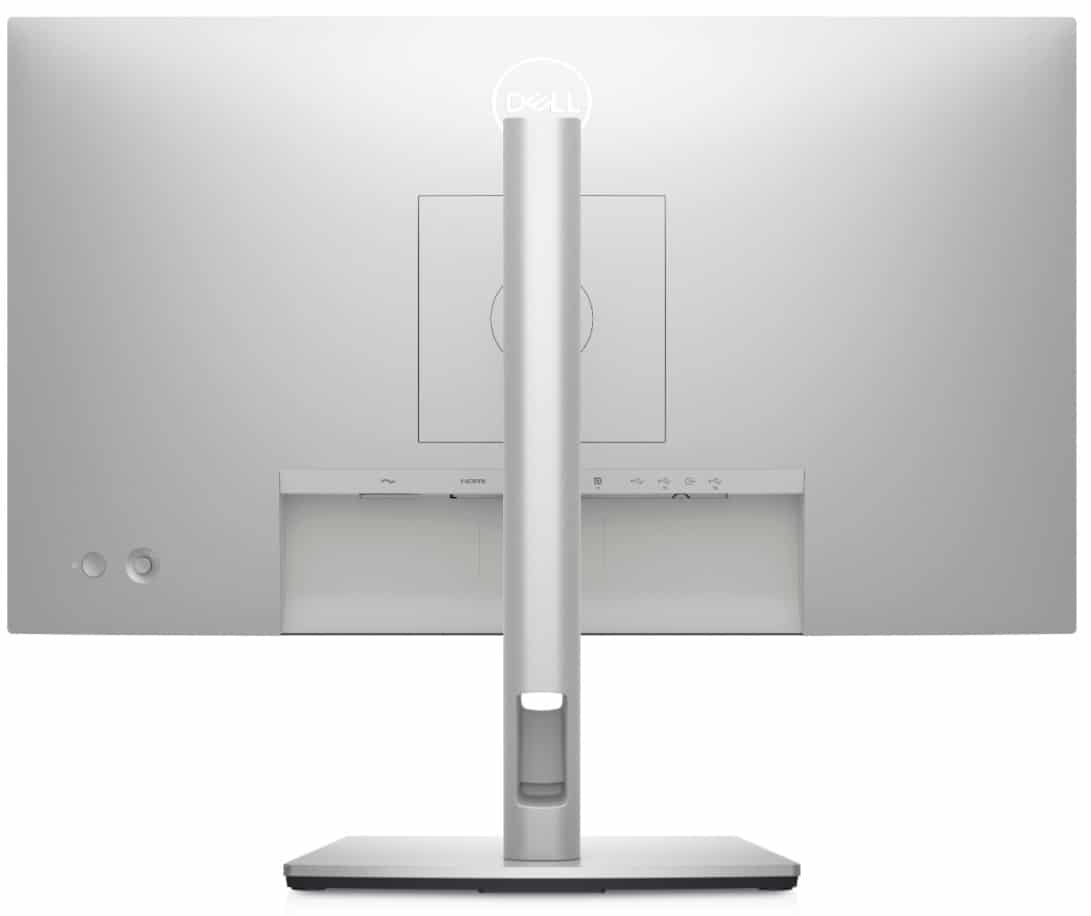
For video connectivity there are 1x DisplayPort 1.4 and 1x HDMI 1.4 on both models, while the HE also offers 1x USB type-C (including DP Alt mode, 90W power delivery, 10Gbps data transfer). There is also a DisplayPort Daisy Chaining output and then several USB data ports on both versions. This includes 1x USB type-C data only port on the back of the screen (10Gbps), and another on the bottom left hand area of the screen for quick access (10Gbps + 15W power delivery). There are also 3x USB 3.2 ports (10Gbps speed) on the back (only 2x on the H model) and an additional quick access port on the bottom left hand area which includes fast power charging. Finally on the back of the screen there is an RJ45 Ethernet connection (HE model only) and an audio output. The RJ45 includes MAC address pass-through, PXE Boot, and Wake-on-LAN conveniently built in.
We liked the quick access additional USB connections on the bottom edge, that was handy to see offered. The flexible stand makes access to all the other ports easy as well. Cables are provided in the box for DisplayPort , USB-A to USB-C and USB-C to USB-C.
KVM, USB type-C and Low Blue Light Panel
On the HE model the the built-in ‘Auto KVM’ feature detects the second connected PC and seamlessly switches controls over. You can use KVM (keyboard, video and mouse) to control both PCs with a single keyboard and mouse. Note there is no PiP or PbP support on these smaller 24″ models like there is on the 27″ U2722 models as the screen is too small really to make that useful. Another potentially useful feature for Dell laptop owners is the power on behaviour of the screen. You can simply press the monitor power button and the power sync feature seamlessly starts your monitor and connected Dell PC, even when the laptop lid is closed. This is only compatible with select Dell PCs and laptops though.
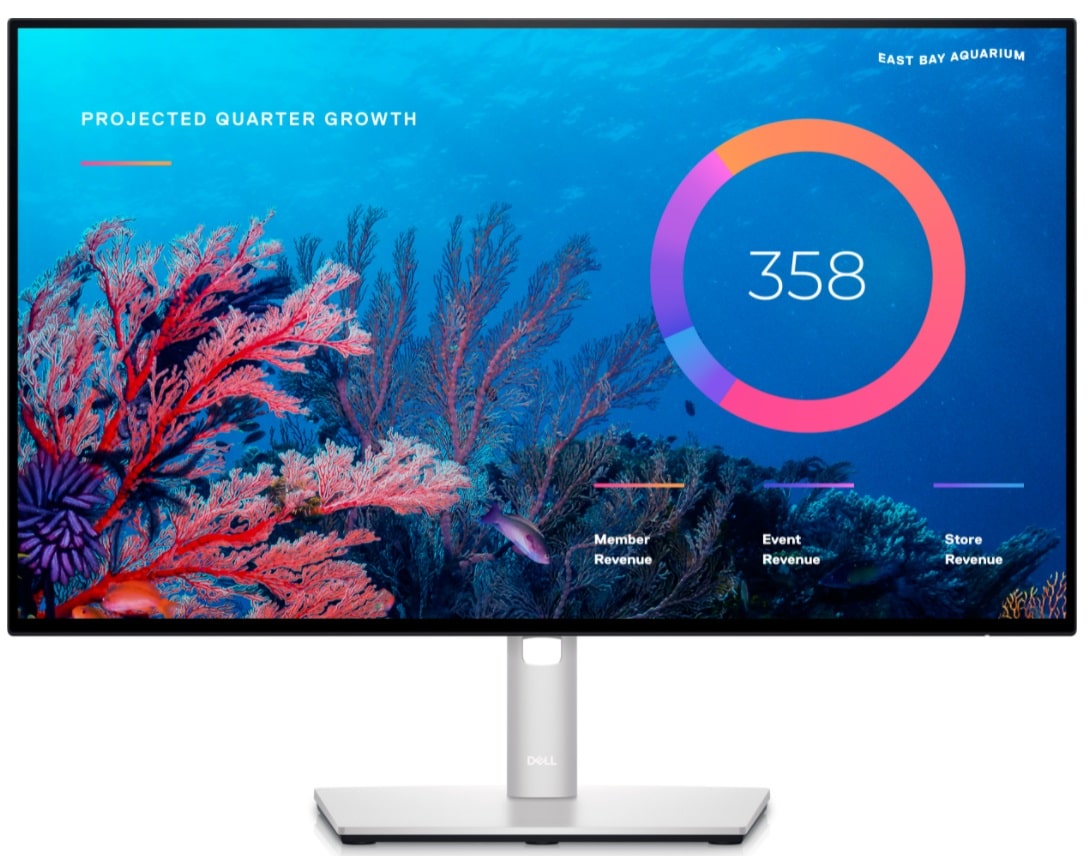
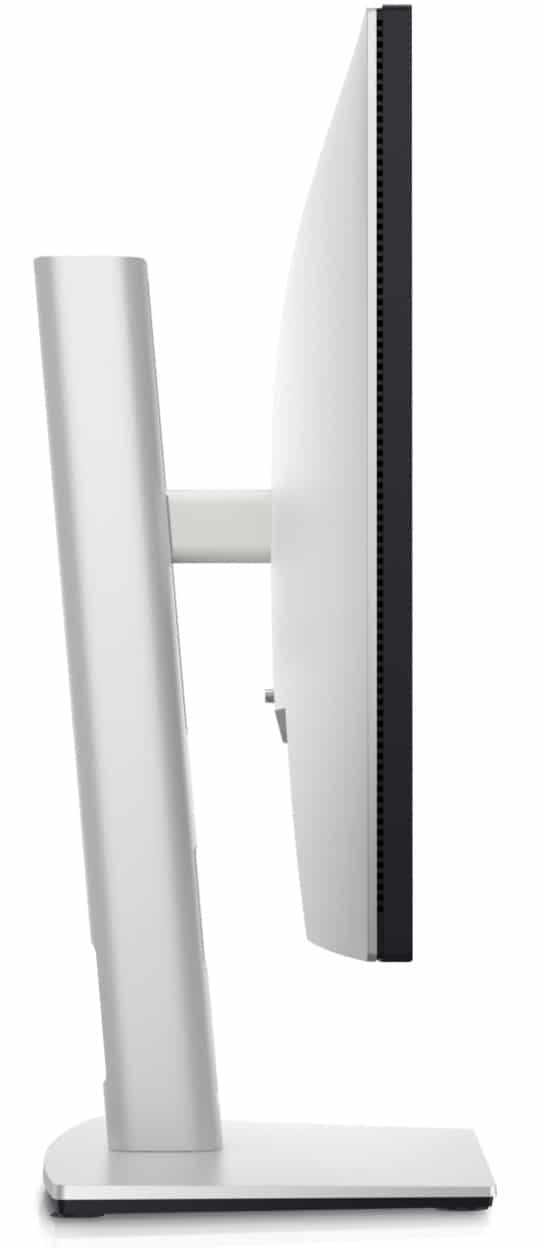
There is a 4-side borderless design on the U2422H/HE with a thin 1mm black plastic edge, and an additional thin ~4.5mm black panel border (~8mm on bottom edge) before the image starts on all sides. This would make it a decent option for multi-screen set ups. The stand is very versatile and flexible on this screen and has an attractive but simple silver coloured design. It provides a pretty sturdy base with very little screen wobble when re-positioning it or altering the OSD. The stand adjustments were all easy to move around and provided a very wide range of positions. We liked the overall aesthetics of the display for an office environment.
The OSD is controlled through a single joystick on the back right hand side of the screen. If we are being picky, we felt this controller was perhaps a little too far away from the edge of the screen so it wasn’t always intuitive and easy to find where it was as you reach behind the back of screen. The controller is easy to use though once you do find it, and there’s a reasonable range of options to play with in the OSD. The software is quite slow and laggy though which is frustrating. A lot of the options do relate to the inputs, and settings like USB behaviour and customisation of names and quick access options. There are lots of preset modes and colour modes available but no gamma settings. Navigation is quick and easy though thanks to the joystick control.
The IPS technology panel provides solid all-round performance for general and office use. There is a stable image with very wide viewing angles and the picture quality is very good thanks to the 1920 x 1080 resolution on a screen of this size. This offers a comfortable and sharp font size on a 23.8″ sized screen. The resolution is certainly limiting relative to all the larger, high res options on the market today. Being used to larger screens and resolutions it was certainly a struggle to go back to using a small 1080p screen again. The jump up to 27″ 1440p should not be under-estimated. If you’re used to a smaller screen and lower res, or only have space for something of this size then of course it’s fine. But we would recommend considering the upgrade to a 27″ 1440p model if you can, you won’t regret it.

There is a focus from this screen on low blue light capabilities, but not in the usual way you see from many displays. There are no specific low blue light modes or settings from the screen which are usually just ways to make the image warmer and reduce the peak of the blue light as a result. The problem with that method is that of course the overall image is affected, and you get a warmer image as a result. Instead the focus is on providing a backlight where the blue light spectral peak has been shifted to a reportedly less harmful frequency, away 415 – 455nm area. We are in the process of looking in to this situation in more detail for a future article on blue light, but if you want more information then Eyesafe provide some background thinking on why they believe this is important on their website.
Note that the U2422 doesn’t seem to have been certified under the Eyesafe program, but there is talk about the ‘ComfortView Plus’ low blue light capabilities on the Dell product page. On the U2422 the blue light peak was measured at 454 nW/nm which is on the edge of the claimed problem area but avoids the lower 415 – 453nm range nicely, without impacting the colour temperature or any other aspects of the image.
Default Setup and Colours
While the U2422 does carry a factory calibration, that is applicable only for the sRGB and Rec.709 preset modes, and the screen comes out of the box in the ‘standard’ preset mode. We tested this for completeness to show the default performance as normal.

Default setup in the ‘standard’ mode was poor. The gamma was a big problem, being way off the 2.2 curve and being especially high in lighter shades. The average we measured across all shades was 2.37, with it ranging up to 2.45 in lighter shades. This results in washed out bright grey details in practice and reduced contrast, and that’s not good news. The RGB balance was also off more so in lighter grey shades. We had an average colour temp across all grey shades of 6257k which was not too bad (4% out) and just a little too warm. The white point was also 5% too warm at 6183k. In practice there was nothing too obvious with the colour temperature of the screen in this mode. This all resulted in pretty moderate greyscale accuracy, with an average dE of 2.4 and max of 3.3 recorded. Contrast ratio was decent, and close to the 1000:1 spec, measured at 945:1 here though. The default brightness, set at 75%, was also not too bad but this is because the screen has a fairly modest 250 nits max brightness anyway, resulting in a 165 nits luminance out of the box.
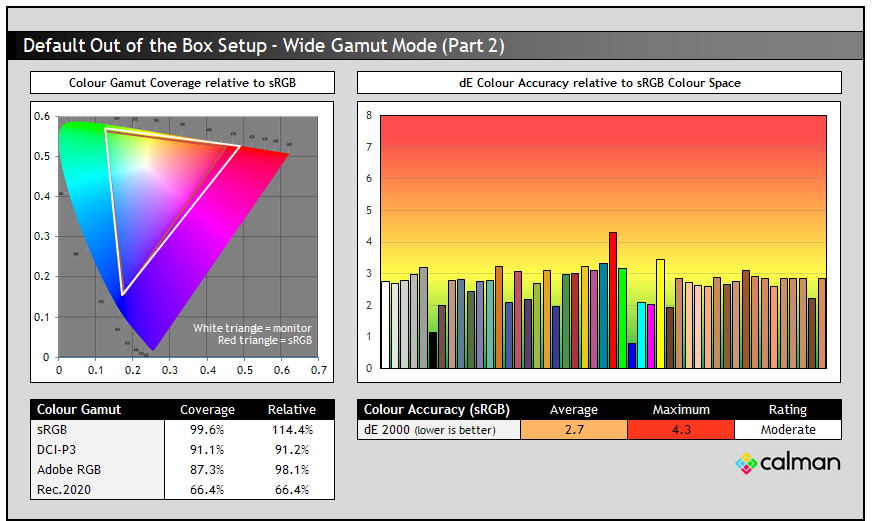
The default ‘standard’ mode carries the screen’s full native colour gamut and we measured a small extension beyond the sRGB space, with 114% relative coverage recorded. You can see from the CIE diagram on the left that the triangle for the screen extends a bit beyond the sRGB triangle, mostly in red shades. This leads to some oversaturation of reds, but it’s not too severe. It’s debatable whether you can call this a “wide gamut” screen, we prefer in this case “extended gamut”. We measured 91.1% DCI-P3 coverage which was a bit beyond the spec.
If anything, this extended gamut can create more problems than it’s worth though. This extended colour space isn’t capable of covering other common colour spaces like Adobe RGB (87.3% coverage) properly, and so it’s hard to make much use of it for general uses or any colour critical work. It will give you a bit of a boost in colour vividness for multimedia and gaming we suppose, and some people like that look. Some people are also not that fussed with the accuracy or with specifically working closely with sRGB/SDR content, so it might not matter to an average user. But given the fact the colour space is only extended a bit beyond sRGB, we would probably have been just as happy to see a standard sRGB-only gamut backlight/panel used here to keep life simple. Thankfully Dell do provide a decent factory calibrated sRGB emulation mode too, which we will test in a moment.
With the extended gamut of the backlight in play here in the ‘standard’ mode, we saw moderate colour accuracy for sRGB colours which is to be expected given the use of an extended gamut backlight. If you want to work more accurately with standard sRGB gamut / SDR content then you will need a way to reduce this colour space either through the provided sRGB emulation mode (tested in a moment) or through calibration and profiling. This is typical of all wider gamut screens keep in mind.
sRGB Emulation Mode
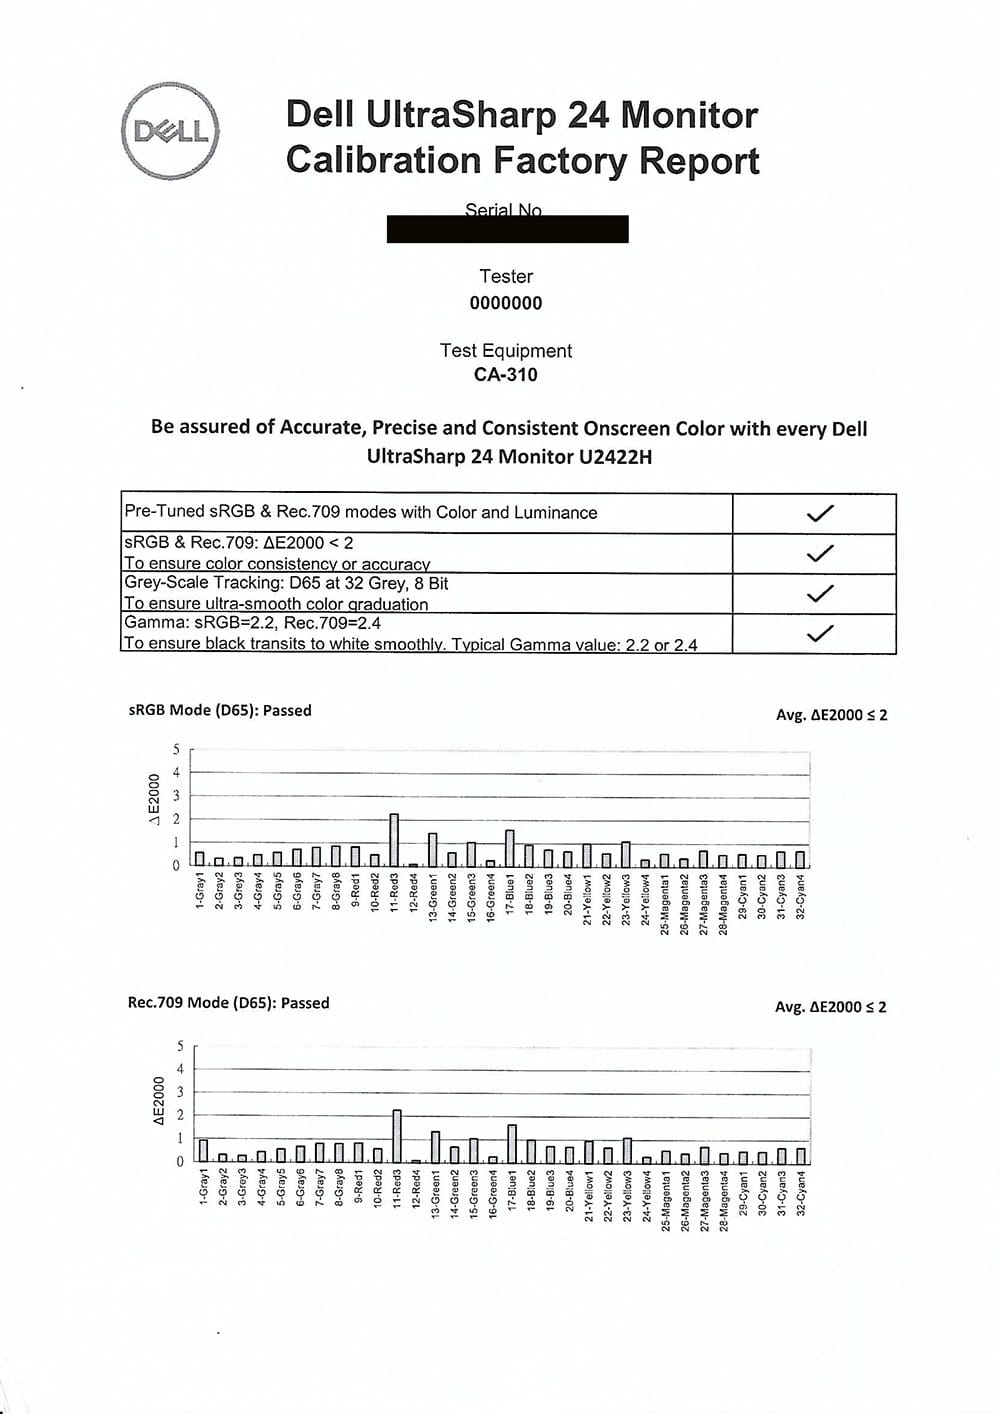
The sRGB emulation mode is available through the OSD in the ‘color space > sRGB’ preset mode. This carries a factory calibration and a report is provided in the box specific to your unit. A copy of the report provided with our sample is included below. You can see that according to this report the sRGB mode has been calibrated to 2.2 gamma, a 6500k greyscale colour temp and for colour accuracy of dE2000 < 2.

We measured the sRGB mode as well:

The default brightness was now a closer to our target at 115 cd/m2, and thankfully you do have control over the brightness control still within the OSD so you can customise this to your liking if needed. We were glad to see that available still. The gamma curve looked to be delivering something closer to sRGB gamma as opposed to the specified 2.2 on the factory calibration report, which we had also seen on the 27″ U2722 models. Below we have re-measured relative to the sRGB gamma curve where you can see this is a closer match. Fair enough, but odd that Dell would specifically list 2.2 on the calibration report when that isn’t what has been used seemingly.
The greyscale colour temp was good at 6388k, being only 2% out from the target. White point was basically spot on at 6467k (small 1% deviance), and you can see a much better balance of RGB channels in the graph above which was great news. The resulting greyscale was far more accurate than the default ‘standard’ preset mode, with an average dE of 1.1 now which was very good. The contrast ratio remained very close to the spec, measured at 965:1 here.


The colour gamut had been nicely reduced now and we had a 99.5% sRGB coverage which was very good. This removed nearly all the over-coverage from the extended gamut backlight, especially in the red shades which were over-saturated before. The colour accuracy of sRGB shades was now very good thanks to the smaller emulated colour space and the factory calibration, and we had a dE average of only 0.9 which was excellent. This sRGB factory calibrated mode was very good overall, the only oddity being the gamma set to sRGB even though the provided report said it was set to 2.2.
Calibration


Calibration and profiling can of course produce excellent results if you have a suitable calibration device and appropriate software. Our results are included above. It seemed tricky to fully correct the gamma curve unfortunately, but this was still a solid result all round. You can see the recommended OSD settings above, and then further corrections are taken care of at the profile level. If you want you can also try our calibrated ICC profile out.
Gaming
The Dell U2422H/HE is not aimed at gaming at all, and in today’s market of high refresh rates, VRR, blur reduction modes and HDR it can’t compete at all. It has a standard 60Hz refresh rate only for a start which is very limiting for gaming nowadays. It is probably still ok for slower some paced strategy and RPG games, but certainly not for any serious fast-paced FPS or racing games. The motion clarity of 60Hz is the main limiting factor here with far higher levels of perceived motion blur than you will see on decent high refresh rate 120Hz+ screens.
There is also no Variable Refresh Rate (VRR) support on this screen so it cannot support FreeSync or G-sync at all. Not that it would add much as you would hopefully be able to power the low 1080p @ 60Hz requirements nicely if you did want to do a bit of gaming without the frame rates fluctuating much. Still it might have been useful to include adaptive sync to avoid the need to use Vsync at all. As we said, its not really suitable for fast paced FPS-type games anyway so the absence of VRR probably isn’t a major issue.

There are only two overdrive settings available in the menu via the ‘Response Time’ option. These are for ‘normal’ (8ms G2G spec from Dell) and ‘Fast’ (5ms G2G from Dell) modes. We tested both of these and it was immediately obvious that the ‘Fast’ mode was like many other aggressive overdrive settings in the market and not usable in practice. The ‘normal’ mode looked far better.
Normal mode delivered pretty slow response times though, with a 9.3ms G2G average but thankfully reasonably low levels of overshoot that were not visible in practice. Given the screen is only 60Hz, while these response times were slow for sure relative to modern gaming screens, they were still fast enough to keep up with the low 60fps frame rate. There’s no real problems with the response times here for what is an office and general use monitor. They can probably handle some light gaming if you wanted to, and are fine for multimedia and certainly for static office-type content of course.
The ‘Fast’ mode did boost the response times down to 6.6ms G2G but at the cost of some very high levels of overshoot that were distracting and problematic in practice. There were noticeable pale halos on moving content, and this mode should be avoided.
We measured a very low input lag though, with a total 5ms display lag, and only about ~0.35ms of that coming from signal processing lag. This is a lot better than the larger U2722DE model we recently tested which had ~8.93ms of signal lag. One possible reason for this is that the 27″ model we tested was the E model, with added USB type-C/KVM etc, while the 24″ model tested here is the standard model without those features. The scalers and internal electronics will likely be different between the E and non-E models, which may explain why the non-E has a lower input lag here. Or maybe the 24″ just has a lower lag generally than the 27″ model, it is hard to know without being able to test all four versions. Regardless, neither screen are really aimed at gaming or that suitable for gaming due to their low refresh rate and mediocre response times anyway so it probably doesn’t matter either way.
Conclusion

Our feelings about the U2422 are quite similar to the U2722 overall in terms of performance, target market and features. We did find it hard to go back to such a small screen and low resolution, when there are so many larger screens available nowadays. We will assume that you are looking at this screen because you only have a small space for a display, or you specifically want or need a small 1080p monitor. For those undecided, we would definitely encourage looking at larger 27″ 1440p models including the equivalent U2722 models if you can as the upgrade in size and resolution is excellent.
Anyway, size and resolution aside we were pleased with the range of features the U2422 provides for office and general users. This was particularly applicable for the HE model where there’s the included USB type-C, KVM and RJ45 features. You can save around £60 with the H model if you don’t need these features though. The design was sleek and attractive and we liked the 4-side borderless design and minimalist, but very functional, stand. The use of an IPS panel is positive, and provides solid all round image quality with wide viewing angles and a stable image. Contrast ratio was good for an IPS panel too and the use of a flicker free backlight, and some efforts to reduce the blue light were welcome.
Default setup in the standard mode was poor, with gamma being a key problem. We found the extended gamut a bit difficult to value. It was too wide to make sRGB/SDR content accurate, but at the same time not wide enough to be useful for Adobe RGB content or work in any of the wider colour spaces. Thankfully there is a decent factory calibration and reliable sRGB mode which is likely to be preferable to many users unless you have a calibration tool as well. Dell had done a nice job there. Gaming we should probably ignore as that’s in no way a target usage and if you’re wanting something for a fair bit of gaming as well as office/general use then there are better choices around.
| Check pricing and availability in your region |
| U2422HE | |
| U2422H |
The Dell U2422HE as reviewed here, and with USB type-C added is available in most European regions from Amazon. The U2422H without USB-C is also available in most regions from Amazon if you want to check out that slightly lower cost model too.

If you enjoy our work and want to say thanks, donations to the site are very welcome. If you would like to get early access to future reviews please consider becoming a TFT Central supporter.
Testing and Results Explained
We will test and measure a range of aspects of these displays. By way of a brief explanation of what some of the results mean we thought we’d include this short guide:
Results Round-up section
- Maximum and minimum brightness – the full range in which the backlight can be adjusted using the monitor’s brightness control. At the upper end this can be important for gaming from a further distance, especially in brighter rooms and the daytime. At the lower end this can be important if you are using the screen up close for more general office-type work, especially in darker room conditions or at night.
- Recommended brightness setting – to achieve approx 120 cd/m2, which is the recommended luminance for LCD monitors in normal lighting conditions
- Flicker free – independently tested and confirmed whether the screen is flicker free or not and without PWM at all brightness settings
Setup and Measurements Section

Performance is measured and evaluated with a high degree of accuracy using a range of testing devices and software. The results are carefully selected to provide the most useful and relevant information that can help evaluate the display while filtering out the wide range of information and figures that will be unnecessary. For measurement we use a UPRtek MK550T spectroradiometer which is particularly good for colour gamut and spectrum measurements. We also use an X-rite i1 Pro 2 Spectrophotometer and a X-rite i1 Display Pro Plus for measurements in various ways. Various software packages are incorporated including Portrait Displays Calman Ultimate package. We measure the screen at default settings (with all ICC profiles deactivated and factory settings used), and any other modes that are of interest such as sRGB emulation presets. We then calibrate and profile the screen.
The results presented can be interpreted as follows:
- Greyscale dE – this graph tracks the accuracy of each greyscale shade measured from 0 (black) to 100 (white). The accuracy of each grey shade will be impacted by the colour temperature and gamma of the display. The lower the dE the better with differences of <1 being imperceptible (marked by the green line on the graph), and differences between 1 and 3 being small (below the yellow line). Anything over dE 3 needs correcting and causes more obvious differences in appearance relative to what should be shown. In the table beneath the graph we provide the average dE across all grey shades, as well as the white point dE (important when considering using the screen for lots of white background and office content), and the max greyscale dE as well.
- RGB Balance and colour temperature – the RGB balance graph shows the relative balance between red, green and blue primaries at each grey shade, from 0 (black) to 100 (white). Ideally all 3 lines should be flat at the 100% level which would represent a balanced 6500k average colour temperature. This is the target colour temperature for desktop monitors and the temperature of daylight. Where the lines deviate from this 100% flat level the image may become too warm or cool. Beneath this RGB balance graph we provide the average correlated colour temperature for all grey shades measured, along with its deviance from the 6500k target. We also provide the white point colour temperature and its deviance from 6500k, as this is particularly important when viewing lots of white background and office content.
- Gamma – we aim for 2.2 gamma which is the default for computer monitors. A graph is provided tracking the 2.2 gamma across different grey shades and ideally the grey line representing the monitor measurements should be horizontal and flat at the 2.2 level. Depending on where the gamma is too low or too high, it can have an impact on the image in certain ways. You can see our gamma explanation graph to help understand that more. Beneath the gamma graph we include the average overall gamma achieved along with the average for dark shades (0 – 50) and for lighter shades (50 – 100).
- Luminance, black depth and Contrast ratio – measuring the brightness, black depth and resulting contrast ratio of the mode being tested, whether that is at default settings or later after calibration and profiling.
- Gamut coverage – we provide measurements of the screens colour gamut relative to various reference spaces including sRGB, DCI-P3, Adobe RGB and Rec.2020. Coverage is shown in absolute numbers as well as relative, which helps identify where the coverage extends beyond a given reference space. A CIE-1976 chromaticity diagram (which provides improved accuracy compared with older CIE-1931 methods) is included which provides a visual representation of the monitors colour gamut as compared with sRGB, and if appropriate also relative to a wide gamut reference space such as DCI-P3.
- dE colour accuracy – a wide range of colours are tested and the colour accuracy dE measured. We compare these produced colours to the sRGB reference space, and if applicable when measuring a wide gamut screen we also provide the accuracy relative to a specific wide gamut reference such as DCI-P3. An average dE and maximum dE is provided along with an overall screen rating. The lower the dE the better with differences of <1 being imperceptible (marked by the green area on the graph), and differences between 1 and 3 being small (yellow areas). Anything over dE 3 needs correcting and causes more obvious differences in appearance relative to what should be shown
Gaming Performance Section
We first of all test the screen visually in each of its available overdrive modes and at a range of refresh rates from 60Hz, all the way up to the maximum supported. This allows us to identify what appears to be optimal setting for each refresh rate and we can then measure the response times across a range of grey to grey (G2G) transitions using our oscilloscope setup, including correcting for gamma to improve accuracy as we described in our detailed article. This helps provide measurements for response times and overshoot that are even more representative of what you see in real use. In the summary section the small table included shows the average G2G response time measured at several refresh rates (where supported), along with the optimal overdrive setting we found. The overshoot level is then also rated in the table at each refresh rate. We will explain in the commentary if there are any considerations when using variable refresh rates (VRR) as well as talking about the overall performance our findings during all these tests.
At the maximum refresh rate of the screen we will also include our familiar more detailed response time measurements, which includes a wider range of transition measurements as well as some analysis of things like the refresh rate compliance. This identifies how many of the measured pixel transitions were fast enough to keep up with the frame rate of the screen. Ideally you’d want pixel response times to be consistently and reliably shorter than this refresh rate cycle, otherwise if they are slower it can lead to additional smearing and blurring on moving content.
In this section we will also include the measured input lag and look at any blur reduction backlight feature if it’s available. The commentary in each section will provide more information if a blur reduction mode is available and how it operates.
We may earn a commission if you purchase from our affiliate links in this article- TFTCentral is a participant in the Amazon Services LLC Associates Programme, an affiliate advertising programme designed to provide a means for sites to earn advertising fees by advertising and linking to Amazon.com, Amazon.co.uk, Amazon.de, Amazon.ca and other Amazon stores worldwide. We also participate in a similar scheme for Overclockers.co.uk, Newegg, Bestbuy , B&H and some manufacturers.