3D Displays…Without The Glasses! Acer’s SpatialLabs Technology, Software and Displays Tested
Disclaimer: this article includes sponsored promotion; but all content, testing, opinions and commentary are our own
Introduction
Remember many years back when 3D displays were all the rage? it seemed like every new monitor and TV released supported 3D gaming and movies, and cinemas were regularly showing 3D movies. In the PC space NVIDIA and AMD both had their own approaches to enabling 3D content for the user, as did different display manufacturers. 3D has fallen out of fashion now in the last 5 years or so, and we can’t remember the last time a desktop monitor included this capability really. Same in the TV space, it just isn’t featured any more. It’s attempting a bit of a come back in the cinema, with big titles like ‘Avatar 2: The Way of Water’ supporting 3D and some people still enjoy the immersive visual experience. Why did it die out? Well, there’s probably various reasons, but one thing that all these technologies had in common was that you had to wear some kind of glasses to allow the 3D to work. We had active shutter glasses, and some passive polarizer glasses, but you always had to wear something and people don’t normally like to do this. It wasn’t really very comfortable or convenient and only on special occasions were people seemingly willing to put on 3D glasses and enjoy 3D content, and the home entertainment space has all but dropped this technology for now.
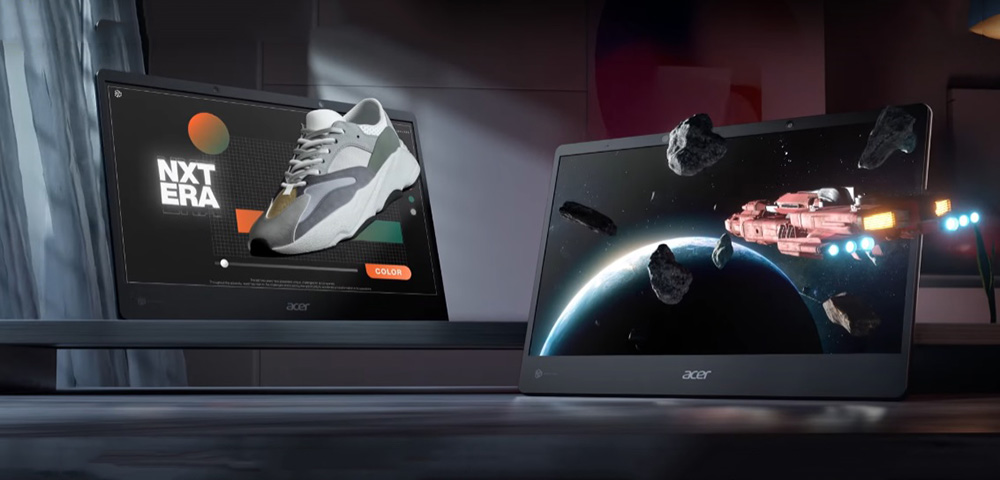
This brings us on to a newer innovation, and a chance to look at a new product line-up from Acer. Their “SpatialLabs” product range is all about delivering an immersive 3D experience, whether that’s for gaming, videos or professional applications, design work and product demos. Best of all, this is without the need for any 3D glasses!
We have the two SpatialLabs external monitor displays with us to test for ourselves along with their accompanying software suites which are really the driver behind the SpatialLabs products. Before we get in to that, let’s give a bit of background about what SpatialLabs is.
SpatialLabs Technology – How it Works
SpatialLabs is a full ecosystem designed to deliver 3D content to the user without the need for any 3D glasses. It consists of advanced optical, display, and real-time rendering solutions. It features the combination of an eye-tracking solution, a stereoscopic 3D display, real-time rendering of content and AI technologies. All of this adds up to the 3D experience you get from games, video or anything else. We will explain how it works a bit more.

- Eye tracking – There is a set of stereo cameras built in to the display, consisting of two image sensors to track the position and movement of your eye and head. This is important for delivering the image on the…
- 3D stereoscopic display – this is built almost like two panels on the same display, allowing a different image to be displayed on each and presented to each eye. An optical lens is optically bonded on top of the display; when the set of images for each eye is created, and the eye movement is tracked, the image set will be projected through the lens then refracted to where the eyes are. This makes it comfortable and easy to use, allowing you to change your viewing position during use as well. The module can be switched between 2D and Stereoscopic 3D modes and all of this allows 3D presentation without the need for any glasses
- Artificial Intelligence technology to upscale 2D content to 3D where needed – ideally the content you would be viewing would be mastered in 3D in the first place, allowing for optimal appearance and experience. However, the SpatialLabs software can also do a nice job of upscaling 2D content to 3D, and the AI allows fully automatic conversion of 2D content such as video or images into stereo 3D in real-time. It does this by combining several machine learning models which perform depth map estimation and stereo image generation, thus allowing users to experience their existing 2D content in stereoscopic 3D. It checks what should be foreground and background and produces the 3D image accordingly.
- Real-time rendering – Utilizing real-time rendering technologies, viewers are able to rotate, move and drag 3D models in certain applications, and the image is rendered real-time following the command. Also, viewers are able to look around the object presented from side to side.
- Drivers and Shaders – for the content itself, next generation shader and driver technologies enable games to be rendered in true-to-life depth and dimensions, and allow gamers to experience games in 3D.
A Wide Range of Use Cases
The SpatialLabs 3D capability is not just aimed at gaming and movies like much of the older 3D display technology was geared towards.
- It can help designers accelerate their ideation to final design process by giving them the ability to simultaneously tweak and review their designs in 3D. For instance architects and property developers can demo their designs in full 3D for a much better engagement and experience of their concepts.
- It can let retailers and marketers and promoters engage in more meaningful ways with their customers via 3D presentations of their products and services. For instance a kitchen showroom could demo how your new kitchen would look in 3D, giving a more realistic and engaging experience for the consumer. Or a car showroom could show their car models and features in 3D as well.
- Educators and communication professionals can get their point across in more tangible ways than ever before possible, and gamers get to experience 3D gaming the way the developers intended for them to be experienced.

Robust support for Unreal Engine allows you to enhance your interactive-storytelling and entertainment in to the world of 3D. Developers have access to detailed documentation and support portals so they can fast-track their existing projects directly into 3D experiences with integrated interactions like hand gesture recognition from companies such as Ultraleap. This helps accelerate a developers’ ability to make an impact in commercial showrooms, educational centers, medical arenas, and wherever your creations are displayed.

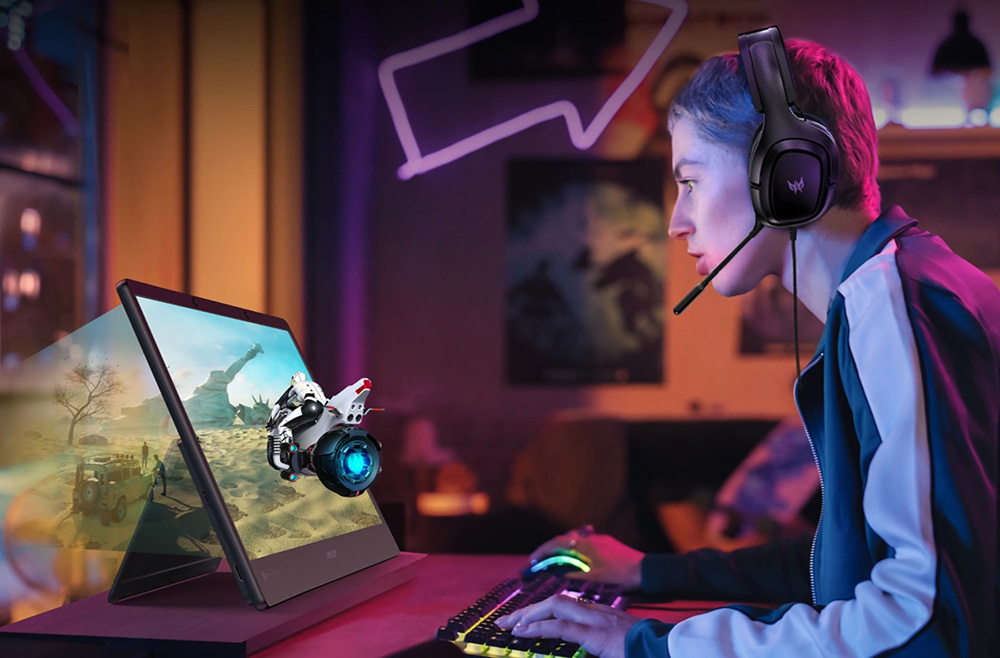
- Gamers are of course included, where users often look to enhance visuals, immersion and enjoyment. 3D presentation, all without the need for 3D glasses, offers an impressive option in this space too.
- Fans of movies and other multimedia can enjoy their favourite content in 3D as well, comfortably and easily.
The SpatialLabs Software Suite
SpatialLabs TrueGame

For gamers, Acer promote their SpatialLabs “TrueGame” product range and capability. This brings 3D technology to games, helping to create more immersive and visually impressive gaming worlds and landscapes for you to explore and enjoy. TrueGame is built around the company’s proprietary stereoization technology that leverages the strengths of their industry-leading stereoscopic 3D displays, and then applies 3D profiles to elevate games into a more realistic and immersive domain.
SpatialLabs TrueGame 3D gaming falls in to two tiers:
- 3D+ = an added depth buffer from the game engine allows 3D rendering and upscaling of standard 2D gaming titles. It’s a step beyond the standard 2D >3D upscaling as there’s an added element in the game content that the software can use.
- 3D Ultra = true geometric 3D objects are made possible as the game is designed and mastered specifically with 3D capabilities in mind, delivering an even more impressive experience with visible perspective that extend the gaming world and 3D effect.

Activation of 3D gaming is also very simple via the provided SpatialLabs Experience Centre software. You simply launch your favorite game via TrueGame and SpatialLabs will automatically apply its 3D profile so you can dive into the stereo 3D gameplay. The game will tell you whether 3D+ or 3D Ultra are supported as well.

During gaming a feature called “3D Sense” lets you adjust the 3D intensity perfectly to your liking. The experiences is further elevated with automatic 3D focus adjustment. There’s a wide range of gaming titles that support SpatialLabs 3D gaming already, and Acer provide a handy list on their website here. Their gaming community is also available to help you configure gaming titles and get help and advice. TrueGame also brings 3D enjoyment to a host of classics and modern titles like Quake and Doom, so you can experience your favourite titles and worlds in true 3D again. Side note: as a rough guide, the system requirements for running 3D games are usually comparable to those needed to play the game at 4K resolution in 2D, so keep that in mind when thinking about your system.
SpatialLabs Model Viewer

This is the software you’d use to view, edit and present 3D models, and it is useful for designers to help move their projects from ideation to final design. The software supports all major 3D file formats to make usage simple and easy. Acer have also added integration with Datasmith, so creators can bring entire pre-constructed scenes and complex assets from a variety of industry-standard applications for viewing in Stereoscopic 3D – without the need for cumbersome conversion routines. SpatialLabs add-ons are available for many different 3D software packages such as Blender, Cura and Rhinoceros; adding a simple shortcut in to those pieces of software to preview your work in SpatialLabs Model Viewer automatically.

Sketchfab integration brings the world’s largest catalog of 3D content into your 3D viewing domain. Designers can search, explore, download the selected free models for glasses-free 3D viewing or and integration into their projects.

Models can be viewed from all kinds of angles and naturally interact with the movement of your head as you move from side to side thanks to the eye-tracking capability of the display. You can also push and pull the model in and out of the screen. SpatialLabs Model Viewer also supports animated models and the ability to dynamically manipulate a myriad of factors such as material, lighting type and direction, and surrounding environment.
SpatialLabs Go

This software transforms some of your other common content into impressive simulated 3D – whether it’s a photo, video, or video call with friends. It uses proprietary technology and sophisticated AI to effectively upscale and convert 2D content, including things like YouTube videos, casual web games or loads of other apps like photo browsing or even web surfing. You also keep control over the depth of perceived 3D effect.
The software allows you to do things like edit your models or scenes on your normal display in 2D, while simultaneously viewing them in 3D on your SpatialLabs display. The platform also supports instantly transforming side-by-side 3D content from online media platforms such as YouTube into glasses-free visualization on a SpatialLabs display.
SpatialLabs Player

Like the name says, you can use this app as a native media player to present side-by-side designed video in stereoscopic 3D, or to also upscale 2D content. You can easily switch between 2D and 3D modes as well, and this is useful for movies and videos especially.
SpatialLabs Monitors

We will have a look at laptops in a moment, but in terms of independent monitors, Acer currently have two SpatialLabs options available – the Acer SpatialLabs View, and the View Pro. Both are built around the same underlying panel, but the design, features and included software packages vary between the two models. The design is slim and sleek, and both even include a built-in 56Wh Li-ion battery for portability of the display, offering around 5 hours of battery life. So if you want to pick it up to demo something, or move it around your home, office or workspace, that’s nice and easy. Both displays weigh only 1.475 Kg so are pretty light to move around although keep in mind you still have to have a video cable connected to input a source, they aren’t self contained units like a laptop or tablet.
The built in extendable metal stand provides a 90 – 115 degree angle adjustment too, but you will always need to either be holding the screen, or have it sat on your desk – there’s no height adjustment or anything because of it’s design keep in mind. The View Pro model can also support VESA mounting though if you want a more permanent position, but without it sitting on your desktop.
15.6″ screen size
Software varies by package
Built in battery for portability
Because this is new cutting edge technology and there’s always a cost factor to consider with new tech like this, there’s currently only a small 15.6″ screen size available, but if the tech proves popular then in the future we could well see larger, and more typical sized desktop monitors developed. For now these are not really designed or suitable to replace your main desktop monitor, they’re too small for that. They’re more suitable as a supplementary display for 3D content, in a wide range of supported use cases. Having said that, they could also make an interesting external display alternative to laptop panels given their similar size. For PC and Mac users it’s likely that you’d use these as a secondary small display, specifically for working with or viewing 3D content.
From our usage with both models the screens feel well built, sturdy and looks smart, with fairly thin borders around the sides (6mm) and a little thicker at the top (12mm) where the eye-tracking cameras are housed.
Panel and Resolution
The 15.6″ display has a 3840 x 2160 “4K” resolution IPS technology panel and a 16:9 aspect ratio. Given the small screen size you need to use operating system scaling, but something like 250% Windows scaling gives you a comfortable text size, similar to a typical 27″ 1440p monitor. It gives you a desktop area equivalent to 1536 x 864 at 250% scaling, but with a a very high pixel density (282 PPI) for a super-sharp and crisp image. With the dual layer panel, each eye receives a 1920 x 2160 resolution in effect but remains sharp and crisp.
The brightness is rated at a rather specific 323 nits while there is also a rated <30ms response time spec, 1200:1 contrast ratio, 1.07b colour depth (although they seemed to only support 8-bit colour depth from our NVIDIA RTX 3090 test system), and 170/170 quoted viewing angles, although they are IPS technology and so for 2D content have the usual 178/178 wide viewing angles. Keep in mind these are not your typical gaming display with super-fast response times and high refresh rate, they are 60Hz max only. The viewing position range of the screen is rated as ±17cm horizontally, and ±30cm vertically. We should note that HDR is not supported at all on these screens.
The screens have a glossy panel coating which provides a sharp and crisp image and makes it feel like an iPad or other tablet (although without the built in software), but at the same time you’ll need to be mindful of positioning of the screen to avoid reflections from lighting and windows. Being IPS technology it offers the usual wide viewing angles and excellent picture quality you’d expect.
Connectivity and Controls

For connectivity there is only a single HDMI 2.0 video input but that can handle 4K 60Hz fine. There’s also a USB-C data port (inc 15W power delivery but no DP Alt mode) and a USB-A data port too, along with an SD card reader slot.

We should mention the OSD menu here which is controlled through a single button and a small up/down toggle slider on the back right hand edge of the screen. This is a little tricky to use at first, but you soon get used to navigating around the menu. The menu itself looks and feels like other Acer displays we’ve seen in the past, although there are only a modest range of options available. There’s some controls for brightness, contrast, colour temp and a few preset modes, but there’s no options for gamma, response times or other things like that which you might find on typical desktop monitors.
Acer provide a short video overview of the SpatialLabs View and View Pro screens here, worth a quick watch before we look in to some of the details further.
Acer have sent us both the View and View Pro screens so we’ve done some testing of these below. This includes some of our usual display testing for colour accuracy, response times etc, as well as a look at the two software packages Acer provide. We have also carried out some testing of 3D content and provided subjective performance analysis in many areas.
Acer SpatialLabs View (model: ASV15-1B)

The ‘View’ is aimed more at personal usage, gaming and multimedia. This model comes in a “steam blue” colour which is basically a dark grey with a subtle dark blue tint to it. This model lacks any VESA mounting support, which is featured on the View Pro model so you can only use the built in tiltable stand and have it sat on a flat surface. Apart from the colour and VESA support, the two models are physically identical.

Experience Centre software
It is a lower cost package than the ‘View Pro’ given its wider target market and more general use-cases and has a RRP of £1199.99 GBP, or $1099.99 USD. It comes with the standard “Experience Centre” software including TrueGame, Model Viewer, Go and Player software that we’ve talked about above. You need to download and install this from Acer’s website, there’s nothing natively built in to the screen, it acts like a normal display.

The Experience Centre software was 1.8 GB to download, and then on first load we were also prompted for another 120MB or so of updates before you can open it, and even an additional 1.15GB for the Model Viewer update when you first load that specific programme, so it’s a hefty package to download and install when you first set the screen up. Once installed it’s very simple to use. You just click the shortcut and the main splash page as shown above loads up where you can choose which software you want to use.
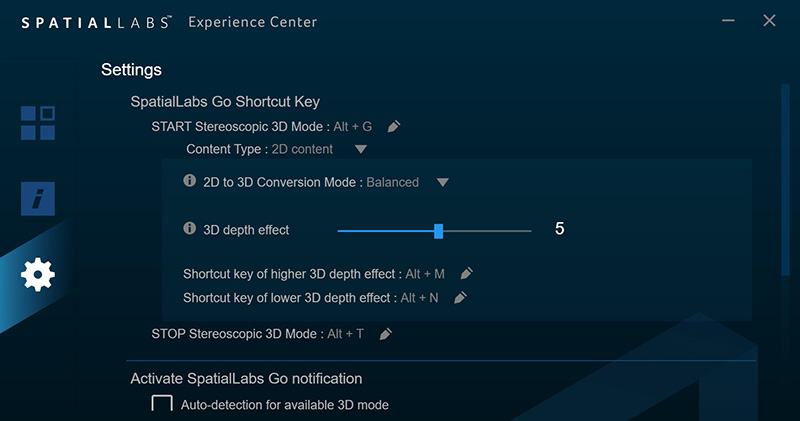
There’s a short settings section too where you can define some shortcut keys for turning 3D mode on/off and controlling the depth of the 3D effect when it’s in certain modes like 2D upscaling. That’s useful. We will look at 3D performance and testing in a moment.

Acer SpatialLabs View Pro (model: ASV15-1BP)

The ‘View Pro’ is aimed at the professional market, at creators, designers and developers. The screen can be used in a wide range of environments like showrooms, museums, medical centres and educational arenas to present impressive 3D content. This model is physically very similar in appearance to the ‘View’ model, but comes in a black colour finish as opposed to the blue tint colour of the View model. It also includes VESA 100mm mount support on the back which might be handy. Because it’s aimed at professional users it is also marketed as having a factory calibration with dE < 2 quoted for Adobe RGB content although actually both models have the same capability here (tested in a moment).

Experience Centre Pro software
It’s the more expensive of the two packages given its target market and advanced professional software and has a RRP of £1,299.99 GBP. This package includes the more comprehensive “Experience Center Pro” software package which is 1.53GB to download from Acer’s website and needed around 180MB of additional updates when we first installed it before it could be used. Plus 1.15GB of updates to Model Viewer when you first open that.
By the way, it won’t let you install this Pro software with the regular ‘View’ screen as it detects the device connected and used over the USB connection.


The software looks largely the same as the normal version, but there’s an additional section here for all the software add-ons and plugins, and a few other options relevant to the View Pro package like support for Unreal engine. It’s more capable for professional application integration, but still supports the gaming, video and model applications that were in the normal version of the software.

Measurements and Testing the Displays
Testing Methodology Explained (SDR)

Performance is measured and evaluated with a high degree of accuracy using a range of testing devices and software. The results are carefully selected to provide the most useful and relevant information that can help evaluate the display while filtering out the wide range of information and figures that will be unnecessary. For measurement, we use a UPRtek MK550T spectroradiometer which is particularly accurate for colour gamut and colour spectrum measurements. We also use an X-rite i1 Pro 2 Spectrophotometer and a X-rite i1 Display Pro Plus colorimeter for various measurements. Several other software packages are incorporated including Portrait Displays’ Calman color calibration software – available from Portrait.com.
We measure the screen at default settings (with all ICC profiles deactivated and factory settings used), and any other modes that are of interest such as sRGB emulation presets. We then calibrate and profile the screen before re-measuring the calibrated state.
The results presented can be interpreted as follows:
- Gamma – we aim for 2.2 gamma which is the default for computer monitors in SDR mode. Testing of some modes might be based on a different gamma but we will state that in the commentary if applicable. A graph is provided tracking the 2.2 gamma across different grey shades and ideally the grey line representing the monitor measurements should be horizontal and flat at the 2.2 level, marked by the yellow line. Depending on where the gamma is too low or too high, it can have an impact on the image in certain ways. You can see our gamma explanation graph to help understand that more. Beneath the gamma graph we include the average overall gamma achieved along with the average for dark shades (0 black to 50 grey) and for lighter shades (50 grey to 100 white).
- RGB Balance and colour temperature – the RGB balance graph shows the relative balance between red, green and blue primaries at each grey shade, from 0 (black) to 100 (white). Ideally all 3 lines should be flat at the 100% level which would represent a balanced 6500K average colour temperature for all grey shades. This is the target colour temperature for desktop monitors, popular colour spaces like sRGB and ‘Display DCI-P3’ and is also the temperature of daylight. It is the most common colour temperature for displays, also sometimes referred to as D65. Where the RGB lines deviate from this 100% flat level the image may become too warm or cool, or show a tint towards a certain colour visually. Beneath this RGB balance graph we provide the average correlated colour temperature for all grey shades measured, along with its percentage deviance from the 6500K target. We also provide the white point colour temperature and its deviance from 6500K, as this is particularly important when viewing lots of white background and office content.
- Greyscale dE – this graph tracks the accuracy of each greyscale shade measured from 0 (black) to 100 (white). The accuracy of each grey shade will be impacted by the colour temperature and gamma of the display. The lower the dE the better, with differences of <1 being imperceptible (marked by the green line on the graph), and differences between 1 and 3 being small (below the yellow line). Anything over dE 3 needs correcting and causes more obvious differences in appearance relative to what should be shown. In the table beneath the graph we provide the average dE across all grey shades, as well as the white point dE (important when considering using the screen for lots of white background and office content), and the max greyscale dE as well.
- Luminance, black depth and contrast ratio (static) – measuring the brightness, black depth and resulting contrast ratio of the mode being tested, whether that is at default settings or later after calibration and profiling. We aim for 120 cd/m2 luminance which is the recommended luminance for LCD/OLED desktop monitors in normal lighting conditions. Black depth should be as low as possible, and contrast ratio should be as high as possible.
- Shadow detail – this is evaluated with the screen configured to a 200 nits white luminance for consistency between different monitors, and viewed in a dimly lit room. This first 16 greyscale shades are measured using our UPRTek MK550T spectro device (0.002 nits lower limit) for shades near-black, and the results are plotted on a graph relative to a target gamma curve (usually 2.2 gamma). Where the measurement line crosses the 0.01 nits point on the Y-axis is typically the visual threshold for where we would start to be able to detect luminance compared with black (0.00 nits). We combine these objective measurements with visual tests using a grey shade test pattern to determine the first visible shade, and then rank the shadow detail performance accordingly.
- Gamut coverage – we provide measurements of the screens colour gamut relative to various reference spaces including sRGB, DCI-P3, Adobe RGB and Rec.2020. Coverage is shown in absolute numbers as well as relative, which helps identify where the coverage extends beyond a given reference space. A CIE-1976 chromaticity diagram (which provides improved accuracy compared with older CIE-1931 methods) is included which provides a visual representation of the monitors colour gamut coverage triangle as compared with sRGB, and if appropriate also relative to a wide gamut reference space such as DCI-P3. The reference triangle will be marked on the CIE diagram as well.
- dE colour accuracy – a wide range of colours are tested and the colour accuracy dE measured. We compare these produced colours to the sRGB reference space, and if applicable when measuring a wide gamut screen we also provide the accuracy relative to a specific wide gamut reference such as DCI-P3. An average dE and maximum dE is provided along with an overall screen rating. The lower the dE the better, with differences of <1 being imperceptible (marked by the green area on the graph), and differences between 1 and 3 being small (yellow areas). Anything over dE 3 needs correcting and causes more obvious differences in appearance relative to what should be shown. dE 2000 is used for improved accuracy and providing a better representation of what you would see as a user, compared with older dE methods like dE 1994, as it takes into account the human eye’s perceptual sensitivity to different colours.
Setup and Accuracy
In our testing we measured the screens in their default state. The performance was very similar between the two, but we’ve provided both for completeness anyway:


You can see some solid performance here, even for the ‘View’ model which isn’t promoted as featuring any factory calibration. Gamma tracking is good, being only slightly too high at 2.25 average on the View and a tad closer at 2.21 on the View Pro; but overall decent and close to our 2.2 target on both models. Colour balance and temperature across the greyscale was very good with a very minor 1 – 2 % deviance from our targets, including for the white point.
The display is set by default in the ‘warm’ colour temp setting, but we also measured the other modes. The normal colour temp mode measured ~7000K, while the cool mode measured ~8250K. The default ‘warm’ setting delivers the best white point close to D65 (6500K). We had a good greyscale accuracy overall as well with dE ~1.9 average, although it was a bit higher in mid-grey shades where the image was a little warmer than intended. Overall this was a very solid default setup.
Default brightness was measured at around 212 – 218 cd/m2 while at a 75% brightness level. The brightness range was measured at 38 – 359 cd/m2 which was decent, offering a wide range of adjustment for different lighting conditions, and surpassing the 323 cd/m2 spec as well a bit at the top end. We confirmed the brightness adjustment was flicker free, without the need for any PWM too which was great news:

We had a decent contrast ratio too of ~1420:1, surpassing the 1200:1 spec nicely. The near black shadow detail in darker grey content was moderate, keeping in mind the still fairly average contrast ratio compared with VA and OLED technology panels. The glossy screen coating offered a sharp and crisp image, and made blacks and colours pop a bit more than a matte coated screen, but at the same time you need to be mindful of screen positioning and reflections. You get nice wide viewing angles from the IPS panel with stable image quality.


You can see here that the colour space of the display extends quite a long way beyond the sRGB reference space in green shades, resulting in a 123.2% relative sRGB coverage measurement. This leaves it very close to the Adobe RGB colour space though as you can see from the bottom left CIE diagram, measuring 99.9% absolute coverage (which was excellent) and only some minor over-coverage to 105.6% relative, mostly in red shades. With the colour space of the display matching Adobe RGB very well, and a decent setup for colour temp and gamma, the accuracy of Adobe RGB colours (bottom right graph) was very good, with a dE average of 1.4 – 1.6. This was very impressive and makes the screen well suited to working with Adobe RGB content, commonly used in the professional, photography and design space. It’s good to see a nice factory calibration from both models here.
Of course with a wide colour gamut natively, the accuracy of sRGB colours (top right graph) was poor, but that’s typical from any wide gamut screen. Unfortunately Acer do not provide any sRGB emulation mode on this screen so there’s no simple way to display or work with sRGB / SDR content unless you can work within colour aware applications, or control this from your graphics card perhaps. An included sRGB emulation mode from the screen itself would have been welcome.
Response Times and Gaming

We also measured the panel response times as usual which are the same on both models. Keep in mind this is a low refresh rate display, supporting 60Hz maximum, and some sacrifices to response times and refresh rate have been made in order to deliver the 3D capability and this new technology. We measured an average 14ms G2G which was slow by modern gaming screen standards, but quite pleasing considering the initially worrying “<30ms” spec Acer list on their product pages, although the slowest transitions did get close to this at 27.2ms.
Transitions along the top row from black to grey were pretty slow, leading to some moderate black smearing in practice as content changes from dark to light. Transitions from white and light grey back to black were also slow in the bottom left hand corner of the table, resulting in some pale smearing too. Motion clarity was of course behind modern high-refresh rate gaming screens, but this is a 60Hz only panel so that’s not surprising. There was at least no visible overshoot at all, meaning no distracting bright or dark halos or trails in the moving content. Perhaps a more aggressive overdrive could have been used to push G2G a little further though.
The panel response times are perfectly fine for general applications, professional uses, movies and video still. For gaming it should still be adequate for slower titles, immersive open world RTS and that kind of thing. The response times and refresh rate make it too slow for any competitive FPS type games though, although this display is more about creating an impressive and immersive 3D effect and bringing new life to old games than it is being used for eSports of course. Perhaps as the technology evolves over time we will see improvements in gaming performance too.
Total display lag in 2D mode was measured at a pretty low 3.3ms which includes the signal processing time and an element of the pixel response times. With the measured G2G figures being quite variable, and there being some particular transitions that were slow and therefore drag the average down, it’s a little hard to estimate how much of that 3.3ms was actually from the pixel response times. We would estimate that around 2.9ms of the total display lag was from pixel response times, leaving us with a very low signal processing of only ~0.4ms.
It’s not possible for us to measure lag in 3D mode unfortunately as our SMTT tool would require the display to be cloned with a CRT, and the SpatialLabs software does not work in clone mode unfortunately. With the SpatialLabs software having to handle different forms of 3D content in different ways, including handling side-by-side (SBS) content or upscaling 2D content as well, there’s a chance some of this processing could lead to additional lag in practice. The monitor itself doesn’t seem to be adding much signal processing at all though which is good news, so any lag caused by the software will hopefully be the kind of thing that can be improved over time as well from Acer.
Unfortunately the screen cannot be used for console gaming in 3D as there’s no way to use the SpatialLabs software that needs to run to power the 3D effect.
3D Testing
We of course carried out a load of testing of 3D content, using the screens for a wide variety of applications, movies, videos and games. Being glasses-free, the 3D content was very accessible and we found it generally very comfortable to use. Being a glasses wearer for normal monitor use, I kept having to remind myself I wasn’t wearing any 3D glasses here, and it was certainly a lot more comfortable than layering another pair on top! Enabling 3D mode for the first time is quite a “wow moment”, and it’s very impressive the way the 3D content is rendered and displayed from the display.
You need to keep in mind the screen can only be used for a single user at a time as it relies on the eye tracking cameras, but the 3D effect was certainly impressive. When you load up the Experience Centre software you’re given some guidance about viewing position and distance which is useful, and we didn’t experience any problems when using the screen from what we’d consider a normal PC desktop position and comfortable viewing distance for the screen size.
Upscaling of 2D content to 3D can be impressive, but you need appropriate content for this to look good. Watching something like sport doesn’t really add much, as for football / soccer, there isn’t much definition between the pitch and the players and so the 3D effect is limited. Watching something like a nature documentary is far more impressive, where there’s obvious differences between the foreground and background. The AI could really work its magic here and we were very impressed by the 3D effect. Being able to support basically any content really opens the door to 3D on a setup like this, as you’re not even reliant on the content being designed for, and mastered in 3D. You can view anything in 3D mode if you want.
You can also watch content mastered in “side by side” (SBS) for 3D and VR which can often look even better, some good examples being this Avatar 2 trailer, and this “world’s best 3D SBS effects” video. High resolution 4K content looks the best as well obviously to take advantage of the panels resolution, and avoid a noticeable drop as it splits the resolution for 3D. Because the SBS content has been filmed and mastered from two angles, it helps produce a more natural 3D effect when viewing it back on a compatible display.
The ability to adjust the 3D effect depth for regular 2D upscaling was very useful, as we found if you have this set too high the image starts to look less clear and almost looks like the image is overlapping itself. Using the shortcut keys to adjust the depth was quick and easy though, and we generally found a setting we liked for all 2D upscaling. This setting isn’t available in SBS 3D mode unfortunately, and on occasion we felt the image became a little less clear, although was generally very good. This might vary by user and by viewing position. With the screen reliant on eye tracking to ensure it sends each eye the correct image from the LCD panels, if you glance away for a moment, it takes a split second when you look back at the screen for things to re-adjust. We found the positioning of ambient lighting and windows important to help ensure a consistent 3D effect, being best where there’s less reflections on the display, and in darker room conditions ideally.
Some people can experience motion sickness and eye strain from competing technologies like Virtual Reality headsets, and on some of the older 3D display technologies such as active shutter glasses. This might still vary from user to user, but we didn’t experience any issue here with comfort and you’re not enclosed like you would be when using a VR headset, and can easily look around your room and away from the screen whenever you want. It was a bit weird going back to a normal 2D display afterwards for a moment, and your eyes need a minute to re-adjust, but during use we didn’t find any real problems.
SpatialLabs Laptops

Acer also have some laptops with SpatialLabs displays built in. The flagship laptop offering that supports this technology is the “Acer Predator Helios 300 SpatialLabs Edition3D”. We won’t go in to loads of specs here apart from to discuss the display side of things. It has an NVIDIA GeForce RTX 3080 8GB graphics card and a 15.6″ sized screen with 3840 x 2160 “4K” maximum resolution, so the same size as the external View and View Pro displays discussed before. It’s basically the same experience built in to a laptop instead of being just an external PC display.
The laptop display is also 100% Adobe RGB & Pantone certified making it well suited for video editing or graphic design too. As with the external displays, two eye tracking cameras fit with image sensors constantly track the position and movement of your eyes and head to help make the 3D work.

You can buy the Helios 300 SpatialLabs Edition 3D already from Currys in the UK, it currently retails for £3,299 GBP. It’s also available to see and demo in person at several Currys stores apparently, as detailed at the bottom of the Acer page here.

Conclusion
We found looking at and testing the Acer SpatialLabs displays and software very interesting, as this is something new and niche in the display market. We were very impressed by the 3D capability and by the extremely wide range of content thanks largely to the ability to simply upscale 2D content. The best effect can be found from proper 3D rendered content such as the supported ‘3D+’, and especially ‘3D Ultra’ games, and also with side-by-side (SBS) filmed content. But one of the key things SpatialLabs does is overcome the limitations around content that impact traditional 3D displays and VR. When you can upscale basically anything to 3D, it opens up a huge range of possibilities for content.
While the screen size is small at only 15.6″, you do get increased immersion from the 3D effect for things like movies and gaming, and having the View / View Pro connected as a secondary display specifically for 3D content seemed a good option. This technology seems to work very nicely and we’d love to see larger monitor sizes in the future that might allow you to have a single screen for both 2D and 3D, as well as adding more immersion for the 3D content thanks to the size. We’d like to see some improvements in refresh rates and response times to push these kind of technologies more in the gaming space as well, but the screen accuracy, pixel density and colour performance make them already well suited to professional uses and slower paced content.
The comfort of using the screen without the need for any glasses can’t be understated either, it really does make the screen easier (and also more impressive) to use. This makes the whole thing very accessible to anyone, and is an impressive cutting edge display technology for sure. The two external display models are very similar in design, features and capability. They use the same panel, and offer the same performance, setup and calibration. The only physical differences are the colour of the casing (black on the View Pro, subtle blue tinted dark grey on the View) and the support for VESA mounting on the Pro model. The main difference, and the key reason for the difference in cost, is the Experience Centre software support. The View Pro has all the software from the View model, but also includes all the “professional” features like application plugins and Unreal engine support etc. If you’re wanting to use the screen for professional applications then the View Pro will offer you that, but if you’re more a general consumer looking to view 3D games and movies the View model has you covered.
Where to buy SpatialLabs displays and get more info
You can register your interest on Acer’s website here to receive more information about each of the products, and on availability. Further Information on the gaming side of things is available on the TrueGame product page too.
You can buy the Helios 300 SpatialLabs Edition 3D already from Currys in the UK, it currently retails for £3,299 GBP. It’s also available to see and demo in person at several Currys stores apparently, as detailed at the bottom of the Acer page here.
We may earn a commission if you purchase from our affiliate links in this article- TFTCentral is a participant in the Amazon Services LLC Associates Programme, an affiliate advertising programme designed to provide a means for sites to earn advertising fees by advertising and linking to Amazon.com, Amazon.co.uk, Amazon.de, Amazon.ca and other Amazon stores worldwide. We also participate in a similar scheme for Overclockers.co.uk, Newegg, Bestbuy , B&H and some manufacturers.