
KOORUI G2412V
Introduction
Can a <$100 USD monitor actually be any good? Through our various conversations with KOORUI over the last few months, as we pulled together content for our article introducing the brand and their core product range, we were intrigued by the upcoming release of a new display in their range which would meet this incredibly competitive price point. At TFTCentral we typically review the latest and greatest monitors and technologies with top-end performance and specs, but we appreciate that not everyone is looking to spend that kind of money on a new display. So, as a break from the norm, we thought we would take a look at this new (extremely) budget-friendly display from KOORUI to see how it performs and establish if a screen in this kind of price bracket can be decent or not.
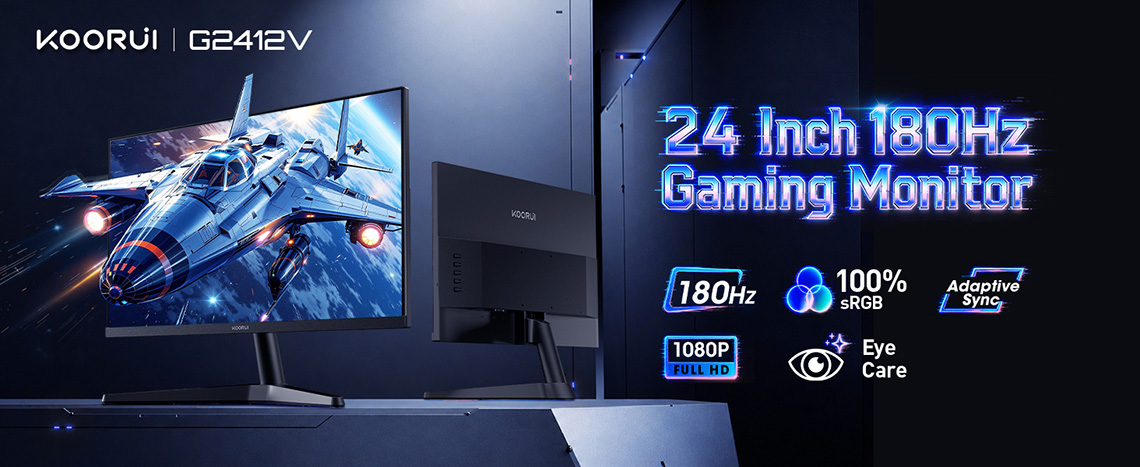
The screen in question is the new KOORUI G2412V, a 23.8″ sized monitor with a VA LCD panel, 1920 x 1080 resolution and 180Hz refresh rate. This model is not to be confused with MSI’s model of the same name, although that is also a 23.8″ sized screen with a 1080p resolution but with an IPS panel and lower 100Hz refresh rate.
The KOORUI G2412V is aimed at users looking for a low-cost display, perhaps for a children’s bedroom, for a small home office space, or for lighter casual use; but KOORUI are looking to offer something a little more than you’d typically see at this price point, with a higher refresh rate for gaming, a strong contrast ratio and even a wide colour gamut for a more vivid and colourful experience.
Obviously at this price point the screen isn’t going to offer all the bells and whistles we’re used to seeing on modern displays and throughout this review we’re going to try and take everything in context. We’ll of course cover what features are and aren’t available, and we’ll criticise things we feel are missing and perhaps should be included even at this price point. But we’ll try not to be overly critical when a <$100 monitor like this doesn’t have a Mini LED backlight, KVM switch, USB-C and so on…it’s not realistic to expect those kind of things at this price point so we will try to be fair in our assessment.
Anyway, let’s get in to the review and see if a budget screen like this can be any good!
- Related content: HKC, KOORUI and ANTGAMER to Expand Their Monitor Range Globally with Exciting New Technologies
Key Specs
- 23.8″ size, flat format
- VA LCD technology panel
- 1920 x 1080 resolution
- 180Hz refresh rate
- Wide colour gamut covering 99% sRGB and ~93% DCI-P3
- 1x VGA and 1x HDMI 1.4 video inputs
- Basic tilt-only stand adjustment

Design and Features
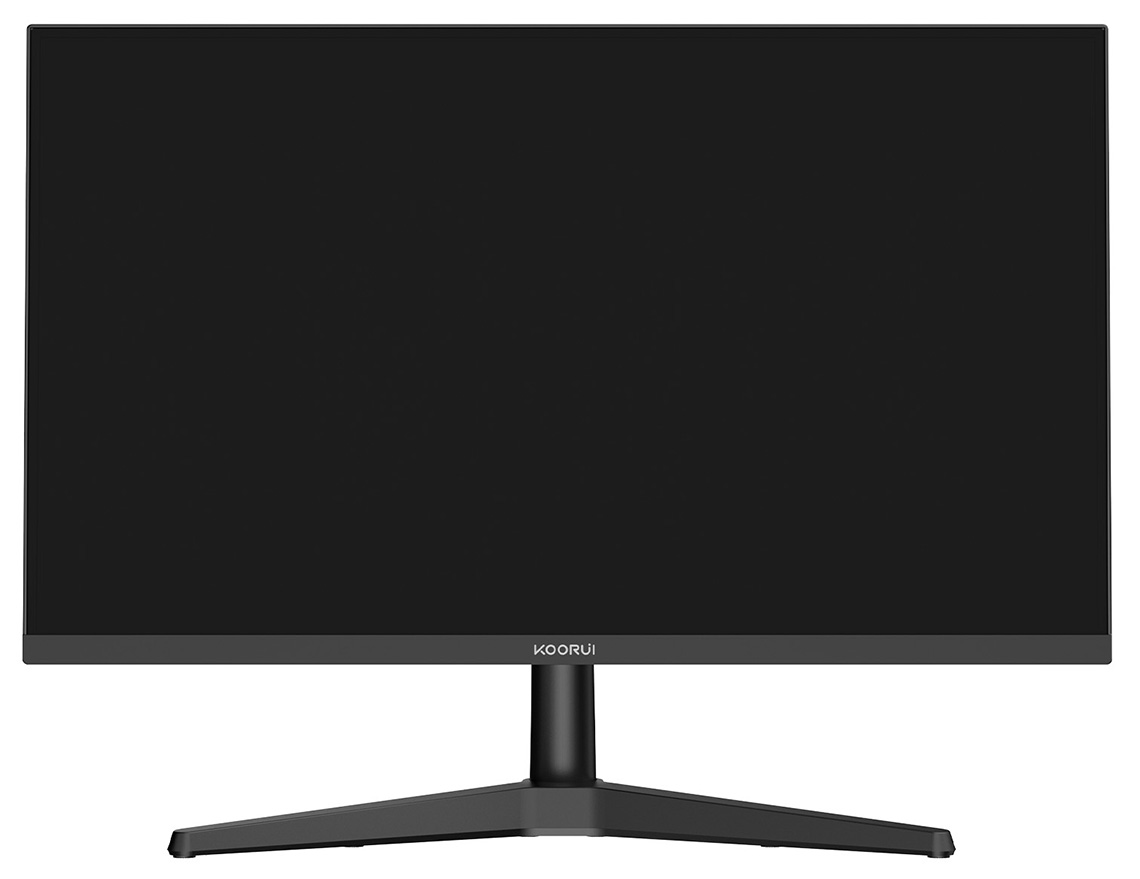
The G2412V has a 3 side “borderless” panel with a thin 3mm black plastic bezel around the sides and top, and an additional 4mm black panel border before the image starts (total 7mm edge on top and sides). There is a thicker matte black plastic bezel along the bottom which measures ~19mm. There’s a light silver “KOORUI” logo in the middle, but no other markings or labels so it looks fairly simple from the front.
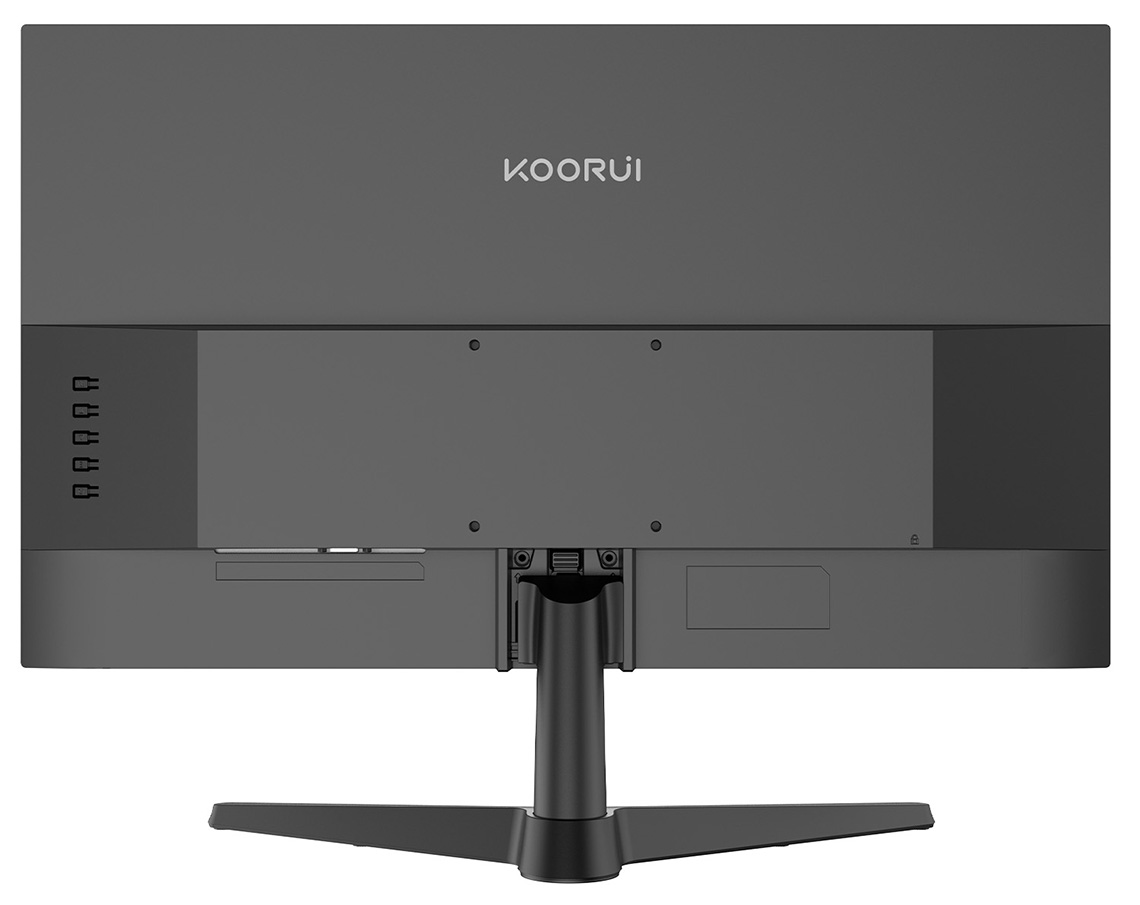
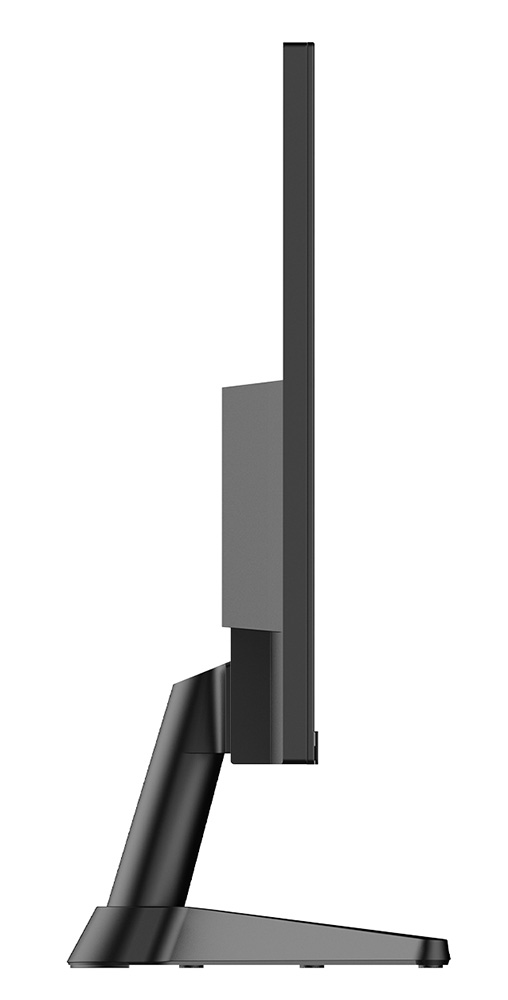
The rear is encased in a matte black plastic with a simple design. The screen is very light at only 2.4Kg and comes packaged separately to two stand sections. There’s a rounded plastic arm section which slots in to the bottom of the screen at the back and clicks in to place, and then a two-pronged black plastic foot which screws in to place on the bottom of the arm. Easy enough to connect, although these are very light and feel quite flimsy and basic as you’d expect for this price point. Total weight with the stand is only 2.75Kg.
Ergonomic adjustments
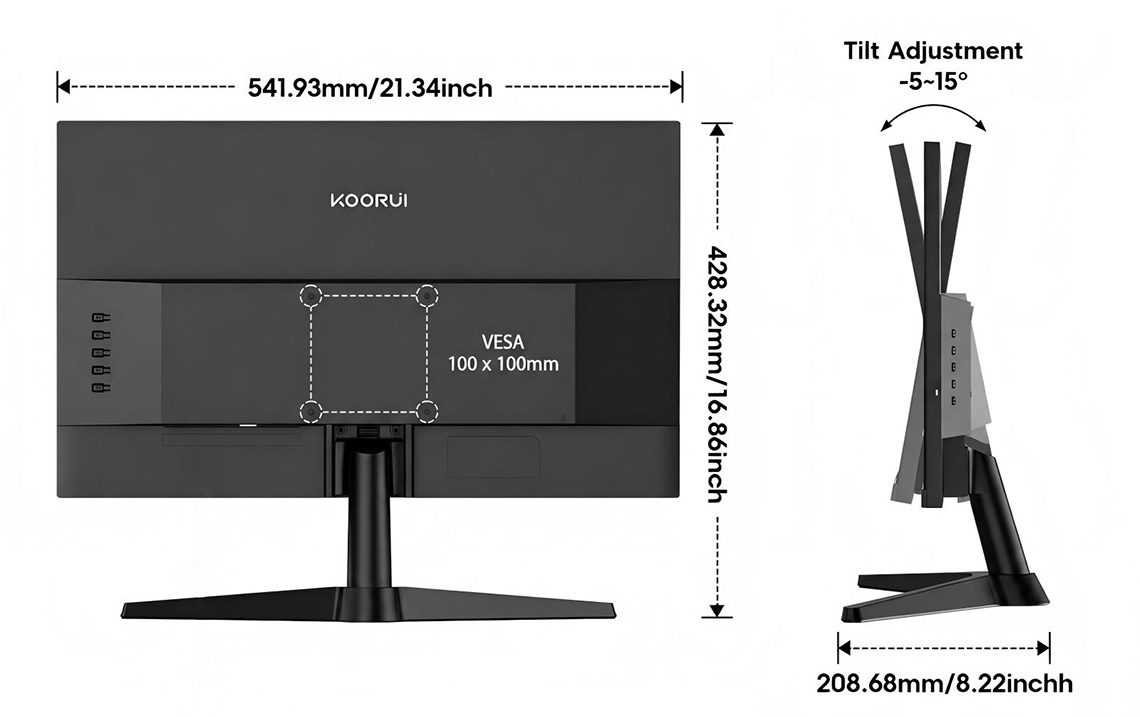
The stand offers a tilt adjustment only so is very limited in ergonomics, although that is pretty common on budget screens. The tilt is fairly stiff to move but provides an adequate adjustment range. The bottom edge of the screen sits ~10cm from the surface of the desk so it’s quite low down and there’s no height adjustment offered. The stand can be removed in favour of VESA 100 x 100mm mounting if you’d rather which would give you better flexibility and adjustments.
Connectivity
Connectivity is very limited. On the back of the screen you will find a D-sub VGA input (wait, is this the 1990’s?!) and an HDMI 1.4 input. There is unfortunately no DisplayPort offered here at all, which is one area we feel should have been better – it can’t have cost much more to add a DP 1.2 spec connection for instance.
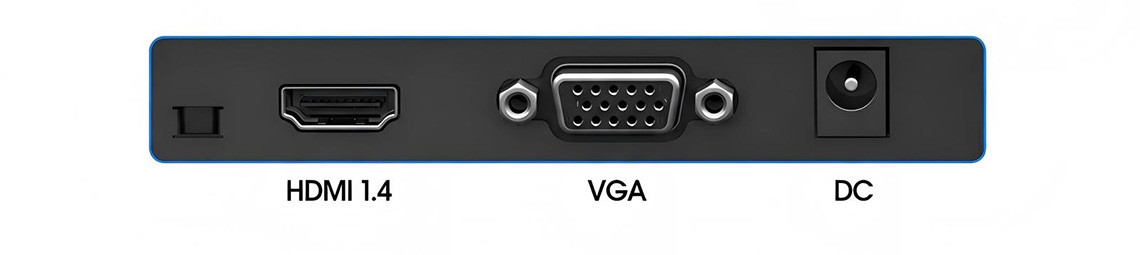
The VGA input is only really relevant if you’ve got a much older PC or laptop to connect to it, that’s a connection which has been long-since abandoned on modern systems. We can’t recall the last time we saw this connection featured on any monitor to be honest. Perhaps it might also be useful for connecting some older retro gaming consoles or certain older devices for some people, but we’d much rather have seen a DP connection here instead.
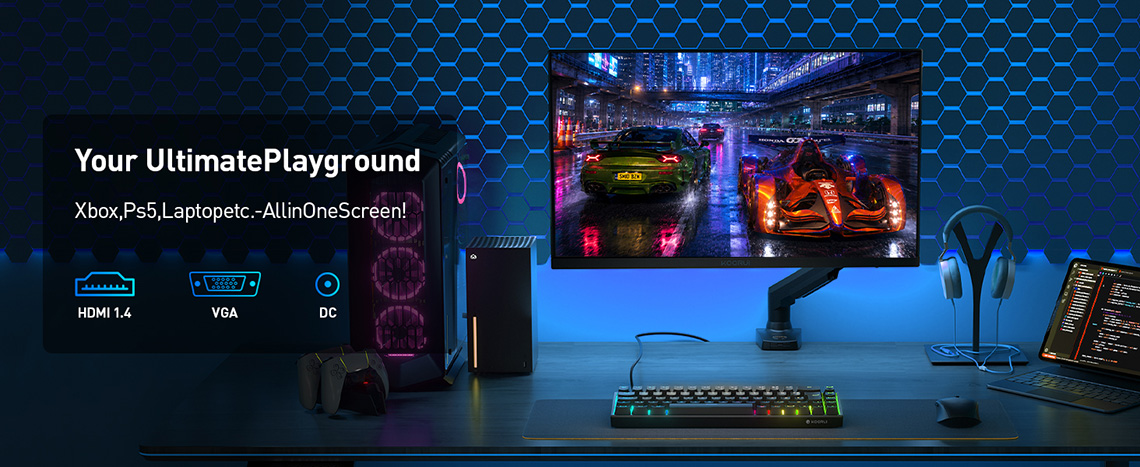
You can use a DisplayPort > VGA adapter/cable to connect from your PC to this screen using that connection, but it will only support 1080p 60Hz maximum. Most people will therefore want to use the single HDMI port on the monitor which is simpler, and provides full 1080p 180Hz support. The only issue then is that you don’t have any other free ports should you want to also connect a games console or second device to it, although maybe you could use a separate HDMI switch for that. If you’re really looking for a display to accommodate multiple inputs and more modern devices you’d probably be looking at a higher-end monitor anyway but we would have ideally liked 1x DisplayPort for PC and 1x HDMI for other devices at least.
There’s no other connectivity offered here, not even USB-A data ports or a headphone connection which is a bit of a shame. We realise everything has been cut back to allow for the aggressive price point, but those two feel like possible things that could have been added without a major price impact. There’s obviously no USB-C, KVM switch, PiP/PbP, integrated speakers and so on here, features that would be reserved for higher end and higher priced displays.
OSD menu
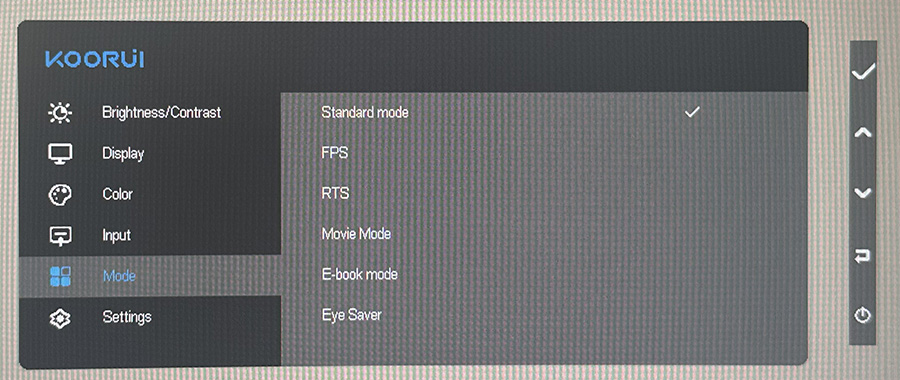
The OSD menu is controlled through 4 pressable buttons on the back right hand side of the screen, along with a power on/off button. The menu provides a limited but adequate range of settings for configuration, and it was good to see some decent picture and colour controls offered at least. Gaming settings are very limited beyond a response time control and a couple of preset modes.
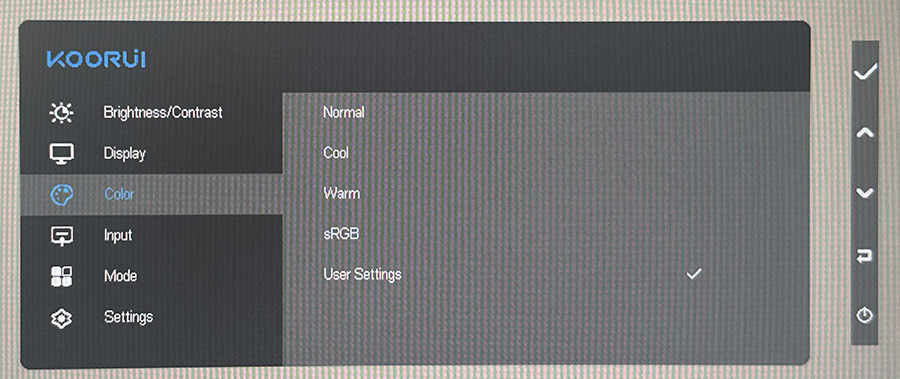
Navigation is ok once you get used to using the buttons, not as simple and quick as a joystick toggle, but reasonable overall. The menu is a bit sluggish in places, like when you’re adjusting the brightness slider it’s quite slow. Once you’ve configured things, you probably won’t need to use the menu much at all anyway.
Testing Methodology Explained (SDR)

Performance is measured and evaluated with a high degree of accuracy using a range of testing devices and software. The results are carefully selected to provide the most useful and relevant information that can help evaluate the display while filtering out the wide range of information and figures that will be unnecessary. For measurement, we use a UPRtek MK550T spectroradiometer which is particularly accurate for colour gamut and colour spectrum measurements. We also use an X-rite i1 Pro 2 Spectrophotometer and a X-rite i1 Display Pro Plus colorimeter for various measurements. Several other software packages are incorporated including Portrait Displays’ Calman color calibration software – available from Portrait.com.
We measure the screen at default settings (with all ICC profiles deactivated and factory settings used), and any other modes that are of interest such as sRGB emulation presets. We then calibrate and profile the screen before re-measuring the calibrated state.
The results presented can be interpreted as follows:
- Gamma – we aim for 2.2 gamma which is the default for computer monitors in SDR mode. Testing of some modes might be based on a different gamma but we will state that in the commentary if applicable. A graph is provided tracking the 2.2 gamma across different grey shades and ideally the grey line representing the monitor measurements should be horizontal and flat at the 2.2 level, marked by the yellow line. Depending on where the gamma is too low or too high, it can have an impact on the image in certain ways. You can see our gamma explanation graph to help understand that more. Beneath the gamma graph we include the average overall gamma achieved along with the average for dark shades (0 black to 50 grey) and for lighter shades (50 grey to 100 white).
- RGB Balance and colour temperature – the RGB balance graph shows the relative balance between red, green and blue primaries at each grey shade, from 0 (black) to 100 (white). Ideally all 3 lines should be flat at the 100% level which would represent a balanced 6500K average colour temperature for all grey shades. This is the target colour temperature for desktop monitors, popular colour spaces like sRGB and ‘Display DCI-P3’ and is also the temperature of daylight. It is the most common colour temperature for displays, also sometimes referred to as D65. Where the RGB lines deviate from this 100% flat level the image may become too warm or cool, or show a tint towards a certain colour visually. Beneath this RGB balance graph we provide the average correlated colour temperature for all grey shades measured, along with its percentage deviance from the 6500K target. We also provide the white point colour temperature and its deviance from 6500K, as this is particularly important when viewing lots of white background and office content.
- Greyscale dE – this graph tracks the accuracy of each greyscale shade measured from 0 (black) to 100 (white). The accuracy of each grey shade will be impacted by the colour temperature and gamma of the display. The lower the dE the better, with differences of <1 being imperceptible (marked by the green line on the graph), and differences between 1 and 3 being small (below the yellow line). Anything over dE 3 needs correcting and causes more obvious differences in appearance relative to what should be shown. In the table beneath the graph we provide the average dE across all grey shades, as well as the white point dE (important when considering using the screen for lots of white background and office content), and the max greyscale dE as well.
- Luminance, black depth and contrast ratio (static) – measuring the brightness, black depth and resulting contrast ratio of the mode being tested, whether that is at default settings or later after calibration and profiling. We aim for 120 cd/m2 luminance which is the recommended luminance for LCD/OLED desktop monitors in normal lighting conditions. Black depth should be as low as possible, and contrast ratio should be as high as possible.
- Shadow detail – this is evaluated with the screen configured to a 200 nits white luminance for consistency between different monitors, and viewed in a dimly lit room. This first 16 greyscale shades are measured using our UPRTek MK550T spectro device (0.002 nits lower limit) for shades near-black, and the results are plotted on a graph relative to a target gamma curve (usually 2.2 gamma). Where the measurement line crosses the 0.01 nits point on the Y-axis is typically the visual threshold for where we would start to be able to detect luminance compared with black (0.00 nits). We combine these objective measurements with visual tests using a grey shade test pattern to determine the first visible shade, and then rank the shadow detail performance accordingly.
- Gamut coverage – we provide measurements of the screens colour gamut relative to various reference spaces including sRGB, DCI-P3, Adobe RGB and Rec.2020. Coverage is shown in absolute numbers as well as relative, which helps identify where the coverage extends beyond a given reference space. A CIE-1976 chromaticity diagram (which provides improved accuracy compared with older CIE-1931 methods) is included which provides a visual representation of the monitors colour gamut coverage triangle as compared with sRGB, and if appropriate also relative to a wide gamut reference space such as DCI-P3. The reference triangle will be marked on the CIE diagram as well.
- dE colour accuracy – a wide range of colours are tested and the colour accuracy dE measured. We compare these produced colours to the sRGB reference space, and if applicable when measuring a wide gamut screen we also provide the accuracy relative to a specific wide gamut reference such as DCI-P3. An average dE and maximum dE is provided along with an overall screen rating. The lower the dE the better, with differences of <1 being imperceptible (marked by the green area on the graph), and differences between 1 and 3 being small (yellow areas). Anything over dE 3 needs correcting and causes more obvious differences in appearance relative to what should be shown. dE 2000 is used for improved accuracy and providing a better representation of what you would see as a user, compared with older dE methods like dE 1994, as it takes into account the human eye’s perceptual sensitivity to different colours.

Brightness and Contrast
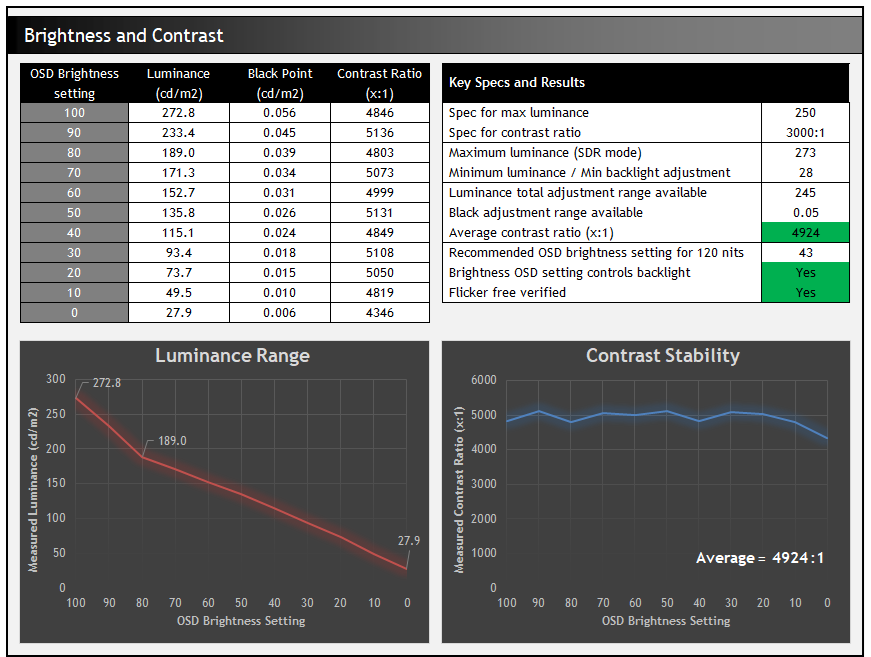
The screen offers a reasonable adjustment range for the backlight with a maximum SDR luminance measured at 273 nits which was slightly higher than the advertised 250 nits spec. This isn’t as bright as many LCD screens can reach keep in mind, so caution is advised if you’re used to running an existing screen at very high brightness levels. 273 nits should still be more than adequate for most users though. At the bottom end of the adjustment the screen can reach a nice low 28 nits luminance as well, which should be perfectly fine for using the screen in darker room conditions.
The VA-type panel delivers very strong contrast with 4924:1 average, which remains pretty consistent across the brightness adjustment range, with minor variation likely down to rounding errors in the black depth measurements more than anything else. The advertised spec is actually only 3000:1, but we found it out-performed this considerably which was impressive, and this represents a very strong contrast ratio for any LCD panel. Certainly a key strength of this screen.
SDR Performance
The screen offers a few different preset modes in the menu, as well as typical controls for things like brightness, contrast, colour temp and gamma so despite the low price point it still gives you a good level of control. We tested the screen in the default ‘standard’ mode first of all.
Default settings – Standard mode
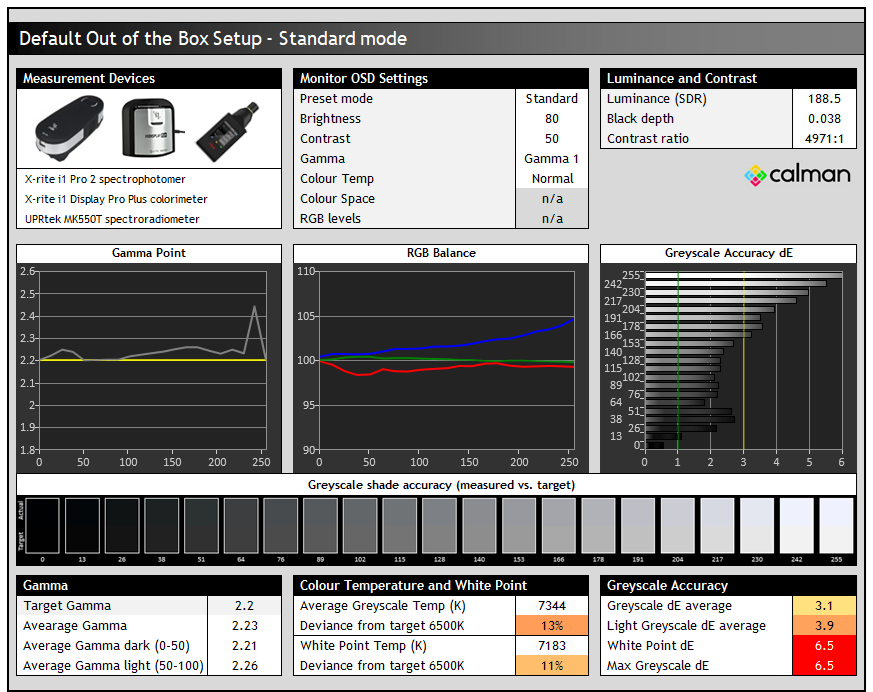
The gamma was overall very good, being very close to the 2.2 target in all but the very lightest grey shades. The RGB balance was weighted towards blue though, giving us a cooler greyscale than intended with around 11% error for the white point and resulting in a moderate overall greyscale accuracy. Contrast ratio was very impressive at ~5000:1, a definite strength of this VA LCD panel.
The colour temp mode is set to ‘normal’ by default, but we also measured the white point in each of the other modes here:
| Colour temp mode | White point measurement |
| Normal (default) | 7183K |
| Cool | 9571K |
| Warm | 6614K |
| sRGB | 6649K |
| User settings (50, 50, 50) | 8753K |
The ‘warm’ mode is closer to our 6500K (D65) white point target, but there’s also a ‘user settings’ mode which allows you to adjust the RGB channels yourself, which will be useful for calibration a bit later. That’s even cooler by default though. There’s also an ‘sRGB’ mode here which actually activates a full sRGB emulation mode, which we will also test in a moment.
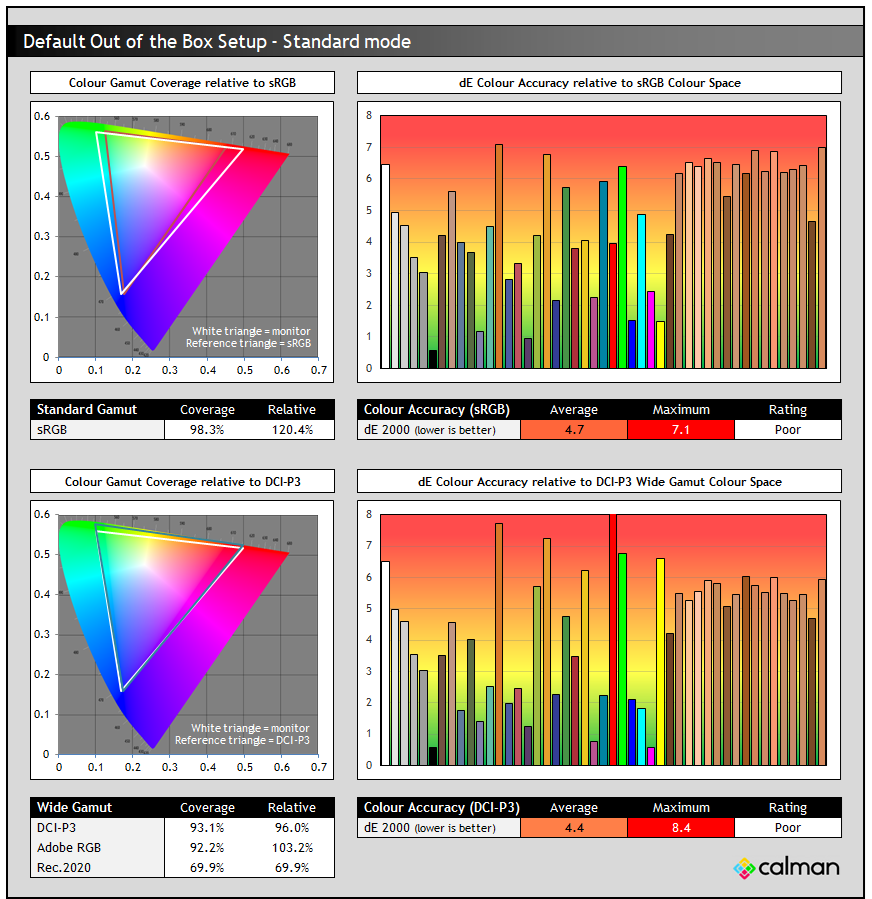
The backlight offers a wide colour gamut, offering ~120% relative sRGB coverage, and pushing up to around 93% absolute coverage of DCI-P3. It can’t quite cover the full DCI-P3 or Adobe RGB colour spaces, but it does offer something beyond just standard sRGB. Colours look more vivid and saturated as a result, although this leads to accuracy challenges for sRGB / SDR content unfortunately. Some people will prefer the more vivid colours for general, casual usage and gaming, but absolute colour accuracy is poor whether you compare them to sRGB or DCI-P3 targets.
sRGB mode
We switched to the ‘sRGB’ colour mode which actually operates a typical sRGB emulation preset. In this mode you retain access to the brightness control, but have locked contrast, gamma and colour RGB settings.
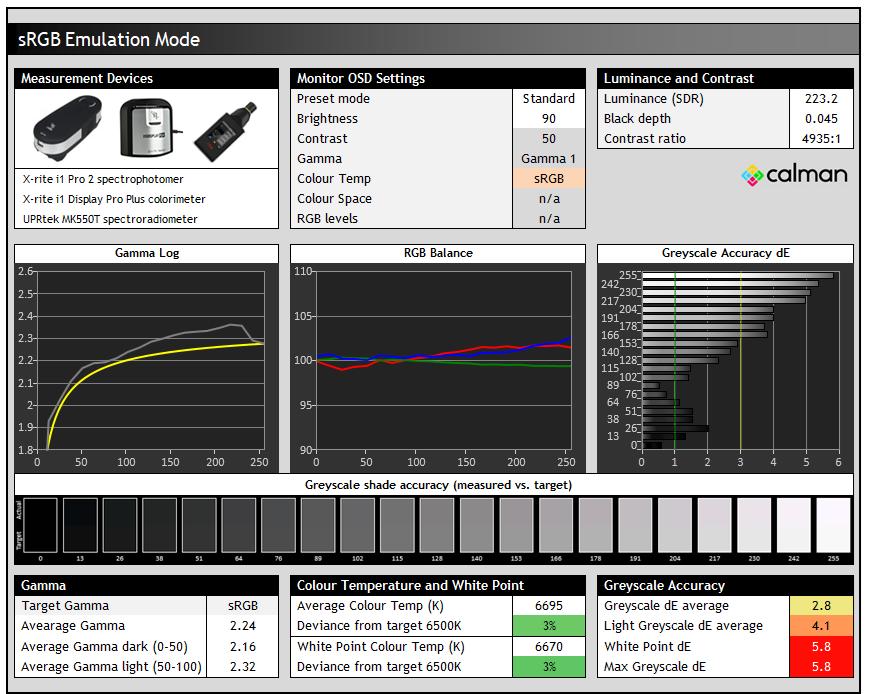
This mode seems to actually be configured to a slightly different sRGB gamma instead of 2.2, close overall but with some adjustments near black which raises the luminance of darker shades a bit. We will explore shadow detail performance a bit more in a moment.
In this mode the RGB balance was better and we had a more accurate white point and colour temp, reaching 6670K and leaving us with only a 3% error for white which was very good. Contrast remains very strong in this mode as well at around 5000:1.
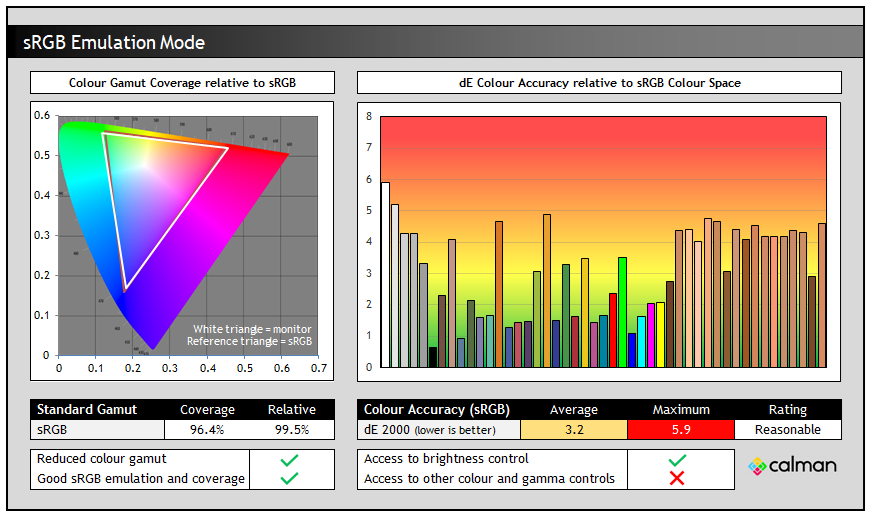
The other main change in this colour temp mode is that it triggers an sRGB colour space clamp, restricting the native colour space of the panel back close to the sRGB reference. It causes a small amount of over-clamping, but it’s now very close to the target which reduces the vividness and saturation noticeably. This improves sRGB / SDR colour accuracy a bit, although it’s only rated as reasonable with dE 3.2 average. There’s probably minimal factory calibration going on here due to the target retail price which is a shame, but it’s adequate for general basic users and combined with the decent gamma and greyscale, it’s a nice, useable mode for SDR.
Shadow Detail
We also tested the near-black shadow detail which can sometimes be a challenge on any monitor, especially on IPS-type panels which have a weaker black depth than competing VA and OLED panel technologies. This VA LCD panel should hopefully fare better though given it’s high contrast ratio. For these tests screen was configured to 200 nits white luminance, and we tested the screen in several modes.
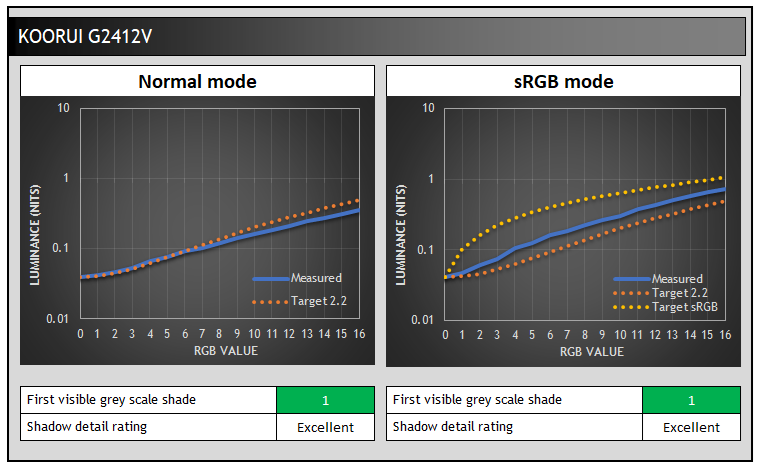
Shadow detail was excellent on this screen, being able to discern even RGB shade 1 visually. The luminance of some of the shades was a tiny bit lower than the target 2.2 gamma in the normal mode, but this was very slight. In the sRGB mode the luminance was boosted a bit as this mode seems to be configured closer to the sRGB gamma curve instead of 2.2, although it’s not as bright as that gamma curve would dictate really. Consider that mode as offering some small boost in brightness in darker scenes, along with the colour clamping we discussed earlier. Anyway, this was a very good result for this screen.
Calibration
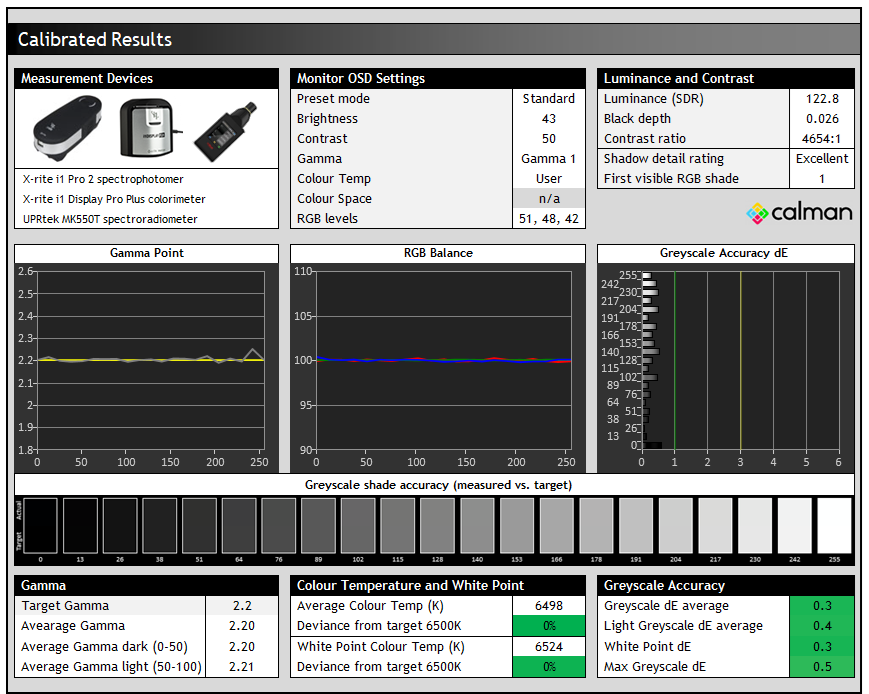
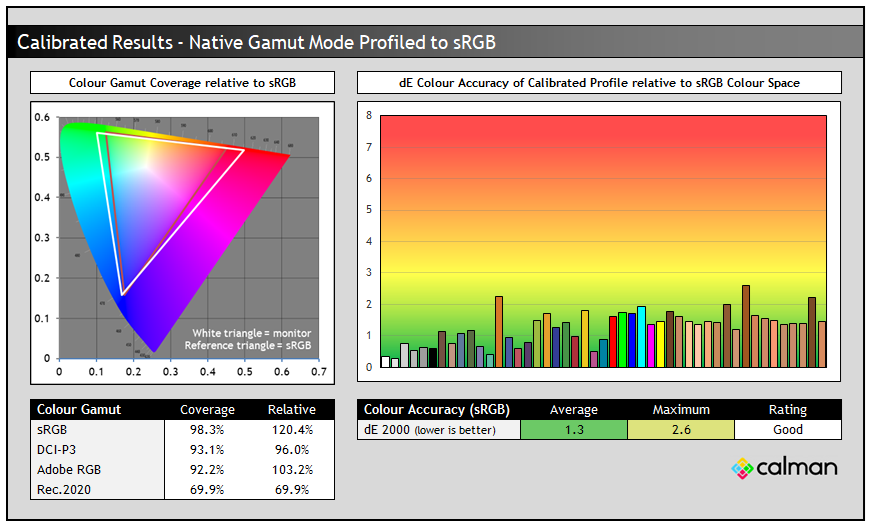
Calibration and profiling can produce some very good overall results and could be useful if you wanted to operate the screen within its native wide gamut mode, but then map the colour space back to something else like sRGB or Adobe RGB for instance for colour-aware applications (e.g. Photoshop). You would need a suitable calibration device and software for this, or you could also try our calibrated ICC profile.
The screen was profiled to 2.2 gamma, 6500K colour temp and to the sRGB colour space. The screen was left in its native wide gamut mode, but this profile will be used in colour-aware applications to map back to sRGB in this instance. Overall the calibrated results were very good as you’d hope. You can find our recommended settings and calibrated ICC profile in our database here if you own this screen.
ICC Profiles and Monitor Calibration Database
Find the recommended settings and a calibrated ICC profile for your display.
[View here]
General and Office
The G2412V is obviously a small-sized screen and at 23.8″ it’s a noticeable step down from the larger screens we’ve become accustomed to using and testing for a long time now. It always feels like a very small screen when we test ~24″ models again. However, that should be an obvious thing from the spec, you know what you’re buying here and for those who perhaps have very limited desk space, or are used to / happy with a 24″ sized screen, that’s still a viable option.
You just don’t get much screen space to work with and it’s not nearly as immersive as a larger screen, with the 1920 x 1080 resolution also being very limited in todays market, not well suited to split screen working or multitasking for instance. Moving up to a 27″ 1440p screen would offer you a significant upgrade, although you’re then probably looking at a higher price point too.
The resolution provides a ~93 PPI pixel density which is ok, but it doesn’t look as sharp and clear as higher pixel density screens. It’s the same as other 1080p 24″ screens for text clarity, but you definitely notice the drop compared with something like a 27″ 1440p 110 PPI display. The panel has a light matte anti-glare coating which provides decent reflection and glare handling with minimal grain.
The VA LCD panel provides reasonable viewing angles, certainly better than TN Film panels but not as wide as IPS-type panels. You get some noticeable gamma shift as you move viewing position, especially vertically although they’re perfectly fine for office-type work and a head on viewing position. Being a VA panel you do also get some off-centre gamma shift that is inherent to this panel technology, where gamma shifts a little as you move away from a central head-on viewing position. This can cause a bit of crushing of darker details when viewed directly head-on like on all VA matrices, but it was minor on this screen to be honest.
| Brightness | |
| Maximum brightness (SDR) | 273 nits |
| Minimum brightness | 28 nits |
| Uniform brightness behaviour |  |
| Flicker free | |
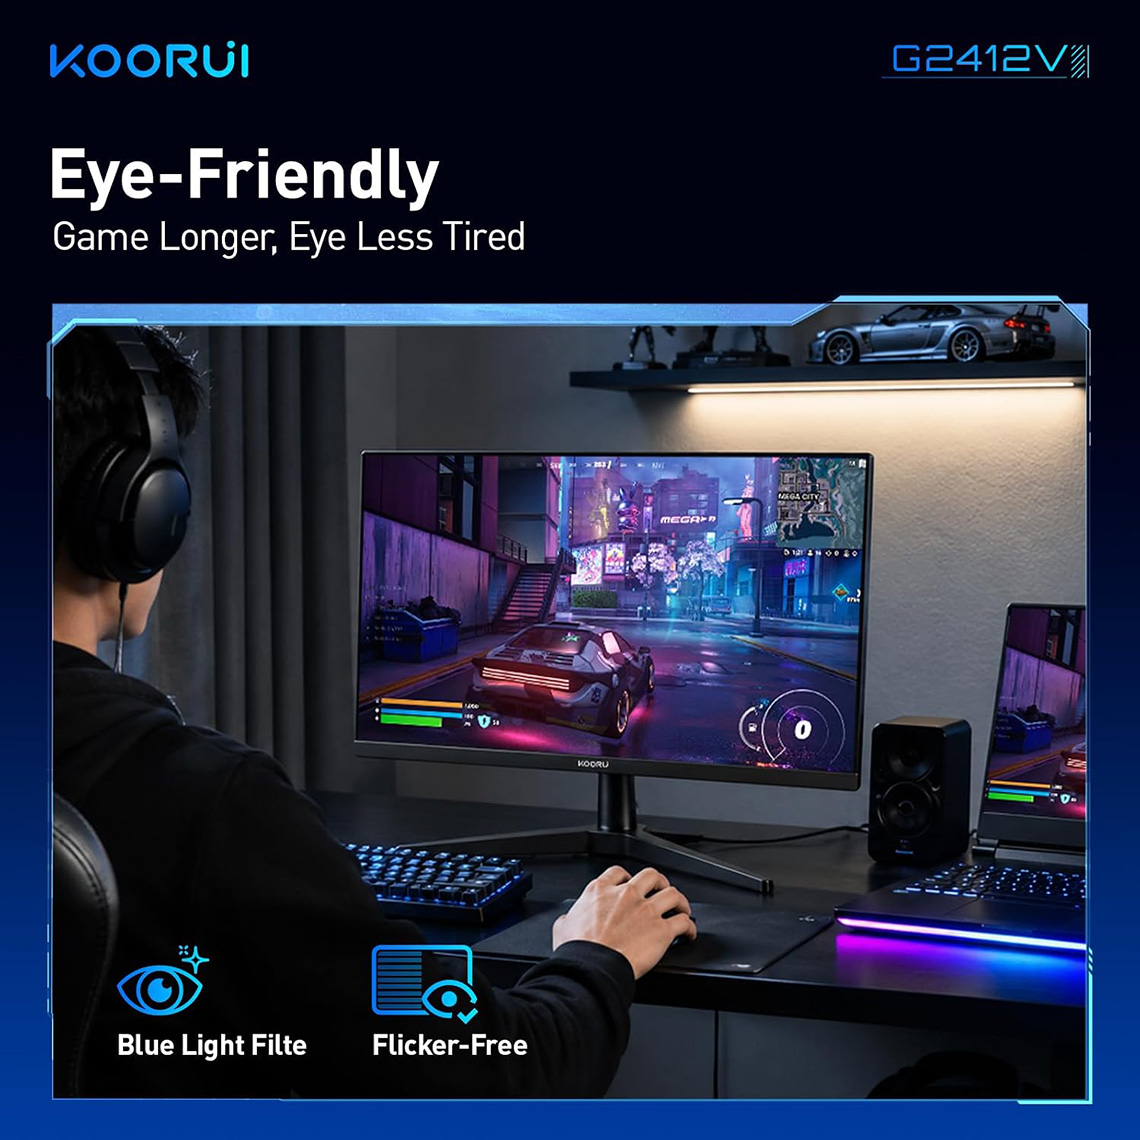
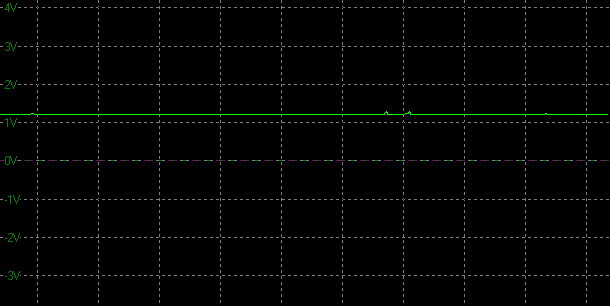
The very high contrast ratio provides a nice image with strong detail in darker content, and there is also a reasonable backlight adjustment range. Certainly there’s a very good minimum adjustment for working in darker room conditions, and an adequate upper brightness for most users, although it won’t get as bright as many other screens. It operates with a flicker free backlight as well with no PWM dimming which is great news.
| Flicker | |
| Flicker free verified | |
| PWM / flicker frequency | n/a |
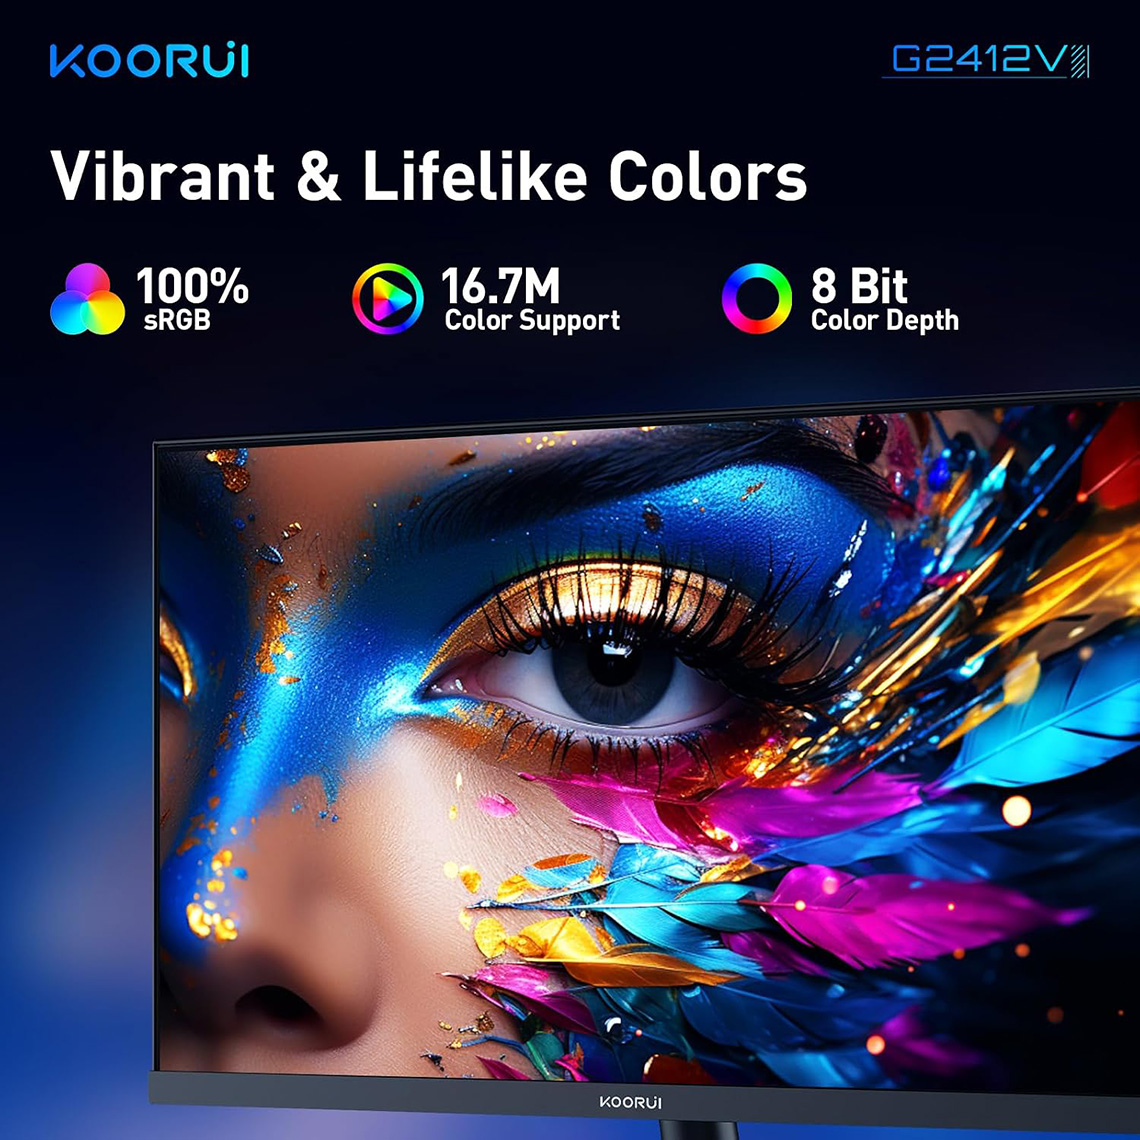
The screen only supports an 8-bit colour depth we should note, not that this should present any noticeable issues for the vast majority of users anyway as 10-bit SDR workflows are uncommon even on monitors which support that colour depth. There is a wide colour gamut from the backlight which provides vivid and saturated colours, giving you a boost over sRGB-only screens if you like that kind of appearance. A lot of people prefer that more colourful image for gaming and multimedia and even for just general usage, but if you want a more accurate sRGB performance for office and general usage then the screen also offers a decent sRGB emulation mode as we tested earlier.
| Blue light output | |
| Blue peak wavelength | 457 nm |
| Blue light portion | 32.34% |
| Low blue light modes available |  But ‘Eye Saver’ preset mode |
| Eye saver mode white point temp | 4568K |
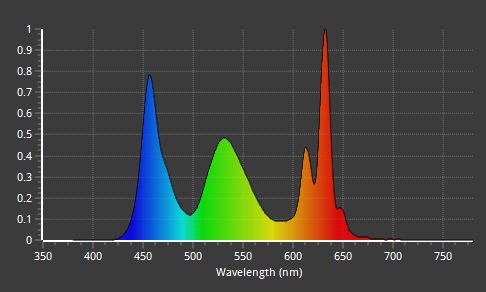
Above is the spectral distribution of the backlight at a calibrated 6500K white point. There are no specific low blue light modes on this screen but there is an ‘Eye-saver’ preset mode in the menu. This offers a much warmer and more yellow looking colour temp at 4568K but it might be useful for lots of office and text work or using the screen in the evening. A lot of the settings are locked in this mode like the colour menu, but you have access to adjust the brightness still although this has a slightly more restricted adjustment range of 23 – 225 nits.
Feature set is very limited of course given the low price point of this screen. Connectivity feels very limited, it’s been ages since we saw a VGA connection on any monitor but that’s included here. Most people with modern devices and graphics cards will need to use the HDMI connection we expect, which means you don’t have anything spare for connecting other external devices unfortunately. There’s no USB type-C connection, KVM switch, PiP/PbP, ambient light sensor, integrated speakers etc that you will find on many modern high-end monitors, there’s not even any USB-A data ports or headphone connection here, the connectivity is very limited. Stand adjustments are also very limited with only a basic tilt function offered, so the screen sits pretty low on your desk and doesn’t provide much in the way of ergonomic adjustment. VESA mounting the screen would be preferrable we expect.
We can’t criticise the screen too much for the lack of features and connections given the price point, we’re trying to be fair. But as we said earlier, we think there should probably have been a DP 1.2 connection instead of VGA and perhaps a couple of USB-A data ports and a headphone jack would have been useful for a lot of people.
Gaming
| Other Features | |
| Overdrive control | Off, Fast, Extreme |
| Single overdrive mode experience | |
| Maximum refresh rate | 180Hz |
| Variable refresh rate support | Not working from PC |
| Dual-mode function | |
| Blur reduction mode | |
| HDR support | |
| Gaming extras | Preset modes FPS and RTS No other settings or extras |
| Emulated gaming sizes | 4:3 aspect ratio mode |
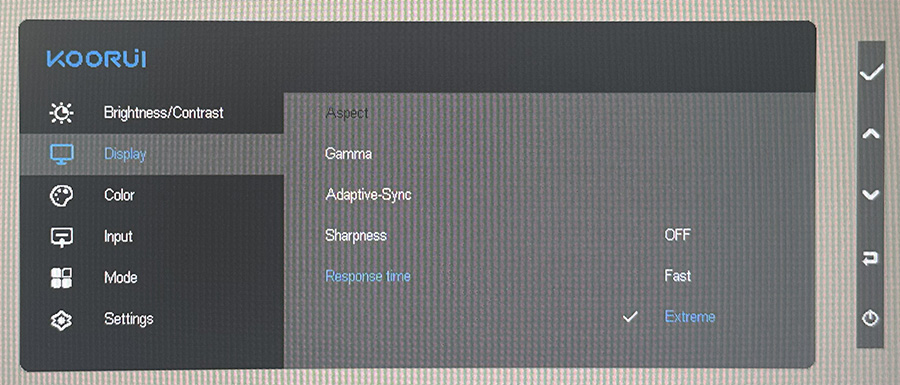
The G2412V has a decent refresh rate of 180Hz, more than you will find on many screens of this price range which typically reach around 100Hz. The VA LCD panel has a 5ms G2G response time spec as well, and there’s a setting in the OSD menu to control the overdrive level – off, fast and extreme modes.
We measured the response time performance in each of these modes at the maximum 180Hz refresh rate first of all and carried out various subjective assessments as well, capturing some pursuit camera photos to give a visual representation of real-world motion clarity.
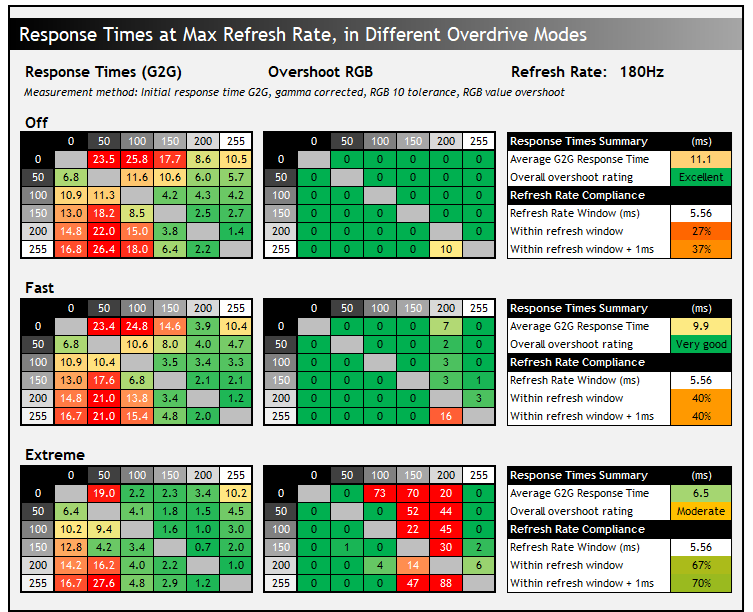
Pixel response times were slow in the ‘off’ mode, with an average 11.1ms G2G measured and some much slower transitions in the bottom left hand area (transitions from light to dark shades). This resulted in more noticeable smearing of light objects on darker backgrounds as you can see from the top UFO image below in the ‘off’ mode.
Along the top row of the G2G table there were also some slow transitions out of black, a familiar challenge on VA LCD panels which leads to some “black smearing” in moving content. You can see this along the dark edges of the UFO in the pursuit camera tests as well, although on this screen the black smearing was moderate, not as bad as we’ve seen on other VA panels in the past which was good.
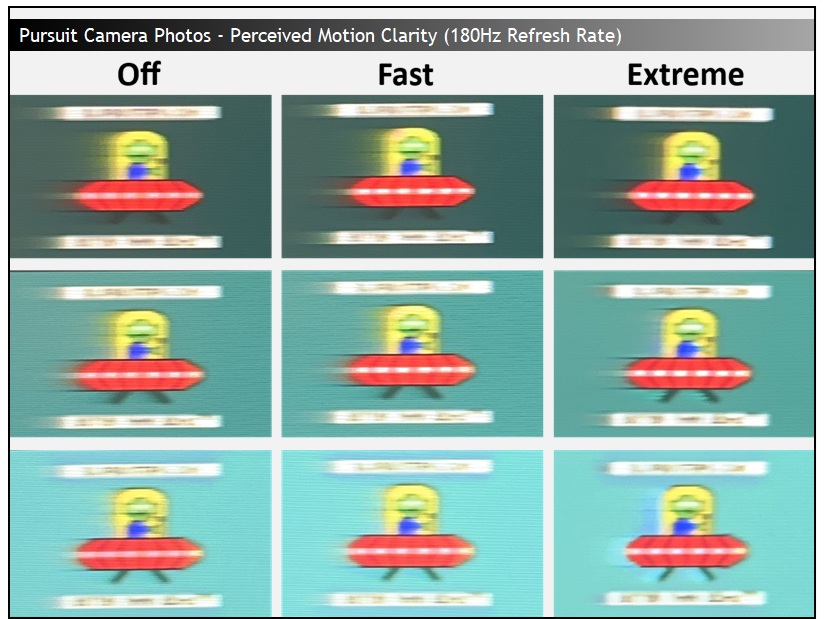
Moving up to the ‘fast’ mode offered some minor improvements to response times (9.9ms G2G average) but didn’t really change much at all, and visually that mode looks basically the same as the ‘off’ mode.
If you move up to the ‘extreme’ mode then things improve a fair bit. We now had a much better 6.5ms G2G response time average and the refresh rate compliance was better as well, with more pixel transitions keeping up with the 180Hz frame rate, and reducing the smearing on moving content. Motion clarity was improved and the moving UFO test looks a bit sharper and clearer in practice. The black smearing was reduced a little as well which was good, although it’s still visible on darker backgrounds. In this ‘extreme’ mode you start to get some high levels of overshoot though, especially evident on light content like the bottom UFO image where you get pale halos behind the moving image instead of smearing. Overshoot is moderate overall and we’d probably say the improvement in overall motion clarity is worth that trade-off in most cases.
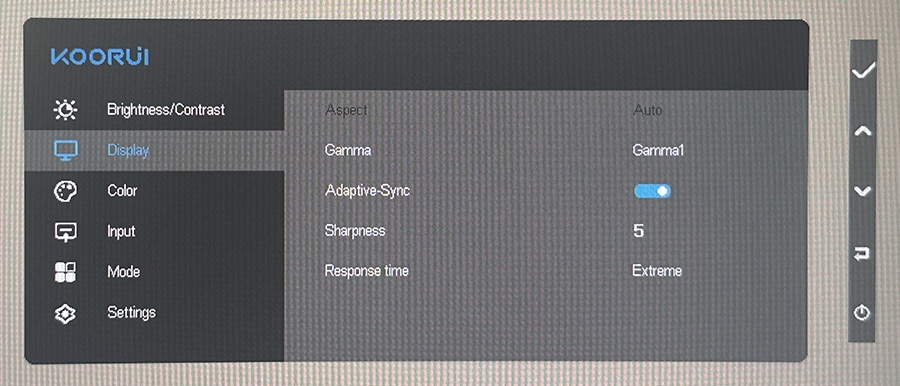
The screen has an option in the OSD menu for adaptive-sync, but we found during our testing that we could not enable G-sync from Windows or the NVIDIA control panel, it seemed to not be supported. Having checked with KOORUI we confirmed that this model does not actually support VRR, due to a scaler choice that was made to meet the extremely low price point.
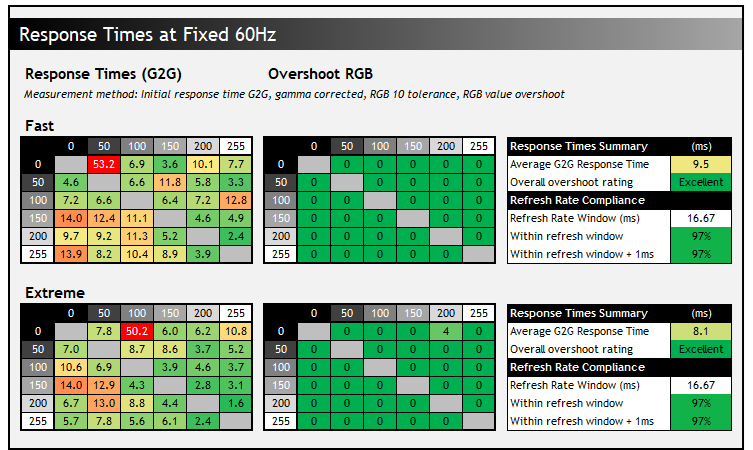
We did also measure the response times for lower refresh rate 60Hz devices which were very good in both the fast and extreme mode, keeping up nicely with the frame rate and showing no visible overshoot at all. Even the black smearing was minimal at this refresh rate, although of course motion clarity is much worse due to the lower refresh rate. Still, at least there’s decent response times for 60Hz inputs if needed, along with the decent colours and impressive contrast ratio offered.
We should note that this screen does not support HDR gaming at all, it won’t even accept an HDR10 input signal so it is only suitable for SDR gaming. Another expected limitation really for a budget screen like this but something to be aware of.
Input lag
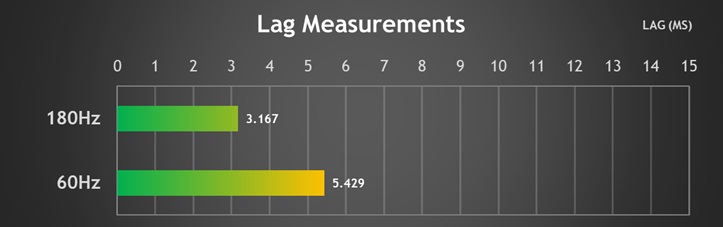
We measured the input lag as well at various refresh rates and this shows the total display lag, made up partly from signal processing delay, and partly from the response times of the panel. There is around 1.54ms of signal processing lag at native refresh rate once pixel response times are accounted for which was decent, and only marginally more (~3.8ms) for 60Hz devices.
Console support
| Console Gaming | |
| Native panel resolution | 1920 x 1080 (1080p) |
| Maximum resolution and refresh rate supported | 1080p @ 120Hz |
| Virtual 4K support | |
| 4K at 24Hz support | |
| 4K at 50Hz support | |
| HDMI connection version | 1.4 |
| HDMI-CEC auto switch | |
| VRR (variable refresh rates) | |
| Auto Low Latency Mode (ALLM) | |
| HDR10 support | |
| Dolby Vision HDR support | |
| Blur reduction mode support | |
| Integrated speakers | |
| Headphone connection | |
| HDMI cable provided | |
Support for modern games consoles is limited, mainly because the screen only offers a 1080p resolution and that’s the maximum you can set a connected console at. There’s no support for a “virtual 4K” input here, but you can run at 1080p 120Hz at least. There is no HDR capability on this screen at all, it won’t even accept an HDR10 input signal, it’s just not available. Also note that there’s no integrated speakers or a headphone connection, so you will need to figure out a way to handle sound from the console separately.
Older consoles which only run at 1080p 60Hz will be supported as well of course, those are a little simpler and don’t offer all the modern features that the latest consoles have.
Alternative screens in this price range
To fully evaluate this screen we should also consider what else you could buy at this extremely competitive price point of <$100 USD. We had a look what else was available on Amazon.com at the time of writing and identified the following alternatives in the same size range as examples from well known brands. There are loads more of course, these are just some examples:
| Model | Current price point ($ USD) | Size | Panel tech | Resolution | Refresh rate | Contrast ratio | Colour gamut | Additional features |
| Asus TUF VG249QE5A | Offer $99.00 Standard $119.00 | 23.8″ | IPS | 1080p | 146Hz (OC) | 1500:1 | 90% DCI-P3 | DP + HDMI + headphone 2x 2W speakers ELMB-sync blur reduction Tilt only stand |
| Dell SE2426H | Offer $75.99 Standard $99.99 | 23.8″ | IPS | 1080p | 144Hz | 1000:1 | sRGB | 2x HDMI Tilt only stand |
| KOORUI G2412V | Offer $99.99 Standard $159.99 | 23.8″ | VA | 1080p | 180Hz | 5000:1 | ~93% DCI-P3 | VGA + HDMI Tilt only stand |
| KTC H24B9S | $99.99 | 23.8″ | IPS | 1080p | 144Hz | 1500:1 | sRGB | DP + HDMI + headphone Tilt only stand |
| LG 24G411A | Offer $97.34 Standard $149.99 | 23.8″ | IPS | 1080p | 144Hz (OC) | 1000:1 | sRGB | DP + HDMI + headphone Tilt only stand |
| MSI MAG 242F | Offer $83.99 Standard $119.99 | 23.8″ | IPS | 1080p | 200Hz | 1000:1 | 89% DCI-P3 | DP + HDMI + headphone Tilt only stand |
| Philips 241V8LB | $89.99 | 23.8″ | VA | 1080p | 100Hz | 4000:1 | sRGB | VGA + HDMI + headphone Tilt only stand |
| Samsung S32GF | Offer $99.99 Standard $139.99 | 24″ | IPS | 1080p | 120Hz | 1000:1 | sRGB | 2x HDMI Tilt only stand |
There’s a big choice in this ~24″ market, lots of competition for budget screens with offerings from all the main brands available. Most of them have the same limited connectivity and stand as this KOORUI monitor, that seems to be a universal sacrifice for the <$100 USD price point. Really the differences are with panel technology (VA vs IPS) and refresh rate.
Where the KOORUI G2412V positions itself is as one of the higher refresh rate VA panel options on the market, offering 180Hz where most VA screens of this bracket are around the 100Hz mark from what we’ve seen. Contrast ratio is also very high at ~5000:1 in our testing, definitely distinguishing it against the IPS alternatives, along with the wide colour gamut which offers a more colourful experience compared with the wide range of sRGB-only screens. The IPS panels on the other hand will offer better viewing angles and possible improved response times for gaming, although we’ve not tested any of those to be able to confirm. Some of the other models offer improved connectivity as well with an extra HDMI port or DisplayPort instead of VGA. You’ll need to decide what is important to you.
Conclusion
It’s unusual for us to review such a budget-friendly screen but overall we thought that the KOORUI G2412V offers some decent features and good performance for its very competitive price point. Before we started testing we were a little concerned that a $100 USD screen would be absolutely awful, but that’s not the case. It does well in various areas, is weaker in some, and of course has a limited feature set in order to meet this price which you should be aware of.
Performance wise the VA LCD panel offers a very impressive contrast ratio of ~5000:1, definitely a key strength of this panel, we were impressed. Combined with excellent shadow detail you’ve got a screen that performs well for darker content, and offers great contrast. SDR accuracy was overall good as well, another area which could have been terrible, but was actually decent. You need to make a few adjustments to correct the cooler default setup, but there’s a good range of options and settings available and the wide gamut provides vivid and colourful images compared with typical sRGB-only monitors of this size. That’s another benefit of this KOORUI model compared with many other ~24″ budget displays. Thankfully KOORUI also provide a decent sRGB emulation mode if you need it, and while you shouldn’t expect super levels of colour accuracy, it is perfectly fine for general, casual usage. Brightness range was adequate, maybe a bit limited at the top end for some users who like a bright screen, and it was also great to see a flicker free backlight.
Gaming was reasonable with decent enough response times in the extreme mode to keep up with the 180Hz refresh rate, with fairly low levels of the dreaded VA black smearing, and moderate overshoot that we felt was an acceptable trade-off. Sure, we would have liked better and cleaner response times at max refresh rate though, but VA panels often struggle in this area and we didn’t feel like this budget panel was really any worse off than many more expensive VA screens we’ve reviewed in the past. We’re not sure why VRR isn’t working from a PC at the moment, that’s definitely an issue and a gap in support right now, and you’ll have to live without all the familiar gaming settings and extras you will find on higher-end monitors. We’d consider this screen suitable for casual gamers really, who might want to do a bit of gaming or watch some videos occasionally and it’s nice to see a decent refresh rate on offer here for this segment.
We can’t expect to have all the modern features and extras we’re used to seeing on other monitors, and we’re trying not to penalise the screen for things we clearly shouldn’t expect to be available like Mini LED backlights, high-end HDR support, blur reduction modes, USB-C and so on. There were a couple of things we felt should have been offered though, even at this price point, especially when some competing screens offer them. Having a VGA connection instead of DisplayPort seems a very unusual and dated choice, and we’d have much rather had DisplayPort available, or at least a secondary HDMI connection to provide support for a second input device. A headphone connection and some USB data ports would have been useful too, and perhaps a more versatile stand but the latter is the kind of thing that definitely adds more cost.
The G2412V is available at the time of writing in the US priced at $99.99 USD (affiliate link) and KOORUI tell us that it should be launched in the UK in late July at £79.99 GBP and in Europe also in late July at €89.99. For the price, it’s hard to say that it doesn’t offer some great value and it is definitely worth looking at if you’re after a budget-friendly screen.
| Pros | Cons |
| Very strong contrast ratio thanks to VA panel | VGA connection feels dated, and it’s missing DisplayPort which would have been far more useful |
| Wide colour gamut and decent colour performance | Adaptive-sync not available for gaming |
| Super competitive and budget price point | Missing a few features like USB-A ports and a headphone connection which could have been provided even at this price point |
We may earn a commission if you purchase from our affiliate links in this article- TFTCentral is a participant in the Amazon Services LLC Associates Programme, an affiliate advertising programme designed to provide a means for sites to earn advertising fees by advertising and linking to Amazon.com, Amazon.co.uk, Amazon.de, Amazon.ca and other Amazon stores worldwide. We also participate in a similar scheme for Overclockers.co.uk, Newegg, Bestbuy , B&H and some manufacturers.