NVIDIA Reflex – Measuring and Improving System Latency, Reflex Analyzer and NVIDIA LDAT
Originally published 7 June 2021, last updated 28 October 2021

Introduction
eSports and competitive gaming is becoming increasingly popular, and both professional and casual gamers continue to focus on performance and experience. Hardware manufacturers are always looking for new ways to help improve things and of course introduce features to promote their own products. There has been an obvious push in recent years with graphics card capabilities, as well as display capabilities in areas like frame rates, resolution and refresh rates. We’ve seen the continued advancement in refresh rates in desktop monitors with 144Hz being very common nowadays, and 240Hz and even 360Hz models being more widely available. This includes 4K @144Hz, 1440p @ 240Hz and 1080p @ 360Hz display options.
One area that has not been looked at as much is system latency in competitive games, by that we mean “click-to-display latency”. The industry has long used Frames Per Second (FPS) as the primary method of measuring gaming performance. But when talking about eSports and competitive gaming, performance is not just about raw throughput measured in FPS, but also about the time it takes for a frame to travel through the system from mouse click to display update. This is the system latency. In fact, system latency has a strong correlation to aim and shot accuracy in games. Reducing system latency is critical for competitive gamers, because it allows the PC and display to respond faster to a user’s mouse and keyboard inputs, enabling players to acquire enemies faster and take shots with greater precision.
You will know from our reviews that we always measure the latency of the display itself, whether that is latency from signal processing (from the scaler and hardware components – aka “input lag”), or from the liquid crystals (the panel response times). But this is only one component of the overall latency a gamer would experience in practice, you need to also consider everything that happens between clicking the mouse, and that action being reflected visually on the screen.
Several years ago NVIDIA invested in an eSports laboratory staffed by NVIDIA Research scientists, dedicated to understanding both player and hardware performance in eSports. Back in September 2020 they launched the first major development from this investment with their ‘NVIDIA Reflex’ technologies. This is a way to both optimize and measure latency in competitive games and consists of a few key areas we wanted to take a closer look at.
It is hard not to make this article sound like an advert given we are looking specifically at lots of NVIDIA innovations but it’s not designed to be an advert at all. Hopefully it is a useful guide giving you an overview of these technologies and what they can do. We will also be taking a look at the Reflex Analyzer tool built in to some modern gaming monitors, as well as the NVIDIA LDAT tool made available to reviewers and testers that you may have heard about online.

If you enjoy our work and want to say thanks, donations to the site are very welcome. If you would like to get early access to future reviews and articles please consider becoming a TFT Central supporter.
System Latency Overview

NVIDIA Reflex dynamically reduces system latency by combining both GPU and game optimisations.
There are many components to overall system latency, not only physical components such as the peripheral (mouse), the PC (system), and the display, but also software components such as the game running on the OS, and the rendering operations of the GPU. Once a user presses the mouse in a game, that event data is then sent to the PC, where it is processed by many components and sub-systems inside the PC including the CPU, the operating system (e.g. Windows), the game application, the render queue, the graphics card (GPU), and then the OS compositor. Next, it goes through scan out, which technically happens on the GPU, but is initiated by the display, before it’s finally processed and displayed on the screen itself. There is it subject to the panel pixel response times, as well as any internal processing from the monitor scaler and hardware itself. Hopefully you will be familiar with the monitor side of things from all our testing and reviews, capturing panel response times and display lag. What we are also interested in here for this article for the “system latency” is the complete “mouse-to-photon” timing, which includes processing by all of the above hardware and software systems.

The above diagram shows a high-level and medium-level view of all of the various components that contribute to latency in a system. PC gaming includes processing by a complex system of serial and parallel pipes, but we will do our best to break down the basic concepts. If a game feels laggy, it’s likely because you are experiencing high system latency – due to any of the smaller latency areas shown above.
A few of the areas where latency is incurred are more important than others. The render queue and the GPU form one of these areas that is called the render latency. While reducing display resolution and/or game graphics settings can lower render latency (not necessarily desirable in terms of picture quality), a great method to reduce render latency is to get a faster GPU if you can afford one. For the CPU, there is game simulation processing, render submit, and the graphics driver that runs on the CPU – these are controlled by the speed of the CPU. If you have latency in your game, you may need a faster CPU in order to reduce game latency. To help break down some of the measurements above, here is a helpful list that describes each latency section in more detail.
- Mouse HW – This is defined as the first electrical contact when the mouse is ready to send the event down the wire. In the mouse, there are a few routines (such as debounce) that add latency to your mouse button press.
- Mouse USB Hardware – The mouse has to wait on the next poll to send the packets down the wire. This time is reflected in USB HW.
- Mouse USB Software – Mouse USB SW is the time the OS and mouse driver handle the USB packet.
- Sampling – This section can grow or shrink based on your CPU framerate. Clicks can come into the OS based on a polling rate of 1000Hz (typically). This means that the click may have to wait for the next opportunity to be sampled by the game. That waiting time is called sampling latency.
- Simulation – Games constantly have to update the state of the world. This update is called Simulation. Simulation includes things like animations, the game state, and changes due to player input. Simulation is where your mouse inputs are applied to the game state.
- Render Submission – As the simulation figures out where to place things in the next frame, it will start to send rendering work to the graphics API runtime. The runtime in-turn hands off rendering commands to the graphics driver.
- Graphics Driver – The driver is responsible for communicating with the GPU and sending it groupings of commands. Depending on the graphics API, the driver does this grouping for the developer or the developer is responsible for grouping rendering work.
- Render Queue – Once the driver submits the work, it enters the Render Queue. The render queue is designed to keep the GPU constantly fed by always having work for the GPU to do. However, this comes at the cost of latency.
- Render – The time it takes for the GPU to render all the work associated with a single frame.
- Composition – Depending on your display mode (Fullscreen, borderless, windowed), Desktop Windows Manager (DWM) has to submit some additional rendering work to composite the rest of the desktop for a particular frame. This can add latency. It’s recommended to always be in fullscreen!
- Scanout – finally, the flip occurs (the currently displayed frame buffer is swapped to the newly completed frame buffer) and scanout is scheduled. Scanout feeds the display line by line based on the Hz of the display. Which is why we have included it into display latency.
- Display Processing – Display Processing is the time the display takes to process the incoming scanlines and initiate the pixel response. This is what we measure in our reviews for “display lag” or more commonly called “input lag” for a display. It can be influenced by the scaler and internal electronics.
- Pixel Response – This is the time it takes from when the pixel received the new colour value to the first detectable change by LDAT. We measure pixel response times in our reviews with G2G figures, and this varies depending on the panel technology, overdrive impulse and other factors.
Further information on system latency can be found on NVIDIA’s website here
Game Support for NVIDIA Reflex
The first part of what NVIDIA have done to help reduce system latency involves development from the game software itself. Latency-reducing technology has to be integrated in to the game software as a special low latency mode that the user can turn on. The NVIDIA Reflex Software Development Kit (SDK) has been made available to game developers and allows them to implement a low latency mode in to the game that “aligns game engine work to complete just-in-time for rendering, eliminating the GPU render queue and reducing CPU back pressure in GPU-bound scenarios”.
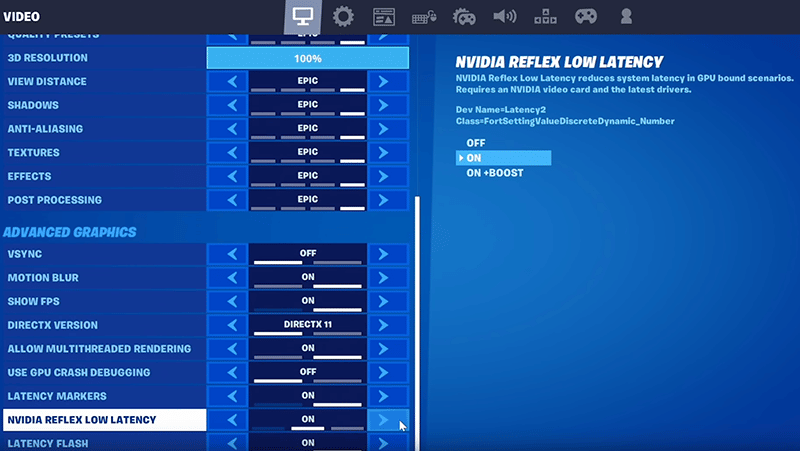
As a developer, System Latency (click-to-display) can be one of the hardest metrics to optimize for. In addition to latency reduction functions, the SDK also features measurement markers to calculate both Game and Render Latency – great for debugging and visualizing in-game performance counters. You can enable Reflex Low Latency mode via the settings menu in top competitive games such as Call of Duty: Warzone, Valorant, Apex Legends, Destiny 2, and Fortnite to boost responsiveness already. More will of course follow, and a full list of Reflex compatible games is available on NVIDIA’s website here.

GTX 1660 Super graphics card and monitor at 60Hz 1080p
The above chart is provided by NVIDIA and gives an indication of the impact Reflex can have on end to end system latency from their own testing. You will find additional third party testing online from hardware review sites. The main comparison is between the Reflex on/off modes with the grey and dark green bars. In these examples the grey bar represents normal 1080p, 60Hz gaming on a GTX 1660 Super graphics card where Reflex can shave off between 5 and 25ms depending on the example games here.
Further improvements to system latency overall are also possible with the latest RTX 30 series graphics cards which NVIDIA are of course keen to promote, as well as with the most recent high refresh rate monitors, which in some cases are also co-produced with NVIDIA and feature their Native G-sync hardware module. The above is just a fairly basic system simply showing that enabling Reflex in a supported game can show an improvement to system latency and experience.
So the first part of improving system latency is by the game software manufacturers integrating the feature in to their game as a setting. We have done a bit of testing ourselves later in this article when we look at the Asus ROG Swift PG259QNR display, but you will also find plenty of benchmarking online looking in more detail at graphics card performance, game settings etc.
Graphics Card Power and Monitor Refresh Rate

RTX 3080 graphics card and 144Hz refresh rate monitor
Competitive gamers generally avoid higher resolutions when playing first person shooters due to the increased rendering load and latency. However, with NVIDIA Reflex, you can get lower latency at higher resolutions – enabling competitive play for gamers who enjoy great image quality and a responsive experience. The above graph compares the impact of the Reflex setting in games at three common resolutions – 1080p, 1440p and 2160p (“4K”). This time it is also using a more powerful system than the first graph above it – an RTX 3080 graphics card and at 144Hz refresh rate monitor.
The combination of the more powerful graphics card and the higher monitor refresh rate has another positive impact on overall latency. For instance if you compare the Fortnite results from the first graph in the previous section, based on a 60Hz GTX 1660 Super card (at 1080p) you can see that the latency was 56 / 38ms with Reflex turned off/on. The in-game setting alone made a pretty major difference there on a fairly weak system. On this more powerful system at 144Hz refresh rate and with an RTX 3080 graphics card it was 23 / 21ms now (at 1080p again). So you can see that the improvements to the graphics card and monitor hardware has had a major impact on overall latency, leaving the in-game software Reflex setting to have a lesser impact now at 1080p.
However, in this second graph above you can see that as the resolution is increased, placing more demand on the graphics card, the impact of the Reflex in-game setting has a larger impact each time. At 1440p the latency is 30ms with Reflex off, and 23ms with it turned on. By the time you reach 4K resolutions the in-game Reflex setting and software improvements starts to have a major impact again, from 49ms down to 31ms.
By the way, we reviewed one of the first 360Hz monitors back in September 2020 which was the 24.5″ Asus ROG Swift PG259QN. That model did not feature the Reflex Latency Analyzer like the updated PG259QNR model (discussed later) but that review will give you a good feel for how these high refresh rate displays perform in terms of pixel response times, input lag etc. We should note here that you do not have to have the most modern NVIDIA graphics card either, as Reflex works with any 900 series GPU or later, meaning even budget or mid-range gamers can take advantage.
So you can see that there are 3 good ways to improve latency here – upgrade your graphics card to something more powerful, increase your monitor refresh rate, or enable Reflex Latency in supported games (or do all three!)
| NVIDIA RTX30 Series Check Pricing and Buy – Affiliate Links |
   |
| TFTCentral is a participant in the Amazon Services LLC Associates Programme, an affiliate advertising programme designed to provide a means for sites to earn advertising fees by advertising and linking to Amazon.com, Amazon.co.uk, Amazon.de, Amazon.ca and other Amazon stores worldwide. We also participate in a similar scheme for Overclockers.co.uk. |
Measuring End to End Latency – NVIDIA Reflex Latency Analyzer

So how do you measure your system latency and get to a position where you can track performance and make changes to improve your gaming experience? How do you make sure that your system is behaving as expected when you’re using NVIDIA Reflex Low Latency mode in a game? How do you measure for yourself the improvements different things can make, whether that is turning on Reflex in the game, or increasing your hardware capabilities?
In the past gamers usually had to guess at their system’s overall responsiveness based on throughput metrics such as Frames Per Second (FPS). Traditionally, measuring full system latency has only been accomplished with expensive and cumbersome high speed cameras, engineering equipment, and a modified mouse and LED to track when the mouse button has been pressed. With a 1000 FPS high speed camera, you can measure a minimum of 1ms of latency. However, a setup like this starts at about $ 5000 USD for the bare minimum equipment. Even then, once you have the setup, it takes roughly 3 minutes for each measurement…pretty much a non-starter for 99.9% of gamers.
NVIDIA’s Reflex Latency Analyzer provides a much more complete and accurate understanding of mouse, PC, and display performance end-to-end. This hardware is built into some new Native G-Sync displays (where the hardware G-sync module is used) and is a tool that captures end-to-end system latency and delivers a precise measure of your PC’s performance. As NVIDIA put it, you can “step confidently into battle knowing your PC is performing at peak level with GeForce RTX GPUs and NVIDIA Reflex Latency Analyzer-compatible displays and mice.” Settings are available within the OSD menu of the monitor which allow you to display a small, simple dashboard tracking latency, allowing you to then carry out testing and optimisation from there if you want.
Setting up your system for measurement – Mouse

To access this capability, you simply plug your mouse into the designated Reflex Latency Analyzer USB port on a compatible G-sync display like the Asus ROG Swift 360Hz PG259QNR (Amazon affiliate link) which we have with us for testing at the moment. This is a slight update to the PG259QN we reviewed last year where the Reflex Analyzer system has been added. The rest of the performance and capabilities should remain the same so you can refer to our old review for more info on the monitor.
As long as this is a Reflex-capable mouse the display’s Reflex USB port is a simple pass-through to the PC that watches for mouse clicks without adding any latency. Reflex Latency Analyzer works by detecting the clicks coming from your mouse and measuring the time it takes for a resulting display pixel change (e.g. gun fire) to happen on the screen, providing you with the option for several system latency measurements. Some games are designed to specifically support the Reflex Latency Analyser with a dedicated “muzzle flash” indicator. These games include Fortnite, Mordhau and Overwatch for instance.
You can use any mouse with Reflex Latency Analyzer to get PC + Display Latency (with the exception of Bluetooth mice). However, with a compatible mouse from many manufacturers including Acer, Asus, Corsair or Logitech for example you will also be able to measure peripheral latency and get full end-to-end system latency. A full list of Reflex compatible mice can be found on NVIDIA’s website here. We are testing with the Asus ROG Chakram Core wired optical gaming mouse – Amazon affiliate link.,
Enabling and using Reflex Latency Analyzer on the monitor

Next up you need a monitor that is compatible with NVIDIA’s Reflex Analyzer, which is built in to the screen and part of several top-end gaming displays where their Native G-sync hardware modules is included. As we said above, we are currently testing the Asus ROG Swift 360Hz PG259QNR which is a slight update to the PG259QN we reviewed last year, same panel and performance but NVIDIA Reflex Analyzer has now been added.
| Check pricing and availability in your region |
| |
|

You will find a setting in the OSD menu as shown in the image above. You can edit a few options like the sensitivity of the measurement, the location of the measurement rectangle and its location for instance. Once turned on, a small display overlay appears in the top left hand corner showing you your active refresh rate and latency measurements when you take them. This built-in monitor display tracks the ‘PC + Display’ latency which is measured from the moment the mouse click is received by the OS to the end of display latency. This excludes therefore any peripheral mouse latency.

We experimented with Reflex Latency Analyzer in Fortnite, following the instructions for simple, repeatable measurements that NVIDIA provide. You can see some example photos from our PG259QNR testing where the monitors built in overlay shows a 13ms latency stat for the ‘PC + Display latency’, that is the stat reported by the monitors built-in display as the most basic, but probably most common latency stat. Each time you take a new measurement (e.g. firing a gun when the measurement rectangle is in the appropriate place), this monitor overlay updates. It’s nice and quick to update and it’s easy to use.
Enabling Reflex Latency Analyzer dashboard from GeForce Experience (software based)

For additional insight, you can also enable a HUD from within the NVIDIA GeForce Experience software on your PC, instructions to enable this and more details are provided on NVIDIA’s site here. This additional software based HUD includes further insight like your frame rate (FPS), render present latency and the mouse latency too. You can also see from here the total system latency, which is the time encompassing the whole end-to-end measurement — from the start of peripheral latency to the end of display latency. The total system latency measurement requires a Latency-compatible mouse by the way.
GeForce Experience HUD in the software reports both PC + Display (like that show in the monitor overlay) and also total System Latency if you want it. You can see from this example photo that the same 13ms PC + Display latency reported from the monitors overlay display is recorded here too. It lags behind the monitors overlay slightly in refreshing. In this software based HUD there are other stats though including the mouse latency (0.8ms in this measurement example), and therefore the overall ‘system latency’ (13.8ms).
Testing with the Asus ROG Swift PG259QNR
We carried out some testing using the Asus ROG Swift PG259QNR as well, although we aren’t going to get in to testing loads of different variables. We mostly focused on the impact that monitor refresh rate can have, along with the in-game Reflex Latency setting.
For these tests we used the following setup with a large sample of 50 measurements taken for each setting, producing an average in each mode. These stats are from the monitors OSD overlay, representing the ‘PC + Display’ latency, as opposed to the full system latency (which would include the mouse as well).
- Asus ROG Chakram Core wired optical gaming mouse (Reflex capable)
- NVIDIA RTX 3080 graphics card
- Asus ROG Swift PG259QNR 360Hz monitor with G-sync module and Reflex Latency Analyzer
- Fortnite (game) with Reflex support

From this set of tests we can see the impact that the Reflex Latency setting has in each mode, helping reduce the latency a bit in each case, especially when running at lower refresh rates like 60Hz. You can see that driving the refresh rate up helps reduce the latency as well, although by the time you reach 240Hz and above you are in to the realms of diminishing returns in these examples it seems. There are benefits to be had in terms of frame rates and motion clarity though still from the increased refresh rate, but the latency flattens out mostly it seems.
There are plenty of websites and YouTube channels out there who have done further Reflex benchmarks so you should also check out those third parties to see more. We aren’t really wanting to delve too much in to graphic card or mouse benchmarking, we have enough to keep us busy with our display testing. From what we have seen this option seems to help nicely with reducing overall latency, especially where you are pushing higher resolutions and refresh rates and stretching the capabilities of your system.
Further Useful Content
NVIDIA also provide a useful video talking about Reflex and Latency Analyzer, embedded below which is worth checking out.
LDAT (Latency Display Analysis Tool)

What about measuring system latency where features like Reflex Latency Analyzer is not available and built in to the display? While this is not available to consumers, for reviewers and testers NVIDIA has created an intuitive and powerful hardware latency measurement tool called LDAT (Latency Display Analysis Tool). This is a tool they’ve used internally for some time, and are now making available to some reviewers too. The LDAT system is also used by top eSports game developers for their game design and quality assurance.

LDAT is a discrete hardware analyser that uses a luminance sensor to quickly and accurately measure the motion-to-photon (click-to-muzzle flash) latency in a game or application. It basically does the same thing that Reflex Latency Analyzer does, but doesn’t need to be built in to the display. The other good thing about LDAT is that it works cross-platform and works with GPUs from all vendors too since it is a separate tool.
LDAT adds a new dimension to measuring and tuning gaming performance, and can answer questions like: “How does resolution or certain in-game settings and effects impact overall end-to-end latency?”, or, “How can I tune settings to reduce latency and still maintain great image quality?”, or, “How does latency compare among different games I play, and which ones need more latency tuning than others?”. Capturing such data was complex and very time consuming in the past—if possible at all. LDAT makes this data available easily and quickly.

The LDAT tool itself is a small matchbox sized device. It has a rubber back so it won’t scratch your display, and a small cut out for the light sensor. This needs to be attached to the display using the connected rubber strap. Placing the LDAT device on the screen is quite simple as you just have to position the luminance sensor over an area of the display that shows a luminance or motion (animation) change once the mouse button has been pressed.

Once it’s in place on the monitor there is a small 2-pin external mouse button connector (optional to use), a pressable button (since LDAT v2) and a status LED at the bottom. The pressable button was added to LDAT v2 so you may see some reviewers using LDAT v1 online where this button is not featured. This button operates the “integrated mouse” to trigger actions in the testing, so you don’t even need to worry about mouse latency unless you want to measure that specifically too with a certain connected mouse. The status indicator light that changes color to indicate the current mode of operation.


There is a Micro-USB port which is used for PC connectivity, and also if you wanted to use it a 3.5-mm audio port which accepts headsets and external microphones. This port serves as an audio input, and a connected microphone can be used to listen for mouse clicks, which can then trigger the latency measurement. For this to work, the microphone has to be placed close to the mouse button.


LDAT compares the time difference between the exact moment of the mouse click and the moment the light changes on the display. Note that LDAT measures system latency beginning with the mouse switch electrically closing the contact (Mouse HW in the ‘system latency overview’ section above) and ending when the screen luminance increases by at least 6% compared to its initial value. This value was chosen as it’s the first detectable change that does not trigger on common luminance noise. It is possible to adjust this to a higher threshold if desired.
The LDAT software then tracks latency performance and provides a range of options and features:

The LDAT software shows the latency measurements in real time, and can average multiple measurements, showing you a histogram with a Gaussian distribution. NVIDIA have added additional functionality to speed up measurements even more dramatically: the ability to have LDAT auto-fire so you don’t have to press the mouse button repeatedly which is handy of course if you’re talking loads of measurements.

Above is an example of a series of 10 measurements taken with a simple DX application provided with the tool (outside of a game), just to show how the measurements are reported. You can use the device within games too, all you really need to do is position the device over where the muzzle flash of a firing gun would be, and you can trigger measurements using the built-in button, which are them captured in the software.


Conclusion
Hopefully that’s a useful overview of what NVIDIA Reflex is all about. There are positive results from what we’ve experienced in our testing, and from what we’ve seen measured online with this technology, especially in certain games and setting configurations. It’s great to see a new capability like this launched and the more games using the NVIDIA SDK and making this option available, the better. Beyond the actual low latency modes and game development, it’s also nice to see NVIDIA integrate new features in to modern G-sync monitors with the Reflex Latency Analyzer tool. That’s a nice addition to gaming displays we think and we expect more serious gamers to see a nice benefit in being able to measure, improve and validate their latency performance simply and easily. For reviewers and hardware testers the LDAT tool also provides the same kind of functionality, but with more flexibility with how you use it, and across different systems and setups. We are exploring new ways in which we can make use of this tool in our future display reviews and testing so watch this space.
If you enjoy our work and want to say thanks, donations to the site are very welcome. If you would like to get early access to future reviews and articles please consider becoming a TFT Central supporter.
We may earn a commission if you purchase from our affiliate links in this article- TFTCentral is a participant in the Amazon Services LLC Associates Programme, an affiliate advertising programme designed to provide a means for sites to earn advertising fees by advertising and linking to Amazon.com, Amazon.co.uk, Amazon.de, Amazon.ca and other Amazon stores worldwide. We also participate in a similar scheme for Overclockers.co.uk, Newegg, Bestbuy , B&H and some manufacturers.
Stay Up To Date
 |  |  | |
| Subscribe on YouTube | Follow us on X | Support Us | Browser Alerts |