Gigabyte Aorus AD27QD Certified as G-sync Compatible by NVIDIA, and New Crosshair Pack
We are currently reviewing the Gigabyte Aorus AD27QD monitor with a 27″ 2560 x 1440 IPS-type panel, 144Hz refresh rate and AMD FreeSync support. Our review should be completed later this week. The screen was already known to support NVIDIA G-sync thanks to their January 2019 driver updates but the screen has now been officially recognized by NVIDIA as being “G-sync Compatible”.
There aren’t many screens confirmed so far as G-sync Compatible. NVIDIA will test monitors that deliver a baseline VRR experience and if the certification is passed, they will activate their VRR features automatically in the NVIDIA control panel. NVIDIA keep an up to date list of monitors that are officially G-sync Compatible, and they’ll continue to evaluate monitors and update the support list going forward. G-sync Compatible testing validates that the monitor does not show blanking, pulsing, flickering, ghosting or other artifacts during VRR gaming. They also validate that the monitor can operate in VRR at any game frame rate by supporting a VRR range of at least 2.4:1 (e.g. 60Hz-144Hz), and offer the gamer a seamless experience by enabling VRR by default. So a screen which carries this official “G-sync Compatible” badge should in theory offer reliable VRR experience at least. It at least has been through many tests and checks from NVIDIA to earn that badge.
You can read more about Variable Refresh Rates, G-sync, FreeSync and the G-sync Compatible scheme in our recently updated article.
Updated v9 Firmware

Although this doesn’t appear to be available from the Gigabyte website yet in the downloads section, their news piece also suggests there is a new version of the firmware available which adds “virtual 4K support”. It’s not clear if any other tweaks of bug fixes have been added at the moment, this is the only thing mentioned in the press release.
According to their marketing, “Virtual 4K technology can help your game console (HDMI signal) output 4K resolution on a non-4K monitor. This technology solves the issue of game consoles not supporting 2K resolution. If you don’t have this technology on your monitor, you can only choose 1080p resolution with your 2K monitor, which is a big waste. With this technology you can output 4K resolution on your 2K monitor, letting you have better picture quality and a better gaming experience.”
We noticed actually that the v4 firmware we are currently testing on this monitor allows you to select a 3840 x 2160 input resolution in Windows if you want. The panel is natively 2560 x 1440 and so you don’t get the usual 4K sharpness if you use it for normal Windows use that you would get from a true 4K panel. But as the press release says, this might be useful if you’ve got a 4K input from a games console or similar that can then be scaled down to 1440p instead of selecting a 1080p input only.
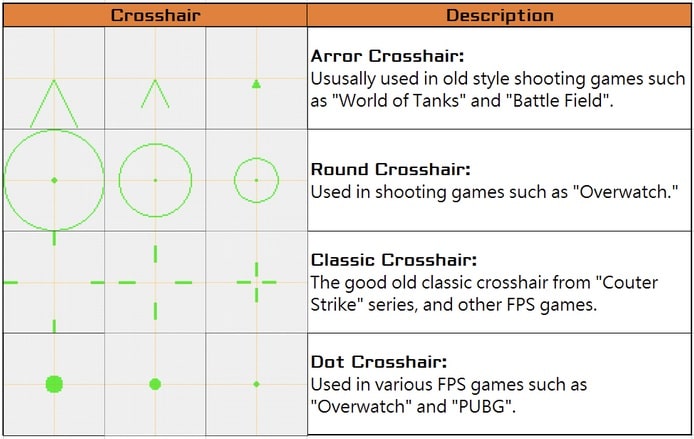
New Crosshair Pack

In this update, AORUS officially released a crosshair pack letting gamers to have more choices for their crosshair if they don’t want to draw one themselves. With such a variety of crosshairs, gamers can find the crosshair that suits them the most, which helps them aim faster and improve their reflexes. This pack is available from their downloads page already.
“In the crosshair pack, you can find 4 kinds of basic crosshairs used from a variety of game titles. Are you a CS:GO veteran that can’t bring out your best performance because of using a crosshair that you are not used to? Do you love to use round crosshairs from Overwatch but also love to play other shooting games such as APEX Legends which doesn’t have one? The crosshair pack can solve all these problems! AORUS delivered 12 crosshairs in this crosshair pack so carrying your favorite crosshair from one game to another is not a fantasy anymore. You can download the crosshair pack and bring out your best performance in the game by using the crosshair you love most now!”
After downloading the crosshair pack, you only need to use the OSD sidekick software to import the crosshair you want into your monitor. Click on the crosshair slot that you want to edit then click the edit icon and you’ll open the crosshair edit panel. Click the import button on the panel and choose the crosshair that you want to import and then click save, the crosshair that you chose will be imported into the monitor.
The software also has an export function. Click on the export button on the edit panel and you can share your customized crosshair with your friends and create a unique crosshair of your own.
Source: Gigabyte