LG 27GR95QE OLED
Originally published 24 Feb 2023, last updated 6 April 2023

Introduction
240Hz OLED monitors are finally here! It’s been teased for a while but the first OLED panels from LG.Display designed specifically for desktop monitors are now available, and not only that; but they have a higher refresh rate than anything seen before in the OLED TV space. The LG 27GR95QE is the first of these released to market, measuring in at 27″ in size and featuring a high 240Hz refresh rate. We’re sure everyone already knows about the benefits of OLED panels, with their true blacks, near-infinite contrast ratio and near-instant response time; but the addition of a 240Hz refresh rate helps take motion clarity to the next level.
This is also the first sensible monitor-sized OLED panel released (with a high refresh rate above 175Hz which was the previous max) and is bound to attract a lot of interest. It’s 27″ panel (well, 26.5″ to be precise) offers a common 2560 x 1440 resolution, a wide colour gamut with 98.5% DCI-P3 coverage quoted, and even support for hardware calibration. Being OLED it’s well placed to handle HDR content with its per-pixel dimming, and it has a quoted 1000 nits peak brightness spec. This is made possible through the use of LG.Display’s latest generation “META” OLED technology, including MLA (Micro Lens Array), which you can read a lot more about here if you’re interested.
A lot has already been made about this screen in pre-release discussion, early reviews and initial buyer feedback, so we plan to tackle all the key questions throughout this review – what is the text clarity like? How is the matte screen coating? Is 1440p too low a resolution? Is the screen bright enough for SDR? What about HDR performance? Is it as fast as 360Hz LCD’s? Read on to find out.
Related content: Monitor OLED Panel Roadmap Updates – March 2023 – what’s coming in the future for OLED desktop monitors
| Where to Buy | |
 | |
| We may earn a commission if you purchase from our affiliate links in this news piece – TFTCentral is a participant in the Amazon Services LLC Associates Programme, an affiliate advertising programme designed to provide a means for sites to earn advertising fees by advertising and linking to Amazon.com, Amazon.co.uk, Amazon.de, Amazon.ca and other Amazon stores worldwide. We also participate in a similar scheme for Overclockers.co.uk, Newegg, Bestbuy and some manufacturers. |
Key Specs
- 27″ screen size (26.5″) with 16:9 aspect ratio (flat)
- 2560 x 1440 resolution (1440p)
- LG.Display OLED panel (LW270AHQ-ERG1)
- 240Hz refresh rate
- Adaptive-sync support for VRR (NVIDIA ‘G-sync Compatible’ and AMD ‘FreeSync Premium’ certified)
- 0.03ms G2G response time spec
- 1.5 million:1 contrast ratio
- Wide colour gamut with 98.5% DCI-P3 coverage
- Hardware calibration support
- 200 cd/m2 brightness (SDR) and 1000 cd/m2 peak brightness (HDR)
- Per pixel dimming for excellent HDR capabilities
- Matte anti-glare screen coating
- DisplayPort 1.4 and 2x HDMI 2.1 connections
- DTS HeadphoneX connection, SPDIF output and 2x USB data ports
- Fully adjustable stand with tilt, height, swivel and rotate functions
- Remote control accessory

Design and Features
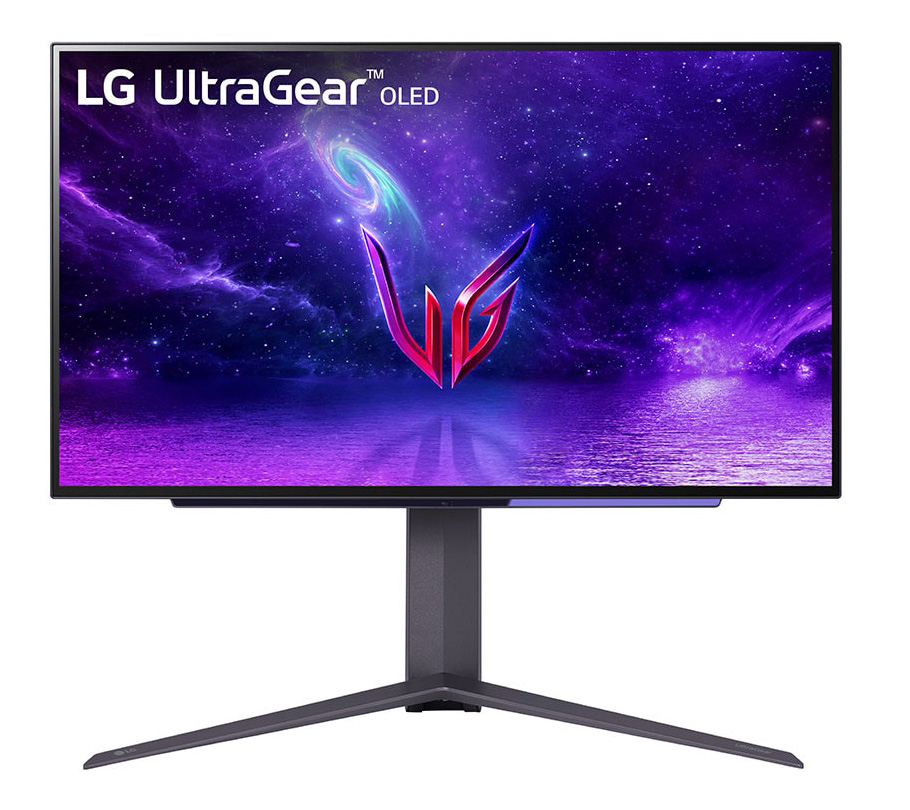
The 27GR95QE comes in a black and dark grey design. It has a 4 side “borderless” design with a thin plastic edge around all sides, but there’s also an additional black panel border before the image starts, giving a total 9mm border along the sides and top, and 12mm along the bottom. There is also a slightly protruding section along the bottom edge that houses some of the electronics, remote control sensor, connections and lighting features.
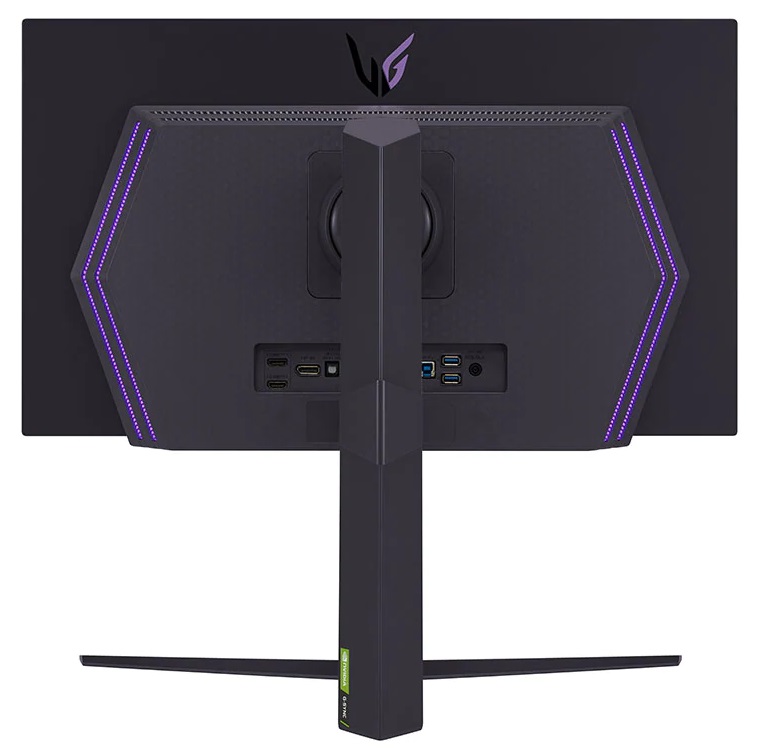
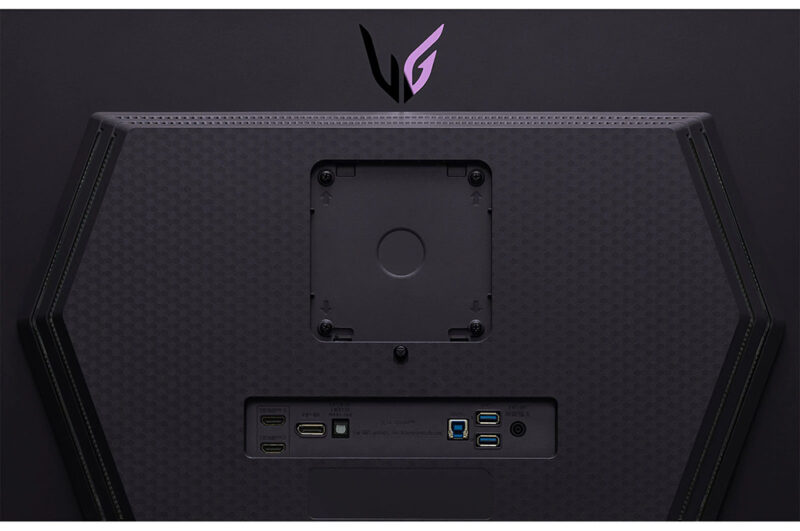
The back of the screen is encased in a matte dark grey plastic. There is a slight etched pattern to the middle section where the stand attaches and the connections are, but it’s quite subtle. The stand attaches in the middle via a quick release mechanism, or can be removed in favour of VESA 100mm mounting if you’d rather. The connections are located on the back of this section too and face outwards, making them easier to reach and access. There is some fairly subtle RGB lighting “wings” on the sides of this central section too which can be customised via the OSD menu in a range of colours. They aren’t particularly bright so can’t really be used for any screen backlighting against a wall. If you’re looking for something like that, you may want to have a look at our recent review of BenQ’s Screenbar Halo monitor accessory. From behind these RGB lights look reasonable enough, but you’re unlikely to get much benefit from them unless you can see the back of your screen. There is a small additional spotlight on the bottom edge of the screen which projects a more noticeable light underneath the monitor and looks pretty good.

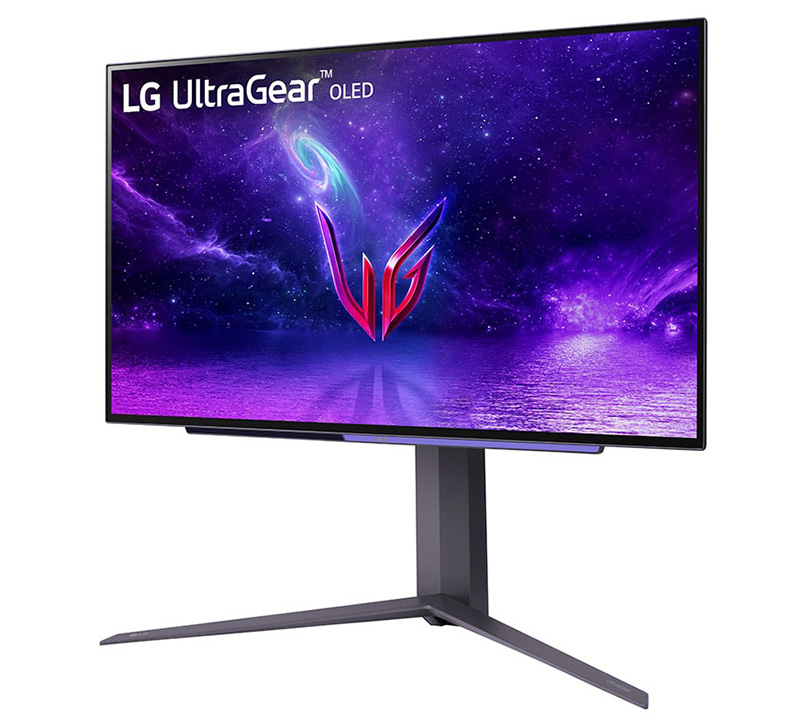
The stand is finished in a dark grey plastic and has a slightly glossy finish to it. There’s a cable tidy clip on the back, and a metal aluminium 2-pronged foot at the base to support the screen. You can see from the side view pictures that the screen has a very thin panel profile. That’s thanks to the OLED panel and there not having the need for any backlight unit. The screen still has a reasonable thickness though overall with that additional central sections with connections and electronics, and the stand is quite deep too. But the panel area looks very sleek and slim which looks great.
Ergonomics
The stand adjustments are all pretty stiff to operate. Tilt provides a good range, as does height, but the side to side swivel is pretty limited. Rotation also only goes in one direction, anti-clockwise which feels a bit counter-intuitive, but it’s probably not the kind of thing you’re going to use regularly anyway. We would have liked the adjustments to be a bit easier though, but at least the screen remains very stable with no real wobble at all thanks to the chunky and sturdy stand.
Connections

The back of the screen hosts the connections. There are 2x HDMI 2.1 and 1x DisplayPort 1.4 (with DSC) video ports. There is then an SPDIF audio output, USB upstream (to connect back to PC), 2x USB downstream data ports and a 4-pole headphone jack which lets you carry a stereo headphone signal and mono microphone signal with common ground.

On the bottom edge of the screen for quick and easy access is a DTS HeadphoneX port. This provides accurate spatialization and localization in games for 3D audio over headphones. It also supports channel-based, scene based, and object-based audio.
Integrated Fan
The screen does have a small fan built in to it to help keep it cool, and presumably as an additional measure to cool the OLED panel and help mitigate image retention risks. It’s very quiet and you can only really hear it if you press your ear up close to the top and back of the screen. At no point during our testing did we hear it over the quiet fans in our PC and our ambient room conditions, and we never heard it “ramp up” to higher levels either. It’s unlikely to cause any concern unless you’ve got a super-quiet room and setup and are really bothered by this kind of thing.
OSD and Controls
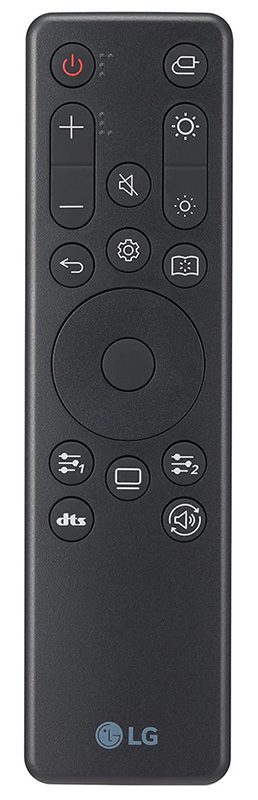
The screen comes packaged with a useful little remote control as shown above. Don’t lose this as you need it to access most of the OSD menu and options! You can control some very limited parts of the OSD via a single button on the bottom edge of the screen, but there’s only access to input selection, volume and brightness so that’s super-limiting. It’s also really fiddly to use.


Even LG’s own OSD control software for your PC has limited options with in it, we’ve no idea why! Why not just include all the same options available via the remote control via the monitors physical buttons, or at least via the separate software? In today’s market where you have simple joystick controllers on monitors to navigate the menu, it seems a massive oversight to not have something like that on the 27GR95QE. Having a remote control is a nice-to-have, and we are grateful it’s been included, but at the same time that shouldn’t be at the expense of full controls from the monitor itself. It’s fair enough on LG’s TV series where you probably always want to use a remote anyway, but on a desktop monitor it’s poor.
Thankfully the controller provides quick, easy and intuitive access to the main menu.

Above is the only menu you can access using the button on the screen itself! Very limited.

But via the remote control, the main menu has a reasonable range of options to play with. There’s a wide range of preset modes you can select from and customise, including two hardware calibrated modes if you have a compatible calibration device.

The game menu has a few familiar gamer settings like black stabilizer, crosshair and FPS counter as with other recent LG gaming screens.

Using the remote control made accessing and moving around the main menu simple. The remote also includes quick access to a few features like volume, brightness, mute, preset mode selection, RGB lighting and some of the other sound and DTS Headphone X stuff. There is also a specific button to access the OLED care controls, which are oddly not a sub-section within the main OSD menu. We’ve no idea why…
The only annoyance really with the remote control is that there’s a quick shortcut to the reader mode. That’s fine, and maybe you’d want to quickly switch to that mode for text work at night or something to make the image warmer. But if you press it a second time, it should really revert you back to the mode you were on before, which it doesn’t, and so you have to dig back through the main OSD to get back to your “normal” preset mode afterwards which often involves cycling back through the modes.
One other side note about the LG control software, that does at least allow user-updateable firmware should LG ever make any updates or improvements, which is good news.
OLED Care Options
There are a few OLED care options available within their own dedicated menu as shown below:

The ‘Screen move’ setting shifts the pixels a bit from time to time if you enable it, and will be familiar to anyone who has used an OLED TV before. Personally I find these features annoying for desktop and general use where you might notice the screen move a bit, but for gaming and multimedia you’d be hard pressed to notice it. But then again, it’s of less value for those kind of dynamic uses anyway. To help mitigate the risk of image retention and burn in, you might want to have this turned on but at least LG give you the option to turn it off as well. The pixels have been “over-provisioned” on this screen, so while the image shifts a bit by a few pixels, you never lose any of the actual image off the edges. There is no explanation of what the 4 different modes do in the user manual, so we have no idea how they differ. We tried a couple of them and found the occasional shifting of the image annoying for desktop use personally.
The Screen Saver function seems a sensible one to leave turned on, as it will turn the screen off if it detects no change to the image for an extended period of time. We never saw this happen unnecessarily during any normal usage, even on pretty static desktop applications. It worked as intended in our usage when we left the screen alone fully.
There are then two cleaning cycles, “image cleaning” which takes 10 mins to run, and “pixel cleaning” which will take 1 minute. It’s the “image cleaning” that is the more common and frequent minor cleaning cycle, despite being the longer to complete. The screen will prompt you to run these periodically anyway after certain amounts of usage time (4 hours of use for image cleaning and 500 hours of use for pixel cleaning), and will run the cycle when the screen is in standby so as not to disrupt your usage.
Thankfully there doesn’t seem to be any ASBL (Automatic Static Brightness Limiter) at all on this screen, a feature on OLED TV’s which dims the screens content when it detects static images. This can be pretty aggressive and frequent on LG’s OLED TV’s (like the LG 42C2), and one of the main problems when trying to use those for desktop and static use. Having the screen dim and brighten all the time can be really annoying, so it’s good to see that’s not featured here. This should not be confused with ABL (Auto Brightness Limiter) though which is related to how the OLED panel handles the screens brightness of different images. We will talk about that more in a moment. For more info on ASBL, ABL and all these other OLED dimming terms and names, see our article here.
Related content: Watch This Before You Buy an OLED Monitor!! 5 Things You Need to Know
Panel
| Panel | Backlighting | ||
| Panel Manufacturer | LG.Display | Backlighting Type | n/a (OLED panel) |
| Panel Technology | WOLED | Colour space | Wide gamut |
| Panel Part | LW270AHQ-ERG1 | sRGB coverage | Not listed (99.8% measured) |
| Screen Coating | Anti-glare (AG) matte | DCI-P3 | 98.5% (97.4% measured) |
| Colour Palette | 1.07b | Adobe RGB coverage | Not listed (96.4% measured) |
| Colour depth | 10-bit | Flicker free verified | |
Anti-glare screen coating
The 27GR95QE features a more traditional monitor-like matte anti-glare coating, as opposed to a glossy panel coating like you’d find on popular OLED TV’s including the LG 42C2. This seems to be the panel coating of choice for OLED screens aimed at desktop use, and it makes sense when you think about the typical use cases for desktop monitors compared with TV’s, and the fact that this type of panel coating has been used for many years in the LCD market.
Reflection handling
This coating does a very good job of reducing reflections and handling external light sources like windows and lamps and we noticed much better reflection handling (no surprise) than glossy panels like the LG C2. Like normal matte coated monitors, there were very minimal reflections of lamps, windows and lights at all, and this made the screen very comfortable to use in office environments and in daytime usage. In our opinion this is far more suitable for a desktop monitor than a glossy panel coating. If you really prefer glossy, you may want to consider looking at the Dough Spectrum ES07E2D which is coming out later this year, and is basically a glossy version of this panel.
Image clarity and graininess
There’s been some complaints about the coating on this screen with some users and reviewers picking up on a grainy appearance in office applications, most noticeable on white backgrounds. The AG coating LG have used here is is more grainy than modern LCD panels, including LG.Display’s own IPS panels oddly. Comparing the 27GR95QE side by side with the LG 38GL950G (LG.Display Nano-IPS panel) you can see that the LCD looks smoother and clearer, whereas the coating on the OLED looks more grainy and a bit dirty. We also compared it next to a modern AU Optronics IPS-type panel and found the same thing. It’s most noticeable on plain white backgrounds, which are of course common for office work and where you are most likely to spot it.
For some reason LG have opted to use a grainer than normal AG coating here. Perhaps this was a measure to further control reflections and diffuse ambient light, and it does do a slightly better job than those LCD panels in that area. But we think most people would have preferred the slightly more modest AG coating akin to modern IPS panels to be honest. This feels a bit of a step back in the world of AG coatings, like going back to the older gen IPS AG coating days. In practice you do quickly get used to it, and to be honest we didn’t see many issues with it day to day, it’s not horrible or anything and it’s not super-obvious unless you compare screens side by side. But if you’re sensitive to coating levels, or you’re coming from another modern panel, you may notice it, if only perhaps at first.
We will talk about text rendering and image clarity a bit more later on in the office and general use section of the review too, where we will talk about the sub-pixel structure.
Coating impact on contrast and black depth
A matte screen coating can have an impact when it comes to black depth, contrast ratio and HDR experience but this depends on your lighting and room conditions. In some ambient light conditions the blacks may not look as deep or inky visually to the user as they would on a glossy display. With this being an OLED panel, famous for its true blacks and amazing contrast ratio this could be considered a problem – are you “wasting” that by having an AG coating that reduces your perceived contrast?
In certain brighter room conditions blacks look a little more dark grey as the anti-reflective coating reflects some of the surrounding light back at you and it “dulls” the contrast a bit. You don’t get this same effect if the coating is fully glossy as there’s no AG layer, but what you do get instead is more reflections. Don’t forget this same thing applies to all AG coated desktop LCD monitors, you have the same impact on perceived black depth and contrast on IPS, TN Film and VA panels depending on your lighting conditions if there’s an AG coating used. You’re still getting better relative blacks and contrast on this OLED (not to mention other benefits) compared with LCD technologies. They are all impacted in the same way by their coatings. Likewise a glossy panel coating on an LCD desktop monitor can help blacks “pop” and look deeper, in the right lighting conditions.

We should say that the impact on the contrast and black depth on this screen was less pronounced than on the Dell Alienware AW3423DW (QD-OLED screen) which is often criticised for this problem, perhaps unfairly in some cases. On the Dell though in moderately to well-lit rooms you do experience an impact on contrast and black depth, with blacks starting to look more grey. You can see a side by side comparison courtesy of Monitors Unboxed above in a studio lit room where the black of the LG looks deeper and darker than the Dell. This gets more pronounced as the ambient lighting conditions get brighter. This reduction in brighter rooms may be down to the alternative semi-glossy AR coating Dell have used, or perhaps related more to the QD-OLED panel, but the key thing is that the impact is less noticeable here on the LG.
Anyway, back to the coating of the LG specifically. This impact to the black depth and contrast really varies depending on your ambient lighting. If you were using the screen in a darker room and were careful about the positioning of your light sources, then blacks look very good and as you would hope for from an OLED screen. Just because it’s got an AG coating doesn’t mean it can’t still offer those benefits, it certainly can. In a dark room like you may have for gaming or movies, blacks and contrast look excellent and comparable to a glossy OLED anyway – something we’ve tested extensively side by side. The only visual difference might then be caused by the graininess of the AG coating when using the screen up close which doesn’t look as sharp and crisp as a glossy coating. Black depth and contrast ratio though will look basically the same.
In daytime viewing or with light sources in certain places though the blacks do get impacted a bit and you lose some of that perceived contrast. Some people might assume that the screen is flawed or that this ruins the experience. But we should think about the full context here and the alternative for a moment…
Is matte or glossy better for OLED monitors?
OLED screens have never been ideal for brighter room conditions anyway, they excel in darker rooms and at night especially for HDR content. The alternative to using this AG coating featured on the 27GR95QE would be to use a glossy coating. In theory this would help retain that true black appearance and avoid the dulling of the contrast caused by the AG element, but if we consider that this only really impacts the 27GR95QE in lighter room conditions that means that had it been fully glossy, we would have instead had to contend with far more reflections. Reflections can equally impact black depth and contrast, something you will notice if you’ve ever tried to watch an OLED in a bright room or on a sunny day.
We’d argue that reflections on glossy panel are likely to be far more problematic to most people than a small impact to the contrast ratio from an AG coating for what is at the end of the day specifically designed to be a desktop monitor. Remember, this isn’t designed to be a TV, it’s not designed to be used in a dark lounge with carefully controlled lighting for relaxing night time viewing. It’s designed to be used as your desktop monitor, throughout the day, in a normal lighting setup where you have windows, overhead lighting and lamps around.
There are bound to be some users who still prefer a glossy panel all the time, and perhaps you can control your lighting environment in other ways to reduce the impact and annoyance of reflections on a glossy screen. But we think for the majority of people who are looking for a desktop monitor, they will gain more from the screen having an AG coating than they would lose. You’re still getting better black and contrast performance than LCD panel technologies, and if you are really wanting to maximise the appearance of those you can always play games or watch movies in a darker room which then improves the contrast ratio again, and generally makes OLED better anyway. If you think about typical desktop monitor usage, office work and SDR content you’re not really going to notice any problems with the black depth or contrast ratio in daytime usage anyway.
We didn’t feel this was an issue to be honest when you consider likely usage scenarios and what the alternative would have been. I know some people will feel differently, and everyone has their preferences and taste, but having used several OLED screens with both matte and glossy panels over the last year or so, on balance for a desktop monitor we prefer the AG coating and we think this was the appropriate choice for the majority of users. Most importantly we think this helps drastically reduce reflections that would be problematic to many people on a screen designed for desktop usage. If you want to make the most of HDR content, viewing in a darker room is advised and preferable, but that’s the same for any OLED really. And if you are using it in a dark room, you get just the same contrast and black depth anyway as a glossy coated screen. If you hate matte coating, then Dough (formally known as Eve) are planning to release a 27″ 1440p 240Hz OLED equivalent later this year with their ES07E2D monitor.
Further comparisons, commentary and information about the screen coating debate in our 42″ OLED shoot-out video time-stamped here
Testing Methodology Explained (SDR)

Performance is measured and evaluated with a high degree of accuracy using a range of testing devices and software. The results are carefully selected to provide the most useful and relevant information that can help evaluate the display while filtering out the wide range of information and figures that will be unnecessary. For measurement, we use a UPRtek MK550T spectroradiometer which is particularly accurate for colour gamut and colour spectrum measurements. We also use an X-rite i1 Pro 2 Spectrophotometer and a X-rite i1 Display Pro Plus colorimeter for various measurements. Several other software packages are incorporated including Portrait Displays’ Calman color calibration software – available from Portrait.com.
We measure the screen at default settings (with all ICC profiles deactivated and factory settings used), and any other modes that are of interest such as sRGB emulation presets. We then calibrate and profile the screen before re-measuring the calibrated state.
The results presented can be interpreted as follows:
- Gamma – we aim for 2.2 gamma which is the default for computer monitors in SDR mode. Testing of some modes might be based on a different gamma but we will state that in the commentary if applicable. A graph is provided tracking the 2.2 gamma across different grey shades and ideally the grey line representing the monitor measurements should be horizontal and flat at the 2.2 level, marked by the yellow line. Depending on where the gamma is too low or too high, it can have an impact on the image in certain ways. You can see our gamma explanation graph to help understand that more. Beneath the gamma graph we include the average overall gamma achieved along with the average for dark shades (0 black to 50 grey) and for lighter shades (50 grey to 100 white).
- RGB Balance and colour temperature – the RGB balance graph shows the relative balance between red, green and blue primaries at each grey shade, from 0 (black) to 100 (white). Ideally all 3 lines should be flat at the 100% level which would represent a balanced 6500K average colour temperature for all grey shades. This is the target colour temperature for desktop monitors, popular colour spaces like sRGB and ‘Display DCI-P3’ and is also the temperature of daylight. It is the most common colour temperature for displays, also sometimes referred to as D65. Where the RGB lines deviate from this 100% flat level the image may become too warm or cool, or show a tint towards a certain colour visually. Beneath this RGB balance graph we provide the average correlated colour temperature for all grey shades measured, along with its percentage deviance from the 6500K target. We also provide the white point colour temperature and its deviance from 6500K, as this is particularly important when viewing lots of white background and office content.
- Greyscale dE – this graph tracks the accuracy of each greyscale shade measured from 0 (black) to 100 (white). The accuracy of each grey shade will be impacted by the colour temperature and gamma of the display. The lower the dE the better, with differences of <1 being imperceptible (marked by the green line on the graph), and differences between 1 and 3 being small (below the yellow line). Anything over dE 3 needs correcting and causes more obvious differences in appearance relative to what should be shown. In the table beneath the graph we provide the average dE across all grey shades, as well as the white point dE (important when considering using the screen for lots of white background and office content), and the max greyscale dE as well.
- Luminance, black depth and contrast ratio (static) – measuring the brightness, black depth and resulting contrast ratio of the mode being tested, whether that is at default settings or later after calibration and profiling. We aim for 120 cd/m2 luminance which is the recommended luminance for LCD/OLED desktop monitors in normal lighting conditions. Black depth should be as low as possible, and contrast ratio should be as high as possible.
- Gamut coverage – we provide measurements of the screens colour gamut relative to various reference spaces including sRGB, DCI-P3, Adobe RGB and Rec.2020. Coverage is shown in absolute numbers as well as relative, which helps identify where the coverage extends beyond a given reference space. A CIE-1976 chromaticity diagram (which provides improved accuracy compared with older CIE-1931 methods) is included which provides a visual representation of the monitors colour gamut coverage triangle as compared with sRGB, and if appropriate also relative to a wide gamut reference space such as DCI-P3. The reference triangle will be marked on the CIE diagram as well.
- dE colour accuracy – a wide range of colours are tested and the colour accuracy dE measured. We compare these produced colours to the sRGB reference space, and if applicable when measuring a wide gamut screen we also provide the accuracy relative to a specific wide gamut reference such as DCI-P3. An average dE and maximum dE is provided along with an overall screen rating. The lower the dE the better, with differences of <1 being imperceptible (marked by the green area on the graph), and differences between 1 and 3 being small (yellow areas). Anything over dE 3 needs correcting and causes more obvious differences in appearance relative to what should be shown. dE 2000 is used for improved accuracy and providing a better representation of what you would see as a user, compared with older dE methods like dE 1994, as it takes into account the human eye’s perceptual sensitivity to different colours.
Default Setup
The screen comes out of the box in the ‘Gamer 1’ preset mode and at maximum 100% brightness. The screen was tested here in SDR mode by the way, and we had disabled ‘Smart Energy Saving’ in the OSD menu.

You can see straight away that the screen has a wide colour gamut, and colours look vivid and saturated. However, you can also see that the image is too cool, having a bluish tint to white backgrounds. This came out in our measurements as well, where we had a 31% error in the white point, measured at 8503K and being far too cool relative to our target 6500K. The blue channel was too high as you can see from the middle graph. The gamma curve was pretty good, being close to 2.2 overall but because of the overly cool greyscale, the accuracy of grey shades was poor at 7.6 dE average, 11.9 max. At this 100% brightness setting, we had a 196 nits luminance, and we will talk more about the brightness capabilities of this screen later on.

The colour space of the screen was quite a lot wider than the sRGB reference (used for SDR content) and we measured a 126.2% relative coverage. There was over-coverage of sRGB in red and green shades, causing those to look more neon and vivid than intended. As normal with any wide gamut screen, measuring the accuracy of sRGB colours results in high dE errors, with an average of 5.0 and a maximum of 11.9. This is further exacerbated by the overly cool colour temp leaving a poorer colour accuracy than might otherwise have been offered if it had been closer to our 6500K target. Out of the box at these default settings, the screen is really not accurate for sRGB / SDR content.
In the bottom section we compared the screens native colour gamut against common wide colour gamut reference spaces. The coverage of DCI-P3 is very good, at 97.4% absolute coverage being slightly under (but very close to) the spec of 98.5%. There was very little over-coverage of DCI-P3 too (100.6% relative), so the screen is very close to that reference space, which is good news should you need to work with any content in that space, often used in HDR content creation and consumption.
In that bottom section though we have measured the colour accuracy of Adobe RGB colours, which is a colour space commonly used in professional and photography markets. There is decent absolute gamut coverage of Adobe RGB at 96.4%, but there’s still some over-coverage in some green, and particularly in red shades. Accuracy of the colours was still poor, with dE 4.9 average (max 11.9), again impacted by the too-cool colour temp. If you did want to work with Adobe RGB content, you’d really want to be able to calibrate the screen with a calibration device, to closely match the Adobe RGB reference colour space, and improve the colour temp and colour accuracy. By default, and certainly at these out of the box settings, the screen is not accurate for work with this content.
Gradient handling was good though with no visible banding issues, and only minor gradation in darker tones.
sRGB Emulation Mode

Thankfully LG also provide an sRGB preset mode in the menu, which seems to carry a decent factory calibration and also has an emulation of the smaller colour space. You still have access to the brightness, contrast and RGB colour controls too which is great news, and avoids everything being locked like you see on some screens. This will be particularly useful for the brightness adjustment.
Default gamma was decent again at 2.16 average, which is good news as that’s one setting greyed out in the menu in this mode for the picture controls. The RGB balance was now much better and very good across the greyscale, with 6553K average colour temp measured. White point was ever so slightly too cool still at 6662K, but only by a minor 2% deviance from the target. This all resulted in a very good greyscale accuracy with dE 1.2 average. Far better here than the default Gamer 1 wide gamut mode. Brightness was more modest in this mode at 136 nits, and actually your maximum possible brightness is more limited in this mode than native mode, at a maximum of 160 nits (100% brightness setting). We will talk about screen brightness more in a moment.

The emulation of the smaller sRGB colour space also worked nicely here. It went slightly too far and left us with a 95.4% coverage, but overall this was perfectly acceptable for a gaming and multimedia screen like this. With the screen now running in sRGB mode, and with a corrected colour temp too, the accuracy of sRGB colours was very good, massively improved from the default mode and now with a dE average of only 1.4. A few shades showed a slightly higher value up to dE 3.2 but only just getting in to the area where you might notice some slight visual differences in practice. This was a really good mode to use for accurate work with SDR and sRGB content, if a little limited potentially in brightness range for some.
Optimal OSD Settings (Wide Gamut mode)
For those who want to use the full wide gamut of the screen, we also experimented to see what the best we could get out of the screen was, with only simple OSD adjustments. This should, if nothing else, allow us to correct the overly cool default colour temp, and from there improve greyscale and colour accuracy somewhat.

With some simple adjustments to the brightness control, contrast and RGB balance, we had achieved a significantly better result in the ‘Gamer 1’ mode. The main benefit was that we’d corrected the RGB balance, and now had a pretty consistent greyscale colour temp, and a white point very close to our target at 6553K. The screen no longer looked bluish, and this in turn improved the greyscale accuracy hugely, now down to dE 1.4 average.
Note that in the Gamer 1 preset mode, the contrast setting in the OSD is at 60% by default, but considering it is set at 70% in most other modes, including the default “calibration” profiles and the sRGB mode, this seems to be a better optimal setting for contrast. Visually it only makes minor difference though in greyscale rendering and shadow detail. We prefer to change this to 70% to match the more accurate preset modes on the screen for this section.

There was also a decent knock-on benefit to the colour accuracy of sRGB (top section) and Adobe RGB (bottom) colours, even without profiling and proper calibration to match these colour spaces. This was simply through correction of that colour temp. We now had an average 2.8 dE for sRGB colours, and while they are never going to be perfect given they’re being rendered on a wide gamut screen, this is a big improvement over the default 5.0 we had before. Same thing for Adobe, down from dE 4.9 to 2.6 average now. Proper calibration and profiling will be completed next as well.
Related content: our video guide to the best settings for the LG 27GR95QE
Calibration (Software Profiling)
We calibrated the screen at a software level using Portrait Display’s Calman Ultimate software and our calibration tools. We will also look at hardware level calibration afterwards.


Calibration and profiling can produce very good results if you have a suitable calibration device and software. This was profiled to 2.2 gamma, 6500k colour temp and to the sRGB colour space. The screen was left in its native wide gamut mode, but this profile will be used in colour-aware applications (e.g. Photoshop) to map back to sRGB in this instance. The only real error was in 100% red shade where the screen couldn’t quite cover the sRGB red primary fully or couldn’t correct the red shade fully, but that’s minor in the grand scheme of things. Overall the calibrated results were very good as you’d hope.
You can see the recommended OSD settings above that go along with this profile. Our calibrated ICC profile for this display is available now for our Patreon supporters and will be added to our main database in the coming months.
Hardware Calibration
Unlike most gaming screens, including all the other 27″ 240Hz OLED monitors announced so far, the LG 27GR95QE includes support for hardware level calibration. With the use of a compatible calibration device, you can calibrate the screen at a hardware level, stored to the monitors internal LUT directly, and therefore active in all applications, multimedia and games. You aren’t reliant on normal software level profiling and colour aware applications; the accuracy and settings apply everywhere.
You can calibrate two different preset modes (“calibration 1” and “calibration 2”) via LG’s free ‘Calibration Studio’ software, downloaded from their website. At the moment there is (as far as we can tell) no support for any third party applications or software for this monitor, so we are reliant on LG’s own software here. One gap though is that this can only be used to calibrate SDR mode at the moment, and HDR hardware calibration is not possible sadly at this time.
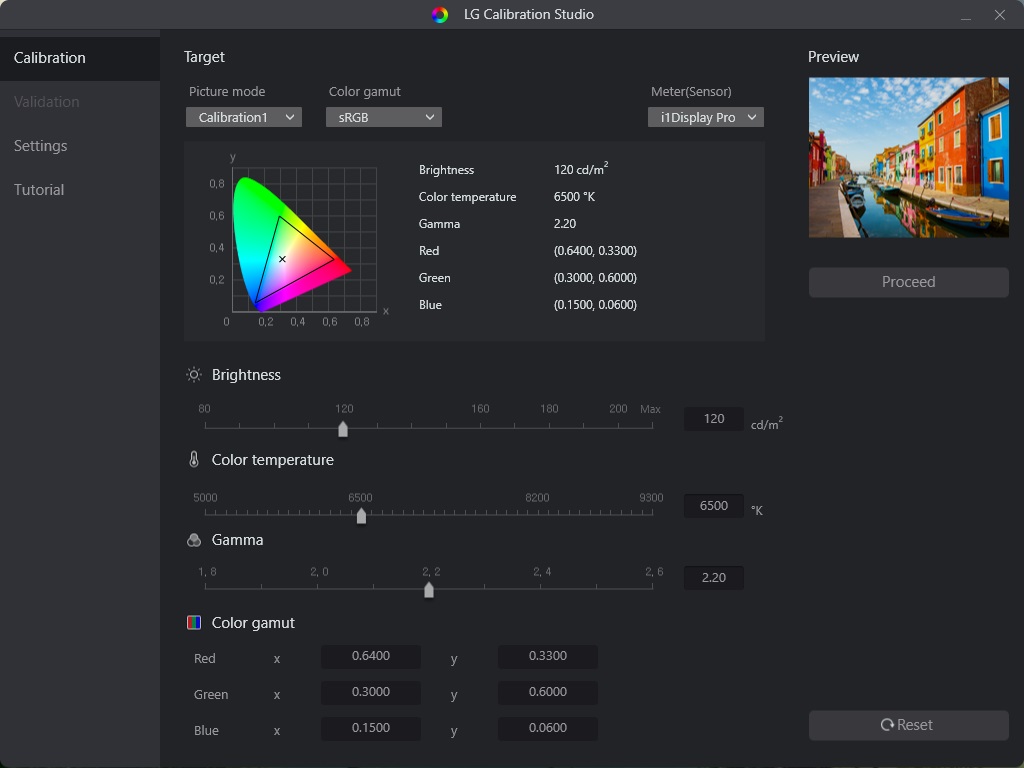
When you load up the software you get a simple section allowing you to define your calibration targets. Here for instance we’ve selected 120 cd/m2 brightness, 6500K white point, 2.2 gamma and the sRGB colour space. You need a compatible calibration tool (or “meter”) with support for a range of popular options provided in the software – Spyder5, SpyderX, i1 Display Pro/Pro Plus, ColorMunki Photo/Design, i1 Pro 2 (spectro) and the CR100. Here for this example we’ve selected the i1 Display Pro Plus colorimeter.
The calibration is entirely automated, you don’t need to make any adjustments yourself in the OSD menu or even change to the preset mode you’re targeting, the software will do that for you. Calibration with this device took around 11 minutes to complete, after which you are presented with the following summary results page:
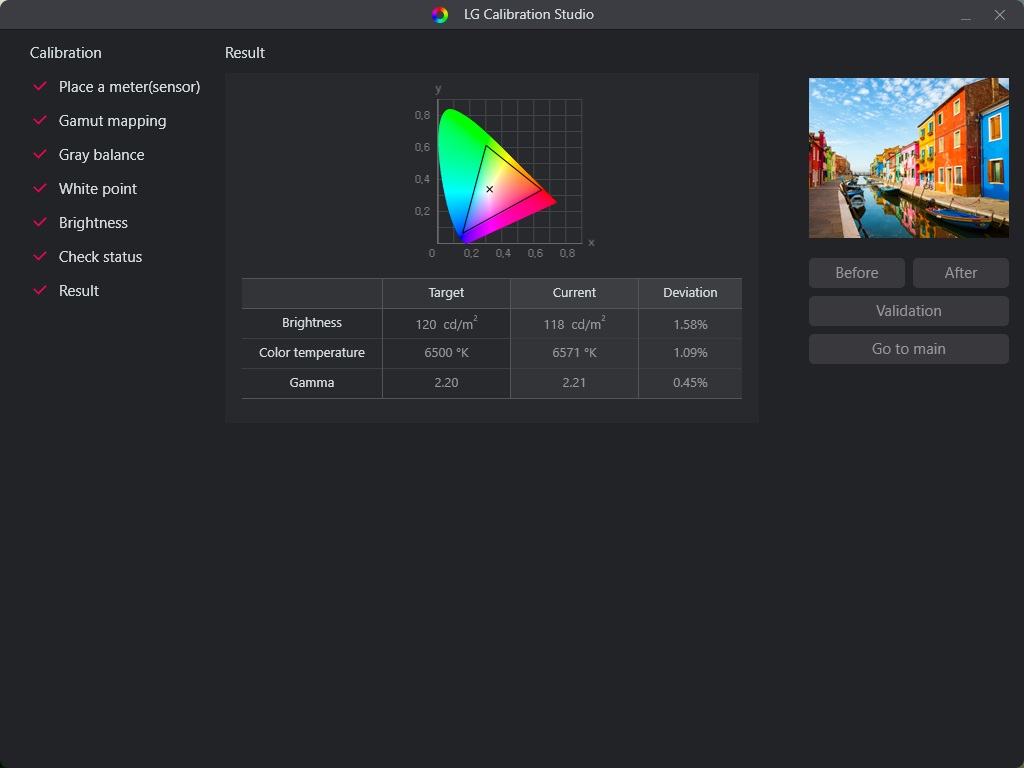
You can see that the targets had been closely matched after this process. This is a further “validation” process you can run which takes 3 minutes to complete and will produce a more thorough report, including one you can save as a PDF if you want:
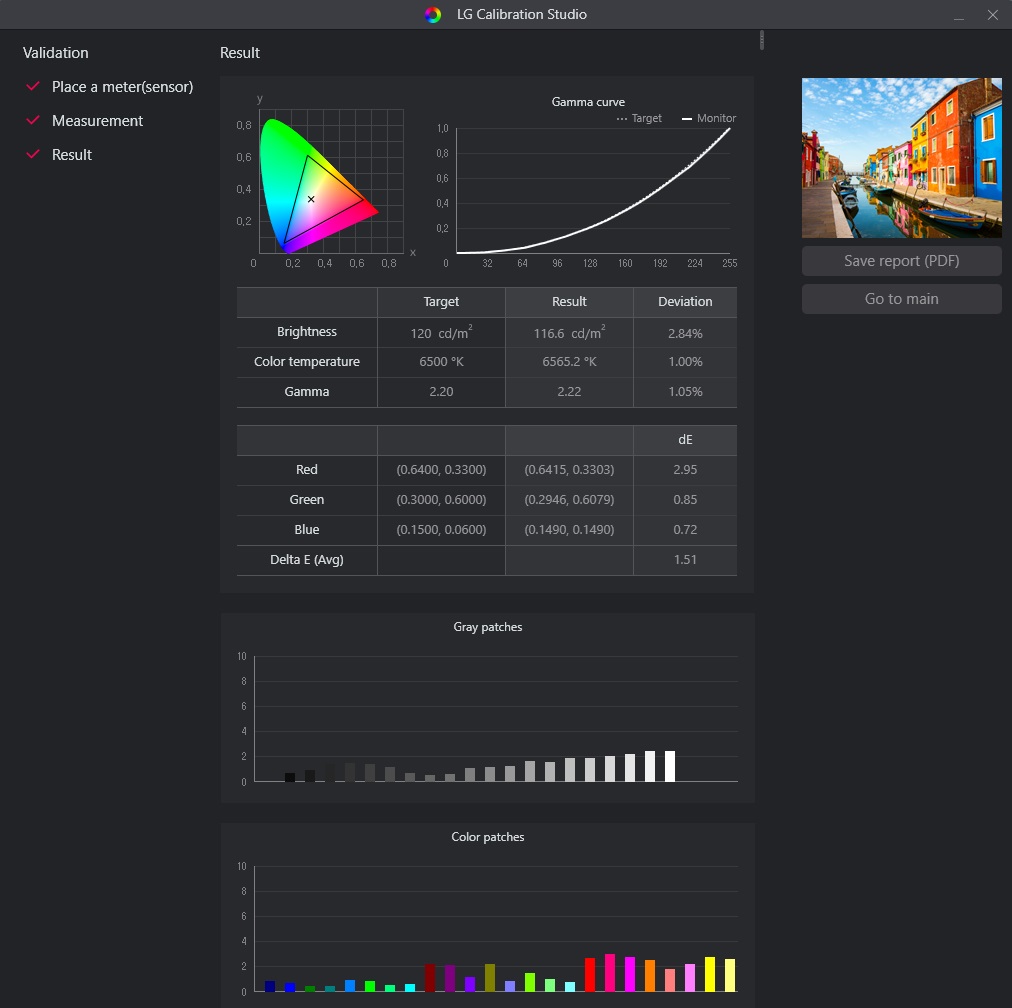
This confirms the measured results. Note that the highest colour error is in red, which is what we’d seen after software profiling too as the screen seems to struggle with that pure 100% red colour.
While the achieved colour coordinates are listed there is no easy measurement for the colour gamut coverage or confirmation that it has been matched really. It would have been nice to include a % sRGB coverage here to make it easier for the user to validate, perhaps an absolute figure and a relative figure, which would then reflect if there’s any over-coverage still. Actually we spotted an error with the reporting of the blue coordinates above too. You can see the target was 0.1500, 0.0600 and the software says the result was 0.1490, 0.1490. That second “0.1490” is wrong, and thankfully it hasn’t been calibrated to that, otherwise we’d end up with a massive under-coverage in blue shades and only 81% sRGB gamut! It’s being reported wrong in the results above.
These coordinates listed are also CIE 1931 colour gamut x,y, coordinates but if we plot those relative to that reference, and assume the blue target was met at 0.1490, 0.0600, then that would equal a 99.9% absolute coverage of sRGB (102.8% relative). Really we would also like the coordinates to be listed here as the more accurate and recent CIE 1976 u’, v’ coordinates, and the coverage % from there. If we convert the coordinates to CIE1976 and plot the colour gamut according to that reference, we get a 99.6% absolute coverage of sRGB (101.7%). It looks like the colour space has been achieved nicely though which is great. We would have just liked the software to report these % for us.
Anyway the process itself is nice and easy to use and the results, as reported by the software based on the device you’re using look very good. Keep in mind that the calibration will only be as good as the device you’re using, but the same could be said for software profiling anyway. There’s no options in the software to use a “correction matrix” or to profile your meter against a reference device, so the accuracy might not be as good as software where that’s possible – like Calman Ultimate for instance which includes a correction matrix for WOLED panels. However, this is free software from LG, and the results will be better and more practical than software profiling, so it’s great to see it included. You can of course calibrate the other preset mode to different targets if you want. It’s a shame there’s no calibration support for HDR though.
Brightness and Contrast
This section tests the full range of luminance (the brightness of the screen) possible, while changing the monitor’s brightness setting in the OSD menu. This allows us to measure the maximum and minimum adjustment ranges, as well as identify the recommended setting to reach a target of 120 cd/m2 for comfortable day to day use in normal lighting conditions. Some users have specific requirements for a very bright display, while others like a much darker display for night time viewing or in low ambient light conditions. At each brightness level we also measure the contrast ratio produced by the screen when comparing a small white sample vs. a black sample (not unrealistic full screen white vs. full screen black tests). The contrast ratio should remain stable across the adjustment range so we also check that.
Tests were made using an X-rite i1 Display Pro Plus colorimeter paired with the Calman Ultimate software for very high levels of accuracy. Measurements were taken on a patch in the centre of the screen, and after settings were adjusted on the monitor as per the ‘calibration’ section above, including any adjustments necessary to reach a ~6500K white point. We left any ICC profile inactive though so as to best represent a typical setup, with only basic OSD adjustments included. This avoids measuring luminance for modes which may be artificially cool in order to increase brightness for instance.
Is the screen too dark?

Note: we turned off “Smart Energy Saving” from the OSD menu which could otherwise impact screen brightness.
In SDR mode the luminance range of the screen is limited compared with LCD monitors, with a maximum brightness measured at 192 cd/m2, which was close to the advertised 200 cd/m2 which was pleasing. Most LCD monitors however can reach 300 – 500 cd/m2 easily for SDR content and so on first glance, this might appear to be very limiting on the 27GR95QE. If you are used to using a very bright monitor or running at high brightness settings, you will almost certainly find this screen to look dark by comparison.
However, we should keep in mind that most people would never run their monitor at brightness levels above 200 cd/m2 really day to day, at least not for desktop use. In fact, 120 cd/m2 is the recommended luminance for a monitor in normal lighting conditions. This panel can comfortably support 120, or a brighter 150 or even very close to 200 cd/m2 luminance which we believe to be more than adequate for most normal users. Remember, we are talking about SDR brightness here for desktop and general use, and we will look at HDR content later. In fact, if we wanted to be really picky and specific, SDR multimedia content is mastered to a brightness of only 80 cd/m2, so that is of course easily supported here. Really though most people will be concerned with how the screen looks as a desktop monitor for normal uses, and 192 cd/m2 max luminance still gives you a decent brightness range suitable for most users. If you prefer a brighter screen though for gaming and multimedia, then this will feel a bit limiting.
The other more noticeable limitation is in sRGB mode where you have access to a better setup and the smaller colour space emulation. In that mode the maximum SDR brightness reached was lower at only 160 nits, so that again might be a bit low for some users. For desktop use in the sRGB colour space it should still be fine for many people, and for gaming/video you’d probably want to switch back to the wide colour gamut modes anyway where the brightness is a bit higher.
Newer firmware April 2023 – no material change to SDR brightness
In early April 2023 LG released an updated firmware for the 27GR95QE designed to supposedly help improve screen brightness. We have unfortunately had to return our screen sample, but our friends over at Monitors Unboxed have updated the firmware on their screen (done via the LG OnScreen Control software) and re-tested brightness in both SDR and HDR modes. In SDR they reported that there was a minor 4% increase in SDR brightness for full screen 100% white (after calibration) which would mean around a 7 nits increase only. Nothing of any real difference for SDR, although it would take it very close now to 200 nits at maximum brightness.
Obviously one of the key benefits of this OLED panel is the fact it can generate true blacks. Each pixel can be fully turned off individually, resulting in basically an infinite contrast ratio. There’s no need for backlight local dimming here like there is on LCD’s and the black depth and contrast ratio surpass all LCD panel technologies including VA panels by a long way. Blacks look inky and deep, and you get local contrast between different areas of an image. Your ambient lighting may have some impact on perceived contrast ratio, as applies to all panel technologies and coating types, which we discussed earlier.

Otherwise the screen is classified as “flicker free”. Horizontal scale = 5ms (240Hz shown)
Like most OLED screens there is a minor fluctuation of the backlight, and in this case it operates in sync with the refresh rate, whatever you have that set at. Above it’s operating at 240Hz so there’s a small fluctuation every 4.17ms. You can see on the graph above that the 0V would be an “off” state, so the amplitude of this fluctuation is minor, and does not produce any visible flickering or anything like that in practice. It’s not the same as PWM on an LCD monitor where the backlight is rapidly switched fully off and on when trying to dim the brightness level. Obviously being an OLED panel there is no backlight here anyway, and this minor fluctuation didn’t cause us any problems in real use and would be considered flicker free.
Auto Brightness Limiter (ABL)
This term has become a little mixed up in the OLED market and sometimes associated with two different things. The correct usage for this term is related to how OLED panels operate from a technical and physics point of view, the other incorrect usage is where it has become associated with the ASBL (Auto Static Brightness Limiter) image protection feature common on OLED screens. We’ve talked about what an “ASBL” function on an OLED display would do above, which dims the brightness of the screen when it detects static images. ASBL isn’t featured on this screen anyway, but this is often what people think ABL means, but it’s not.
OLED panels all have an inherent limitation with the panel itself. The power consumption of these panels is highly dependent upon the content displayed. With a pure white image, every pixel must be lit, while with a pure black image every pixel is off. As the display has a maximum power usage, this opens up the capability for OLED displays to allocate more power per pixel to create a higher maximum luminance when not displaying a full-white image. This is different to LCD panels where a separate backlight unit sits behind the panel and can produce the same max luminance level regardless of the screen content, and how much of it is white in this example. On the OLED screen the percentage of the display that is lit up compared with a full white display is known as the Average Picture level (APL). You will see then on OLED panels that with a low APL (like a small 1% window size of white) the maximum peak brightness is achievable. This peak brightness reduces normally as the window size increases, as this is where the Auto Brightness Limiter (ABL) feature comes in. This ABL dims the screen if the APL is too high and the brightness level can no longer be sustained. If you try and display a bright area over a certain window size you will find that the screen is dimmer than if that window size was smaller.
The point at which this ABL feature kicks in based on the size of the APL will vary on different OLED panels. We will measure that later on in the HDR section for the absolute max peak brightness levels, but it’s also important to understand if this will have an impact during normal desktop SDR usage as well even when you’re not pushing the highest brightness levels. What you’re really looking for here is the screen to be able to sustain your SDR brightness level at all APL, so that when you’re using the screen for SDR content, including desktop use, it never needs to dim because of the ABL. For SDR and desktop use this should be at least 120 nits (a common and comfortable desktop brightness level), but you may want it to be higher if you like to run at 150 nits or 200 nits perhaps.
We calibrated the screen to different common brightness levels of 120, 150 and 200 nits (with a 10% APL) and then measured how bright the screen was as the APL changes. This will show at what point the ABL kicks in and whether it’s a problem during SDR and desktop usage.
Useful reading – OLED Dimming Confusion – APL, ABL, ASBL, TPC and GSR Explained

At all brightness levels the luminance was very similar across all APL sizes, although there was some slight variation across the range which was unusual. We are talking very minor differences of about 7 – 8 cd/m2 maximum difference at 120 cd/m2 and 150 cd/m2 settings, which is going to be basically impossible to detect visually. At 200 cd/m2 there’s about a 15 cd/m2 maximum variance, but again this will be very hard to see. Resizing office document windows showed no noticeable fluctuations or changes in brightness which was great news, so the ABL was not needed or used in SDR desktop use.
Office and General Use

Resolution
The resolution of 2560 x 1440 is comfortable on a 26.5″ sized screen providing a nice desktop area to work with, including decent support for split screen working and an obvious step up from 1080p displays. Some people may complain that it does not have a higher 3840 x 2160 “4K” resolution which could provide an even sharper image for these kind of uses, although there are added complications then of how your applications and OS handle scaling, and whether your system is powerful enough to run the screen at 4K in different situations, including for gaming. As we discussed in our recent article, ‘The Obsession with 4K and Do You Need it on a New Monitor?‘, we think that 1440p is perfectly fine for most people on a ~27″ screen like this and in many situations preferable. Right now it is difficult and expensive to increase the pixel density on these OLED panels, but we’re sure that in time we will see higher resolution and higher density options released. For now 1440p on a 26.5″ screen is still great!
Brightness for office use
The contrast ratio is obviously a strong point of the OLED panel, offering a basically infinite contrast, true blacks, and easily surpassing all LCD technologies including modern VA panels and latest-generation “IPS Black” panels. The brightness adjustment range was adequate we think for most typical desktop/office uses, a bit less so if you want to use the sRGB emulation mode preset. You can reach up to as high as ~192 nits for SDR desktop use if you want (a little higher after the new April 2023 firmware to ~200 nits), or ~160 nits in sRGB mode, but a brightness of around 120 or 150 nits is likely to be more popular and common anyway which is fine in either mode.
At all brightness levels in SDR, there is no need for the screen to use ABL, so you get a consistent brightness level no matter what your content is. That’s great news on an OLED panel as it’s annoying to see changing brightness as you move windows around or look at different content where ABL is used. A lot of fuss has been made about the screen being “dark” but that isn’t really a problem for office and general uses in our opinion, not unless you’re using the screen in a very bright room or are simply used to having a very bright LCD monitor pumping out 300 nits+. It’s perhaps more of an issue for gaming and video where maybe you want a brighter screen or use the screen from a further viewing position.
Text Clarity and Sub-pixel structure
One of the hottest topics being discussed so far from early owners and early reviews is the text clarity. Text doesn’t look at sharp as normal LCD desktop monitors and you can see some fringing in certain situations, with strange coloured text edges and generally just a less sharp appearance to the image.
The reason for this is that the screen has an atypical sub-pixel structure from its OLED panel, which the Windows operating system struggles with a little. We should note that this isn’t an issue for Mac users, which is capable of handling “weird” sub-pixel structures much better. This screen is using an LG.Display WOLED panel, often and widely referred to (incorrectly we might add) as having a “WRGB” or sometimes “RGBW” sub-pixel layout. Rather than a normal RGB sub-pixel layout like Windows expects to see from an LCD monitor, there is an additional White (hence the “W”) sub-pixel added. This is used to help control and improve brightness on LG.Display’s OLED panels but the theory goes that it’s this additional white sub-pixel which messes up the text rendering a bit. Actually it’s a little worse than that, as even if we removed the white sub-pixel from the equation, the sub-pixel structure being used here is not in the expected RGB order.
We’ve seen the pixel layout referred to as so many different things online, so to set the record straight, the correct layout of the sub-pixels is RWBG (red-white-blue-green). You can see this in the macro photo we took with a digital microscope above, taking an image of a 1 pixel wide red, green, blue and white dot stacked on top of each other, used to reveal the sub-pixel order (since it’s not possible for all four to be lit up at once). So it’s not only the added white pixel that’s causing the text clarity issues, it’s the odd layout! We also picked out a somewhat unusual issue with rendering green shades, where rather than just the green sub-pixel being lit, the red and white sub-pixels also seems to come on a bit. But how bad is the text because of this weird layout?
This structure has been used for many years on all LG’s OLED TV’s, and in fact on nearly all the OLED TV’s on the market since LG supply the panels to other manufacturers like Sony, Philips and so on. With the pixel density and text size being very similar to the 42″ OLED panels (at 4K) already available for several years and used as desktop monitors by many, the text clarity is basically the same as that. It’s no worse than those OLED panels and many people have been very happy with those for a long time. There is a bit of fringing to the text, and sometimes you get some odd edges in spreadsheets and with borders. Sometimes it even looks like things are slightly mis-aligned between different colours icons or graphics because of the odd layout. But to be honest, we didn’t find it too bad most of the time. You can notice the difference when switching between an LCD and this screen, but you get used to it fairly quickly.
It does mean the screen isn’t as well suited to productivity or high-detail design work, and some people may of course be more sensitive to the sharpness drop than others. But day to day it’s still adequate and generally fine in our opinion for moderate office and internet use when you need to, alongside the main target use cases of gaming and multimedia. It’s certainly not terrible, and we should also keep in mind that the screen is primarily aimed at gaming and multimedia, where you shouldn’t notice issues related to this sub-pixel layout there hardly at all.
Anti-glare coating for office use
The matte anti-glare (AG) coating that LG have opted for is going to be controversial for sure, as the topic it was when we reviewed the Asus PG42UQ and other matte coated OLED screens. Whether or not it’s a good thing might also depend on your other uses somewhat. For this ‘office and general use’ section of the review we definitely preferred this AG coating over a glossy coating like that found on something like the LG 42C2. It does a really good job of eliminating reflections that you’d get from glossy coatings and diffuses light sources nicely. It looks and feels a lot more like a normal desktop monitor to use, and we think this is a good thing for the majority of people for office and general uses. These kind of environments are unlikely to be light controlled and you wouldn’t want to be working in a dark room for office work. You’ll have various lights and windows to worry about and we felt that the AG coating was a good thing for these uses.
We will repeat some of what we said earlier for those who might have skipped to this section. The only issue really with the AG coating LG have used here is that it is more grainy than modern LCD panels, including LG.Display’s own IPS panels. We talked about it earlier in the review too, but when comparing the 27GR95QE side by side with the LG 38GL950G (LG.Display Nano-IPS panel) you can see that the LCD looks smoother and clearer, whereas the coating on the OLED looks more grainy and a bit dirty. We also compared it next to a modern AU Optronics IPS-type panel and found the same thing. It’s most noticeable on plain white backgrounds, which are of course common for office work. For some reason LG have opted to use a grainer than normal AG coating here.
Perhaps this was a measure to further control reflections and diffuse ambient light, and it does do a slightly better job than those LCD panels in that area. But we think most people would have preferred the slightly more modest AG coating akin to modern IPS panels to be honest. This feels a bit of a step back in the world of AG coatings, like going back to older gen IPS AG coating days. In practice you do quickly get used to it, and to be honest we didn’t see many issues with it day to day, it’s not horrible or anything and it’s not super-obvious unless you compare screens side by side. But if you’re sensitive to coating levels, or you’re coming from another modern panel, you may notice it at least at first.
Spectral Output and Blue Light

The spectral distribution at a calibrated 6500k is shown above, with the blue peak measured at 456 nm wavelength. This means that although not currently listed on their website as a specific display, it should be considered part of the Eyesafe certified range of products. This is because it has a blue peak that is outside of the supposed harmful range according to Eyesafe which is 415 – 455nm, which is good news. There is no blue light filter control on this screen, but there is a “reader” preset mode which makes the image warmer, more yellow looking and also more washed out. We measured a 5071K white point in that mode. Probably not of much value to be honest.
Other office use considerations and performance
The wide colour gamut provides flexibility to work with a range of different colour spaces if you need to. The native wide gamut is useful for gaming, HDR and multimedia where you might well prefer the more saturated and vivid colours, and especially for HDR content which is mastered in a very wide Rec.2020 colour space anyway. Having the ability to cover most of the DCI-P3 (97.4%) and Adobe RGB colour spaces (96.4%) from this screen is great news if you want to work in either of those, although you’d need to be able to calibrate the screen with a calibration tool to clamp the gamut to Adobe RGB properly. The native colour space is very close to DCI-P3 so you wouldn’t need much clamping there. A decent and well configured sRGB emulation mode is also provided which is definitely useable and valuable.
The panel offers super-wide viewing angles which result in a stable and clear image, even from viewing positions that are not head on. There’s also none of the glow on dark content like you get on IPS panels, popular in the office LCD monitor space.
Ergonomics and Connections
The screen has a decent range of ergonomic adjustments with tilt, height, swivel and also rotate available. They are all pretty stiff to operate though which makes changing the viewing angle a pain sometimes. Side to side swivel adjustment also has a pretty limited range, but overall the screen is very sturdy and stable.
Although there are the common DisplayPort and HDMI inputs, there is unfortunately no USB type-C provided here which is a shame, as that might have been useful for some users for single cable connectivity from compatible devices. There are however 2x USB ports, an SPDIF audio output and a DTS sound headphone jack too (easy access on the bottom edge). There are no integrated speakers, ambient light sensors, PiP/PbP or KVM functions on this screen, as it’s aimed at gamers, and not really intended for lots of office or productivity work. In fact being an OLED panel it’s not really ideal for these kind of uses anyway because of…
Image retention risks and OLED issues
We will not go too much in to potential concerns around lifespan of the OLED panel, colour shift, dark spots or image retention/burn-in here. You can read our OLED Displays and the Monitor Market article for more information about those potential issues. As a desktop monitor if you are going to use the screen for many hours per day, some of these things might become an issue in time. In our fairly short period of time testing and using the screen we noticed no issues in any of these areas.
If you are using the screen a lot as a desktop monitor and working with a lot of static content you will probably want to consider things like auto-hiding your taskbar, setting a screensaver to run etc. If you’re working with a lot of stationary windows for office work, internet browsing, photos etc then the risk of burn-in increases and to be honest that’s a bit of an annoyance with an OLED screen like this. These are things you don’t need to worry about with a typical LCD desktop monitor but it’s always in the back of your mind when using an OLED screen. The only built-in prevention measures featured is the pixel shifter, which you can leave turned on to help. Although you may also find it annoying for static and office use too, which is ironically the area where it’s of most value. There’s no ASBL (Auto Static Brightness Limiter) on this screen, which is a very good thing from a usability point of view, but an added risk when it comes to image retention. There is an auto power off though which is useful if you leave the screen unattended or idle which we would recommend leaving turned on.
LG provide a 2 year warranty for this screen although do not really talk about image retention or burn in cover, other than to say that the warranty does NOT cover “Burned-in images resulting from improper usage as described in the user manual” – but improper use is a pretty vague term. This may make it difficult to claim under the warranty should you ever run in to any image retention issues, so we would advise some caution depending on your usage type and habits, and your risk tolerance.
Gaming

The screen uses an OLED panel which is well-known for its near-instant response times. As a result it does not need to use overdrive technology in the same way as a desktop LCD panel would, and there aren’t any controls for the response time or overdrive in the OSD menu. We are reliant on LG’s tuning of the response times. LG quote a pretty absurd 0.03ms G2G response time in their spec, and while true <1ms G2G should be expected from this technology it is over the top to start suggesting they are really going to reach that low. With LCD’s being regularly listed as 1ms, we will cut LG some slack in trying to articulate how much quicker OLED is relative to LCD panels, but we’d still rather see realistic and achievable response time figures quoted.
| (at native resolution) | Refresh Rate |
| Maximum Refresh Rate DisplayPort | 240Hz |
| Maximum Refresh Rate HDMI | 240Hz |
| VRR range | 48 – 240Hz (both DP and HDMI) |
The screen has a native 240Hz refresh rate which makes it much faster than any previously available OLED monitor or TV, which are limited to ~120Hz at the moment, or 175Hz from the QD-OLED panels. We will discuss how this impacts motion clarity and gaming experience in a moment, but this is a refresh rate getting much closer to what’s available in the LCD space – which are currently available up to 360Hz. You will be able to push higher frame rates up to 240fps here compared with other OLED displays, and with the 1440p resolution instead of 4K, that is also a somewhat easier task in modern games too.
| VRR capabilities and Certification | |
| AMD FreeSync Premium certification | |
| Native NVIDIA G-sync module | |
| NVIDIA ‘G-sync Compatible’ certified | |
| HDMI-VRR (consoles via HDMI 2.1) |
To help support the 1440p @ 240Hz the screen features adaptive-sync, giving Variable Refresh Rate (VRR) support for both NVIDIA and AMD systems which is great news. The screen has also been certified under the NVIDIA ‘G-sync Compatible’ and AMD ‘FreeSync Premium’ schemes to give added reassurance around VRR performance. There is also support for HDMI-VRR via HDMI 2.1 which is useful for the latest PS5 and Xbox Series X games consoles. We will look at console gaming more later.
OLED panel benefits for gaming and additional features
The OLED panel provides super-deep blacks and infinite contrast ratio which is of course excellent for gaming too. This helps ensure great shadow detail and true blacks. You may find optimal appearance in a darkened room though where ambient lighting is low. The very wide viewing angles of this technology are excellent and make the screen suitable for viewing from many different positions if you need. These wide viewing angles importantly include the freedom from things like the pale/white “IPS glow” that you get on darker content on that common LCD technology. There’s none of that here on the OLED panel.
There are a few additional gaming extras in the OSD menu familiar to LG monitors. These include a black stabilizer control, crosshair graphic and FPS counter. The black stabilizer can be useful for tuning near black shadow detail especially.
Black Frame Insertion (BFI) is missing (and missed)
We should note here that unfortunately there is no Black Frame Insertion (BFI) mode available on this screen which we were disappointed about. That’s the equivalent of a strobing blur reduction backlight on an LCD monitor, but thanks to the super-low response times on OLED this feature can work really well at reducing motion blur. It was available on some of LG’s older OLED TV’s including the CX and C1 at both 60Hz and 120Hz, and we were really impressed by the motion clarity improvements it brought at 120Hz when we tested the LG CX.
On the more recent 2022 LG 42C2 model it was only available at 60Hz, and unfortunately LG have now left it off altogether here on the 27GR95QQE monitor. LG.Display (the panel manufacturer) have basically stopped inclusion of this with their new panels which is a shame. We’d like to see that brought back at some point as it can work extremely well on OLED panels.
Response Times
As discussed in our detailed article about Response Time Testing – Pitfalls, Improvements and Updating Our Methodology we are using an improved and more accurate method for capturing G2G response times and overshoot, based on figures that are more reflective to what you see visually on the screen in real-World usage. Our article linked above talks through why this is better and how we arrived at this improved method in much more detail.

The above response times are consistent at all refresh rates, including 240Hz, 120Hz and 60Hz and during VRR situations with changing frame rates. Thanks to the OLED panel the response times are super-fast and near-instant, with an average of only 0.43ms G2G measured! The best case was an incredibly impressive 0.32ms but not as low as the silly 0.03ms advertised. All transitions can keep up easily with the frame rate demands of 240Hz, and in fact this screen could comfortably keep up with >1000Hz if the panel could support it! Let’s hope OLED refresh rates are driven much higher in the coming years, as it’s a really well suited technology for that.
The G2G performance remained basically the same across all refresh rates which means you get those same excellent response times during VRR situations and for fixed 120Hz / 60Hz input devices.

There is however some overshoot present here in a few transitions, which is quite rare for an OLED panel at these levels. It’s most noticeable along the top row of the table with changes from black (0) to grey (50, 100 and 150). At 240Hz this does not create any real artefacts or halos in real use and that is because although the overshoot RGB value might be moderately high (up to 16 RB values in the worst case), as a new frame is drawn the overshoot is “wiped” away instantly. So at 240Hz where a new frame is drawn every 4.17ms the duration of the overshoot is very short which helps minimise its visual impact. So although the value of the overshoot is quite high in a few places, its duration is so short that it’s not really visible in practice at 240Hz.

However as you lower the refresh rate, either in VRR situations or for fixed inputs like games consoles, the overshoot does become more noticeable unfortunately. Although the overshoot value is the same in terms of how far it misses the required shade, because the frames are not being refreshed as quickly the duration of the overshoot is now longer. For instance at 60Hz the new frame only comes after 16.67ms and at 120Hz after 8.33ms. You do get some pale halos visible at 120Hz (slight) and at 60Hz (more noticeable). It’s not terrible, and we wouldn’t call it “bad” overshoot or anything as the overshoot value is still moderate, but it is something we’ve not seen on OLED panels before, and is a bit of a shame.

Motion Clarity – Pursuit Camera Photos
We captured some pursuit camera photos of the screen at a variety of refresh rates, designed to capture real-world perceived motion clarity. This gives you a good indication of how the screen looks in real use, beyond raw measurements.

Despite the amazing pixel response times you still get large amount of blur at 60Hz due to the sample-and-hold nature of the OLED screen, you can’t expect miracles just because it’s got fast response times. There are major and obvious benefits in motion clarity as you increase to 120Hz high refresh rate mode, and this brings it on par with common 120Hz OLED screens such as the popular 42″ LG 42C2 TV. Moving up to 240Hz offers another significant and noticeable improvement in motion clarity, and the moving image is now sharper and clearer. Tracking of moving content is now much easier and clearer. This really was excellent motion clarity and very impressive. If you can push the screen up to 240fps in your games, you will benefit from excellent clarity and smoothness.
At 60Hz you can spot some of the pale trails behind the moving UFO, especially behind the red part of the image and on the middle and bottom lighter backgrounds. At 60Hz these are fairly noticeable in real use, and that’s a shame as we’ve not seen overshoot in this way on any OLED panel before. The response time tuning could have been better to avoid this, it’s almost as if it’s been tuned to handle 240Hz nicely and push them as low as they can (maybe to try and reach their crazy 0.03ms spec!), but lower refresh rates were forgotten about. At 120Hz the overshoot artefacts reduce quite a lot as the frame rate is now doubled, and while the actual overshoot RGB value remains the same, its duration is now half as long as at 60Hz. You can still see some slight pale halos in practice and in these photos, but it’s not too intrusive. Again, it’s a shame it’s there at all though. At 240Hz the frame rate is doubled again, and the duration of the overshoot is so short that you can’t see this in practice. To avoid any visible overshoot you’d want to be running at 240Hz and pushing that upper end of the frame rate from your graphics card wherever possible. We don’t expect the overshoot to be too problematic for 120Hz, but at 60Hz it is a bit more of an issue and sometimes distracting. But then again the motion blur is more of the issue then anyway.

We can also compare the motion clarity of the 27GR95QE here against some 360Hz LCD screens we’ve reviewed. You can see that actually despite the lower refresh rate (by 33%) the motion clarity is very similar here from the 240Hz OLED panel. There is a ratio of approximately 1.5:1 when it comes to motion clarity between an OLED screen and an LCD screen, thanks to the near-instant response times. So you get a motion clarity in practice beyond what you might expect from the refresh rate number. We have compared the LG against two 360Hz screens here.
First the BenQ Zowie XL2566K which we would rate overall as being slightly faster than the LG, with a slightly sharper and clearer image. This becomes a little more apparent in certain situations like with scrolling text as well, but unless you were comparing them side by side it would probably be hard to separate the two for most people. If you’re after the absolute clearest motion for Esports and competitive gaming, then something like the BenQ with its 360Hz TN Film panel has the slight edge.
Compared with the 360Hz IPS panel of the Asus ROG Swift PG259QN we would say the LG has the edge though. Despite the higher refresh rate of the Asus, it has some issues with response time, notably some slower transitions from light to dark shades common on IPS panels and causing a bit of pale smearing. And also a bit of pale overshoot as the response times are pushed hard to keep up with the frame rate. Admittedly this was one of the first gen 360Hz IPS panels and other reviewers have noted that more recent offerings are a bit faster (e.g. the Asus ROG Swift PG27AQN – 27″ 1440p, 360Hz as reviewed by Monitors Unboxed) which would bring the performance closer to the LG OLED panel. But certainly compared with most of the existing 360Hz IPS panels we think the LG 240Hz OLED panel has the slight edge in motion clarity, even though it has a lower refresh rate.
Lag
Read our detailed article about input lag and the various measurement techniques which are used to evaluate this aspect of a display. The screens tested are split into two measurements which are based on our overall display lag tests and half the average G2G response time, as measured by our oscilloscope. The response time element, part of the lag you can see, is split from the overall display lag and shown on the graph as the green bar. From there, the signal processing (red bar) can be provided as a good estimation of the lag you would feel from the display. We also classify each display as follows:
Lag Classification
- Class 1) Less than 8.33ms – the equivalent to 1 frame lag of a display at 120Hz refresh rate – should be fine for gamers, even at high levels
- Class 2) A lag of 8.33 – 16.66ms – the equivalent of one to two frames at a 120Hz refresh rate – moderate lag but should be fine for many gamers. Caution advised for serious gaming
- Class 3) A lag of more than 16.66ms – the equivalent of more than 2 frames at a refresh rate of 120Hz – Some noticeable lag in daily usage, not suitable for high end gaming

Updated 8/3/23 – There is a very low lag on the 27GR95QE measured at 0.78ms total display lag, and leaving us with only 0.67ms estimated signal processing lag. This is fine for competitive gaming and shouldn’t represent any issue. This is a lot lower than most TV’s since there is no added image processing or advanced scalers like there would be on TV’s, with the screen designed to be like a normal desktop monitor. There is no difference to lag in HDR mode by the way.
Console Gaming

The 27GR95QE is well positioned to handle console gaming too, with its strengths being the super-fast response times and excellent HDR capabilities (discussed later). The screen has two HDMI 2.1 ports, and so can support the full capabilities of this screen from a PC (1440p @ 240Hz), as well as handle modern games consoles and many of their features.
| Console Gaming | |
| Native panel resolution | 2560 x 1440 (1440p) |
| Maximum resolution and refresh rate supported | 3840 x 2160 (4K) |
| PlayStation 5 support | 4K @ 120Hz |
| Xbox Series X support | 4K @ 120Hz |
| Virtual 4K support | |
| 4K at 24Hz support | |
| 4K at 50Hz support | |
| HDMI connection version | 2.1 |
| HDMI connection bandwidth | 48Gbps ? |
| HDMI-VRR (over HDMI 2.1) | |
| Adaptive-sync (FreeSync) over HDMI | n/a |
| Auto Low Latency Mode (ALLM) | |
| Display aspect ratio controls | Full, Original, Just Scan |
| Ultra high speed HDMI 2.1 cable provided | |
The screen has a native 1440p panel, but can also accept a “virtual 4K” input signal which may sometimes be useful for modern consoles. That means you can input a 4K resolution if you want, and the screen will scale that back down to the 1440p native resolution. On PS5 nowadays that isn’t really necessary, as you can instead set the console to output in 1440p now Sony have added it, and instead prioritise the higher refresh rate up to 120Hz. That’s probably optimal to avoid the need for any monitor scaling as well, and because you can push refresh rate better at 1440p.
On the Xbox Series X there is also a 1440p setting which would have been better to prioritise refresh rate again. However, that mode annoyingly cannot support HDR from the console, and so if you are playing an HDR capable game (and most are nowadays) you would be better running at 4K output to the screen, where HDR is then supported from the console.
HDMI-VRR is supported thanks to HDMI 2.1 from both consoles. ALLM is unfortunately not supported, and although the input lag will be consistent across all preset modes (the main reason for this setting is to turn a TV in to its game mode for lower lag), it could have been useful if it had switched to a gamer preset mode, as opposed to perhaps your normal working mode like sRGB or a calibrated preset.
- Related content: Here’s Why You Should Only Enable HDR Mode on Your PC When You Are Viewing HDR Content
HDR (High Dynamic Range)

The screen is well positioned to handle HDR content and surpasses anything available currently in the LCD monitor space in many regards. OLED technology has long been regarded as the best technology for HDR thanks to its pixel-level dimming capability. This allows each pixel to be individually lit, meaning you don’t need backlight local dimming zones or need to worry about issues like blooming or halos like you get on other technologies. Even very demanding HDR scenes like the night sky or Christmas lights perform well, being able to easily dim the darker areas, and brighten the lighter areas without producing any blooming at all. Technically the contrast ratio you get for normal SDR content is infinite:1 as well (for maximum “dynamic range”), but in HDR mode these OLED screens are capable of offering increased peak brightness as well.
| HDR Technical Capabilities | ||
| VESA DisplayHDR certification level | None at time of writing | |
| Multiple HDR formats supported | HDR 10 only | |
| Local dimming | | Yes, pixel level OLED |
| High number of local dimming zones | | 3.68 million (per pixel) |
| Increased peak brightness | | 609 max at ~D65 white point |
| Reaching advertised peak brightness | Doesn’t reach 1000 nits in any mode | |
| Increased dynamic range (contrast) max | | ~Infinite:1 |
| Increased “local” HDR contrast ratio max | | ~Infinite:1 |
| Wide colour gamut >90% DCI-P3 | | 97.4% absolute 100.6% relative |
| 10-bit colour depth support | | Supported |
The screen only accepts an HDR10 input signal, which leaves it behind LG’s TV range like the C2 which can support Dolby Vision and HLG formats too. As we discussed earlier, in order to maximise black depth and contrast ratio you’d ideally want to be using the screen in a dark or dimly lit room for HDR, to avoid diffuse reflections from the coating impacting these areas. Although generally HDR is best viewed in those environments anyway, regardless of the screen coating choice.
When you enable an HDR input source you are left with a few available preset modes in the menu – Gamer 1, Gamer 2, FPS, RTS and Vivid. Most other picture related settings are greyed out, but brightness remains available in case you wanted to turn that down at all, and sharpness too in case you wanted to change that for gaming and movie viewing. The default 100% brightness setting is optimal for maintaining the highest possible peak brightness in HDR content.
We measured the screen in its default ‘Gamer 1’ preset mode:

Default setup was pretty good overall for HDR in this mode. We had a good tracking of the PQ curve on the right, dropping a slight bit in darker grey shades below the target luminance. The colour temp across the greyscale was very good at 6444K average (1% deviance), but the white point was a tad too cool at 6847K (5% deviance). Greyscale accuracy was moderate overall at 2.8 dE average.

Peak brightness in this default mode reached a maximum of 609 nits in our tests, and that was on a 10% APL window. It was also at approximately that brightness for smaller APL window sizes, but sadly didn’t reach higher, and certainly nowhere near the spec of 1000 nits from LG. We will examine other modes and whether you can get higher peak brightness in a moment. At a full white windows (100% APL) the sustained brightness was only 141 nits, which was quite a bit lower than a 100% window in SDR for some reason (~192 nits). We would have liked to have seen better HDR brightness here really.
Newer firmware April 2023 – no change to brightness
In early April 2023 LG released an updated firmware for the 27GR95QE designed to supposedly help improve screen brightness. We have unfortunately had to return our screen sample, but our friends over at Monitors Unboxed have updated the firmware on their screen (done via the LG OnScreen Control software) and re-tested brightness in both SDR and HDR modes. They confirmed there was no change at all to HDR brightness in Gamer 1 mode, which has the ~6500K colour temp.

Colour accuracy of wide gamut Rec.2020 content was very good overall. With a moderate 73.3% coverage of this very wide colour space possible, the largest errors came in pure red and green, which is typical for any HDR display really. Colours and skin tones looked accurate though and this was a good factory setup for HDR accuracy.
Original Firmware Testing for Gamer 1 and Gamer 2

We also tested the ‘Gamer 2’ preset mode which returned basically the same results, very similar in colour temp, white point, peak brightness capabilities and colour accuracy. The only difference, and this was visually quite easy to see as you switch between the two Gamer modes, was a slightly brighter looking image. Actually the peak brightness measured remained the same in both modes at around 600 nits, but the image seems to be adjusted in different ways. While the setting is not available in the menu we believe this is because it has a different default contrast setting, or perhaps different black equalizer level. It’s not possible to see what those are set at, but it appears to be what’s causing the difference. As a side note, the sharpness setting was higher in Gamer 2 at 70, instead of 50 in Gamer 1, but that is an option you do have control over still in the OSD menu.
You can see in the graphs above that in Gamer 2 mode, the brightness in the darker grey shades up to around 20 was a bit higher than the target line, whereas in Gamer 1 it was a bit lower. Also at the top end for the lighter greys, the brightness was a bit more consistent and slightly higher. It’s the higher brightness in these areas that’s really the only difference here with Gamer 2, but this might be useful to bring out more shadow detail or for a slightly brighter dark HDR experience.
Newer firmware April 2023 – Gamer 2 mode now updated, but much cooler
In early April 2023 LG released an updated firmware for the 27GR95QE designed to supposedly help improve screen brightness. We have unfortunately had to return our screen sample, but our friends over at Monitors Unboxed have updated the firmware on their screen (done via the LG OnScreen Control software) and re-tested brightness in both SDR and HDR modes. The Gamer 2 HDR mode has now been changed to be much cooler than before, reaching around 8900K in their measurements. This does however deliver a brighter image, reaching up now to 882 nits max (2% APL) but at the cost of a much cooler and bluer image. This is a common cheat method on OLED screens to try and reach a higher peak brightness, and we would not consider this useful unless you specifically like a very cool looking image.
Where is the 1000 nits peak HDR brightness?
The maximum peak brightness we’d measured in the Gamer 1 mode which was configured to be close to a 6500K white point was around 609 nits. Not bad, but then also not great for a modern HDR display. Certainly nowhere near the peak brightness spec of 1000 nits that LG promote, and quite a long way off modern Mini LED LCD monitors which can typically reach 1000 – 1500 nits. This 609 nits we measured was achieved at a white point close to 6500K in those modes (6847K measured) at least.#
It’s quite common for OLED screens to offer a much cooler mode that will increase the peak brightness quite a lot. We saw this “trick” on the Asus ROG Swift PG42UQ for instance, which reached over 900 nits but only when set at a crazily cool colour temp around 10,000K. In our original testing we tried all the different HDR preset modes on the 27GR95QE to see if any could deliver a higher peak brightness.
| Preset Mode | White Point | Peak brightness |
| Gamer 1 | 6847K | 609 nits |
| Gamer 2 (original FW) | 6850K | 608 nits |
| Gamer 2 (updated FW) | ~8900K | 882 nits |
| FPS | 8009K | 641 nits |
| RTS | 6839K | 601 nits |
| Vivd | 9252K | 792 nits |
In our original testing only the ‘vivid’ mode showed any real improvement in HDR peak brightness, reaching up to 792 nits, but only at the expense of an overly colour colour temp, now measured at 9252K. Even this wasn’t reaching the 1000 nits advertised, and we have no idea where that spec came from really. We couldn’t achieve it from our testing. As we said above, the newer April 2023 firmware made some adjustments to the Gamer 2 preset mode which we have added to the table above, making that much cooler now and reaching 882 nits max, but at ~8900K colour temp. Even this “cheat mode” didn’t help it reach the advertised 1000 nits.
We would suggest sticking with the Gamer preset mode for a more accurate setup and colour temp. In real world HDR content and scenes the OLED panel offered excellent black depth and contrast ratio, all without any blooming or halos. Brightness is however a weakness of this panel, and while the HDR effect and experience is still decent, it can’t match that of Mini LED LCD screens. To be fair, OLED TV’s can generally only support ~700 nits peak brightness typically, so the 609 nits here isn’t terrible. But we’ve seen some other OLED monitors like the Dell Alienware AW3423DW (QD-OLED panel) which can reach over 1000 nits so we’d have hoped for more here. Especially since LG have used the latest generation META / MLA panel technology, and have advertised a 1000 nits peak brightness spec. Perhaps brightness has been toned to help try and avoid image retention, but we were a bit disappointed in that area of HDR performance.

Conclusion
The LG 27GR95QE was a really interesting screen to test, being the first super-high refresh rate OLED monitor released to market, and the first OLED gaming monitor in a smaller and common size and form factor. There’s no doubt the OLED panel can offer some impressive and excellent performance in many areas, although it’s not perfect if you’re after a multi-purpose monitor, and struggles a little in some areas it should do better.
The target market for this screen is clearly gamers, and those wanting a super fluid and clear gaming experience, as well as high-end HDR support. The OLED panel performs extremely well when it comes to pixel response times and motion clarity, with significant improvements compared with common ~120Hz OLED panels. The jump to 240Hz is very impressive, and puts the panel very close to even 360Hz LCD monitors. The high refresh rate also means support for higher frame rates, the inclusion of VRR support is welcome as ever, and the input lag was low too. A bit better tuning of the response times for lower refresh rates would have been nice, as you do see a bit of pale overshoot in some situations, but it’s never terrible and it’s not visible at higher refresh rates including 240Hz. HDR gaming was also a strong point overall, with per-pixel dimming, amazing contrast ratios and the avoidance of any blooming or halos. As we’ve said with other modern OLED screens, we did miss BFI though for further improvements to perceived motion clarity for those who look those kind of modes.
We were disappointed though with the brightness capability of the screen in HDR content, not getting anywhere near the spec advertised, even in overly cool preset modes. If you like the extra pop of a very bright HDR experience, then you will find higher elsewhere, but you probably need to look at Mini LED LCD screens instead of OLED for the brightest HDR performance. On the plus side the HDR setup was pretty decent and accurate which was pleasing, as that’s one mode you can’t hardware calibrate sadly at the moment.
We need to keep in mind this is firmly a gaming screen so we can’t be too harsh on the performance in other areas, but when you’re spending this much money on a new monitor you are likely to want to use it for other things too – and who doesn’t also need to use their gaming PC and monitor sometimes for office and internet work? There are 3 problems really with using this screen away from gaming. Firstly, it’s an OLED panel and you always have to be mindful of image retention and burn in risks. LG have been flexible with the OLED care options, rather than forcing you to experience annoying dimming from things like ASBL, but perhaps even more than normal as a result, you need to be careful in your usage patterns. We would have liked a more robust and clear warranty from LG too.
Secondly the unusual sub-pixel structure of LG’s WOLED panels (RWBG layout) is not handled that well by Windows OS. It’s not terrible by any means, and you do get used to it quickly, but there’s some occasions where its problems are more noticeable, with some text fringing, as well as weird lines and alignment in spreadsheets and some graphics. It’s not ideal therefore for any major office or productivity work. Thirdly, the AG screen coating is a bit too grainy. We’d prefer to see a matte AG coating used than glossy on a desktop monitor like this, but LG seem to have gone a step too far and it’s more grainy in appearance than their modern IPS LCD panels for some reason leading to some dirty appearance on white backgrounds and a bit of noticeable grain sometimes.
There’s a reasonable range of connections available and from a gaming point of view we were pleased to see HDMI 2.1 with VRR support and even 4K @ 120Hz available. That’s useful for games consoles. USB type-C would have been nice to include for other uses and some external devices. The stand is sturdy and strong, but a bit stiff and chunky. One daft omission from LG is the exclusion of proper OSD controls on the monitor. A single button that gives you barely any access to the settings is not acceptable for a desktop monitor. The remote is great, but scrimping on a simple controller joystick on the monitor seems daft on a high-end product like this. If nothing else, at least make all the options available from the Windows software, in case the user loses the remote control at some point!
Default setup is overly cool and not very accurate, but thankfully there’s a nicely configured sRGB emulation mode with accurate performance, and it’s not hard to tweak things in the wide gamut mode either for a better performance. The inclusion of hardware calibration is a nice-to-have and offers some further accuracy potential for those with compatible devices, although it’s a shame it has limited reporting capabilities and cannot be used in HDR mode at the moment. Perhaps LG will update their software at some point to make this better. Brightness in SDR mode would be considered “limited” compared with LCD monitors, but we think perfectly adequate for most people still. It might be a bit dark if you’re used to pumping up the brightness for gaming or movies though. At least in SDR there is no need for the screen to use ABL, so you get consistent screen performance and brightness regardless of your image and content. HDR brightness was disappointing and didn’t get anywhere near the advertised 1000 nits peak brightness in any sensible colour temp mode, although the setup and accuracy was decent and the OLED panel offers the usual excellent contrast ratio and HDR experience.
| Where to Buy | |
| |
All in all, there are some big pros to OLED monitors, but also some limitations at this time to be aware of. If you’re after an OLED screen and love that technology, and want a super-fast, high refresh rate gaming screen, this is definitely worth a look. It’s available from Amazon in some regions and other major retailers linked above.
Further Content
- Check out our LG 27GR95QE Best Settings Guide Video here too!
- Watch this before you buy an OLED monitor! 5 things you need to know
- Our article: OLED Monitor Panel development plans and roadmap for the future
- Our article: Here’s Why You Should Only Enable HDR Mode on Your PC When You Are Viewing HDR Content

| Pros | Cons |
| Excellent response times and motion clarity with a high 240Hz refresh rate | Peak brightness in HDR is disappointing, even after April 2023 firmware update |
| Per pixel dimming, excellent black depth and contrast ratio and no blooming or halos make it great for HDR content | Text clarity not great for a desktop monitor due to WOLED panel sub-pixel layout and graininess of AG coating |
| Hardware calibration supported, as well as decent modes available for SDR and HDR usage | Daft decision to leave off a proper OSD control on the monitor itself |
We may earn a commission if you purchase from our affiliate links in this review – TFTCentral is a participant in the Amazon Services LLC Associates Programme, an affiliate advertising programme designed to provide a means for sites to earn advertising fees by advertising and linking to Amazon.com, Amazon.co.uk, Amazon.de, Amazon.ca and other Amazon stores worldwide. We also participate in a similar scheme for Overclockers.co.uk, Newegg, Bestbuy and some manufacturers.
Stay Up to Date
 |  |  | |
| Browser Alerts | Follow us on X (Twitter) | Subscribe | Support Us |
Popular Trending Reviews
 Dell Alienware AW3225QF February 29, 2024 The new 32″ 4K QD-OLED monitor from Dell, with a 240Hz refresh rate, Dolby Vision HDR and even eARC sound support
- Asus ROG Swift PG32UCDM February 14, 2024 One of the first 32″ 4K 240Hz OLED monitors released to market featuring a 3rd gen QD-OLED panel, USB type-C, KVM, and many Asus extras
- Dell Alienware AW2725DF February 17, 2024 Dell’s new 27″ QD-OLED gaming monitor, offering 2560 x 1440 resolution and the fastest current OLED refresh rate of 360Hz. Is this the new 27″ OLED king?
- MSI MPG 321URX February 23, 2024 The brand new and very competitively priced 32” 4K 240Hz OLED monitor from MSI. Offering an extremely impressive spec and set of features, at an attractive price point.
- MSI MPG 271QRX March 8, 2024 The new 27″ QD-OLED monitor from MSI with 1440p resolution and 360Hz refresh rate. Is this the best 27″ OLED monitor to buy now?


