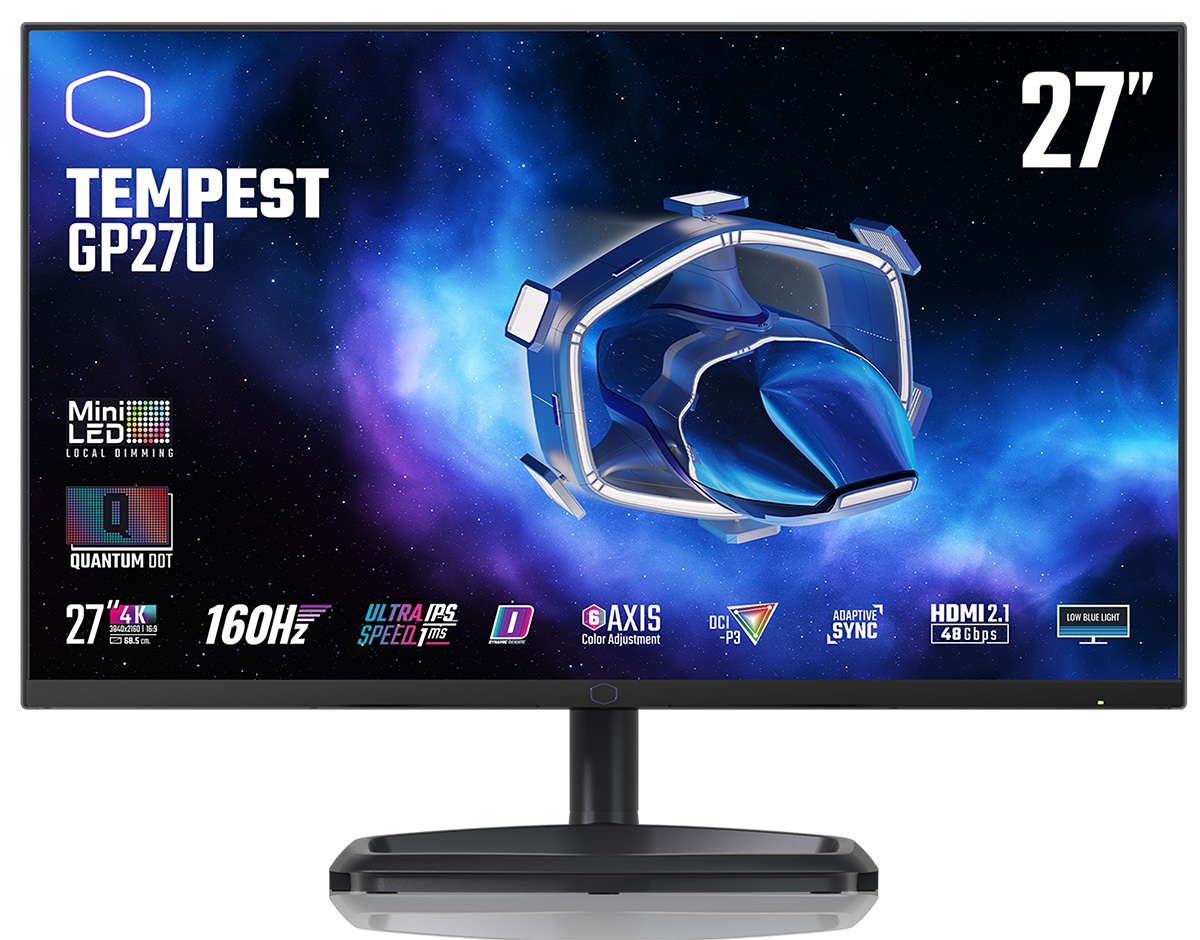
Cooler Master Tempest GP27U
Originally published 9 November 2022, last update 7 December 2022

Introduction
Every monitor launched nowadays is marketed as being great for HDR (High Dynamic Range), but very few can deliver a real HDR performance in practice. Many so-called HDR screens simply accept an HDR input signal, but lack any of the hardware to improve the contrast and dynamic range or even improve the colours associated with this kind of content. Nothing you’d associated with HDR is delivered, and it makes a farce of so-called HDR certifications at the same time. The Cooler Master Tempest GP27U (aka GP27-FUS) is different. It’s a display focused on delivering a better HDR performance. It achieves this by adding two key ingredients, a Full Array Local Dimming (FALD) Mini LED backlight, and a Quantum Dot screen coating. The former allows for vastly improved local dimming of the backlight across the screen, with 576 zones in total on this 27″ sized display. This should help offer bright highlights up to a spec of 1200 nits, as well as very dark areas where needed, significantly improving the overall image contrast. The latter provides the colour enhancements associated with HDR, with a wide colour gamut covering 98% of the DCI-P3 wide colour gamut reference.

The GP27U is part of Cooler Master’s new Tempest line-up of screens. As well as the Mini LED backlight the screen offers a 3840 x 2160 “4K” resolution, with this being the first of Cooler Master’s models we’ve tested with this resolution. It also has a 160Hz refresh rate, adaptive-sync for variable refresh rates (VRR) from both NVIDIA and AMD systems, and is based on an ‘Ultra Fast IPS’ panel. It has a decent range of connectivity options and features too including DisplayPort 1.4, full-bandwidth HDMI 2.1 and USB type-C (with DP Alt mode and 90W power delivery). It’s great to see better quality backlights appearing more in the market for modern HDR gaming and multimedia, so we will see how the GP27U performs in our tests.
 | Check pricing and availability in your region |
 | |
 |
- If you want a quick hit of all the information you need to know about this screen, check out our 5 minute review video below!
- If you are interested in a 1440p version of this screen (at a lower price point) then our review of the Cooler Master Tempest GP27Q is also available here.
Update 7 Dec 2022 – Firmware Improvements
Before we get in to the rest of the review, Cooler Master have recently updated the firmware available for this screen (dated 2 Dec 2022), which can be flashed quickly and easily yourself using a USB stick plugged in to the monitor. We have updated the review in various places to account for the changes they’ve made, many of which were based on the feedback we gave, as well as feedback from owners of this screen. Well done Cooler Master for listening to feedback and making improvements quickly to the product, that’s really great to see!
The new firmware can be found here. The changelog for the firmware (v1.1) as of 2 Dec 2022 is below, with key updates in bold:
Changelog:
- Adaptive Sync (VRR) and Local Dimming can now be enabled together.
- Fixed some instances where the KVM would not automatically switch to a new signal input.
- More overall flexible color adjustments in all picture modes.
- Enabling Adaptive Sync will no longer limit the refresh rate to 144Hz, and instead works up to 160Hz (both HDMI 2.1 and DP).
- Fixed issues with 160Hz not activating when using DisplayPort.
- Fixed black screen issues when using DisplayPort.
- Fixed PS5 black screen issues.
- HDR Gamma issue is now corrected where gamma mode was sometimes selectable in HDR mode when it shouldn’t be
- Fixed an issue where color space would not change even when selecting a new color space in OSD.
Key Specs and Features
- 27″ “Ultra speed IPS” panel from AU Optronics (M270QAN07.0 – flat format)
- 3840 x 2160 “4K” resolution (16:9 aspect ratio)
- 160Hz refresh rate
- Adaptive-sync VRR for NVIDIA and AMD systems
- 576-zone local dimming Mini LED backlight h
- 1200 nits peak brightness spec for HDR
- 98% DCI-P3 wide colour gamut and 10-bit colour depth
- 1x DisplayPort 1.4, 1x USB type-C (DP alt mode and 90W power delivery) and 2x HDMI 2.1 video connections
- 2x USB ports, 2x 3W integrated speakers and headphone jack
- Stand with tilt, height, swivel and rotate adjustments
- Rear cover RGB lighting
Design and Features
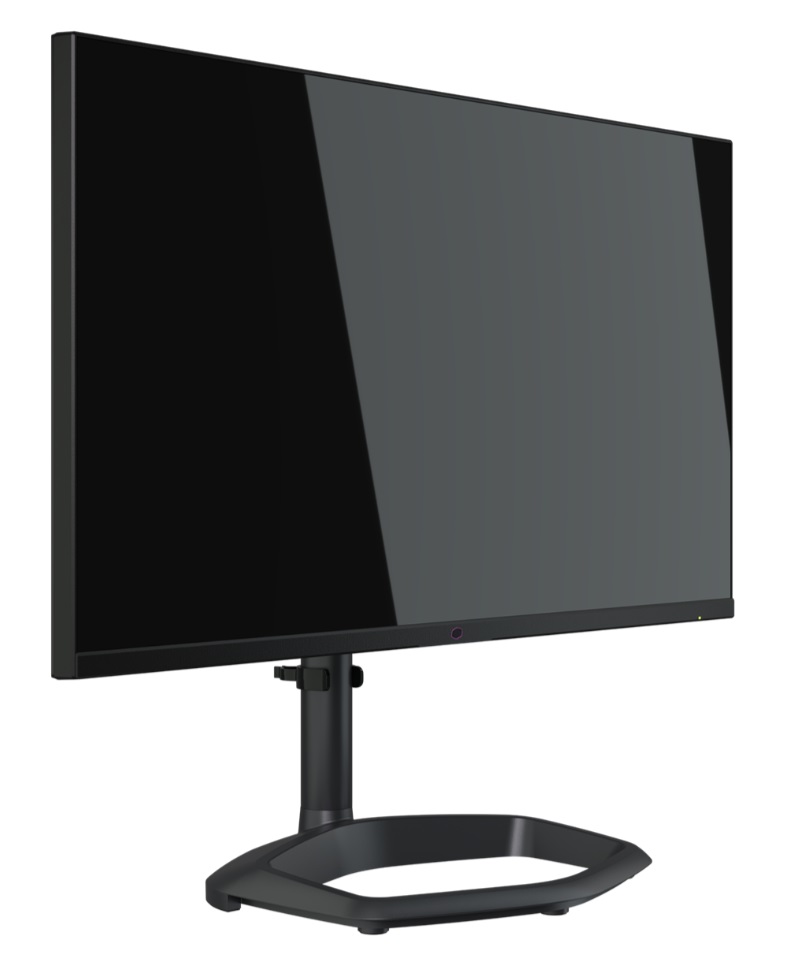
The GP27U comes in a black and dark silver design. There is a 3-side borderless panel design with a thin ~9mm black edge along the sides and top, and a slightly thicker ~17mm black bottom edge. It is fairly minimalist in design, and in keeping with other Cooler Master screens we’ve tested in the past.
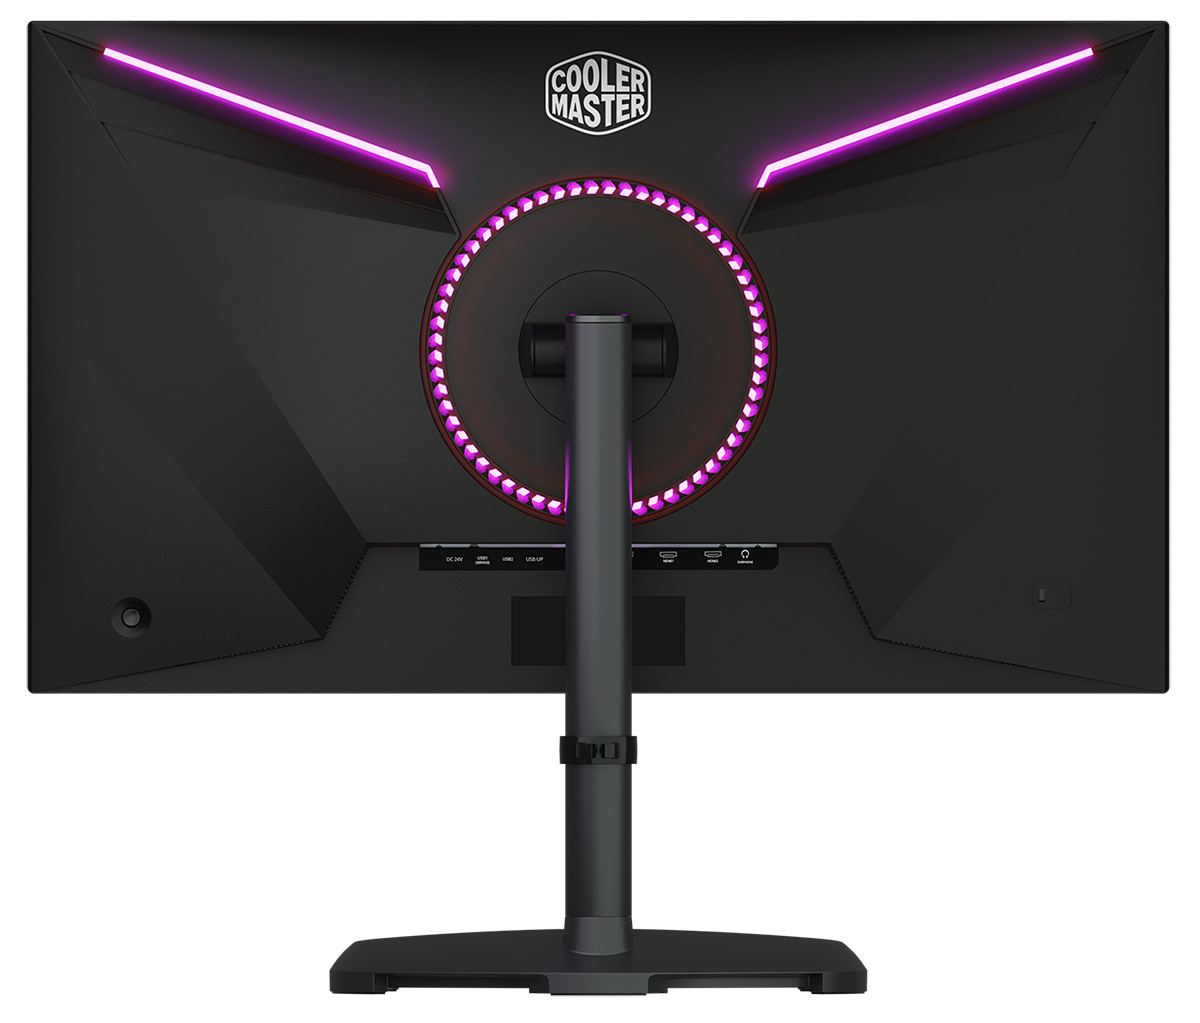
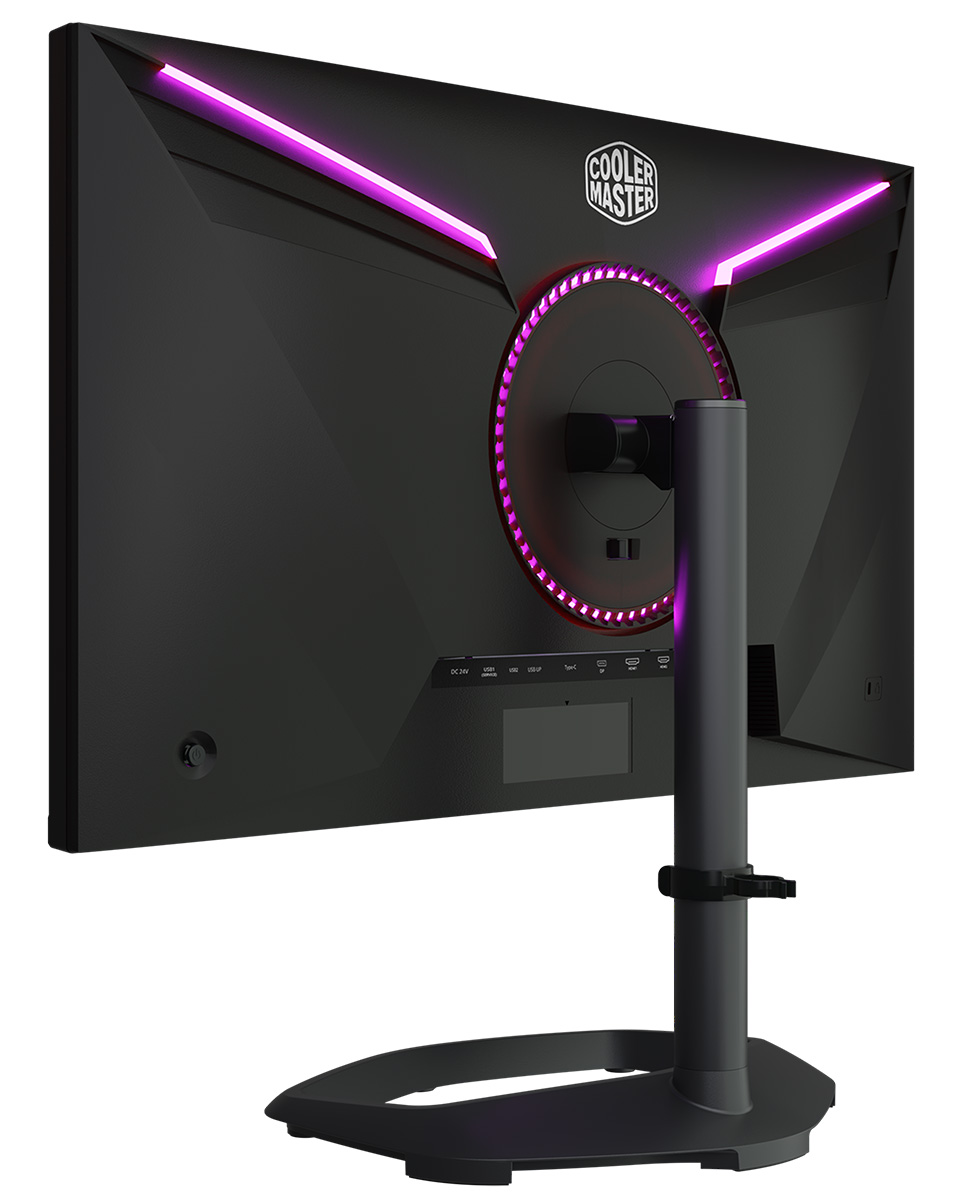
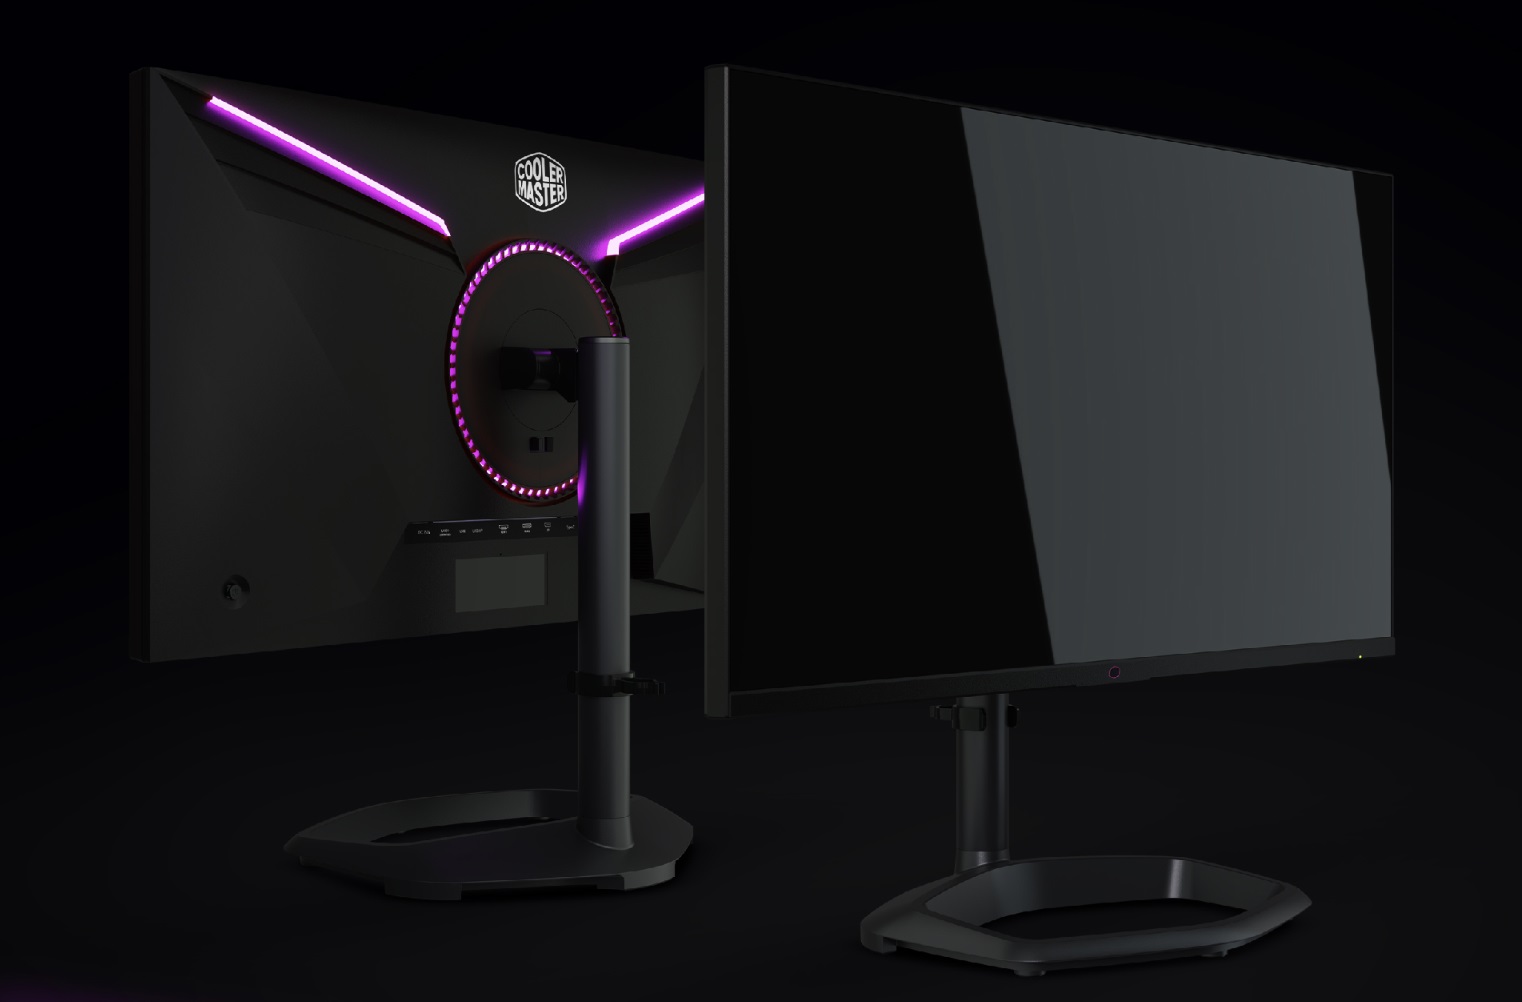
The rear of the screen is encased in a matte black plastic with a quick release stand attachment in the middle. You can see from the above images the fairly subtle RGB lighting elements on the back with two “wing” sections and a circle around the monitor’s arm. These are not bright enough to cast a light on your wall behind the screen really, so are only really useful if you can see the rear of the screen in certain situations. There is also a cable tidy clip on the arm of the stand, and you can see the OSD controller joystick on the left hand side in the photos above too.
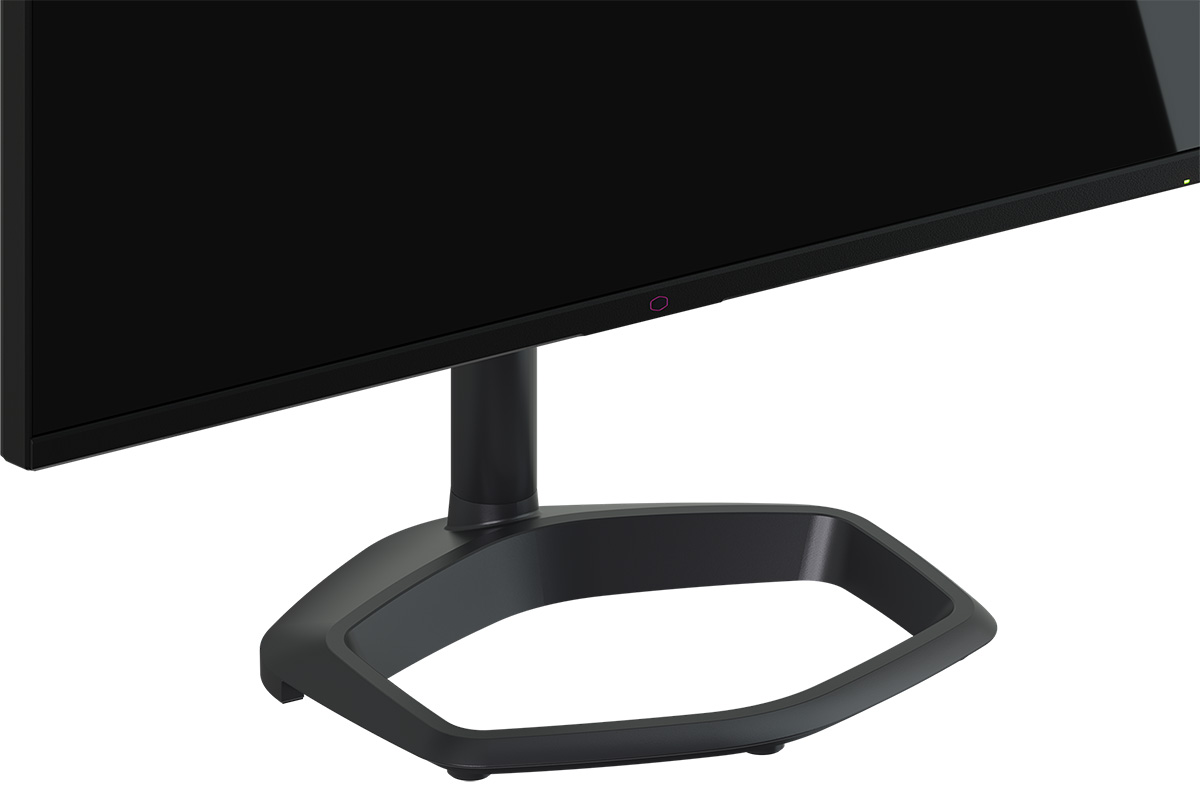
The stand provides a full range of ergonomic adjustments with tilt, height, swivel and rotate functions. All of these are smooth in movement and generally easy to use, although side to side swivel is a little limited in its range and the tilt adjustment is quite stiff to operate. The panel remains stable with very little wobble on the stand as you move it around or use the OSD buttons.
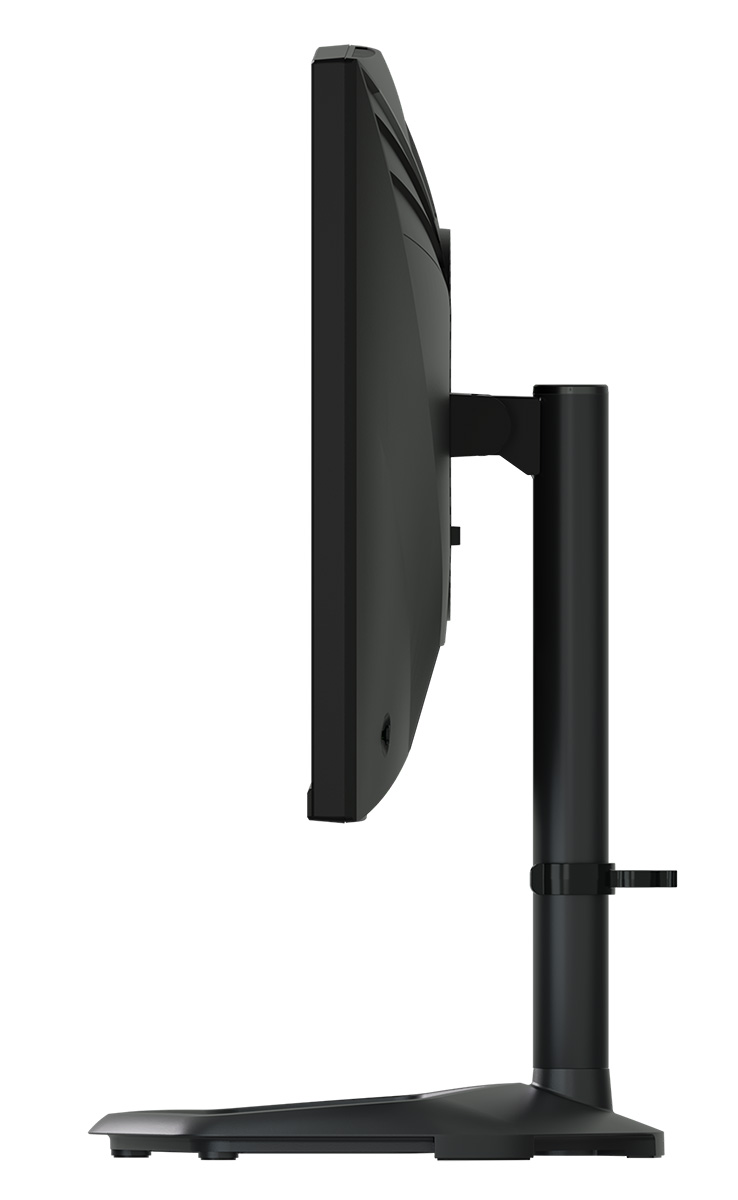
The screen has a thin profile as seen above. Connections are shown in the photo below on the back underside of the screen where there are 1x DisplayPort 1.4, 2x HDMI 2.1 and USB type-C (with DP Alt mode, data and 90W power delivery) available.
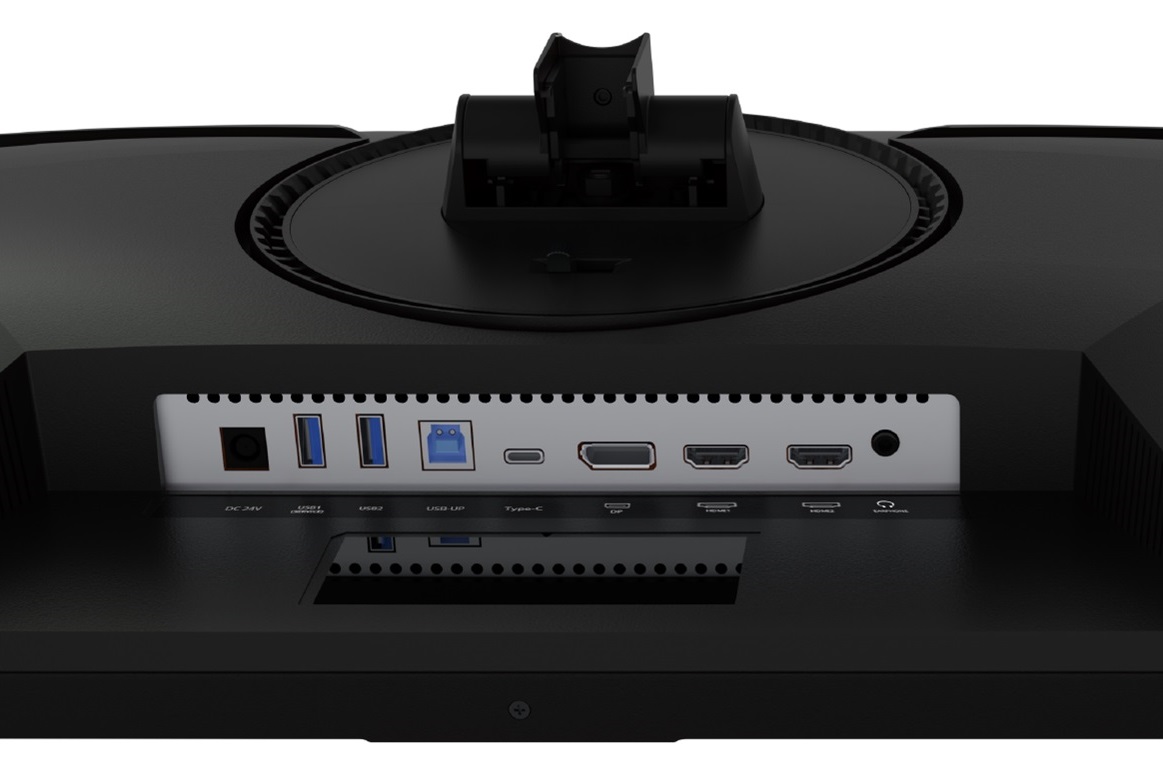
There are also 2x USB data ports and a headphone jack on the back here. It might have been nice to have the USB ports and headphone jack in a more easy to get to position for easy access.

The OSD is controlled through a single joystick on the back right hand side of the screen (when viewed from the front). Navigation is generally quick and intuitive, although you have to select and enable settings sometimes by pressing ‘right’ on the joystick, when a press of the button seems to feel more logical. There’s a decent range of options to play with in here too.

One annoyance with the menu software is that many settings trigger a warning about increasing/changing power consumption, and that happens every time. The most annoying of these is if you want to change between the different local dimming modes, although once you’ve found the mode you like, you shouldn’t need to change it again. It would be nice if you could turn off these warning messages as they get very annoying appearing all the time. This wasn’t addressed in the 2 Dec 2022 firmware, but hopefully will be in a future version.
Testing Methodology Explained (SDR)

Performance is measured and evaluated with a high degree of accuracy using a range of testing devices and software. The results are carefully selected to provide the most useful and relevant information that can help evaluate the display while filtering out the wide range of information and figures that will be unnecessary. For measurement, we use a UPRtek MK550T spectroradiometer which is particularly accurate for colour gamut and colour spectrum measurements. We also use an X-rite i1 Pro 2 Spectrophotometer and a X-rite i1 Display Pro Plus colorimeter for various measurements. Several other software packages are incorporated including Portrait Displays’ Calman color calibration software – available from Portrait.com.
We measure the screen at default settings (with all ICC profiles deactivated and factory settings used), and any other modes that are of interest such as sRGB emulation presets. We then calibrate and profile the screen before re-measuring the calibrated state.
The results presented can be interpreted as follows:
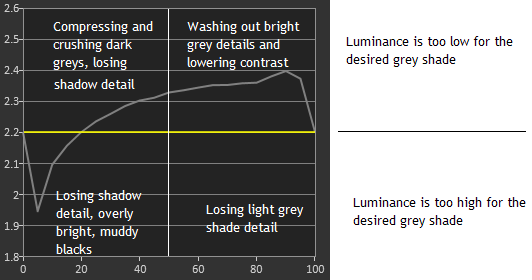
- Gamma – we aim for 2.2 gamma which is the default for computer monitors in SDR mode. Testing of some modes might be based on a different gamma but we will state that in the commentary if applicable. A graph is provided tracking the 2.2 gamma across different grey shades and ideally the grey line representing the monitor measurements should be horizontal and flat at the 2.2 level, marked by the yellow line. Depending on where the gamma is too low or too high, it can have an impact on the image in certain ways. You can see our gamma explanation graph to help understand that more. Beneath the gamma graph we include the average overall gamma achieved along with the average for dark shades (0 black to 50 grey) and for lighter shades (50 grey to 100 white).
- RGB Balance and colour temperature – the RGB balance graph shows the relative balance between red, green and blue primaries at each grey shade, from 0 (black) to 100 (white). Ideally all 3 lines should be flat at the 100% level which would represent a balanced 6500K average colour temperature for all grey shades. This is the target colour temperature for desktop monitors, popular colour spaces like sRGB and ‘Display DCI-P3’ and is also the temperature of daylight. It is the most common colour temperature for displays, also sometimes referred to as D65. Where the RGB lines deviate from this 100% flat level the image may become too warm or cool, or show a tint towards a certain colour visually. Beneath this RGB balance graph we provide the average correlated colour temperature for all grey shades measured, along with its percentage deviance from the 6500K target. We also provide the white point colour temperature and its deviance from 6500K, as this is particularly important when viewing lots of white background and office content.
- Greyscale dE – this graph tracks the accuracy of each greyscale shade measured from 0 (black) to 100 (white). The accuracy of each grey shade will be impacted by the colour temperature and gamma of the display. The lower the dE the better, with differences of <1 being imperceptible (marked by the green line on the graph), and differences between 1 and 3 being small (below the yellow line). Anything over dE 3 needs correcting and causes more obvious differences in appearance relative to what should be shown. In the table beneath the graph we provide the average dE across all grey shades, as well as the white point dE (important when considering using the screen for lots of white background and office content), and the max greyscale dE as well.
- Luminance, black depth and contrast ratio (static) – measuring the brightness, black depth and resulting contrast ratio of the mode being tested, whether that is at default settings or later after calibration and profiling. We aim for 120 cd/m2 luminance which is the recommended luminance for LCD/OLED desktop monitors in normal lighting conditions. Black depth should be as low as possible, and contrast ratio should be as high as possible.
- Gamut coverage – we provide measurements of the screens colour gamut relative to various reference spaces including sRGB, DCI-P3, Adobe RGB and Rec.2020. Coverage is shown in absolute numbers as well as relative, which helps identify where the coverage extends beyond a given reference space. A CIE-1976 chromaticity diagram (which provides improved accuracy compared with older CIE-1931 methods) is included which provides a visual representation of the monitors colour gamut coverage triangle as compared with sRGB, and if appropriate also relative to a wide gamut reference space such as DCI-P3. The reference triangle will be marked on the CIE diagram as well.
- dE colour accuracy – a wide range of colours are tested and the colour accuracy dE measured. We compare these produced colours to the sRGB reference space, and if applicable when measuring a wide gamut screen we also provide the accuracy relative to a specific wide gamut reference such as DCI-P3. An average dE and maximum dE is provided along with an overall screen rating. The lower the dE the better, with differences of <1 being imperceptible (marked by the green area on the graph), and differences between 1 and 3 being small (yellow areas). Anything over dE 3 needs correcting and causes more obvious differences in appearance relative to what should be shown. dE 2000 is used for improved accuracy and providing a better representation of what you would see as a user, compared with older dE methods like dE 1994, as it takes into account the human eye’s perceptual sensitivity to different colours.
Default Setup
The GP27U offers a wide colour gamut backlight which provides vivid and saturated colours well suited to a lot of gaming and to modern multimedia and HDR content. HDR is a key target use for this model given its high end Mini LED local dimming backlight. If you like the more colourful appearance then the screen does nicely here with a wide colour space. However, for a lot of normal desktop uses actually you want to work with a smaller SDR / sRGB colour space and that can be more difficult on a wide gamut screen. We will see how this screen handles that usage scenario shortly.
We first want to measure the accuracy of the default out-of-the-box setup relative to typical sRGB content, while also examining the screen’s suitability and accuracy for common wider colour gamut spaces such as DCI-P3, or for Adobe RGB which is used in the professional and photography markets quite often. We should note that the screen does carry a factory calibration, but this applies in the defined sRGB, DCI-P3 and Adobe RGB modes which we will test shortly.

Note that we left the local dimming function disabled for these tests.
The screen has a fairly modest default brightness which is rare for a desktop monitor, but it is set for some reason in the ‘cool’ colour temperature mode out of the box which is a bit too cool visually and leaves whites looking a bit bluish. From our measurements we can see that the image is a lot cooler than desired, at 8128K white point it was 25% too cool compared with our 6500K target. Gamma tracking of 2.2 gamma was at least very good, but the overly cool image resulted in high errors in greyscale with dE 6.5 average.
The contrast ratio in this default mode was disappointing though, at 729:1 which is poor even for an IPS-type panel. This seemed to be a result of the pre-defined colour temp setting (default = cool). We tested the other modes as well including bluish, native and warm and all had similarly poor contrast ratios. If you move to the ‘user color’ temperature instead, which allows you control over the RGB channels, the contrast ratio is significantly improved up to >1000:1. So whatever mode you end up using, we would definitely recommend avoiding the pre-defined colour temp settings as those seem to crush contrast. We will test the different colour gamut and colour space emulation modes and also see what is achievable after calibration later too.
Backlight adjustment range in this default mode (with local dimming off and in SDR) was ~432 nits max, down as low as 56 nits, which provided a good range of luminance for both bright and dark room conditions. You can actually enable the backlight local dimming if you want even in SDR mode which provides a significantly brighter image, which we will test a bit more later. Local dimming is really supposed to be used for HDR gaming and multimedia, you won’t want to use it for normal desktop or office use, although you could enable it for SDR games and movies as well to provide a better contrast ratio and potentially brighter image.

From a colour point of view we have measured the screen’s native mode relative to the common sRGB colour space at the top, and then also relative to Adobe RGB at the bottom, a wider gamut colour space often used in the photography and professional market. Thanks to the Quantum Dot screen coating there is a very wide 149.1% relative coverage of sRGB, with large over-extension of colours in red and green shades particularly, making them look very saturated in practice. When viewing sRGB/SDR content in this default mode, colour accuracy is bad at dE 5.7 average but that’s common on wide gamut screens because of the over-coverage of the colour space.
The bottom section shows that there is good coverage of wider colour gamut spaces like DCI-P3 (98.5% absolute) and Adobe RGB (98.7%), although both also over-extend in this native gamut mode by a considerable way (118.9% and 127.8% relative coverage respectively). Although this does mean that in theory you can work with those wider gamut spaces nicely, if you have a way to clamp the colour space back to the intended area either from the monitor itself (tested in a moment), or via calibration and profiling. With the large over-coverage even of the Adobe RGB space, we had poor colour accuracy in this default mode for those colours with dE 4.6 average. This is all to be expected really from a screen with such a wide colour gamut, but it will be interesting to see how we can “tame” this via the other monitor modes.
sRGB Emulation
The GP27U provides an sRGB emulation mode in the OSD that can allow you to restrict the colour gamut back to the more common sRGB / SDR reference space. These modes can be useful if you want to avoid the over-saturation in the native wide gamut mode or specifically work with and view SDR content, although it’s also possible to use other methods such as graphics card clamping, or of course calibration and ICC profiles. Having a usable and working sRGB emulation mode from the monitor itself is the easiest method though, and can be used for all different applications, inputs and modes.
The provided factory calibration report lists sRGB mode as one that should have been factory calibrated, and mentions 2.2 gamma and 6500K colour temp, but for some odd reason doesn’t go on to show the colour space and dE figures for that mode, only for DCI-P3 and Adobe RGB modes which are also factory calibrated. Perhaps sRGB should be on a second page of the report, perhaps missing from our sample.

The sRGB emulation mode thankfully allows you control over many settings within the OSD menu, including importantly brightness so you are not stuck with whatever the manufacturer default is like on some screens. This means you can thankfully turn it down to something more comfortable than the 268 nits we measured out of the box in this mode. One immediately noticeable benefit of this mode compared with the default ‘auto’ gamut mode was that the contrast ratio was far better. It had improved from the default 729:1 to a far better 1025:1, now being basically on spec, and considered good for an IPS-type panel. Remember this is the SDR contrast ratio with local dimming disabled.
Gamma was reasonable, although a little high in mid to light grey shades. The white point was pretty good as well at 6630K, leaving a small 2% deviance and being only slightly too cool. The greyscale was slightly cooler on average at 6847K but this wasn’t too bad.
Update 7 Dec 2022 – When we originally tested the screen we found that you did not have access to the colour temp or RGB channel gain controls, so the colour temp was one area you couldn’t correct without separate calibration devices. With the new firmware (dated 2 Dec 2022) you now have access to the RGB channels to make tweaks if you want, which is really handy. You get a warning that this will move you away from their factory calibration, but ultimately it gives you better control in this emulation mode.

Clamping of the very wide native gamut of the screen (~149% sRGB in native mode) back to the defined sRGB space was very good. Perhaps slightly too far, but we had a 95.5% absolute coverage now, and nearly all the over-coverage had been eliminated. Colours now looked more muted of course than in the full wide gamut mode, but they are far more accurate for sRGB and SDR content. We measured a 1.5 dE average which was much better and represented an overall good colour accuracy for this mode. With access to brightness and other settings still available to the user, this is a decent and usable sRGB emulation mode.
Adobe RGB emulation
The GP27U also includes a factory calibrated mode for the Adobe RGB colour space, useful in the professional and photography markets.

This mode had a very good gamma tracking for 2.2 gamma, but its colour temp and white point were a bit cooler than the sRGB mode. We measured a 6% deviance for white point at 6872K, and a slightly higher 9% deviance at 7064K average across grey shades. This does leave us with a larger error on the greyscale at dE 3.2 average, because the blue channel is a bit high and the image is a bit cool. Note in this mode again that we had a good contrast ratio for an IPS panel at 1009:1, compared with the default native mode earlier.
Update 7 Dec 2022 – When we originally tested the screen we found that you did not have access to the colour temp or RGB channel gain controls, so the colour temp was one area you couldn’t correct without separate calibration devices. With the new firmware (dated 2 Dec 2022) you now have access to the RGB channels to make tweaks if you want, which is really handy. You get a warning that this will move you away from their factory calibration, but ultimately it gives you better control in this emulation mode.

Clamping of the colour space was a bit too aggressive in this mode. We didn’t know whether to give this a tick or a cross in the table really. On the one hand, it’s certainly cut back on the large over-coverage of the native mode (127.8% relative coverage), especially in red and blue shades where the monitors native gamut goes a long way beyond the Adobe RGB space. But then it goes a bit too far, and now we have some under-coverage of red shade instead, resulting in a 92.6% coverage of the colour space. Still, by emulating the Adobe RGB space quite well, and by including a factory calibration, we had a better colour accuracy that we would rate as good, with dE average of 1.7.
This is a usable mode as well if you wanted to work specifically with Adobe RGB content for photography or professional applications, and can live with a cool default image and not-quite-perfect colour space. You can now make changes to the RGB channels to try and improve the white point which is good, but if you have a calibration device you might actually be better profiling the native gamut mode back to Adobe RGB and using the ICC profile in colour aware applications for more accurate Adobe RGB colour space clamping.
DCI-P3 Emulation
The GP27U also includes a factory calibrated mode for the DCI-P3 colour space, applicable in the HDR content creation and multimedia markets.

This mode is very similar in setup to the Adobe RGB mode for gamma, but the white point and colour temp are slightly cooler still in this mode, with a blue channel that is too high. We measured 7046K white point now. Contrast ratio was again solid at 987:1.
Update 7 Dec 2022 – When we originally tested the screen we found that you did not have access to the colour temp or RGB channel gain controls, so the colour temp was one area you couldn’t correct without separate calibration devices. With the new firmware (dated 2 Dec 2022) you now have access to the RGB channels to make tweaks if you want, which is really handy. You get a warning that this will move you away from their factory calibration, but ultimately it gives you better control in this emulation mode.

Like the Adobe RGB mode again, this DCI-P3 mode did cut down on the very large native gamut nicely, but went slightly too far in red shades, resulting in a 93.0% coverage of DCI-P3. The colour accuracy was reasonable in this mode, and again we would say this is a usable mode generally if you need to work in this colour space, and tame somewhat the very wide default gamut. Having a calibration device would give you better control over the colour space profiling, and allow you to correct things like the too cool white point easily.
Calibration
Note that the calibration here is with local dimming turned off


Calibration and profiling can produce very good results if you have a suitable calibration device and software. This was profiled to 2.2 gamma, 6500k colour temp and to the sRGB colour space. The screen was left in its native wide gamut mode, but this profile will be used in colour-aware applications (e.g. Photoshop) to map back to sRGB in this instance. You can see the recommended OSD settings above that go along with this profile. Our calibrated ICC profile for this display is available now for our Patreon supporters and will be added to our main database in the coming months.
SDR Local Dimming
Cooler Master provide the option to enable the local dimming backlight even in SDR mode, which could potentially be useful for gaming and multimedia. It can offer impressive increases in brightness and contrast in those situations although keep in mind that the tone mapping of content won’t be there like it is for HDR. SDR content is mastered to a much lower brightness level (actually 100 nits), so you will need to try and get to a comfortable brightness for your uses, ambient light conditions and content. You don’t have to get it to 100 nits, many people find that too dark, but you will need to customise the brightness control in the OSD to get something comfortable. With local dimming enabled you can then still benefit from the local dimming to improve black depth and darker content, while improving the contrast ratio significantly.
For these tests we switch to the sRGB gamut mode, as SDR content is based on that colour space and it will provide more accurate colours as as result. You can of course use the ‘auto’ wide gamut mode if you prefer for your SDR gaming and multimedia, but the colours will be more saturated and unrealistic if you do. You’d have to experiment with the OSD settings to get a comfortable brightness, gamma etc. We have provided some recommendations below for the sRGB emulation mode with local dimming enabled.
We first of all tested the brightness range with local dimming enabled in each of the three modes. We used a 10% APL for this test:
| Local Dimming Setting in OSD menu | Max 100% (nits) | Min 0% (nits) |
| Low | 920 | 56 |
| Medium | 1201 | 88 |
| High | 1417 | 95 |
The brightness levels possible with local dimming in SDR mode are basically the same as in HDR mode (see results later on in the 10% APL row). This means that the screen can be crazily bright and this can be a problem for SDR content which is not tone-mapped and graded in the same way that HDR content is. Unlike HDR mode where you would just leave brightness on 100%, you need to set the brightness in SDR local dimming mode to something comfortable and suitable for your uses. We will come back to some possible recommended brightness levels in a moment once we’ve explained the other settings we used for this mode.
After a fair bit of experimentation in the sRGB mode with local dimming enabled (set to high in this case to maximise contrast) we found that the gamma needs to be increased a step to 2.4 in order to more closely match our target 2.2 gamma. We left other settings at default.

Gamma was fairly close to 2.2 here after we’d adjusted the OSD setting to 2.4. The white point and colour temp was unfortunately too cool though by about 17%, and you don’t have access to change the RGB balance when using the sRGB emulation mode in order to correct this. That’s the main problem in the sRGB mode with local dimming enabled and this leads to high errors in the greyscale. A cooler setting is not uncommon for multimedia though so it should still be usable for this kind of content.

Colour accuracy is moderate in this mode, but you do at least have a pretty good emulation of this smaller sRGB colour space which is suitable for SDR content.
One other option if you want to use local dimming for SDR content is to run the screen at its native ‘auto’ gamut mode where you then have access to correct the white point through adjustments to the RGB channels. You can use the settings recommended in our calibration section above (50, 47, 47) to get a white point closer to 6500K, although you then have the wide gamut colour space to contend with. SDR content, designed to operate within the sRGB colour space, would then be far less accurate, with more saturated, vivid and neon looking colours.
When it comes to screen brightness here’s a few recommendations when using local dimming = high. You have to set the brightness control very low to get a comfortable SDR brightness. 1% = 120 nits, 2% = 152 nits and 4% = 214 nits.
One simple option if you want to have a mode for SDR desktop use (local dimming off) and one for SDR gaming/movies (local dimming on) is to use the two User preset modes. Save one load of settings in each mode, and then you can simply switch between the two presets rather than having to mess around with multiple changes.
Update 7 Dec 2022 – Cooler Master have stated on this Reddit post that they are planning some updates and improvements to SDR local dimming performance in a future update.
General and Office
The GP27U features a 3840 x 2160 Ultra HD resolution (“4K”), all packed in to a 27″ sized screen. The higher resolution is not about providing more screen real-estate here, it’s about providing a sharper and crisper image, while still operating with a similar desktop area and same font size to the 1440p models. It is providing a higher pixel density (Pixels Per Inch, PPI) to improve the degree of definition to the image. You need to us operating system scaling to handle this properly. If you try and run the screen without any scaling at 3840 x 2160 the 0.156mm pixel pitch makes everything far too small and tiny. On this 27″ model, if you increase the scaling to 150% for comfortable text size, you actually end up with the same workspace area as 2560 x 1440, but at a much higher PPI pixel density – and therefore a sharper image. For those wanting a high pixel density for CAD, design, photo work etc, this is a really good option. Of course it’s also great for providing a sharp and crisp image for gaming and multimedia. The image was very sharp and crisp and text was very clear. It is a little debatable whether you will gain much benefit from the higher PPI on a screen this size compared with a 2560 x 1440 standard model, but some may notice picture quality and sharpness improvements.
Keep in mind that not all Operating Systems and applications handle scaling the same. More recent versions of Windows tend to handle it all better, and recent versions of Mac OS are pretty solid as well. Some applications and games don’t handle scaling correctly and so you can end up with some things with very minute text and fonts and some things which don’t scale completely in every place. Keep this in mind if you’re selecting any super high resolution display as it could be an important factor. You need to ensure you have the necessary operating system and applications to handle scaling effectively for your needs. It does make life a bit more complicated than if you just ran at a native resolution, which is where the more common 2560 x 1440 res fits in to the 27″ display space. If you have the necessary software and operating system then the 4K resolution provides a very sharp and crisp image on a screen this size.
The IPS panel used for this screen offers some solid all round performance including wide viewing angles and a stable image quality that you’d expect from this technology. You get a typical pale glow on dark content when viewed from an angle though. The contrast ratio is good but not brilliant for an IPS-type panel at around 960:1 after calibration, but still not as good as VA panels or next generation “IPS Black” panels. Just make sure not to use the defined colour temp modes in the menu which crush contrast to ~730:1. Select the ‘user’ mode and tweak the RGB channels as we suggest in this review to get a nice white point and maintain a much higher contrast ratio. The backlight adjustment range (52 – 409 cd/m2) is very good, including adjustment for darker room conditions.

We confirmed that when the local dimming function is turned off, the backlight operates with a flicker-free direct current (DC) method, as opposed to any PWM.

If you enable local dimming then a low amplitude oscillation, with the high peaks you see in this graph syncing with the refresh rate of the screen. So in this example at 160Hz the high peaks were every 6.25ms. This shouldn’t present any noticeable flicker in practice, but we would not recommend turning local dimming on for office and general use anyway. There’s perhaps scenarios where it could help contrast in SDR movies, games and multimedia, but not for office use.
The wide colour gamut provides flexibility to work with a range of different colour spaces if you need to. The native wide gamut is useful for gaming, HDR and multimedia where you might well prefer the more saturated and vivid colours, and especially for HDR content which is mastered in a wide Rec.2020 colour space anyway. Having the ability to cover nearly all of the DCI-P3 and Adobe RGB colour spaces from this screen is great news if you want to work in either of those, and the provided emulation modes are pretty useful for this too. sRGB emulation is also provided and well set up.

The spectral distribution at a calibrated 6500k is shown above, with the blue peak measured at 448 nm wavelength. This means it is not part of the Eyesafe certified range of products, as it does not have a blue peak that is outside of the supposed harmful range according to Eyesafe which is 415 – 455nm. There is a ‘Blue Light filter’ setting in the OSD menu which can be accessed via the ‘color adjust’ section. This is a slider from 0 (off) to 100 in increments of 10, and makes the image progressively warmer, but then also very yellow in colour. It’s usable up to about a setting of 30 which measured 4626K, but any higher setting just looks ridiculously yellow, especially at the higher settings.

With a built-in KVM switch in the Tempest Monitor series, you can easily control an extra device such as a laptop, another desktop, tablet, or a phone using only a single set of a keyboard and mouse. With a simple toggle in the OSD menu, you can seamlessly swap controls to your second device for ultimate multitasking.
The screen has a decent range of ergonomic adjustments with tilt, height, swivel and also rotate available. Along with the common DisplayPort and HDMI inputs, there is a USB type-C with DP Alt mode and 90W power delivery which might be useful for some devices for single cable connectivity. There are also 2x USB ports and a headphone jack too, as well as some simple integrated 2x 3W speakers on this model.
Gaming
The GP27U is based on an IPS-type panel from panel manufacturer AU Optronics, their AHVA or so-called “Fast IPS” technology which Cooler Master have branded “Ultra Fast”. The screen has a quoted 1ms response time spec which must be G2G as there is no blur reduction backlight mode available on this particular model.
Updated 7 Dec 2022 – There is a pretty high 160Hz native panel refresh rate and the screen features adaptive-sync for variable refresh rates (VRR) from both AMD and NVIDIA systems. When we first tested the screen this operated with a range of 48 – 144Hz supported. At the time you couldn’t use the full 160Hz refresh rate range when using VRR, and actually you are blocked from being able to select 160Hz refresh rate from your graphics card control panel if you have adaptive-sync enabled in the monitor’s OSD. Only refresh rates up to 144Hz were available. Although given this is a 4K panel, pushing your frame rate in to these realms is going to be a challenge anyway. It was a shame you couldn’t use the full advertised 160Hz though at the time.
Thankfully Cooler Master have improved this with their newest firmware (dated 2 Dec 2022) allowing you to use the full 160Hz in VRR situations. Oddly if you enable adaptive-sync on the screen, you can only select 160Hz refresh rate in the NVIDIA control panel, the lower refresh rate options are not listed. This is perhaps a remaining bug that will be ironed out in the future, but good news is you can now use the screen up to 160Hz in VRR situations.
The screen has not yet been certified under any of AMD’s or NVIDIA’s certification schemes according to their respective websites, but Cooler Master say in their reviewers guide that ‘FreeSync Premium Pro’ certification is expected.

Within the OSD menu are a few ‘Gaming Plus’ settings for timer, crosshair and FPS counter in case you find those useful by the way, but there is no blur reduction mode available on this model. There are also a range of preset modes available for things like FPS, simulation, RTS and some customisable modes.
Response Times and Motion Clarity
As discussed in our detailed article about Response Time Testing – Pitfalls, Improvements and Updating Our Methodology we are using an improved and more accurate method for capturing G2G response times and overshoot, based on figures that are more reflective to what you see visually on the screen in real-World usage. Our article linked above talks through why this is better and how we arrived at this improved method in much more detail.

We tested the screen at the maximum 160Hz refresh rate in each of the overdrive modes in the OSD menu, using our measurement devices and a range of visual tests. We have not bothered with the ‘off’ mode here by the way, instead focusing on the 4 other modes. You can see that there are actually very good response times even in the ‘normal’ mode with 4.9ms G2G average and basically no overshoot at all, with good refresh rate compliance so the pixel transitions can keep up with the frame rates well. The response times improve slightly when you move up to the ‘advanced’ mode with 4.5ms G2G average now measured but a small amount of overshoot starts to appear. These two modes look visually the same in motion tests and real content.
If you move up to the ‘Ultra Fast’ mode there are improvements to the G2G figure, but at the cost of some high levels of overshoot, visible in practice too with some pale halos being the most obvious. There is also a ‘dynamic’ mode available which offered slightly fastest response times at 160Hz than the ‘normal’ and ‘advanced’ modes at 4.3ms G2G measured, and only low, non-visible levels of overshoot in practice. It looked very similar in practice at 160Hz to the normal and advanced modes though.
The performance during VRR situations and for other fixed refresh rate inputs also needs to be considered. First let’s look at VRR mode. We have included measurements at 144Hz max here from our original testing before the full 160Hz range was enabled for VRR in a later firmware update:

We tested all of the overdrive modes during VRR situations with a range of different active frame rates. In VRR, the Advanced and Dynamic modes looked the same across the VRR range, and both showed high levels of overshoot with visible pale trails at the lower end of the refresh rate range. We tried the normal mode as well which we felt also showed a little too much overshoot at lower frame rates. In the end we decided to tinker with the ‘User’ mode which gives you manual control for the overdrive impulse. We pushed this as high as we sensibly could at the lower refresh rates before overshoot became too noticeable, and settled on a level of 20 for the best balance. The above measurements show response times at 60, 100 and 144Hz in this User 20 mode. You can see the G2G response times are largely the same across the range but the overshoot level is higher as the refresh rate reduces. This is pretty typical for any screen without ‘variable overdrive’, but we still felt that this User 20 mode gave a “single overdrive setting experience” for gaming in VRR. At no point did the overshoot become too problematic which was good news. We had expected the ‘dynamic’ mode to offer variable overdrive in VRR, but it seems not to.
We can also look at fixed refresh rate inputs (non-VRR) to consider things like 60Hz inputs in particular:

We found that for a fixed 60Hz input the ‘dynamic’ mode looked noticeably better than the ‘advanced’ mode, even though the two had been the same during VRR situations. There was a lot less overshoot and so we would recommend this mode for 60Hz, or you could also just stick to User 20 which pushes things a little further.

We have provided some motion clarity pursuit camera photos below comparing the ultra fast mode to the optimal ‘dynamic’ mode when using 160Hz refresh rate. You can see the solid performance in dynamic mode, and also the pale overshoot artefacts that start to appear if you were to use the ‘ultra fast’ mode. This overshoot in that mode gets worse by the way in that mode at lower refresh rates. Motion clarity will vary of course if you lower the refresh rate or use VRR and frame rate drops, this is more to demonstrate the best case motion clarity at the max refresh rate.
Gaming was sharp, crisp and clear thanks to the high 4K resolution, providing a very pleasing gaming experience. We will talk about HDR more in a moment, but the HDR gaming experience is also excellent. Update 7 Dec 2022 – when we first tested the screen you could only use HDR when adaptive-sync VRR was disabled but that has since been updated with the new firmware (dated 2 Dec 2022).
Another useful option perhaps for gaming is enabling the local dimming backlight even in SDR mode, which is a supported option on the GP27U. That can significantly increase brightness, and you’d want to be careful about what you set that to. But it can also help with contrast, improving darker areas and increasing the overall image quality. That’s something you could consider for SDR gaming too and it was nice to see access to the local dimming Mini LED backlight outside of HDR. The performance and colour setup in that SDR local dimming mode isn’t great right now, but Cooler Master are exploring improvements for a future firmware update they’ve said.
Lag
We should note here that we measured a super low input lag on the GP27U. There was a total display lag of only 2.50ms and with ~1.08ms of that accounted for by pixel response times, that leaves a signal processing lag of only ~1.43ms which is excellent. As a result the screen is perfectly fine for fast paced competitive games if you need from that point of view. There was no change to this lag result with local dimming enabled in SDR mode by the way.
Console Gaming

The screen features offers a 4K resolution and support for high refresh rates including 120Hz, making it well suited to modern games consoles like the Xbox Series X and PlayStation 5. Cooler Master have included two full-bandwidth HDMI 2.1 ports, delivering 48 Gbps speed and therefore supporting the max bandwidth capabilities of the two consoles. The support for 4K resolution (natively here) means you can make use of HDR from the Xbox where that mode is only available at 4K, which is of course one of the key capabilities of this screen. The Mini LED backlight comes in to its own here for HDR gaming, providing an excellent image quality and HDR experience. More on HDR in a moment.
| Console Gaming | |
| Native panel resolution | 3840 x 2160 “4K” |
| Maximum resolution and refresh rate supported | 4K @ 120Hz |
| PlayStation 5 support | 4K @ 120Hz 4:2:2 chroma (console limit) |
| Xbox Series X support | 4K @ 120Hz 4:4:4 chroma |
| Virtual 4K support | Not needed |
| 4K at 24Hz support | |
| 4K at 50Hz support | |
| HDMI connection version | 2.1 |
| HDMI connection bandwidth | 48 Gbps |
| HDMI-VRR (over HDMI 2.1) | ? |
| Adaptive-sync (FreeSync) over HDMI | |
| Auto Low Latency Mode (ALLM) | |
| Ultra high speed HDMI 2.1 cable provided |
We confirmed via an Xbox Series X that 4K 120Hz works fine. For some reason initially the console reported that 4K 60Hz was not supported, but after switching to 60Hz, we found that worked fine – at which point the console reported it would work after all. There is no support for 24Hz or 50Hz though, or any HDR format other than HDR10, but that’s fine for most HDR gaming anyway.
VRR was supported only when you have adaptive-sync enabled in the monitors OSD, which suggests maybe it’s using FreeSync over HDMI (supported for VRR from the Xbox) but not HDMI-VRR as a feature of HDMI 2.1. We do not have access to a PS5 to confirm whether or not that is the case, but it seemed that way from the way you could disable VRR from the monitors adaptive-sync setting.
Updated 7 Dec 2022 – When we first tested the screen you could not use VRR with local dimming, but that has now been changed with the new firmware (dated 2 Dec 2022). This means you can now use HDR, local dimming and VRR which is great news – from the Xbox at least.
Further recommended reading
HDR (High Dynamic Range)

One of the key benefits of the GP27U is its 576 zone Mini LED backlight which sets it apart from common edge-lit local dimming monitors, which only have a very limited number of dimming zones, commonly 8 or 16. Mini LED backlights like the one used here provide a much better control over the image on the screen, being able to dim smaller parts of the image while brightening other areas to improve the contrast and dynamic range. Dark areas can often be dimmed so low that they are basically being turned off, while bright highlights can often be brightened to very high peak brightness levels. That’s one of the key benefits in using a direct lit backlight with many zones like this.
Each zone on this screen is responsible for around 14,400 pixels given the high 4K resolution which obviously isn’t as finite in control as something like OLED which has per-pixel level dimming control. Having said that, a Mini LED backlight is capable of reaching much higher brightness levels, including sustaining those brightness levels for larger screen areas, so each technology has its advantages and limitations. The 576 zones used here is very good though on a screen this size in the LCD market. This helps reduce blooming and halos in practice relative to screens with fewer zones. There can still be challenges on very specific content like star fields for instance, or scenes with very small bright areas, but that’s going to be hard for any FALD screen to handle and you really need something like OLED to avoid all halos.
Normal use HDR content looks very impressive, with images that pop with nice colours, some almost uncomfortably bright areas, and very low levels of blooming and halos from what we could see. We are aware of reports from some users online of blooming issues on this screen, but we saw no sign of that here on our sample. We tested the local dimming in both SDR mode (where it is available to use if you want) and HDR, and in a range of different settings and options, and the blooming was consistently low. Halos were small and the Mini LED backlight did a very good job of brightening light areas, and darkening dark areas. There are quite a few different options available, which are explained below so you do need to make sure you are using the appropriate settings when using the screen for HDR.
| HDR Technical Capabilities | ||
| VESA DisplayHDR certification level | Not officially certified | |
| HDR formats supported | HDR10 Only | |
| Local dimming | 576 zone Mini LED | |
| High number of local dimming zones | 576 zone Mini LED | |
| Increased peak brightness | 1496 nits | |
| Reaching advertised peak brightness | Surpassing by a considerable way | |
| Increased dynamic range (contrast) max | ~306,000:1 | |
| Increased “local” HDR contrast ratio max | ~2700:1 | |
| Wide colour gamut >90% DCI-P3 | 98.5% absolute coverage 118.9% relative coverage | |
| 10-bit colour depth support | Supported | |
Updated 7 Dec 2022 – When you first enable HDR in Windows the image might very washed out, but this is because on the older firmware you also have to enable HDR in the OSD menu (set it to ‘auto’ instead of the default ‘off’), and then also enable local dimming to one of the three settings (low, medium, high). Once you’ve done that, the default Windows appearance in HDR mode is very good. On the newer firmware from 2 Dec 2022 this seems to be enabled by default now which is easier and avoids that initial shock of it looking really bad!
There are 3 preset modes for HDR which are User, Movie and Game. All carry different default settings but after the 2 Dec 2022 firmware update you can now change most settings to your liking. We don’t need to break down the modes here as they are all pretty customisable.
Local Dimming Setting

Before we get in to the other measurements we compared the peak brightness performance in each of the ‘local dimming’ settings. Visually when switching between the three modes you could see the brightness increased as you moved up the setting. There was some very minor increase in blooming as it seems the backlight is now being raised even higher to bring out the highlights, which could risk some slight “over-spill” in to adjacent areas more often. To be honest, the differences were very minimal, so unless you are experiencing blooming problems with your specific content, we would probably recommend sticking to the ‘high’ mode to optimise the brightness of the screen and make images pop more.
You can see from the above that the high mode delivered the highest brightness levels for content. If you find the image too bright at all, turning the local dimming down a step is an effective way to reduce the peak brightness of the screen, while avoiding the need to darken the overall image (like changing the brightness slider would), and at the same time also get a small improvement in blooming levels. So if you find the screen too bright at all, use the ‘local dimming’ setting to make that a bit darker and move down to medium or low.
HDR User Mode Default Settings
We went ahead and tested the User mode which gives you the best flexibility in settings. HDR mode was set to ‘auto’ on the monitor so that it was active, and local dimming was set to ‘high’ for these tests.

Tracking of the PQ curve was good with only some small deviance in light grey shades. The colour temp and white point were the main problem in this mode, being too cool at 7803k (20% deviance) white point. This lead to some high errors in grey scale which had a slight blue tint to them. Some people prefer a cooler image for HDR and movies, but our target here is for 6500K. In this HDR User mode you do have access to the colour temp setting and RGB channels so it is possible to improve things with some changes there. We will look at that in a moment.

Colour accuracy of HDR Rec.2020 colours is only moderate overall, despite the particularly wide colour gamut covering a decent 85.3% of the Rec.2020 colour space because of the overly cool colour temp.

Somewhat surprisingly, the GP27U surpasses its spec when it comes to peak brightness. We measured a peak brightness of 1496 nits, which is a considerable way beyond the 1200 nits advertised. The peak brightness varied depending on the APL (size of bright content on the screen) with the highest brightness being achieved for 5 and 10% window sizes, before dropping down to a bit lower as that APL increased, and then pushing back up near the maximum again for 100% white screen. Small highlights were also very bright at ~980 nits, although not reaching as high as the screen is capable of due to the local dimming nature, and the desire to avoid creating halos or blooming problems. Brightness setting remains available in the HDR mode, so if you do want to turn it down to something a bit lower to be more comfortable for close-up viewing, that is possible.
HDR User Mode Adjusted Settings
We made some simple adjustments to the OSD menu, mostly to the colour temp mode which basically we adjusted to have the same RGB values (50, 47, 47) as we’d used during our SDR calibration. That returned a white point much closer to 6500K and improved colour accuracy very nicely as a result. This was a more accurate HDR setting with minimal setting changes.


The only odd thing about this change was that there was an obvious and noticeable change to the screen’s brightness as soon as you made any change to the colour temp levels in the menu. Even a single step change from the default 50, 50, 50 seemed to drop the brightness, it was almost as if it was in some kind of “super bright” mode from the factory, but then changing the settings impacted that and moved you to a somewhat lower brightness. You can see from our peak brightness above that it was still reaching up to ~1000 nits, but was not nearly as bright as it had been out of the box at the default settings. We are investigating this further with Cooler Master in case there’s a bug that can be fixed with a future firmware. For now we would consider the improvements to the white point and colour accuracy worth this drop to brightness, of what is still a very bright HDR monitor when you’re using it up close.
If you want to maximise brightness, stick with the default state, and just live with a cooler image. Or if you want it a bit warmer, you can get a nice setup as above with simple RGB changes, but it seems to impact brightness quite a bit.
Further recommended reading
Conclusion
Updated 7 Dec 2022 after new firmware update
The Tempest GP27U is an impressive 4K HDR gaming screen, with an attractive price point. It’s really great to see investment in proper HDR capable backlights at the moment, with more and more screens shunning poor edge-lit local dimming in favour of FALD and Mini LED options. This gives you a big boost to HDR performance in the desktop monitor space.
For gaming the response times were very good, and the screen provided a single overdrive mode experience for VRR situations which was great news. The 4K resolution provides a very sharp and clear image, although keep in mind you’ll need a powerful system to power this at high refresh rates. With the new firmware allowing you full support for the max 160Hz in VRR situations, this provides a very good combination of resolution and refresh rate. Input lag was super-low too which was great news and there are full bandwidth HDMI 2.1 ports for 4K 120Hz console gaming as well.
A main use-case for the GP27U would be for HDR gaming and multimedia, and we found the Mini LED backlight to work very well, producing very good contrast, very bright highlights and low levels of blooming. Thankfully Cooler Master added support for local dimming at the same time as VRR in their latest firmware, which improves the HDR gaming support nicely. In other HDR uses like movies, the Mini LED backlight performed very well, it’s great to see a proper HDR-capable backlight being used here instead of poor edge-lit dimming solutions (or no dimming at all) like you find on most supposed “HDR” monitors.
The wide colour gamut enabled by the Quantum Dot coating provides vivid and saturated colours for HDR and gaming, but also provides you enough space to work within common colour gamuts like sRGB, DCI-P3 and Adobe RGB. The provided sRGB emulation mode is likely the most important and works well, with a nice factory calibration. Cooler Master have thankfully allowed you control over important screen settings. The P3 and Adobe RGB modes do a reasonable job of emulating the smaller colour space and are practical if you want to work with content in those spaces too, although having your own calibration device would allow better accuracy and mapping of the colour space. But good news is the native gamut of the panel allows full coverage of those spaces if you need them.
| Check pricing and availability in your region |
| |
|
The 4K resolution IPS panel also provides an excellent and sharp image for general and office work. The inclusion of USB type-C, a KVM function and other familiar extras like USB ports, basic speakers and a fully adjustable stand make it also a decent screen for these kind of uses if you need to.
The Tempest GP27U has an MSRP of $799 USD, 899 Euro and £799 GBP which makes it a very competitive offering relative to other 4K screens when you consider that this model has a high end Mini LED backlight for HDR, and many of the competition lack that entirely. It’s expected to be available in Europe and the UK towards the end of 2022, but is available in the USA from Amazon.com already. Keep an eye on availability and pricing for your region here, or using our links above.
If you’re looking for a lower resolution 1440p version of this screen, at an even lower price point, then check our our review of the Cooler Master Tempest GP27Q now available! We also have a short format 5 minute review of this screen (GP27U) linked below (on original firmware).

| Pros | Cons |
| Very good response times, high refresh rate and low lag | OSD is laggy and a bit of a pain to use |
| Mini LED backlight offers excellent HDR performance with high contrast and peak brightness | DCI-P3 and Adobe RGB colour space emulation a bit too aggressive |
| Included USB type-C and KVM support for office environments | HDR brightness takes a hit if you move away from the cool default setup |
We may earn a commission if you purchase from our affiliate links in this review – TFTCentral is a participant in the Amazon Services LLC Associates Programme, an affiliate advertising programme designed to provide a means for sites to earn advertising fees by advertising and linking to Amazon.com, Amazon.co.uk, Amazon.de, Amazon.ca and other Amazon stores worldwide. We also participate in a similar scheme for Overclockers.co.uk, Newegg, Bestbuy and some manufacturers.
Stay Up to Date
 |  |  | |
| Browser Alerts | Follow us on X (Twitter) | Subscribe | Support Us |
Popular Trending Reviews
 Dell Alienware AW3225QF February 29, 2024 The new 32″ 4K QD-OLED monitor from Dell, with a 240Hz refresh rate, Dolby Vision HDR and even eARC sound support
- Asus ROG Swift PG32UCDM February 14, 2024 One of the first 32″ 4K 240Hz OLED monitors released to market featuring a 3rd gen QD-OLED panel, USB type-C, KVM, and many Asus extras
- MSI MPG 321URX February 23, 2024 The brand new and very competitively priced 32” 4K 240Hz OLED monitor from MSI. Offering an extremely impressive spec and set of features, at an attractive price point.
- MSI MPG 271QRX March 8, 2024 The new 27″ QD-OLED monitor from MSI with 1440p resolution and 360Hz refresh rate. Is this the best 27″ OLED monitor to buy now?
- LG 27GL850 August 15, 2019 A detailed look at the new 27″ 1440p high refresh rate IPS gaming display from LG. With a DCI-P3 gamut, 1ms G2G response time spec and 144Hz refresh rate. Can it live up to all the hype?


